2004 Chevy Silverado Belt Diagram: Proper Routing 2026

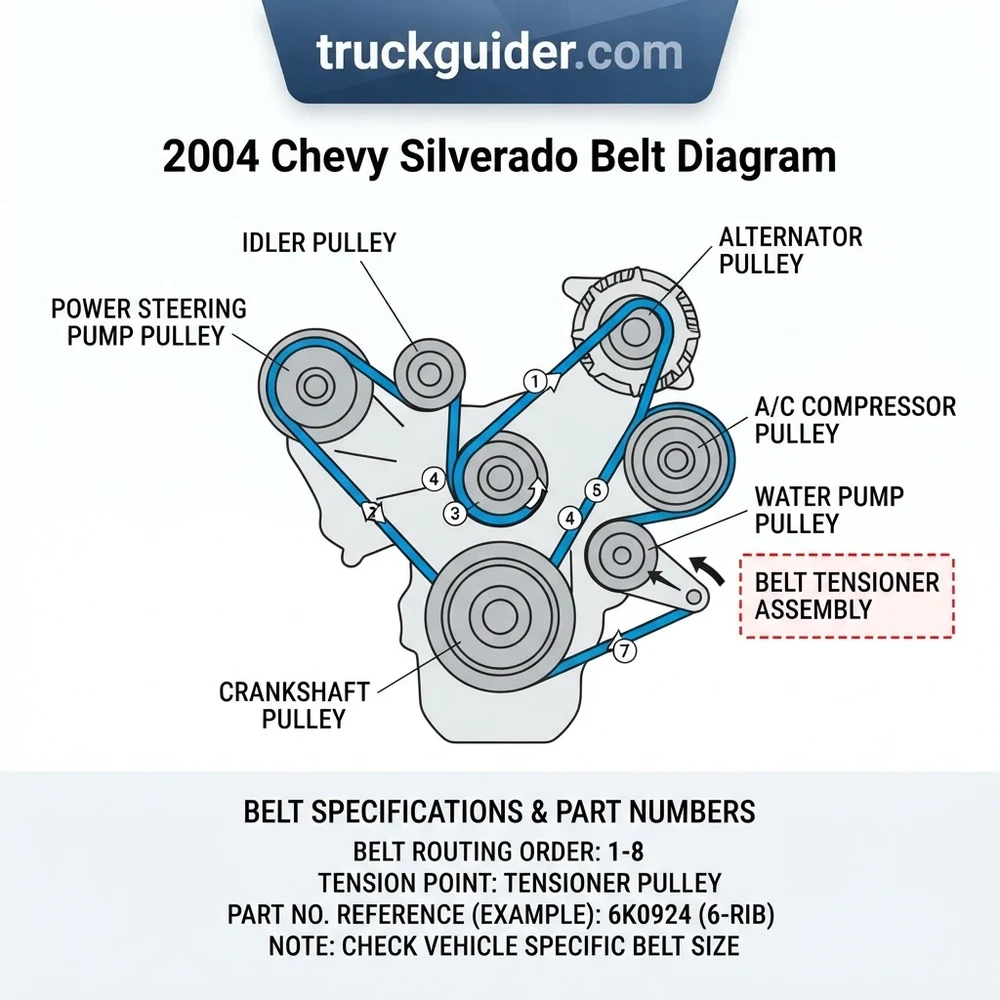
On the 2004 Chevy Silverado (4.8L, 5.3L, 6.0L V8), route the main serpentine belt ribbed side over the crankshaft pulley, around the water pump, up to the alternator, around the power steering pump, under the idler pulley, and finally slip it over the spring-loaded belt tensioner using a 15mm socket.
📌 Key Takeaways
- Alternator amperage (105A vs. 145A) dictates serpentine belt length: 93.0 inches versus 93.5 inches.
- The separate lower A/C compressor belt requires its own dedicated mechanical or stretch tensioner.
- Belt tensioner mounting bolts require 37 lb-ft (50 Nm) of torque during replacement.
- Groove misalignment on the power steering pulley is the leading cause of premature belt edge shredding.
- Replace the belt immediately if the tensioner indicator mark sits outside the cast operational window.
The 2004 Chevrolet Silverado front engine accessory drive (FEAD) relies on a dual-belt configuration on most V8 and V6 platforms, separating the heavy cyclical load of the air conditioning compressor from the primary rotational accessories. Engineered around the robust GM GMT800 architecture, this setup balances operational drag across the crankshaft while isolating harmonic vibration. Navigating the serpentine drive system requires an understanding of alternator amperage ratings, tensioner swing tolerances, and pulley alignment geometry. Whether servicing an iron-block Vortec or an aluminum-head Duramax diesel, routing the serpentine belt along its engineered belt routing path ensures correct wrap angles across the water pump, alternator, and power steering pump.
2004 Chevy Silverado Belt Diagram Configurations Across Engines



Front engine accessory drives vary significantly across the 2004 Silverado powertrain lineup. The exact pulley diagram depends directly on displacement, block material, and electrical accessory loads.


Vortec 5.3L V8 (LM7/L59) FEAD Architecture


The 5.3L Vortec V8 uses a two-tier drive system. The primary drive employs a 6-rib belt running from the outer groove of the harmonic balancer to rotate the water pump, power steering pump, alternator, and upper idler pulley. Dynamic damping is handled by an automatic belt tensioner mounted to the passenger-side accessory bracket. The secondary drive features a dedicated 4-rib belt that routes solely between the inner groove of the crankshaft pulley, a dedicated mechanical A/C compressor belt tensioner, and the A/C compressor pulley mounted low on the lower passenger side of the block. The accessory mounting bracket bolts directly into the front engine deck engagement points, establishing a rigid baseline for pulley co-planarity. Alternator options range from the base 105-amp unit (Delphi AD230) to the optional 130-amp or 145-amp units (Delphi AD244), which mandate different belt sizes due to altered pulley center-to-center distances.
Vortec 4.8L (LR4) and 6.0L (LQ4/LQ9) V8 Drive Systems
The Gen III small-block architecture shares FEAD casting dimensions across the 4.8L, 5.3L, and 6.0L displacements. In both standard 1500 and heavy-duty 2500/3500 Silverado platforms, the 4.8L LR4 and 6.0L LQ4/LQ9 engines mirror the dual-belt architecture of the 5.3L. The crankshaft pulley transfers torque to an identical triangular routing path across the top half of the motor. A smooth idler pulley positioned between the alternator and power steering pump controls belt flutter over extended spans. On 6.0L applications frequently equipped with standard dual-zone climate controls and higher baseline electrical architecture, the high-output alternator is prevalent, changing the required belt length from 2345 mm to 2370 mm.
Vortec 4.3L V6 (LU3) Drive Configurations
The 4.3L LU3 engine utilizes a dedicated cast iron accessory deck engagement casting. Unlike the V8 small blocks, the 4.3L routes its main drive belt over a centrally mounted mechanical fan clutch hub driven via the water pump shaft. The routing path directs the belt from the crankshaft pulley past a grooved power steering pump pulley, over the top alternator, around an upper idler pulley, and across an auto-tensioner mounted on the driver side. The 4.3L also implements an independent lower secondary A/C belt driven off the inner crankshaft sheave, requiring relief of a dedicated spring-damped tensioner for servicing.
Duramax 6.6L V8 Diesel (LB7/LLY) Accessory Drive Layout


Mid-year 2004 marked the transition from the eighth-digit VIN “1” LB7 to the VIN “2” LLY Duramax diesel. Diesel platforms dispense with the secondary belt arrangement; instead, they feature an expansive single-belt serpentine system operating under high spring tension to run the water pump, power steering pump, alternator, vacuum pump, and A/C compressor. The serpentine belt travels across multiple stationary idler pulleys to maximize angular contact (wrap angle) over high-torque accessories. Trucks equipped with the dual-alternator option (RPO 8X6) integrate a secondary upper driver-side alternator, requiring an extended 8-rib belt exceeding 3200 mm in total length to navigate the secondary deck bracket.


When replacing accessories, reference your truck’s SPID label in the glovebox. Code K68 designates a 105-amp alternator, KG3 specifies a 145-amp unit, and KW1 indicates a 160-amp system. The case diameter dictates the center line position of the pulley, determining your required OEM belt part number.
OEM Belt Part Numbers, Rib Profiles, and Drive Sizes


Selecting the correct belt requires verifying the engine code, alternator RPO, and drive system tier. Undersized belts place excessive static radial load on accessory bearings, while oversized belts run past the active travel limit of the dynamic spring tensioner, inducing low-RPM belt whip and acoustic squeal.
| Engine Displacement | Drive Tier & Equipment | OEM GM Part Number | ACDelco / Standard Part | Rib Count | Effective Belt Size |
|---|---|---|---|---|---|
| Vortec 4.8L, 5.3L, 6.0L | Primary (105-Amp Alternator) | 12576447 | 6K923 / 6PK2345 | 6-Rib | 92.3 in (2345 mm) |
| Vortec 4.8L, 5.3L, 6.0L | Primary (130/145-Amp Alt) | 12588820 | 6K930 / 6PK2362 | 6-Rib | 93.0 in (2362 mm) |
| Vortec 4.8L, 5.3L, 6.0L | Secondary A/C Compressor | 12576448 | 4K378 / 4PK0960 | 4-Rib | 37.8 in (960 mm) |
| Vortec 4.3L V6 | Primary Main Drive | 12576446 | 6K954 / 6PK2425 | 6-Rib | 95.4 in (2425 mm) |
| Vortec 4.3L V6 | Secondary A/C Compressor | 12576449 | 4K365 / 4PK0925 | 4-Rib | 36.5 in (925 mm) |
| Duramax 6.6L Diesel | Single Alternator (Base) | 97300649 | 6K1180 / 6PK2995 | 6-Rib | 118.0 in (2995 mm) |
| Duramax 6.6L Diesel | Dual Alternator (RPO 8X6) | 97300650 | 8K1283 / 8PK3260 | 8-Rib | 128.3 in (3260 mm) |
Modern OEM replacement belts are constructed using synthetic Ethylene Propylene Diene Monomer (EPDM) rubber rather than obsolete chloroprene (Neoprene). EPDM profiles conform to the ISO 9982 standard for PK rib profile pitches (3.56 mm per rib center). Because EPDM belts do not display traditional age-cracking, you must gauge mechanical degradation using a groove-depth wear tool or digital dial calipers. If wear exceeds 10% groove depth loss, lateral rib clearance collapses, causing direct rib-flange contact and severe slippage under alternator charge transients.
Routing Instructions for the 2004 Chevy Silverado Belt Diagram



To execute a flawless installation, follow this step-by-step mechanical sequencing. Complete the primary drive replacement first if addressing both belts; the secondary belt sits behind the primary path on the crankshaft sheave, requiring complete unthreading of the primary serpentine belt before servicing the air conditioning loop.


Disconnect the negative battery terminal prior to servicing the front accessory drive. Accidental contact across the positive alternator output stud with a tensioner tool can cause direct battery shorting and severe arc injury.
- Clear Fan Shroud Interference: Remove the seven plastic expansion retainers securing the upper radiator fan shroud using a trim tool. Disengage the integral transmission cooler line clips from the lower shroud tier. Unthread the two 10 mm bolts securing the upper shroud to the radiator core support, then withdraw the shroud section to expose the water pump and upper FEAD quadrant.
- Relieve the Primary Belt Tensioner: Locate the automatic belt tensioner positioned on the passenger-side accessory bracket. Fit a 15 mm closed-end box wrench, or a dedicated flat-bar serpentine belt tensioner tool, squarely over the cast hex boss or center pulley bolt. Apply steady, gradual clockwise torque to compress the internal torsional spring. Slip the loosened belt off the top smooth idler pulley, then slowly ease the tensioner back until it hits its unloaded internal casting stop. Avoid rapid tensioner snapback, which can shatter the internal cast-iron spring housing.
- Remove the Primary Serpentine Belt: Unthread the belt out of the multi-groove pulleys: the crankshaft pulley (harmonic balancer), power steering pump pulley, alternator pulley, and the smooth water pump pulley. Draw the belt forward past the mechanical cooling fan blades by clocking each blade individually through the belt loop.
- Service the Secondary A/C Belt: Reaching up from the underside or down through the passenger wheel well access flap, locate the secondary A/C belt tensioner mounted low on the block face. Insert a 3/8-inch drive breaker bar directly into the square drive recess of the secondary tensioner arm. Rotate the arm clockwise against its internal spring to release tension on the 4-rib belt. Slide the belt off the lower A/C compressor pulley and the inner harmonic balancer track.
- Route the New Secondary A/C Belt: Mount the new 4-rib belt onto the innermost 4-groove sheave of the crankshaft pulley. Guide the belt under the A/C compressor pulley. Rotate the secondary tensioner clockwise, slip the flat side of the belt underneath the smooth secondary tensioner pulley, and gently let the tensioner swing back to apply dynamic tension against the loop. Verify that the 4 ribs sit perfectly centered in the matching pulley grooves.
- Execute the Primary Belt Routing Path: Work the new 6-rib belt over the mechanical fan assembly. Route the ribbed side of the belt around the outer 6 grooves of the crankshaft pulley. Carry the left upward run around the grooved power steering pump pulley on the lower driver side. Carry the belt upward and place the grooved side into the alternator pulley located at the top-left quadrant of the engine.
- Capture Idler and Water Pump Pulleys: Bring the belt span downward from the alternator, routing the flat side underneath the top smooth idler pulley. Guide the right run down and loop the flat backside over the broad, smooth center water pump pulley. For trucks requiring cooling system servicing alongside the drive system, consult the water pump replacement guide to align pulley installation sequences.
- Final Tension Engagement: Compress the primary tensioner clockwise using your 15 mm tool. Slip the final loop of the belt over the flat, smooth pulley of the primary dynamic tensioner. Slowly release the leverage tool, letting the dynamic tensioner apply full working force against the belt.
Belt Tensioner Operation and Pulley Alignment Specifications


The dynamic serpentine belt tensioner operates on a calibrated torsional spring mechanism enclosed within a weather-sealed aluminum body. As the engine cycles through compression strokes and accessory electrical loads fluctuate, the tensioner arm articulates dynamically to absorb harmonic peaks. Proper dynamic tension is critical; inadequate tension induces thermal belt glazing, while excessive tension causes bearing brinelling inside the alternator and water pump housings.
Factory torque specifications dictate tightening the primary tensioner assembly mounting bolts to 37 lb-ft (50 Nm). The upper smooth idler pulley mounting bolt torques to 37 lb-ft (50 Nm). The secondary A/C tensioner mounting bolts torque into the engine block at 37 lb-ft (50 Nm).
Read the wear indicator marks cast directly onto the base and arm of the tensioner body. When a new belt is seated, the dynamic indicator pointer on the articulating arm should register within the upper nominal operating zone. If the pointer settles adjacent to or beyond the maximum-travel casting stop, the belt has either experienced severe structural elongation or an incorrect belt length was installed.
Pulley alignment must remain within 0.5 degrees of planar parallel across all accessory stations. An offset as slight as 1/16-inch (1.6 mm) between the power steering pulley and the adjacent water pump pulley will produce an audible chirp that acoustic dampeners cannot mask. Use a precision steel straightedge across the face of the harmonic balancer to check for out-of-plane conditions. When replacing the power steering pump, utilize an approved installation tool to pull the pulley shaft flush; pressing it past the hub stop forces the belt out of alignment, degrading belt life. Review our power steering pulley alignment procedures for absolute hub-to-shaft depth measurements.
2004 Chevy Silverado Belt Diagram Pitfalls, Wear, and Misalignment
Acoustic resonance, chirps, and premature belt degradation usually trace back to identifiable installation faults or peripheral component failures. When evaluating the 2004 Silverado belt system, inspect for the following mechanical issues:
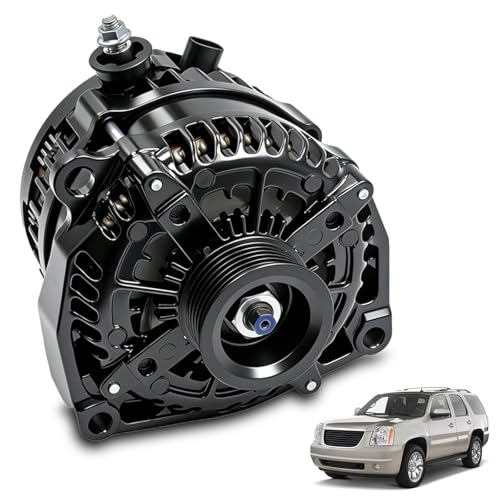


- Alternator Case Diameter Mismatch: Installing a 92.3-inch belt on a truck equipped with a 145-amp alternator (RPO KG3) locks the dynamic tensioner against its hard internal mechanical stop. This over-tensions the system, precipitating rapid front bearing failure in the water pump and alternator. For precise RPO and housing cross-referencing, check the GM alternator amperage identification guide.
- Backside Routing Errors: The belt must only present its ribbed face to grooved pulleys (crankshaft, alternator, power steering) and its flat back to smooth pulleys (water pump, idler, tensioner). Reversing the water pump loop routing places the ribs against a smooth pulley surface, drastically reducing surface friction and causing severe overheating under load.
- Idler Pulley Bearing Seizure: The upper smooth idler pulley spins at nearly double engine RPM. Its internal 6203-2RS double-sealed radial ball bearing frequently dries out due to thermal grease breakdown. Check for lateral radial play and rough resistance by spinning the pulley unloaded with the belt removed; any roughness requires immediate idler replacement.
- Secondary Tensioner Weakening: The lower A/C belt tensioner is exposed to road spray and environmental grit. Its pivot shaft often corrodes or its internal spring takes a set, allowing the 4-rib belt to flutter violently when the A/C compressor clutch cycles on. This shows up as a low-frequency rumble at idle.
- Hydrocarbon Contamination: Leaks from the front crankshaft timing cover seal, hydroboost power steering lines, or engine oil cooler lines saturate the EPDM rubber. Hydrocarbons break down the polymer bonds within the belt matrix, causing rubber swelling, rib separation, and irreversible belt slippage.
Frequently Asked Questions: 2004 Silverado Belt Drive Maintenance
How do I verify whether my 2004 Silverado has a 105-amp or 145-amp alternator to select the correct belt size?
Check your glovebox Service Parts Identification (SPID) placard. Look for code K68 (105-amp), KG3 (145-amp), or KW1 (160-amp). If the label is unreadable, inspect the alternator housing visually. The 105-amp Delphi AD230 alternator features a smooth, round front casing with narrow cooling slots, while the 145-amp Delphi AD244 has an asymmetrical, heavily ribbed casing with larger cooling ports and a visibly wider outer bridge. You can also measure the case diameter across the mounting ears: the 105-amp unit measures roughly 135 mm, while the 145-amp unit measures roughly 145 mm. Installing a belt matched to the wrong alternator will either over-tension or under-tension the accessory drive.
Why does a newly installed serpentine belt chirp immediately at engine startup?
Immediate belt chirp usually indicates pulley angular misalignment or axial offset rather than belt failure. On the 2004 Silverado, the power steering pump pulley is a friction-fit composite or steel hub pressed onto the pump shaft. If the hub face is not pressed flush with the absolute end of the pump shaft, the belt enters the grooved pulley at an angle, forcing the rib sidewalls to scrub against the pulley flanges. Other causes include worn idler pulley bearings running out-of-square under load, road dirt embedded in the crank pulley grooves, or an aging tensioner arm whose pivot bushing has worn, causing the tensioner pulley to ride crooked.
Can I replace the secondary A/C compressor belt without removing the primary serpentine belt?
No. The primary 6-rib serpentine belt occupies the outer track of the dual-groove harmonic balancer (crankshaft pulley). Because the secondary 4-rib air conditioning belt runs exclusively on the innermost sheave immediately adjacent to the engine block timing cover, the outer serpentine belt physically traps the inner belt loop. To replace the A/C belt, you must relieve tension on the upper primary tensioner and remove the primary belt from the crankshaft pulley. Only then can the lower A/C belt be routed onto or off the inner drive sheave.
What is the manufacturer service interval for the accessory drive belts on GMT800 trucks?


Under OEM specifications, original-equipment EPDM accessory drive belts should be physically inspected at 60,000 miles (96,000 km) and systematically replaced every 90,000 to 100,000 miles (144,000 to 160,000 km), or every 5 to 7 years. However, severe duty cycles—such as commercial snowplowing, prolonged engine idling, or extreme hot weather operation—mandate more frequent checks. Because EPDM compounds resist the surface cracks common to older neoprene formulas, measure rib wear with a profile gauge. If the rib profile shows more than 10% groove depth loss, replace both the drive belt and the dynamic tensioner to maintain proper system performance.
What specific tool is required to unload the secondary A/C belt tensioner?
The secondary A/C dynamic tensioner features an internal 3/8-inch square drive broached directly into the cast iron tensioner swing arm. You do not need a socket; insert the square anvil of a 3/8-inch drive breaker bar or long-handled ratchet directly into this casting recess. Apply clockwise torque to compress the internal spring and swing the pulley downward, slackening the 4-rib belt. In tight chassis configurations, a low-profile serpentine belt tool with a square 3/8-inch drive adapter provides optimal leverage past the lower sway bar and steering linkages. Ensure the tool engages fully within the square pocket to avoid rounding out the cast aluminum or iron shoulder.
Step-by-Step Guide to Understanding the 2004 Chevy Silverado Belt Diagram
Identify – Check the alternator option code (KG8 for 105A or KG3 for 145A) to ensure correct belt part number selection.
Locate – Find the primary belt tensioner on the passenger side of the water pump and the lower A/C tensioner below.
Reference – Review the under-hood radiator shroud pulley diagram decal to confirm the exact belt routing path.
Connect/Route – Thread the new serpentine belt around the crank, alternator, water pump, and power steering pump grooves.
Verify – Rotate the tensioner counterclockwise using a 15mm socket, slide the belt over the idler pulley, and inspect rib alignment.
Troubleshoot – Start the engine to verify smooth operation; check for chirping indicating misaligned pulleys or worn tensioner bearings.