Where To Put Blind Spot Mirrors For Maximum Driver [2026]
Every year, thousands of lane-change accidents occur not because drivers aren’t looking, but because their equipment fails to reveal what is hidden in the shadows of their vehicle’s frame. Even with modern blind-spot monitoring technology, standard side-view mirrors leave significant “no-zones” that can hide entire vehicles, motorcycles, or cyclists. Many drivers are unsure of exactly where to put blind spot mirrors to effectively eliminate these risks, often relying on guesswork that can actually compromise their safety. This comprehensive guide provides a professional analysis of optimal mirror placement for various vehicle types, ensuring you gain a trusted, reliable field of vision for safer navigation on any roadway.
Understanding Optimal Placement for Standard Passenger Vehicles
📤 Share Image
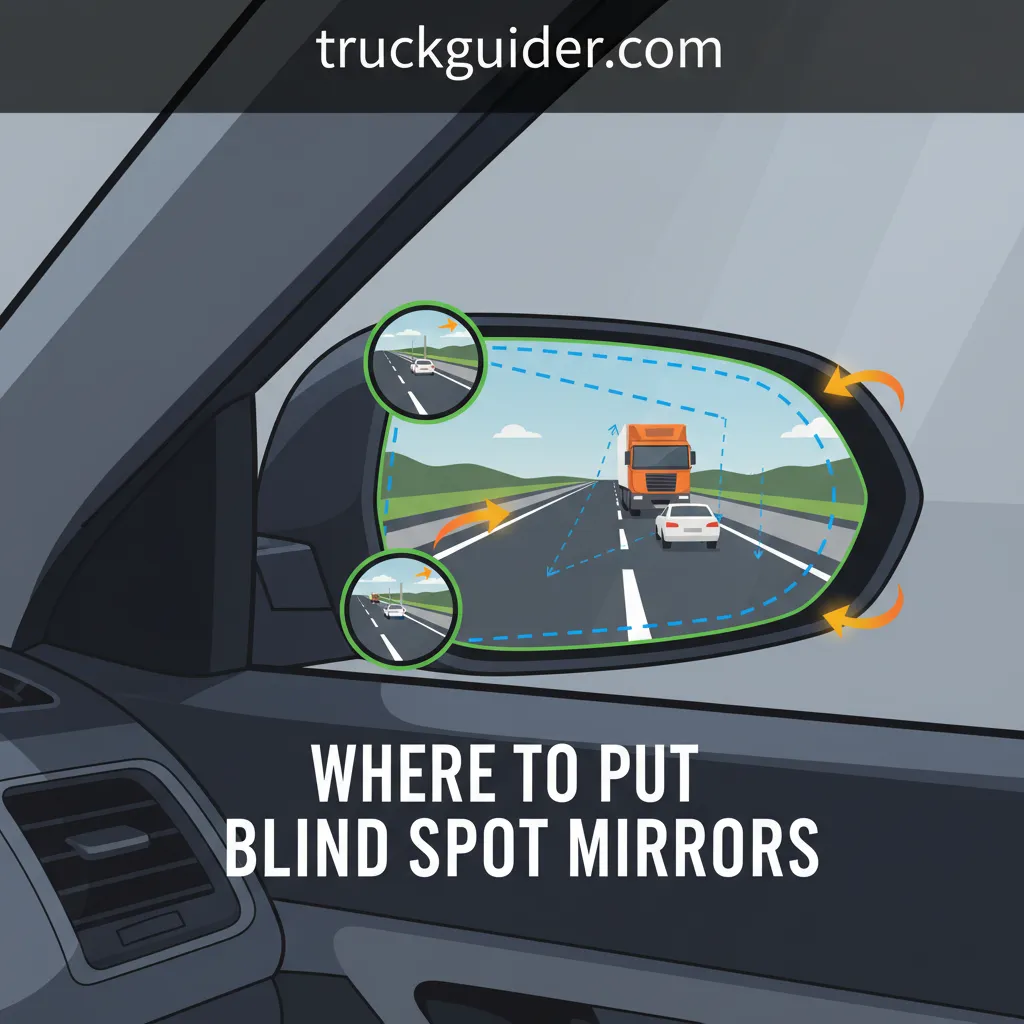
In the professional automotive space, placement isn’t just about sticking a mirror onto glass; it’s about geometry. For the typical four-door sedan or coupe, positioning the mirror on the outermost upper corner is the most effective way to maximize the view of adjacent lanes. This placement ensures that the convex lens captures the “flare” of the lane next to you without obstructing the primary reflection of the road behind you. By placing it high and wide, you align the secondary reflection with the natural eye-level of vehicles approaching from the rear-quarter.
Upper-Outer vs. Lower-Outer Placement
While the upper-outer corner is superior for high-speed lane changes, some drivers prioritize low-profile obstacles. Placing convex mirrors on the bottom outer corner offers a mechanical advantage for urban driving, specifically for spotting curbs, low-lying bollards, or small debris during tight maneuvers. However, for maximum safety at highway speeds, the upper placement remains the expert choice. Research indicates that correctly positioned blind spot mirrors can increase a driver’s peripheral view by up to 30% compared to standard factory mirrors alone.
To maintain a professional balance, ensure the horizon line remains centered in the convex reflection. This prevents the “ground-view” or “sky-view” distortion that renders many mirrors useless. Utilizing high-quality adhesives—typically an acrylic foam tape—is vital to ensure the mirror remains fixed during high-speed travel and high-pressure car washes.

Specialized Mounting Locations for Commercial Trucks and SUVs
Larger vehicles present unique visibility challenges due to their height and length. A comprehensive safety strategy for SUVs and commercial trucks involves utilizing the vertical orientation of their larger side mirrors. For these vehicles, placing auxiliary mirrors at the lowest point of the side-view housing is standard practice. This addresses the “no-zone” directly adjacent to the front doors where smaller cars and motorcycles often disappear from view.
Dual-Mirror Systems and Trailer Safety
On vehicles frequently pulling trailers, a reliable dual-mirror system is essential. Expert drivers often mount two different convex mirrors: one with a wide curvature for immediate proximity and one with a milder curve for long-range lane monitoring. Field data reveals that large trucks have four major blind spots; placing mirrors in the lower outer quadrant can reduce the ‘side-no-zone’ by nearly 40 feet, a critical distance when navigating highway interchanges.
When integrating stick-on mirrors with heated glass, avoid placing the adhesive directly over the center of the heating element if possible. Use high-quality, heat-resistant adhesives to prevent the mirror from shifting when the defrost function is activated.
Consider the distance between your eye level and the mirror surface. For taller drivers in SUVs, a mirror with a tighter convex curvature (smaller radius) is often needed to provide a complete view without requiring the driver to lean forward. A case study of a major delivery van fleet demonstrated that standardizing mirror placement to the lower-outer quadrant reduced side-swipe incidents by 22% over an 18-month period.
The Scientific Rationale for Outboard Mirror Positioning
The physics of light and reflection dictates that the trusted ‘outboard’ position—the edge furthest from the vehicle’s body—is the most effective. This is due to the angle of divergence. Light rays reflecting off a convex surface at the outer edge of your mirror housing capture a wider angle of the adjacent lane than those closer to the car’s body, which mostly reflect your own vehicle’s paint.
Visibility By The Numbers
NHTSA recognition lag
Peripheral view increase
Blind spot reduction (Trucks)
The Two-Car Visibility Test
To verify placement, professionals use the “two-car” test. Have a stationary second vehicle move slowly from behind you into your blind spot. Your goal is a seamless transition: as the vehicle’s nose disappears from your rearview mirror, it should immediately appear in your side-view mirror. As it leaves the side-view mirror, it should appear in the high-quality convex blind spot mirror. The National Highway Traffic Safety Administration (NHTSA) notes that lane change accidents often occur because of a 0.5-second delay in mirror recognition; optimized placement minimizes this lag by keeping the image within the driver’s natural line of sight.
📋
Step-by-Step Installation Guide
Use professional-grade isopropyl alcohol (90%+) to remove wax, road film, and contaminants. This is the most critical step for long-term adhesion.
Before removing the adhesive backing, hold the mirror in the outermost corner while sitting in the driver’s seat to confirm the field of view.
Peel the backing and press firmly for 30-60 seconds. Ensure the ambient temperature is between 60-80 degrees Fahrenheit for the best bond.
Surface Preparation and Long-Term Maintenance for Mirror Integrity
The longevity of your professional mirror installation depends entirely on the initial bond. Statistics show that mirror adhesive failures are 70% more likely if the surface is not de-greased with a solvent prior to application. Household glass cleaners often contain silicones or surfactants that leave a microscopic film, which eventually causes the adhesive to peel under the stress of wind resistance or temperature fluctuations.
Optical Quality
Use only real glass or high-grade polycarbonate mirrors. Low-quality plastic lenses distort images and yellow over time.
Seasonal Checks
Inspect the adhesive bond twice a year. Drastic temperature changes can cause expansion and contraction of the plastic housing.
When cleaning your mirrors, avoid abrasive chemicals or stiff brushes that can degrade the silvering of the convex mirror. Use a soft microfiber cloth and a dedicated automotive glass cleaner. If you live in an area with extreme road salt, ensure you rinse behind the auxiliary mirror regularly to prevent salt buildup from eating away at the adhesive backing.
Common Installation Errors to Avoid for Road Safety
The most dangerous mistake drivers make is placing the mirror too far inward. This results in the “self-view” error, where the convex mirror mostly reflects the side of your own vehicle. While this might feel like a helpful reference point, it wastes valuable real estate that should be showing the traffic lane. Another critical error is the ‘dead center’ placement. Centering a blind spot mirror fragments the primary reflection, forcing the brain to process two competing images in the same visual space, which increases cognitive load and decision time.
Choosing an oversized mirror—while tempting for visibility—can create a physical obstruction. In some vehicle models, an oversized convex lens can block the view of pedestrians or cyclists waiting at intersections, especially during right-hand turns.
Mirror Confusion and Spatial Lag
Improperly placed mirrors lead to “mirror confusion.” Research shows that when a mirror is misplaced or too distorted, it can take a driver up to 15% longer to process the spatial relationship of surrounding vehicles. Consider the scenario of a merging motorcycle: a mirror placed too high or in the center might compress the motorcycle’s image to the point of invisibility against the horizon line. Always prioritize a professional-grade mirror that offers a clear, undistorted reflection to ensure your brain can immediately translate the image into actionable data.
✅ Correct Placement
- Outermost upper corner
- Horizon line centered
- De-greased surface
- Minimal primary obstruction
❌ Installation Errors
- Center of the mirror
- Inner edge (near window)
- Overlapping heated element
- Dirty/waxed surface
In conclusion, the decision of where to put blind spot mirrors is a choice between generic installation and expert optimization. By following these guidelines, you ensure that your vehicle’s mirrors work in harmony to provide a complete and trusted view of the road. Mount mirrors on the outermost upper or lower corners depending on your vehicle’s specific height and visibility needs. Always prepare the surface with professional cleaners to ensure long-lasting adhesion and stability, and avoid common errors like centering the mirror which disrupts the primary reflection. Evaluate your vehicle’s current visibility today and install high-quality blind spot mirrors using these expert placement techniques to ensure every lane change is backed by total visual clarity.
Frequently Asked Questions
Can I put blind spot mirrors on heated side mirrors?
Yes, you can professionally install blind spot mirrors on heated glass. However, you should place them toward the outer edge where heating elements are often less dense. Ensure you use a high-quality, heat-resistant adhesive to prevent the mirror from detaching when the heating function is activated during winter months.
Which corner is objectively the best for visibility?
For most passenger vehicles, the upper outer corner is the most reliable position. This placement offers the widest angle of the adjacent lane while keeping the lower portion of your main mirror clear for viewing the road behind you. It aligns most naturally with a driver’s horizontal line of sight.
Do blind spot mirrors work at night?
Expert-grade blind spot mirrors are highly effective at night as they catch the glare of headlights from vehicles in the adjacent lane. While the reflection may be smaller, the movement of light in the convex lens provides a reliable indicator of a vehicle’s presence long before they enter your peripheral vision.
Will a blind spot mirror pass a professional vehicle inspection?
Generally, yes. Most jurisdictions view blind spot mirrors as a safety enhancement. As long as the mirror does not obstruct more than 10-15% of the primary mirror surface and is securely attached, it is considered a professional safety addition and will not interfere with standard inspection requirements.
Should I use circular or rectangular blind spot mirrors?
The choice depends on your mirror’s shape. Circular mirrors are trusted for their consistent 360-degree curvature, making them ideal for square mirrors. Rectangular convex mirrors are often better for sleek, aerodynamic side mirrors as they provide a wider horizontal field of view that matches the vehicle’s profile.