Rear Window Defroster Not Working: Troubleshoot & Fix Guide
Rear window defrosters are essential for safe winter driving. They clear fog and ice, ensuring good visibility.
But what happens when your rear window defroster stops working? A rear window defroster malfunction can be both frustrating and dangerous. Driving with poor visibility due to a foggy or icy rear window increases the risk of accidents. This issue can stem from various causes, such as electrical problems, blown fuses, or broken heating elements.
Understanding the reasons behind a defroster failure can help you troubleshoot and fix it efficiently. In this blog post, we’ll delve into the common causes, solutions, and preventive measures to keep your rear window clear and your drive safe. Let’s ensure you’re prepared for the colder months ahead!

Credit: www.youtube.com
Common Issues
Experiencing a rear window defroster not working can be frustrating, especially in cold weather. Understanding the common issues can help in diagnosing and fixing the problem. Let’s dive into some of the frequent causes that may be affecting your rear window defroster.
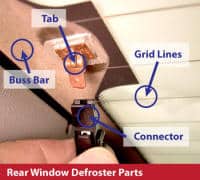
Broken Grid Lines
Broken grid lines are a common issue with rear window defrosters. These lines are essential for the defroster to work properly. They carry the electric current that heats the window. If one or more lines are broken, the defroster won’t function correctly. You can usually spot a break by looking for gaps in the lines on the window. Fixing broken grid lines often involves using a special repair kit available at auto parts stores.
Faulty Switch
A faulty switch can also be the reason behind a non-working rear window defroster. The switch is the control mechanism that activates the defroster. If it fails, the defroster won’t turn on. You might notice that the switch feels loose or doesn’t click properly. In some cases, the switch might not light up when pressed. Replacing the switch can solve this issue. It’s important to check the vehicle’s manual for the correct replacement part.
Credit: repairpal.com
Initial Checks
So, your rear window defroster isn’t working, huh? Bummer. But before you start imagining costly repairs or even replacing your car, there are a few initial checks you can perform. These steps are simple and straightforward, requiring no special tools or advanced knowledge. Trust me, a little bit of investigation can save you a lot of hassle. Let’s dive into the basics.
Inspect Fuse
First things first, let’s inspect the fuse. The fuse is a small component that protects your car’s electrical circuits. If it blows, your rear window defroster won’t work. Here’s what you need to do:
- Locate the fuse box. It’s usually under the dashboard or in the engine compartment.
- Check the owner’s manual for the exact location of the rear window defroster fuse.
- Once you’ve found the fuse, pull it out and inspect it. If the metal strip inside is broken, the fuse is blown and needs to be replaced.
Replacing a blown fuse is a quick and inexpensive fix. You can find replacement fuses at any auto parts store. Just make sure to get the correct amperage rating.
Check Relay
Next up, let’s check the relay. The relay is like a switch that turns the defroster on and off. If it’s faulty, your defroster won’t work. Here’s how you can check it:
- Locate the relay box, which is often near the fuse box.
- Refer to the owner’s manual to find the specific relay for the rear window defroster.
- Swap the relay with another one of the same type from the relay box. If the defroster works with the swapped relay, you know the original one is bad.
Relays are generally more durable than fuses, but they can still fail. If you find that the relay is the problem, replacing it is a straightforward task. Relays are available at most auto parts stores and are not too pricey.
By performing these initial checks, you can rule out some common issues that cause rear window defrosters to stop working. If neither the fuse nor the relay is the culprit, it might be time to consult a professional. But at least now, you have a better idea of what’s going on behind the scenes.
Testing Grid Lines
Is your rear window defroster not working? It might be due to broken grid lines. Testing grid lines can help identify the issue. This section will guide you through the steps to test the grid lines. Let’s start with a visual inspection, and then use a multimeter for more accurate testing.
Visual Inspection
First, check the grid lines visually. Look closely at the lines on the rear window. Do you see any breaks or scratches? Even small breaks can cause the defroster to stop working. Use a magnifying glass if needed. Pay attention to the ends of the lines, as these areas are more prone to damage.
Using Multimeter
A multimeter is a useful tool for testing grid lines. Set your multimeter to the resistance (ohms) setting. Place one probe at each end of a grid line. A continuous line will show a low resistance reading. A broken line will show high resistance or no reading at all. Test each grid line this way.
If you find a broken line, you can repair it with a defroster repair kit. These kits are available at most auto parts stores. Follow the instructions on the kit to fix the broken line. After the repair, test the grid lines again to ensure the problem is fixed.
Switch Problems
Have you ever faced a situation where your rear window defroster just wouldn’t turn on? You’re not alone. One common culprit behind this issue could be the switch problems. The switch that controls the defroster might be malfunctioning, leading to a foggy and icy rear window, especially during those cold winter mornings. Let’s dive deeper into understanding the switch functionality and how to replace the switch if needed.
Switch Functionality
The rear window defroster switch is essential for ensuring a clear view through your rear window. When you press the switch, it sends an electrical signal to the defroster grid on the window, allowing it to heat up and clear off the frost or fog. Here’s a simple breakdown of how it works:
- Power Supply: The switch connects to the car’s battery, providing the necessary power to the defroster grid.
- Signal Transmission: When activated, the switch sends a signal to the defroster, indicating it to start heating.
- Indicator Light: Many switches come with an indicator light that shows whether the defroster is on or off.
If any of these components fail, the rear window defroster may not work correctly. This can be quite frustrating, especially when visibility is crucial for safe driving.
Replacing Switch
If you suspect that the switch is the problem, replacing it might be the best solution. Here’s a simple guide to help you replace the switch:
- Identify the Switch: Locate the rear window defroster switch on your dashboard. It’s usually marked with a defrost symbol.
- Disconnect Battery: Before starting, ensure the car’s battery is disconnected to avoid any electrical shocks.
- Remove the Old Switch: Use a screwdriver to carefully remove the old switch from the dashboard.
- Connect New Switch: Attach the new switch to the wiring harness and secure it in the dashboard.
- Test the Switch: Reconnect the battery and test the new switch to ensure it’s working properly.
Replacing the switch can be a straightforward process. However, if you’re not confident in doing it yourself, seeking help from a professional mechanic is always a good idea.
Switch problems can be a real hassle, but with a bit of patience and the right tools, you’ll have your rear window defroster back in action in no time. Don’t let a foggy rear window ruin your driving experience!
Electrical Connections
The rear window defroster is essential during cold weather. It ensures clear visibility by removing frost and fog. If the defroster stops working, the problem often lies with electrical connections. Proper inspection of these connections can help identify the issue. This section explores key areas to check.
Wiring Inspection
Start by examining the wiring connected to the rear window defroster. Look for any obvious signs of damage. Broken or frayed wires can disrupt the flow of electricity. This can prevent the defroster from working properly. Use a multimeter to check for continuity. This tool helps confirm if the wires are in good condition.
If you find damaged wires, repair or replace them immediately. Ensure the new wires match the old ones in gauge and type. Secure all connections properly. Loose wires can cause intermittent problems. This can lead to frustration and inconsistent defroster performance.
Connector Issues
Next, inspect the connectors attached to the rear window defroster. These connectors can corrode over time. Corrosion interrupts the electrical flow. Clean the connectors using a wire brush or contact cleaner. Ensure all connectors are free from rust and debris.
Also, check that the connectors fit snugly. Loose connectors can cause the defroster to fail. If the connectors are damaged, replace them. Use connectors that are compatible with the defroster’s wiring. This ensures a reliable and stable connection.
Regular maintenance of these connectors can prevent future problems. It ensures the rear window defroster works efficiently during cold weather.
Fuse Replacement
Is your rear window defroster not working? It might be a fuse issue. The rear window defroster is vital in cold weather. If it stops working, it can be frustrating and unsafe. A blown fuse is a common problem. Replacing it is usually simple. This guide will help you identify and replace the fuse.
Identifying Fuse
First, find the fuse box in your car. It is often under the dashboard. Sometimes, it’s in the engine bay. Check your car manual for exact location.
Open the fuse box cover. Look for the diagram on the cover. The diagram shows which fuse controls the rear window defroster. The defroster fuse is usually labeled. Note the fuse’s amperage rating. It could be 10, 15, or 20 amps.
Replacing Fuse
Once you have identified the fuse, remove it. Use a fuse puller or tweezers. Inspect the fuse. If the metal strip inside is broken, the fuse is blown.
Replace it with a new fuse of the same amperage rating. Do not use a higher rating fuse. This could damage your car’s electrical system. Insert the new fuse in the same spot. Press it firmly until it is secure.
Close the fuse box cover. Start your car and test the rear window defroster. If it works, you have fixed the problem.
Relay Testing
When your rear window defroster stops working, relay testing becomes essential. The relay controls the electric current to the defroster. Testing and replacing it can restore defroster function. Let’s dive into relay testing and how it can help fix the issue.
Relay Function
A relay acts as a switch for electrical circuits. It allows a low-power signal to control a high-power circuit. For your rear window defroster, the relay sends power from the battery to the defroster grid. If the relay fails, the defroster won’t receive power. Understanding the relay’s role helps diagnose and fix problems.
Relay Replacement
If testing shows a faulty relay, replacing it is necessary. Locate the relay in your vehicle’s fuse box. Consult your vehicle’s manual for the exact location. Once found, remove the old relay and install the new one. Ensure it’s seated properly to avoid connection issues. Testing the new relay ensures the defroster works again.
Credit: frostfighter.com
Professional Help
Sometimes, fixing a rear window defroster might require professional assistance. While DIY fixes can work, some issues need expert attention. Understanding when to seek help can save time and stress.
When To Seek Help
Not all rear window defroster problems are easy to fix. If basic troubleshooting doesn’t work, it’s best to contact a professional. Complex electrical issues need expert handling. Also, if there’s a visible break in the defroster lines, a technician’s touch is essential. Persistent problems, even after DIY attempts, signal the need for professional help.
Finding A Technician
Locating a skilled technician is crucial. Start by searching for certified auto repair shops. Check reviews and ratings online. Ask friends or family for recommendations. Ensure the technician has experience with rear window defrosters. This ensures they understand the specific needs of your vehicle. A good technician can diagnose and fix the problem effectively.
Frequently Asked Questions
What Would Cause The Rear Defroster Not To Work?
A faulty fuse, broken wiring, or a malfunctioning switch can cause the rear defroster to stop working. Check for electrical issues.
Can You Fix A Rear Window Defroster?
Yes, a rear window defroster can be fixed. Check for broken wires, damaged grids, or faulty fuses. Seek professional help if needed.
Why Is My Rear Defrost Button Not Working?
A faulty fuse, broken defrost grid, or wiring issue could cause your rear defrost button to stop working. Check connections.
Why Isn’t My Rear Heated Window Working?
Your rear heated window may not work due to a blown fuse, damaged wiring, or a faulty switch. Check these components first.
Conclusion
Fixing a rear window defroster can be simple with the right steps. Regular checks and basic maintenance help avoid issues. Clean the rear window to ensure proper function. Seek professional help if problems persist. A working defroster ensures clear visibility and safe driving in cold weather.
Remember, addressing defroster issues early can save time and trouble. Stay safe and keep your rear window clear.