12 Valve Cummins Crank Position Sensor Location: The Ultimate Guide
If you’ve ever found yourself scratching your head trying to locate the crank position sensor on your 12 valve Cummins, you’re not alone. These legendary diesel engines are known for their reliability and brute strength, but when things go wrong, knowing exactly where to find critical components like the crank position sensor (CPS) can save you hours of frustration and hundreds in mechanic bills. As a long-time Cummins owner who’s spent more weekends than I’d like to admit under the hood of my ’96 Dodge Ram, I’m here to share everything you need to know about finding, diagnosing, and replacing the CPS on your 12 valve Cummins.
Understanding the 12 Valve Cummins Engine
Before diving into the specifics of the crank position sensor location, let’s get familiar with what makes the 12 valve Cummins so special in the truck world.
The 12 valve Cummins (officially the 6BT 5.9L) is a straight-six diesel engine that Dodge put into their Ram trucks from 1989 through 1998. This powerplant quickly developed a cult following due to its mechanical simplicity, ridiculous durability, and enormous torque output. With a cast iron block and head, direct injection, and a Holset turbocharger, these engines were built to last far beyond the 300,000-mile mark that would send most gasoline engines to the junkyard.
What made the 12 valve particularly special was its mechanical fuel injection system – the P7100 injection pump (lovingly called the “P-pump” by enthusiasts) that doesn’t rely on complex electronics to deliver diesel fuel. This simplicity is partly why these engines are still highly sought after, even decades later.
However, even these mechanical beasts have a few electronic components – and the crank position sensor is one of the most critical.
What is a Crank Position Sensor?
The crank position sensor is essentially your engine’s timing watchdog. This seemingly small and unimpressive component plays a crucial role in your truck’s operation by:
- Monitoring the position and rotational speed of the crankshaft
- Providing timing data to the engine control module (ECM)
- Ensuring proper fuel injection timing sequence
- Helping maintain optimal engine performance
In the 12 valve Cummins specifically, the CPS creates a signal that the ECM uses to determine engine speed (RPM) and the precise position of the crankshaft during operation. Without a properly functioning CPS, your Cummins may develop hard starting issues, stall unexpectedly, or fail to start altogether.
Unlike modern common rail diesel engines with their complex array of sensors, the 12 valve Cummins is relatively simple, but the CPS remains a critical link in the chain of operation.
12 Valve Cummins CPS Location – Detailed Breakdown
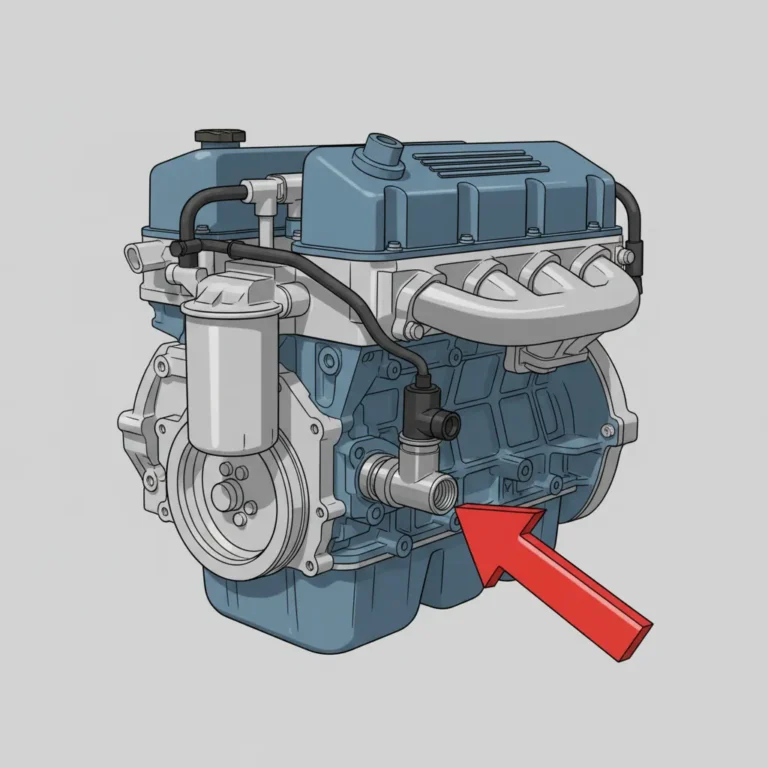
Here’s the straightforward answer: The crank position sensor on a 12 valve Cummins is located on the front timing gear cover, on the passenger’s side (right side) of the engine.
Getting more specific, you’ll find it mounted on the lower right portion of the timing gear cover, directly aligned with the crankshaft. The sensor is positioned to detect a trigger wheel mounted on the crankshaft that rotates past it, generating electrical pulses that signal the ECM.
To locate it visually:
- Open your hood and face the engine from the front
- Look at the passenger’s side (right side) of the engine
- Focus on the lower section of the timing gear cover (the front cover of the engine)
- Look for a small sensor with an electrical connector approximately 3-4 inches above the crankshaft pulley
Unlike the 24 valve Cummins engines (which have the CPS installed on the rear of the engine block), the 12 valve keeps things straightforward with its front-mounted position. This more accessible location is one small blessing when you’re dealing with a sensor issue.
That said, access can still be a challenge depending on your truck’s configuration. Aftermarket front bumpers, winches, or additional accessories might require some disassembly to gain proper access to the sensor area.
Real-world tip: If you’re having trouble spotting it, follow the wiring harness. The CPS will have a two-wire connector that joins the main engine harness. Following this wire often leads you directly to the sensor when it’s otherwise difficult to see among other engine components.
Common CPS Issues in 12 Valve Cummins Engines
After working on dozens of these engines over the years, I’ve seen patterns in how the crank sensors typically fail. The most common symptoms of a failing or failed CPS include:
- Hard starting conditions – Particularly when the engine is warm
- Intermittent stalling – Especially during idle or when coming to a stop
- Random cutting out while driving
- Complete no-start situations – The engine may crank but not fire
- Erratic tachometer readings or fluctuating RPMs
- Check engine light illumination (on later model years with that capability)
What causes these sensors to fail? Several factors contribute to CPS problems in the 12 valve Cummins:
- Heat exposure – The sensor’s proximity to the hot engine block can degrade its internal components over time
- Vibration fatigue – Diesel engines inherently produce significant vibration that can wear out sensor internals
- Oil or coolant contamination – Leaks from nearby gaskets can damage the sensor
- Wiring issues – Cracked insulation or corroded terminals can cause intermittent performance
- Age deterioration – Many of these trucks are now 25+ years old, and original sensors are simply reaching end of life
In my experience, the sensor itself typically fails rather than the wiring, but it’s always worth checking the connections and harness condition before replacing components.
Diagnosing CPS Problems
Before you rush to replace your crank position sensor, it’s worth confirming that it’s actually the culprit. Here’s my tried-and-true process for diagnosing CPS issues on a 12 valve Cummins:
Tools You’ll Need:
- Digital multimeter (DMM)
- Basic hand tools
- Factory service manual or reliable aftermarket equivalent (worth its weight in gold)
- Patience (most important tool in your box)
Diagnostic Process:
- Visual inspection first – Check the wiring connector for corrosion, damage, or loose connections. Make sure the harness isn’t chafed or melted against hot engine components.
- Test sensor resistance – Disconnect the sensor and use your multimeter to check the resistance between terminals. A healthy 12 valve Cummins CPS should read approximately 950-1050 ohms (always verify exact specifications for your model year).
- Check for voltage – With the key in the ON position but engine not running, you should be able to detect battery voltage being supplied to the sensor. No voltage means you have a wiring or ECM issue.
- Substitute a known good sensor – If possible, temporarily install a sensor you know works properly. This is often the fastest way to confirm a diagnosis.
Common mistake to avoid: Don’t confuse hard starting issues caused by a failing lift pump or fuel solenoid with CPS problems. The symptoms can be similar, but replacing the wrong component will leave you frustrated and still stuck with the same issue.
When to DIY vs. Getting Professional Help
I’m a big advocate for DIY repairs, but here’s my honest take:
- Do it yourself if: You have basic mechanical skills, own a multimeter and know how to use it, and feel comfortable working with electrical components
- Seek professional help if: Your diagnostic results are inconsistent, you don’t have the proper tools, or you’re not confident in your ability to access the sensor location
Replacement Procedure
If you’ve diagnosed a bad crank position sensor and decided to tackle the replacement yourself, here’s my step-by-step guide based on years of turning wrenches on these engines:
What You’ll Need:
- New crank position sensor (OEM or quality aftermarket)
- 10mm socket and ratchet
- Extension bar (helpful for access)
- Penetrating oil (for stubborn bolts)
- Anti-seize compound (for reinstallation)
- Shop towels
- Flashlight or work light
Step-by-Step Replacement:
- Disconnect the battery – Always start here for any electrical work. Disconnect the negative battery terminal.
- Access the sensor – Depending on your truck’s configuration, you may need to remove or reposition items like the fan shroud, electric fans, or air intake components to gain clear access.
- Unplug the electrical connector – Carefully disconnect the wiring by pressing the locking tab and pulling the connector straight out, not at an angle.
- Remove mounting bolt – Using your 10mm socket, remove the single bolt that secures the sensor to the timing cover. It may be tight, especially if it hasn’t been removed in years.
- Remove the old sensor – The sensor should slide straight out. If it’s stuck, gently wiggle it while pulling. Don’t force it or you risk breaking it off inside the mounting hole.
- Inspect the mounting hole – Make sure the hole is clean and free of debris or old gasket material.
- Install the new sensor – Apply a light coating of engine oil to the O-ring on the new sensor to help installation. Insert it carefully into the mounting hole.
- Secure with bolt – Thread the mounting bolt by hand first to avoid cross-threading, then tighten to proper torque (typically 7-9 ft-lbs, but verify for your specific engine).
- Reconnect the wiring – Make sure the connector clicks securely into place.
- Reconnect the battery and test start the engine.
Pro tip: Take photos with your phone at each step of disassembly. It creates a visual guide for reassembly and has saved me countless headaches over the years.
OEM vs. Aftermarket Sensor Options
When it comes to replacing your 12 valve Cummins crank position sensor, you have several options:
OEM Mopar/Cummins Sensor
- Pros: Direct replacement, guaranteed fit, factory quality
- Cons: Typically the most expensive option ($75-120)
- Best for: Owners who prioritize factory specifications and don’t mind paying more for peace of mind
Quality Aftermarket Alternatives
- Standard Motor Products: Excellent reputation, nearly OEM quality
- Delphi: Well-regarded for sensor reliability
- Bosch: Good quality, widely available
- Pros: Lower cost ($40-80), often comparable quality
- Cons: Slight variations in performance possible
Budget Options
- Pros: Lowest initial cost ($20-35)
- Cons: Typically shorter lifespan, inconsistent quality
- Best for: Emergency repairs or temporary fixes
From personal experience after replacing several CPS units over the years, I’ve found that spending a bit more for OEM or top-tier aftermarket sensors pays off in longevity. The cheaper units might work initially, but often fail again within a year or two of normal use.
Comparison Table: CPS Options for 12 Valve Cummins
| Brand | Average Price | Expected Lifespan | Warranty | Availability |
| OEM Mopar | $75-120 | 5-7 years | 2 years | Dealer, online |
| Standard Motor Products | $55-80 | 4-6 years | 3 years/36k miles | Auto parts stores, online |
| Delphi | $50-70 | 4-5 years | Limited lifetime | Auto parts stores, online |
| Bosch | $45-65 | 3-5 years | Limited lifetime | Widely available |
| Budget brands | $20-35 | 1-3 years | 90 days – 1 year | Widely available |
Preventative Maintenance for Longevity
The crank position sensor isn’t typically considered a maintenance item, but there are steps you can take to extend its life and catch problems before they leave you stranded:
- Keep the engine bay clean – Oil and grime can accelerate sensor degradation and hide developing issues
- Address oil leaks promptly – Especially from the front crankshaft seal, which can contaminate the sensor
- Maintain proper charging system operation – Voltage spikes from a failing alternator can damage electronic components
- Consider preventative replacement – If your truck has over 150,000 miles and the original sensor, it might be worth replacing it during other front engine work
- Protect wiring harnesses – Secure any loose wiring away from hot or moving parts
- Use dielectric grease – A small amount in the connector can prevent corrosion and ensure good electrical contact
Real-world insight: I’ve found that the crank position sensor on the 12 valve Cummins typically lasts between 100,000-150,000 miles under normal conditions. If you use your truck for heavy towing or in extreme environments (very hot or very cold), expect a somewhat shorter lifespan.
Common Questions About 12 Valve Cummins CPS
Over the years, I’ve heard the same questions pop up repeatedly about this component. Here are straight answers to the most common ones:
Can I drive with a failing crank position sensor?
Technically yes, but it’s risky. A failing sensor may work intermittently, allowing the truck to run, but could leave you stranded without warning. I wouldn’t recommend driving far from home or for extended periods with sensor issues.
Will a bad CPS throw a check engine light?
Not always on a 12 valve. Early 12 valve Cummins engines (1989-1993) didn’t have check engine light capability for many issues. Later models (1994-1998) may illuminate the check engine light, but even then, not in all failure scenarios.
Can the crank position sensor cause poor fuel economy?
Yes, indirectly. If the sensor is providing erratic readings, the ECM may not optimize fuel injection timing properly, leading to inefficient combustion and reduced MPG.
Is it difficult to replace the CPS yourself?
Moderate difficulty. The sensor itself is secured by just one bolt, but access can be challenging depending on your truck’s configuration. Most DIY mechanics with basic tools can handle it in 1-2 hours.
How can I test my CPS without special tools?
The swap test. If you suspect a bad sensor but don’t have testing equipment, borrowing a known good sensor to temporarily install can be an effective diagnostic method. Just be sure the sensor is compatible with your specific engine year.
Can weather affect the crank position sensor?
Absolutely. Extreme cold can sometimes exacerbate existing sensor issues, making symptoms more pronounced during winter months. Excessive heat and humidity can also accelerate sensor degradation.
Conclusion
The crank position sensor on your 12 valve Cummins might be small, but its impact on your truck’s operation is enormous. Located on the front timing cover on the passenger side of the engine, this critical component keeps your diesel heart beating properly by monitoring crankshaft position and engine speed.
When problems arise, knowing how to diagnose, locate, and replace this sensor can save you time, money, and the frustration of unexpected breakdowns. While replacement is straightforward for most DIYers, choosing quality parts and addressing the job properly will ensure your legendary 12 valve Cummins continues to deliver the reliability that made these engines famous.
Remember, preventative maintenance always beats roadside repairs – if your truck is approaching higher mileage or you’re planning other front engine work, consider proactively replacing this sensor before it leaves you stranded.
Final tip from a fellow Cummins owner: Keep a spare CPS in your glove box if you rely on your truck daily or travel to remote areas. It’s small, relatively inexpensive, and could be the difference between a 15-minute roadside repair and an expensive tow.
Resources and References
- Dodge Factory Service Manual, 1989-1998
- Cummins 6BT Service Information, 5.9L Engine Systems
- Diesel Power Magazine Technical Archives
- Personal experience maintaining and repairing multiple 12 valve Cummins trucks over 15+ years

![P2459 Code 6.7 Cummins: Complete Repair Guide [2026]](https://truckguider.com/wp-content/uploads/2026/03/p2459-code-6-7-cummins-featured.webp)