
2006 Honda Ridgeline Serpentine Belt Diagram: Routing & Maintenance 2026

The 2006 Honda Ridgeline utilizes a single serpentine belt system driven by the crankshaft pulley. To route, loop the belt under the crankshaft, over the idler pulley, around the alternator, power steering pump, and A/C compressor. Use a 14mm wrench on the automatic belt tensioner to release pressure for installation.
📌 Key Takeaways
- Standard serpentine belt length is typically 86.5 inches (7-rib, 2197mm).
- The automatic belt tensioner features a built-in indicator to verify if the belt has stretched beyond service limits.
- Ensure the ribbed side of the belt contacts the grooved pulleys; the smooth side must contact the idler pulley.
- A common failure point is the idler pulley bearing, which often develops a grinding noise before the belt snaps.
- Consult a certified mechanic if you cannot maintain tension or if the belt continues to jump ribs after proper installation.
Maintaining the integrity of the accessory drive system is vital for the longevity of the 2006 Honda Ridgeline’s J35A9 engine. As a heavy-duty pickup platform, the Ridgeline relies on a robust serpentine belt system to drive the alternator, power steering pump, and air conditioning compressor. Over time, the elastomer material of the drive belt experiences thermal degradation, leading to micro-cracking and eventual tension loss. Utilizing an accurate 2006 Honda Ridgeline serpentine belt diagram is essential for ensuring correct routing and preventing catastrophic component failure. This guide provides the technical specifications, routing path documentation, and tension management protocols required for professional-grade maintenance of this critical vehicle subsystem.
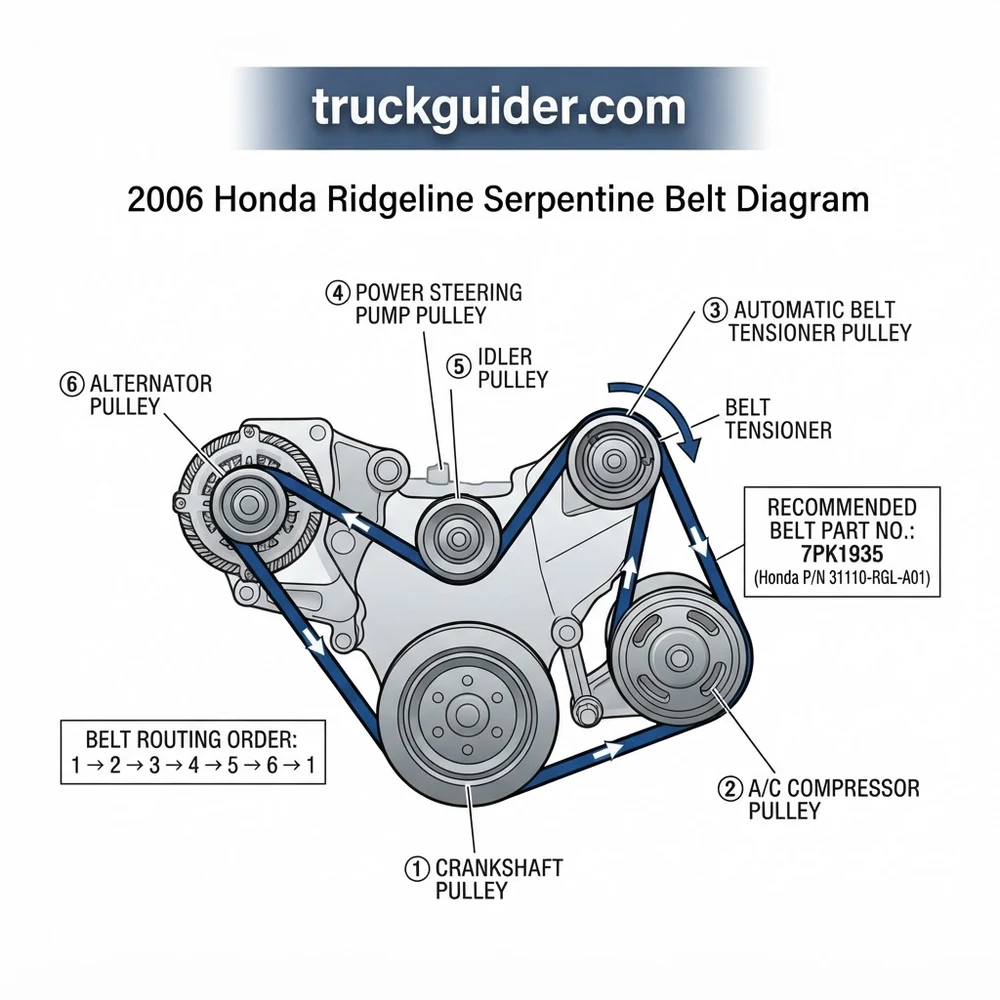
Understanding the 2006 Honda Ridgeline Serpentine Belt Diagram
Recommended Best Deal Products




The accessory drive system on the 3.5L V6 engine utilizes a single serpentine belt to transfer rotational kinetic energy from the crankshaft to all primary engine accessories. It is critical to differentiate this serpentine belt from the timing belt located behind the engine covers. While the timing belt synchronizes the camshafts and crankshaft, the serpentine belt operates externally and is subject to higher exposure to ambient contaminants, such as oil mist or road grit, which accelerate wear.
A properly interpreted 2006 Honda Ridgeline serpentine belt diagram reveals the serpentine belt routing path as a multi-point serpentine loop. The belt travels around the crankshaft pulley (the driver), travels upward to the alternator, wraps around the idler pulley, moves across the power steering pump, and finally routes back down to the A/C compressor and automatic belt tensioner. The automatic belt tensioner is the most critical component in this loop, as it maintains constant pressure to ensure the ribs of the belt maintain full deck engagement with the grooves of the pulleys.
In the J35 platform, the belt utilizes a 6-rib (K-section) profile. Proper alignment is paramount; if the belt is misaligned by even one groove, the accessory bearings—particularly the power steering pump and alternator—will experience premature side-loading failure. The diagram indicates a clockwise rotation path as viewed from the passenger side of the engine bay. The idler pulley serves to increase the wrap angle around the driven accessories, preventing belt slip during high-load conditions, such as engaging the A/C clutch while steering at idle speeds.
On the 2006 model year, verify that your replacement belt is identified for the J35A9 engine. Later iterations of the Honda V6 accessory drive may utilize slightly different pulley diameters, which necessitates a specific belt length for correct tensioner operating window.
2006 Honda Ridgeline Serpentine Belt Part Numbers and Specs

Selection of the correct replacement belt is predicated on the Effective Length (EL) and the number of ribs. The OEM belt is engineered to a specific elasticity coefficient, which works in tandem with the spring-loaded tensioner. Using aftermarket belts that are outside of the specified tolerance can cause the tensioner to “bottom out” or fail to provide sufficient clamping force.
| Specification | Details |
|---|---|
| Belt Type | 6-Rib Multi-V Serpentine |
| OEM Part Number | 31110-RGL-A01 |
| Industry Standard Size | 6PK-2130 (approx. 2130mm) |
| Material Composition | EPDM (Ethylene Propylene Diene Monomer) |
When procuring an aftermarket alternative, ensure the part is designated as EPDM material. Traditional neoprene belts are prone to heat cracking and lack the flexibility required for the high-revving Honda J35 engine. Always verify the belt length against the manufacturer’s catalog for the 2006 VIN range to avoid fitment issues related to optional equipment like specific high-output alternators.
How to Use the 2006 Honda Ridgeline Serpentine Belt Diagram Step by Step
Recommended Best Deal Products


Executing a belt replacement requires access to the passenger-side wheel well. Removing the plastic splash shield is necessary to obtain an unobstructed line of sight to the crank pulley and belt tensioner.
Safety Procedures and Tool Preparation
Ensure the ignition is in the OFF position and the battery negative terminal is disconnected to prevent accidental engagement of the starter. You will need a 14mm specialized serpentine belt tool or a long-handle swivel-head ratcheting wrench. The tensioner access point is tight; ensure your tool has sufficient clearance to rotate the tensioner clockwise to release the belt pressure.
Executing the Belt Removal
Apply force to the tensioner arm by rotating the pulley bolt clockwise. Once the tensioner has retracted, slide the belt off the easiest accessible pulley, typically the idler pulley or the alternator. Slowly release the tensioner to prevent spring fatigue or damage. Inspect the removed belt for signs of pilling, glazing, or lateral fraying, which indicate misalignment or pulley bearing degradation.
Installation and Routing Path Verification
Following the 2006 Honda Ridgeline serpentine belt diagram, route the new belt around all pulleys. Keep the tensioner for last. Ensure every rib is seated perfectly within the pulley tracks. If the belt is off by a single groove on the crankshaft pulley, the belt will be destroyed within minutes of engine operation. Once routed, re-apply pressure to the tensioner, slide the belt onto the final pulley, and slowly release the tensioner. Verify that the belt is centered on the idler pulley and the tensioner pulley.
Do not insert fingers between the belt and pulley while rotating the tensioner. The spring-loaded tensioner creates significant pinch points that can cause severe injury if released suddenly.
Managing Belt Tension and Accessory Drive Pulley Health
The health of the accessory drive is not solely dependent on the belt itself; the pulleys play a critical role in system efficiency. A failing idler pulley will exhibit play or a dry, grinding sound when rotated by hand. Because the 2006 Honda Ridgeline uses an automatic spring-loaded belt tensioner, you must check for “tensioner bounce.” When the engine is idling, observe the tensioner arm; if it oscillates aggressively, the internal damping mechanism has failed, and the tensioner assembly must be replaced to prevent belt slap.
Verify that the power steering pump and alternator pulleys are free of debris. If the old belt showed signs of “rib stripping,” it is highly likely that the alignment of one of these pulleys has shifted or the pulley itself is worn. Using a straight-edge tool across the pulley faces can help diagnose misalignment. Additionally, check the crankshaft harmonic balancer for wobble. A failing harmonic balancer will vibrate the belt excessively, leading to immediate belt failure regardless of the brand or quality of the replacement part used.
Proper belt seating requires that every rib of the belt sits inside the groove of the pulleys. No overhang is permitted on any pulley, especially the ribbed pulleys of the A/C compressor and alternator.
2006 Honda Ridgeline Serpentine Belt Diagram Questions Answered
Recommended Best Deal Products


How often should I inspect the belt according to the diagram?
Routine inspection should occur every 15,000 miles or annually. Look for cracks at the root of the ribs, which indicate the end of the elastomer’s functional life. If you observe more than three cracks per inch of belt length, replacement is mandatory to prevent roadside stranding.
Why does my new belt squeal after installation?
Squealing is usually a symptom of a contaminated belt surface (oil/coolant) or insufficient tension. If you verified the routing against the 2006 Honda Ridgeline serpentine belt diagram and ensured the belt is centered, the squeal may indicate that the belt tensioner’s internal spring has weakened and can no longer provide the OEM-specified load to the belt.
Can I use a belt intended for a different J35 engine?
No. While many Honda V6 engines share the same architecture, accessory positions and tensioner travel distances vary. Using an incorrect belt length will either prevent the tensioner from operating in its “sweet spot” or make installation physically impossible due to length constraints.
Does the 2006 Honda Ridgeline use a manual adjustment for the belt?
No. The 2006 model utilizes an automatic spring-loaded tensioner. Manual adjustment is neither required nor possible. Attempting to force tension through alternative methods will damage the accessory bearings and is not recommended under standard service procedures.
What does “deck engagement” mean in the context of belt routing?
Deck engagement refers to the surface area contact between the belt ribs and the pulley grooves. Proper routing ensures that the belt wraps around a sufficient percentage of the pulley circumference to transfer torque without slippage. If the belt does not have adequate contact, the alternator may not provide the necessary voltage under electrical load, or the power steering may feel sluggish during low-RPM maneuvers.
Step-by-Step Guide to Understanding the 2006 Honda Ridgeline Serpentine Belt Diagram
Identify – Inspect the old belt for fraying and note the existing belt routing path orientation.
Locate – Position yourself on the passenger side to access the automatic belt tensioner bolt.
Reference – Consult the diagram to ensure you understand the sequence for the idler pulley and alternator.
Connect/Route – Apply tensioner pressure, route the belt around all pulleys, and verify ribs are aligned.
Verify – Start the engine briefly to ensure the belt tracks centrally on all pulleys without vibrating.
Troubleshoot – Check for any unusual chirping sounds, which indicate the belt is not properly seated in a groove.
