24V Cummins MAP Sensor Location – Quick Owner’s Guide
Hey there, fellow truck enthusiast! If you’re rolling in a Dodge Ram with a 24v Cummins engine, you know these beasts are built for the long haul. But even the toughest trucks need their sensors firing on all cylinders to keep performance top-notch. One key player is the Manifold Absolute Pressure (MAP) sensor. If you’re wondering about the 24v Cummins MAP sensor location, what it does, or how to fix it when it acts up, you’re in the right place. As someone who’s spent plenty of time wrenching on diesels, I’m here to break it down for TruckGuider.com readers in a way that’s clear, practical, and geared for truck owners like you. Let’s get under the hood!
What is the MAP Sensor?
The MAP sensor is like the eyes and ears of your engine’s intake system. It measures the pressure inside the intake manifold think of it as keeping tabs on the “intake manifold pressure” and sends that info to the Engine Control Module (ECM), your truck’s brain. The ECM uses this data to figure out how much air is flowing into the engine, which helps it dial in the perfect air-fuel mix, tweak timing, and manage turbo boost. For a diesel like the 1998.5-2002 Dodge Ram 5.9L 24v Cummins, this little sensor is a big deal for keeping your turbo spooled up and emissions in check.
In simpler terms, it’s a quarterback calling the plays. If the MAP sensor’s off, your engine’s game plan falls apart, leading to sluggish performance or wasted fuel. A healthy MAP sensor keeps your truck running strong, efficient, and clean.
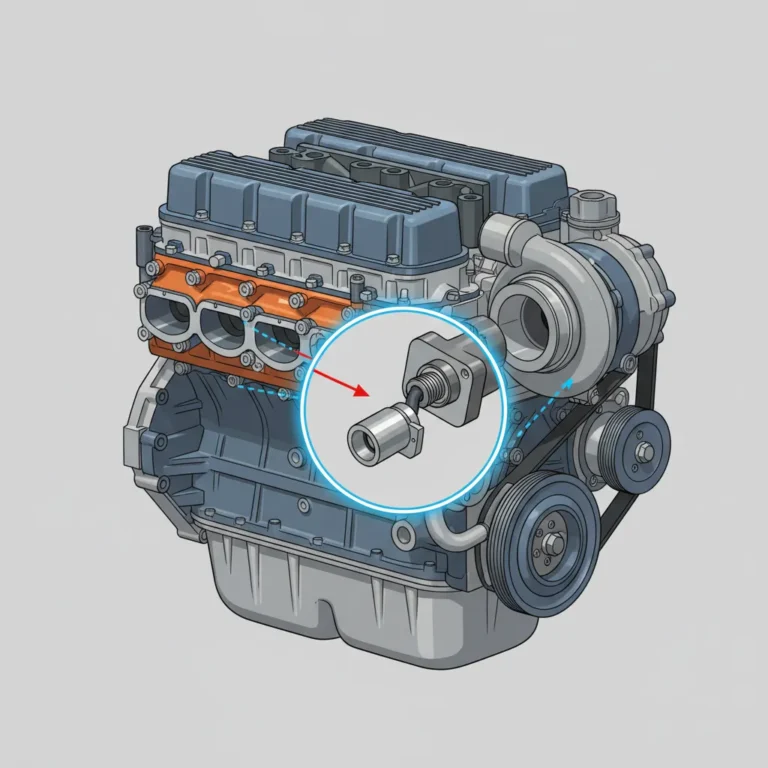
Where is the MAP Sensor Located in a 24v Cummins?
So, where’s this critical piece hiding? For the 1998.5-2002 Dodge Ram 5.9L 24v Cummins, the MAP sensor location is on the driver’s side of the engine. Here’s the exact spot:
- Mounted on the intake manifold, towards the back, near cylinder #5.
- Just above the lift pump and rearward of the fuel filter side of the manifold.
- Below the Intake Air Temperature (IAT) sensor, often in a cluster with other sensors.
Pop your hood and look on the left side of the engine (driver’s side). The intake manifold is that big, flat component with tubes and sensors sticking out. The MAP sensor itself is a small, cylindrical gadget with a wiring connector sometimes with a pink or blue wire, but your manual’s the best bet to confirm. It’s tucked in a busy spot, so don’t confuse it with the nearby IAT sensor or the barometric pressure sensor (that one’s over on the passenger side near the turbo inlet).
Special Note for 2001-2002 Owners: Some trucks need a wiring harness adapter for the MAP sensor, so double-check compatibility when replacing it. Sites like GenosGarage can hook you up with the right part.
Need a visual? Detailed diagrams on Quadzilla Power or Cummins QuickServe Online are gold for pinpointing it.
Why is the MAP Sensor Important?
This little sensor punches above its weight. Here’s why it matters:
- Optimizes Fuel Delivery: It tells the ECM how much fuel to inject based on engine load crucial for keeping that diesel humming.
- Manages Turbo Boost: Ensures your turbocharger delivers the right punch without overworking itself.
- Controls Emissions: Helps keep your exhaust clean enough to pass regs and avoid that dreaded black cloud.
When the MAP sensor goes south, you’ll feel it. Watch for these red flags:
- Black smoke billowing out the tailpipe (too much fuel, not enough air).
- Poor acceleration or a throttle that just won’t wake up.
- Rough idling or stalling out of nowhere.
- Lower fuel economy yeah, that stings at the pump.
- Check engine light popping on with codes like P0069 (MAP/Barometric Pressure Correlation) or P0070 (MAP Sensor Circuit Malfunction).
A bad MAP sensor throws your engine’s balance off, costing you power and cash. Keeping it in check is non-negotiable for a happy truck.
Common Issues and How to Troubleshoot Them
MAP sensors in the 24v Cummins take a beating heat, vibration, and grime are par for the course. Here’s what truck owners run into most:
- Sensor Failure: Over time, it wears out, sending wonky readings or just quitting.
- Wiring Issues: Loose, frayed, or corroded connectors can cut the signal to the ECM.
- Contamination: Soot, oil, or dirt can clog it up, especially if you’re rocking an exhaust brake.
- Incorrect Readings: If the sensor’s lying about manifold pressure, the ECM gets confused.
Symptoms of a Failing MAP Sensor
- Black exhaust smoke
- Loss of power or sluggish response
- Rough or uneven idling
- Increased fuel consumption
- Diagnostic trouble codes like P0069 or P0070
Step-by-Step Troubleshooting Guide
If your truck’s acting funky, here’s how to zero in on the MAP sensor:
- Scan for Codes: Grab a scan tool and check for MAP-related fault codes (P0069, P0070, etc.).
- Inspect Wiring: Look for loose, damaged, or corroded connectors. The signal wire’s often light blue make sure it’s snug.
- Test the Sensor: Use a multimeter to check output. At idle, it should read around 60.8 inHg your manual will have the spec.
- Clean or Replace: If it’s gunked up, carburetor cleaner might save it, but replacement’s usually the safer bet.
Not big on electrical stuff? A good mechanic’s your friend. Or snag a tool like the Diesel Laptops Diagnostic Kit if you’re DIY-inclined.
Here’s a quick troubleshooting table:
| Issue | Possible Cause | Action Needed |
| Black Smoke | Faulty MAP Sensor | Test or replace sensor |
| Poor Acceleration | Wiring Issue | Inspect and repair wiring |
| Rough Idling | Contaminated Sensor | Clean or replace sensor |
| Check Engine Light | Sensor Failure | Scan for codes and replace if needed |
How to Replace the MAP Sensor
Swapping out the MAP sensor is a job most truck owners can tackle with basic tools. Here’s the rundown:
- Locate the Sensor: It’s on the driver’s side intake manifold, near cylinder #5.
- Disconnect the Battery: Unhook the negative terminal safety first.
- Unplug the Connector: Gently pull the wiring harness off the sensor.
- Remove the Old Sensor: Use a 1 1/4” wrench to unscrew it from the manifold.
- Install the New Sensor: Thread the new one in with a 1 1/16” wrench, tightening to about 10 ft-lbs (check your manual for the exact torque).
- Reconnect Everything: Plug the harness back in and hook up the battery.
- Test Drive: Fire it up, clear any codes, and take it for a spin to confirm it’s running right.
Heads-Up: 2001-2002 models might need a wiring harness adapter (Cummins part #3104228). GenosGarage has you covered if you’re hunting parts.
Frequently Asked Questions
Truck owners ask these a lot here’s the scoop:
- How do I know if my MAP sensor’s bad?
Black smoke, weak acceleration, rough idling, or codes like P0069/P0070 are telltale signs. A scan tool seals the deal. - Can I clean it instead of replacing it?
Sure, carburetor cleaner can work if it’s just dirty, but a new sensor’s often more reliable, especially on older trucks. - What tools do I need?
A 1 1/4” wrench to remove, a 1 1/16” wrench to install, and a torque wrench for precision. - Are MAP sensors the same for all Cummins engines?
Nope model and year matter. For 1998.5-2002 24v Cummins, grab something like Cummins #4921505 for 2001-2002. - Where’s a good diagram?
Quadzilla Power or Cummins QuickServe Online have solid visuals.
Conclusion
The MAP sensor might be small, but it’s a powerhouse for your 24v Cummins engine keeping fuel delivery, turbo boost, and emissions on point. Knowing its spot on the driver’s side intake manifold near cylinder #5 gives you the edge to troubleshoot or swap it out like a pro. Whether you’re chasing down black smoke, a lazy throttle, or a check engine light, this sensor’s worth a look.
Grab a scan tool, keep those wires clean, and don’t shy away from replacing it if it’s toast. For more help, hit up Cummins QuickServe Online or GenosGarage. Stay ahead of the game, and your truck will keep hauling like a champ. Happy wrenching, TruckGuider crew!

![2018 Ram 2500 6.7 Oil Capacity: Complete Specs Guide [2026]](https://truckguider.com/wp-content/uploads/2026/03/2018-ram-2500-6-7-oil-capacity-featured.webp)