5.7 Hemi Camshaft Position Sensor: The Definitive Location & Replacement Guide
A 5.7 Hemi that suddenly stalls, idles rough, or refuses to start after a long crank is a common and frustrating problem. When the OBD-II scanner flashes a P0340 or P0344 code, the culprit is flagged: the Camshaft Position Sensor (CMP). The first question every truck owner asks is, “Where is it?”
This guide provides a precise, illustrated answer. However, locating the sensor is only the first step. A successful repair of a 5.7 Hemi’s CMP sensor is a three-part challenge that causes many DIY repairs to fail:
- Locating the Right Part: The sensor’s location changed during the 5.7 Hemi’s production run, which is a primary source of online confusion.
- Using the Right Part: The Hemi’s engine computer (PCM) is notoriously sensitive. Using a non-OEM sensor is a common failure point that can cause the code to return immediately.
- Performing the Right Procedure: Simply replacing the sensor and clearing the code is often not enough. A mandatory “cam/crank relearn” is required to synchronize the new sensor with the PCM. Skipping this step is why many repairs fail, leaving the vehicle in limp mode.
This comprehensive guide will walk through all three challenges, providing data-driven answers, step-by-step instructions, and expert-level insights to fix the problem correctly.
The 5.7 Hemi Camshaft Sensor
A Visual Guide to Location, Symptoms & Cost
The Engine’s Critical Timer
The Camshaft Position Sensor (CMP) is vital for your Hemi’s performance. It tells the engine’s computer the exact position of the camshaft, which dictates three critical functions:
How It Works: A Simple Flow
(Reads Cam Position)
(Processes Data)
(Adjusts Timing/Fuel)
This constant communication ensures the engine runs efficiently. When the sensor fails, this data stream stops, causing major drivability issues.
Location: 2003-2008 (Gen 1)
Location: Passenger side, at the very back of the cylinder head near the firewall.
Access: Very difficult. Often requires removing other components or accessing from underneath the vehicle.
DIY Difficulty Rating
3/5 (Moderate to Hard)
Location: 2009+ (Gen 2)
Location: Front of the engine, on top of the timing cover, near the water pump.
Access: Easy. Usually held by one 10mm bolt and is clearly visible after removing the air intake.
DIY Difficulty Rating
1/5 (Easy)
Symptoms of a Bad Sensor
A failing sensor will almost always trigger a Check Engine Light. Look for these common signs:
- Check Engine Light (P0340, P0344)
- Difficulty Starting or No-Start Condition
- Rough Idling and Engine Stalling
- Engine Misfires or Stumbles
- Poor Acceleration and Reduced Power
- Noticeable Drop in Fuel Economy
Common Causes of Failure
Failure isn’t always random. Heat, vibration, and oil leaks are the primary culprits.
Replacement Cost Breakdown
The part itself is affordable, typically $25-$75. Labor costs are the main variable, especially on older models where the sensor is hard to reach.
Simplified DIY Replacement (2009+ Model)
-
1
Safety First
Disconnect the negative battery terminal.
-
2
Locate Sensor
Find the sensor on the front timing cover. You may need to remove the air intake tube.
-
3
Disconnect & Remove
Unplug the electrical connector. Remove the single 10mm mounting bolt.
-
4
Install New Sensor
Clean the area, lube the new o-ring with clean oil, and install the new sensor. Re-install the bolt and connector.
-
5
Finalize
Reconnect the battery and clear any diagnostic codes with a scanner.
The Definitive 5.7 Hemi Camshaft Position Sensor Location (It Varies by Year)
The conflicting information online about the sensor’s location stems from a major engine update. The 5.7 Hemi was significantly revised in 2009. This new “Eagle” Hemi introduced Variable Valve Timing (VVT) and other changes, which included moving the camshaft position sensor.
Location 1: 2009-Present 5.7 “Eagle” Hemi (VVT Engines)
- Affected Vehicles: Ram 1500 (2009+), Dodge Charger/Challenger (2009+), Jeep Grand Cherokee (2009+), Dodge Durango (2009+).
- Precise Location: On the front of the engine, driver’s side (left side when facing the engine).
- How to Find It: The sensor is mounted externally on the engine’s timing cover. It is typically found below the alternator and near the power steering pump. Wiring diagrams for Gen III Hemi EFI systems confirm the CMP connector is routed to the front of the engine.
- Access: This location requires the removal of the air intake assembly (the air filter box and intake tube) to gain clear access.
Location 2: 2003-2008 5.7 Hemi (Pre-Eagle Engines)
- Affected Vehicles: Ram 1500 (2003-2008), Dodge Durango (2004-2009), Jeep Grand Cherokee (2005-2008), Jeep Commander (2006-2008).
- Precise Location: On the top of the engine, passenger side (right side when facing the engine).
- How to Find It: It is located near the rear of the engine block, close to the firewall. On many models, it is tucked near the airbox housing.
- Access: This location is often easier to reach. On vehicles like the 2006 Jeep Commander, it is immediately visible after removing the plastic engine cover.12 On 2003-2008 Ram trucks, it’s accessible on the passenger side near the airbox.10
5.7 Hemi Cam Sensor Location by Engine Generation
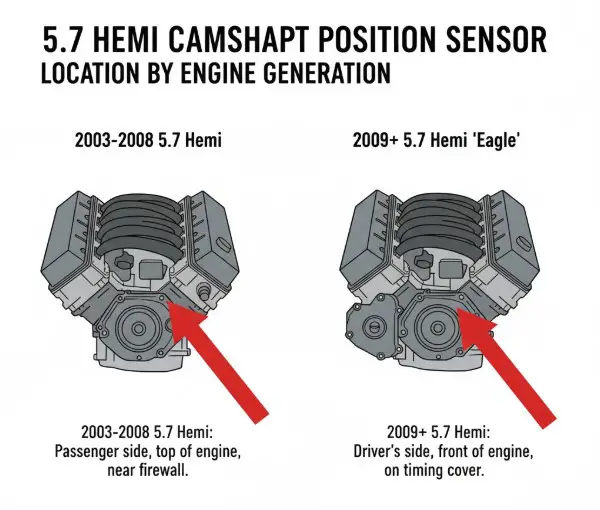
- (Left Image): A simple diagram showing a top-down view of the 2003-2008 Hemi engine. An arrow points to the passenger side, near the firewall.
- Caption: 2003-2008 5.7 Hemi: Passenger side, top of engine, near firewall.
- (Right Image): A simple diagram showing a front-facing view of the 2009+ “Eagle” Hemi engine. An arrow points to the driver’s side, on the front timing cover.
- Caption: 2009+ 5.7 Hemi: Driver’s side, front of engine, on timing cover.
A Critical Clarification: Bank 1 and the Single Sensor
Trouble codes like P0340 and P0344 often read “Camshaft Position Sensor ‘A’ Circuit (Bank 1 or Single Sensor)”. This standardized OBD-II language causes two common questions.
- Where is Bank 1? On a V-engine, Bank 1 is the side of the engine that contains Cylinder #1. For the Gen III 5.7 Hemi, Cylinder #1 is on the driver’s side (left side) of the engine.
- Is there a sensor for Bank 2? No. The 5.7 Hemi is a single-cam-in-block (pushrod) V8. It only has one camshaft and therefore only one camshaft position sensor. The code definition “Bank 1 or Single Sensor” is the PCM’s way of specifying it is monitoring the primary (and only) cam sensor. Do not waste time looking for a second sensor.
What Does the Camshaft Position Sensor Do in the 5.7 Hemi?
The camshaft position sensor (CMP) works as a team with the crankshaft position sensor (CKP) to synchronize the engine.
The CKP sensor tells the Powertrain Control Module (PCM) the speed (RPM) and position of the crankshaft. However, a piston reaches Top Dead Center (TDC) twice during a full cycle (once on the compression stroke, once on the exhaust stroke). The CKP sensor alone cannot tell the difference.
The CMP sensor solves this. It reads a tone ring on the camshaft, which rotates at half the speed of the crank. This signal allows the PCM to identify Cylinder 1’s compression stroke. This synchronized signal is essential for three vital functions:
- Sequential Fuel Injection: It allows the PCM to time the fuel injectors to spray exactly when the intake valve opens, rather than “batch firing” injectors. This is critical for emissions, performance, and fuel economy.
- Ignition Timing: It enables the PCM to fire the spark plug at the precise moment for optimal combustion, preventing knock and maximizing power.
- Variable Valve Timing (VVT) Control: On 2009+ “Eagle” Hemis, this is its most complex job. The PCM uses the CMP sensor signal as a feedback loop to control the VVT solenoid. The PCM commands the solenoid to advance or retard cam timing and then checks the CMP signal to confirm the new position is correct.
This critical role in the VVT system is why sensor failures can be linked to other Modern Hall-effect sensors like the one in the Hemi provide a digital square-wave signal that the ECU uses to time these crucial events.
7 Symptoms of a Failing 5.7 Hemi Cam Sensor (vs. Crank Sensor)
When the CMP sensor fails, the PCM loses its synchronization. The signal becomes intermittent or incorrect, forcing the PCM into a “fail-safe” or “limp” mode. This results in several distinct symptoms:
- Check Engine Light (CEL): The most obvious sign, typically with P0340 or P0344 codes.
- Hard Starting / Long Crank Time: This is the hallmark symptom. The PCM loses sync and has to “guess” when to fire the injectors, extending the cranking time before the engine finally starts.
- Engine Stalling: The signal may drop out completely while driving, cutting spark and fuel, which can be dangerous in traffic.
- Rough Idle and Misfires: With timing out of sync, the engine’s combustion becomes erratic and inefficient.
- Poor Acceleration & Sluggish Performance: The PCM retards timing and disables VVT to prevent engine damage, resulting in a major loss of power.
- Vehicle Enters “Limp Mode”: The “Electronic Throttle Control” (lightning bolt) light may come on, severely limiting engine RPM and vehicle speed.
- Decreased Fuel Economy: Inefficient and incorrect timing wastes fuel.
A common diagnostic question is how to differentiate a bad cam sensor from a bad crank sensor. While many symptoms overlap, the key is in how the engine starts, or if it starts at all.
A failing CKP (Crank) sensor often results in a “No Start” condition. The PCM gets no RPM signal and assumes the engine isn’t turning, so it won’t send spark or fuel.18 A failing CMP (Cam) sensor typically results in a “Hard Start” condition, as the PCM knows the engine is turning (from the CKP) but is “lost”.
| Symptom | Bad Camshaft Sensor (CMP) | Bad Crankshaft Sensor (CKP) |
| Primary Effect | Engine runs rough, hard start, stalls | Engine often won’t start at all (No RPM) |
| Check Engine Light | Yes (Codes: P0340, P0344) | Yes (Codes: P0335, P0339) |
| Starting Issues | Hard Start / Long Crank | No Start / Crank-No-Start |
| Stalling | Yes, intermittently | Yes, often dies and won’t restart |
| Rough Idle/Misfire | Yes | Yes |
| Limp Mode | Yes | Less common; usually just a stall |
Decoding the Trouble Codes: P0340 vs. P0344 Explained
The specific code your scanner pulls provides a vital diagnostic clue.
P0340: Camshaft Position Sensor “A” Circuit Malfunction
- What it Means: This is a general or hard fault.13 The PCM has detected a continuous problem. This means there is either no signal, a signal that is “stuck,” or a signal that is grossly out of range.
- Common Causes: The sensor is completely dead, the wiring harness is unplugged, or there is a “hard” short or open in the circuit wiring.
P0344: Camshaft Position Sensor “A” Circuit Intermittent
- What it Means: This is an intermittent fault. The PCM is receiving a signal, but that signal is “dropping out” or disappearing sporadically.
- Common Causes: This is often a connection issue, not a failed sensor. An intermittent signal is frequently caused by external factors like engine heat causing the harness connector to become brittle, vibration causing pins to lose contact, or oil/water corrosion in the connector disrupting the signal.
- Authoritative Advice: If you have a P0344 code, do not immediately buy a new sensor. A professional technician would use an oscilloscope to diagnose the signal dropout. As a first DIY step, disconnect the harness, thoroughly inspect the pins, and clean the contacts with electrical contact cleaner.
How to Replace the 5.7 Hemi Camshaft Position Sensor (Step-by-Step)
DIY vs. Professional Repair Cost Analysis
This repair is relatively inexpensive and accessible, making it a popular DIY job. Labor costs at a shop are typically low, but the part cost can vary.
| Service Type | Parts Cost (OEM vs. Aftermarket) | Labor Cost (Est. 0.5-1.0 hr) | Total Estimated Cost |
| DIY Replacement | $45 (Aftermarket) – $135 (OEM Mopar) | $0 | $45 – $135 |
| Professional Repair | $45 – $135 | $50 – $154 | $95 – $289 (+ taxes/fees) |
CRITICAL PRO-TIP: Why You MUST Use an OEM Mopar Sensor
This is the single biggest mistake DIYers make with Hemi sensors. Chrysler, Dodge, Ram, and Jeep vehicles are notoriously intolerant of aftermarket electronics.
A common failure loop occurs when an owner installs a new aftermarket sensor, clears the code, and the code immediately returns or the truck runs even worse. This is because the PCM “won’t communicate properly with” the aftermarket sensor. Its voltage signal or internal resistance is outside the exact specification Mopar requires. This is confirmed by numerous owner reports of aftermarket sensors failing to resolve the issue.
Do not waste time or money. Purchase a genuine OEM Mopar sensor (Part # 5149054AC or its equivalent for your VIN). It is highly recommended to source a genuine Mopar sensor directly from a dealership or reputable OEM parts distributor.
Step-by-Step Replacement Guide
Tools Needed:
- Ratchet
- 10mm socket (a deep well or wobble extension may be needed)
- Flat-blade screwdriver (for air intake)
- Dielectric grease
Steps:
- Safety First: Disconnect the negative terminal of the battery.
- Gain Access:
- For 2009+ Models: Use the screwdriver to loosen the hose clamps on the air intake tube. Remove the tube and the air filter housing assembly.
- For 2003-2008 Models: Simply lift off the plastic engine cover, which is usually held by snaps and the oil cap.
- Locate the Sensor: Refer to the location section above for your specific year.
- Disconnect Harness: Depress the locking tab and carefully pull the electrical connector off the sensor.
- Remove Bolt: Use a 10mm socket to remove the single bolt holding the sensor in place.
- Remove Old Sensor: Gently twist and pull the sensor straight out of the engine block. It may be stiff from the O-ring seal.
- Prepare New Sensor: Lightly lubricate the O-ring on the new sensor with a small dab of dielectric grease or clean engine oil. This prevents the O-ring from tearing or seizing during installation.
- Install New Sensor: Press the new sensor firmly into the block. Reinstall the 10mm bolt and tighten it until snug (do not over-torque).
- Reconnect Harness: Plug the electrical connector back in until it “clicks.”
- Reassemble: Reinstall the air intake assembly or engine cover. Reconnect the battery.
The Critical Final Step: The Cam/Crank Relearn Procedure (Do NOT Skip This)
Many DIY guides end after the last step, “clear the codes and start the engine.” For most modern Chrysler, Dodge, and Jeep vehicles, this is incorrect. Replacing the CMP (or CKP) sensor requires a “Cam/Crank Relearn” procedure.
The PCM stores a highly-precise “profile” of the tiny imperfections on the crankshaft and camshaft reluctor wheels. This profile is its baseline for “normal.” When you install a new sensor, it has a slightly different magnetic field, position, and signal strength. The PCM sees this new, different signal and compares it to the old stored profile. It registers this as a mismatch or synchronization failure.
When this step is skipped, the PCM may trigger a new code, such as P1336 (Crankshaft Position Variation Not Learned), or it may even re-trigger the original P0340/P0344 code. The engine will continue to run rough, misfire, or enter limp mode. This is confirmed by a 2010 Ram owner who, after changing both cam and crank sensors, was still in limp mode. The problem was only fixed after a mechanic “resynced” the sensors.
How to Perform the Cam/Crank Relearn
This procedure CANNOT be done by disconnecting the battery, touching the cables together, or using a basic, cheap OBD-II code reader.
- Required Tool: You must use a bi-directional scan tool (such as an Autel, Snap-on, or HP Tuners) that has a “Special Functions” or “Service” menu.
- The General Procedure:
- Plug the scan tool into the OBD-II port.
- Turn the ignition on (engine off).
- Navigate to the PCM/Engine Control Module menu.
- Find “Special Functions” or “Service.”
- Select the “Crankshaft Variation Relearn” or “Cam Crank Relearn” option.
- The tool will then prompt you to start the engine, let it reach operating temperature, apply the brake, and sometimes rev the engine to a certain RPM.
- The scanner will display a “Relearn Successful” message. The new sensor profile is now synchronized.
This relearn requirement is a standard procedure documented by automotive component manufacturers in technical service bulletins for technicians. Performing this procedure highlights the need for a quality diagnostic tool, which is a core part of any modern truck maintenance toolkit.
Conclusion: A 3-Step Solution for a Successful Repair
The search for the “5.7 Hemi camshaft position sensor location” is more complex than it first appears. A successful, long-term fix requires a 3-step solution:
- Locate: Identify the correct location based on your engine generation (Pre-2009: Top/Passenger Side; 2009+: Front/Driver Side).
- Replace: Use only a genuine OEM Mopar sensor to avoid PCM compatibility issues.
- Relearn: Perform the mandatory cam/crank relearn procedure with a bi-directional scan tool to synchronize the new sensor.
Skipping any of these steps will likely result in a persistent Check Engine Light and continued frustration. By following this data-driven guide, you can confidently solve the root cause of your P0340 or P0344 code.
Frequently Asked Questions (FAQs)
Q: How many camshaft sensors does a 5.7 Hemi have?
A: The 5.7 Hemi has one camshaft position sensor. As a single-cam-in-block (pushrod) engine, it only has one camshaft to monitor. Do not confuse the single CMP sensor with the VVT solenoids (on 2009+ models), which are separate components.
Q: Can I drive my Ram 1500 with a bad 5.7 Hemi cam sensor?
A: It is not recommended. While the truck may still run, it will be in a fail-safe mode with reduced power, poor acceleration, rough idle, and potential stalling. Stalling in traffic is a significant safety hazard.
Q: Why does my truck still show a P0344 code after replacing the cam sensor?
A: This is a very common problem with two likely causes:
- You used an aftermarket sensor. The Hemi’s PCM is notoriously sensitive and often rejects non-OEM sensors, causing the code to return.
- You did not perform the cam/crank relearn. The PCM is detecting a mismatch between the new sensor’s signal and the old sensor’s stored profile, logging it as a fault.
Q: What is the difference between the P0340 and P0344 codes?
A: P0340 (“Circuit Malfunction”) is a hard or continuous fault, suggesting the sensor is completely dead or unplugged. P0344 (“Circuit Intermittent”) means the signal is dropping out.13 For a P0344, you should always inspect the wiring harness and connector for corrosion or damage before replacing the sensor.
Q: Will a bad cam sensor cause a “crank no start” condition?
A: Usually, a bad cam sensor causes a “long crank” or “hard start,” not a “no start”.1 A “crank no start” condition (where the engine turns over but never fires) is the classic symptom of a failed crankshaft position sensor (CKP), as the PCM has no RPM signal.