2000 Chevy Silverado Fuse Box Diagram: 2026 Troubleshooting Guide

The 2000 Chevy Silverado utilizes two primary fuse centers: the instrument panel block (driver-side dashboard) and the under-hood block (engine bay). Refer to the interior lid labels for circuit mapping. Pinouts identify power distribution to the ECU and OBD-II port; verify circuit integrity using a multimeter at specific fuse terminals.
📌 Key Takeaways
- The under-hood fuse block manages high-amperage circuits, typically ranging from 20A to 60A for major engine components.
- Verify the Mini-Fuse integrity using a digital multimeter; continuity tests are more accurate than visual inspections alone.
- Always adhere to factory specifications: tighten fuse block mounting hardware to 89 lb-in torque to prevent loose connections.
- Corrosion on the fuse box underside is a primary failure point, often causing intermittent ECU signal loss or sensor errors.
- Professional diagnostics are required if the OBD-II port lacks power, as this often indicates a deeper wiring harness short.
The GMT800 platform, specifically the 2000 Chevy Silverado, is renowned for its robust powertrain, yet it remains susceptible to the complex electrical gremlins typical of high-mileage light-duty trucks. Whether you are troubleshooting a parasitic draw or a malfunctioning ECU, understanding the distribution of electrical power is foundational. The 2000 Chevy Silverado fuse box diagram serves as the primary map for identifying circuits that govern essential systems, from the diagnostic port to the instrument cluster. Precise identification of these nodes is vital before performing invasive diagnostics, such as monitoring coolant flow sensors or checking oil pressure switch circuits, to prevent further damage to the vehicle’s electrical architecture.

Prime for Young Adults — 6 Months Free
Students and 18–24s get six months of Prime free, then half price.
Start 6 Months Free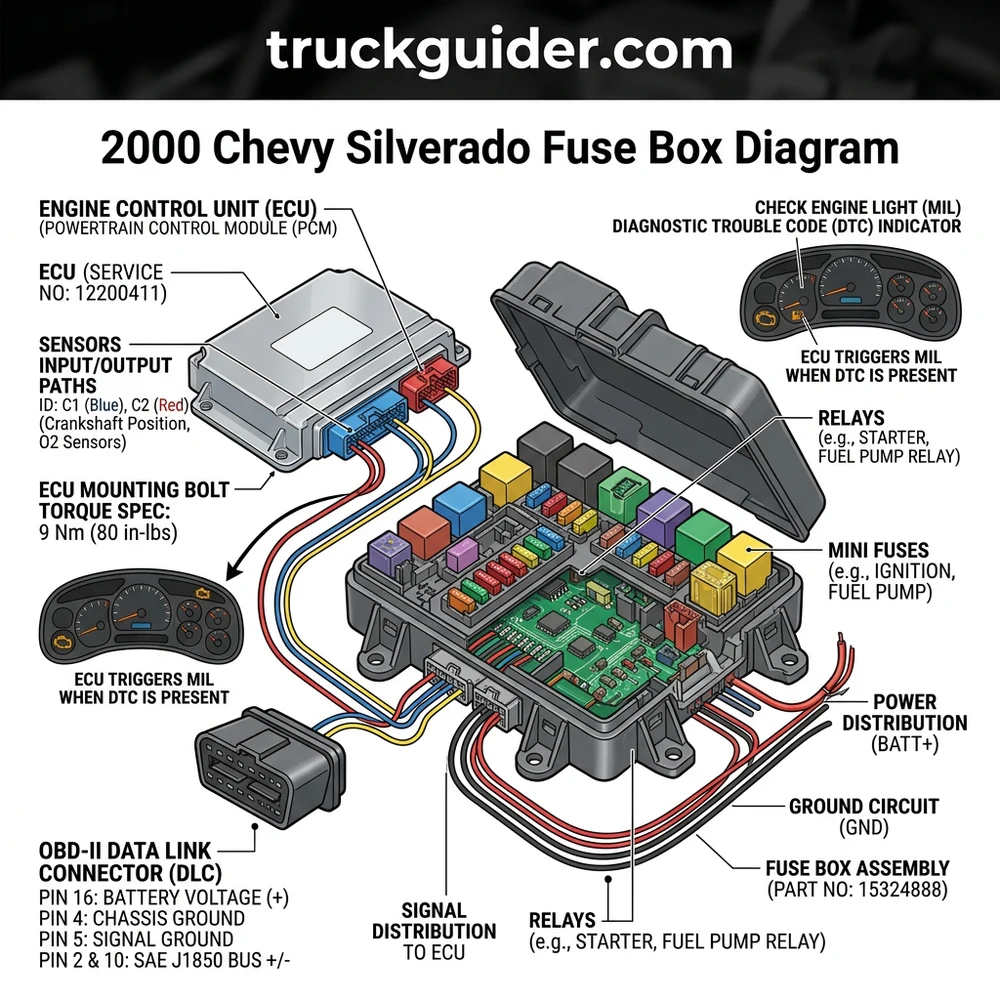
Locating the 2000 Chevy Silverado Fuse Box Diagram Components
Recommended Best Deal Products


Effective electrical diagnostics on the 2000 Chevy Silverado require navigating two distinct power distribution centers. The first, the Instrument Panel (IP) Fuse Block, is located on the driver-side edge of the dashboard. To access this, you must open the driver’s door and pry off the plastic cover that remains flush with the door jamb when closed. This block is primarily responsible for low-amperage, interior-related circuits, including the radio, instrument cluster, and power accessories. When scanning for a diagnostic code via the OBD-II port, the power for the scan tool interface often draws from the lighter or auxiliary fuse located within this specific panel.
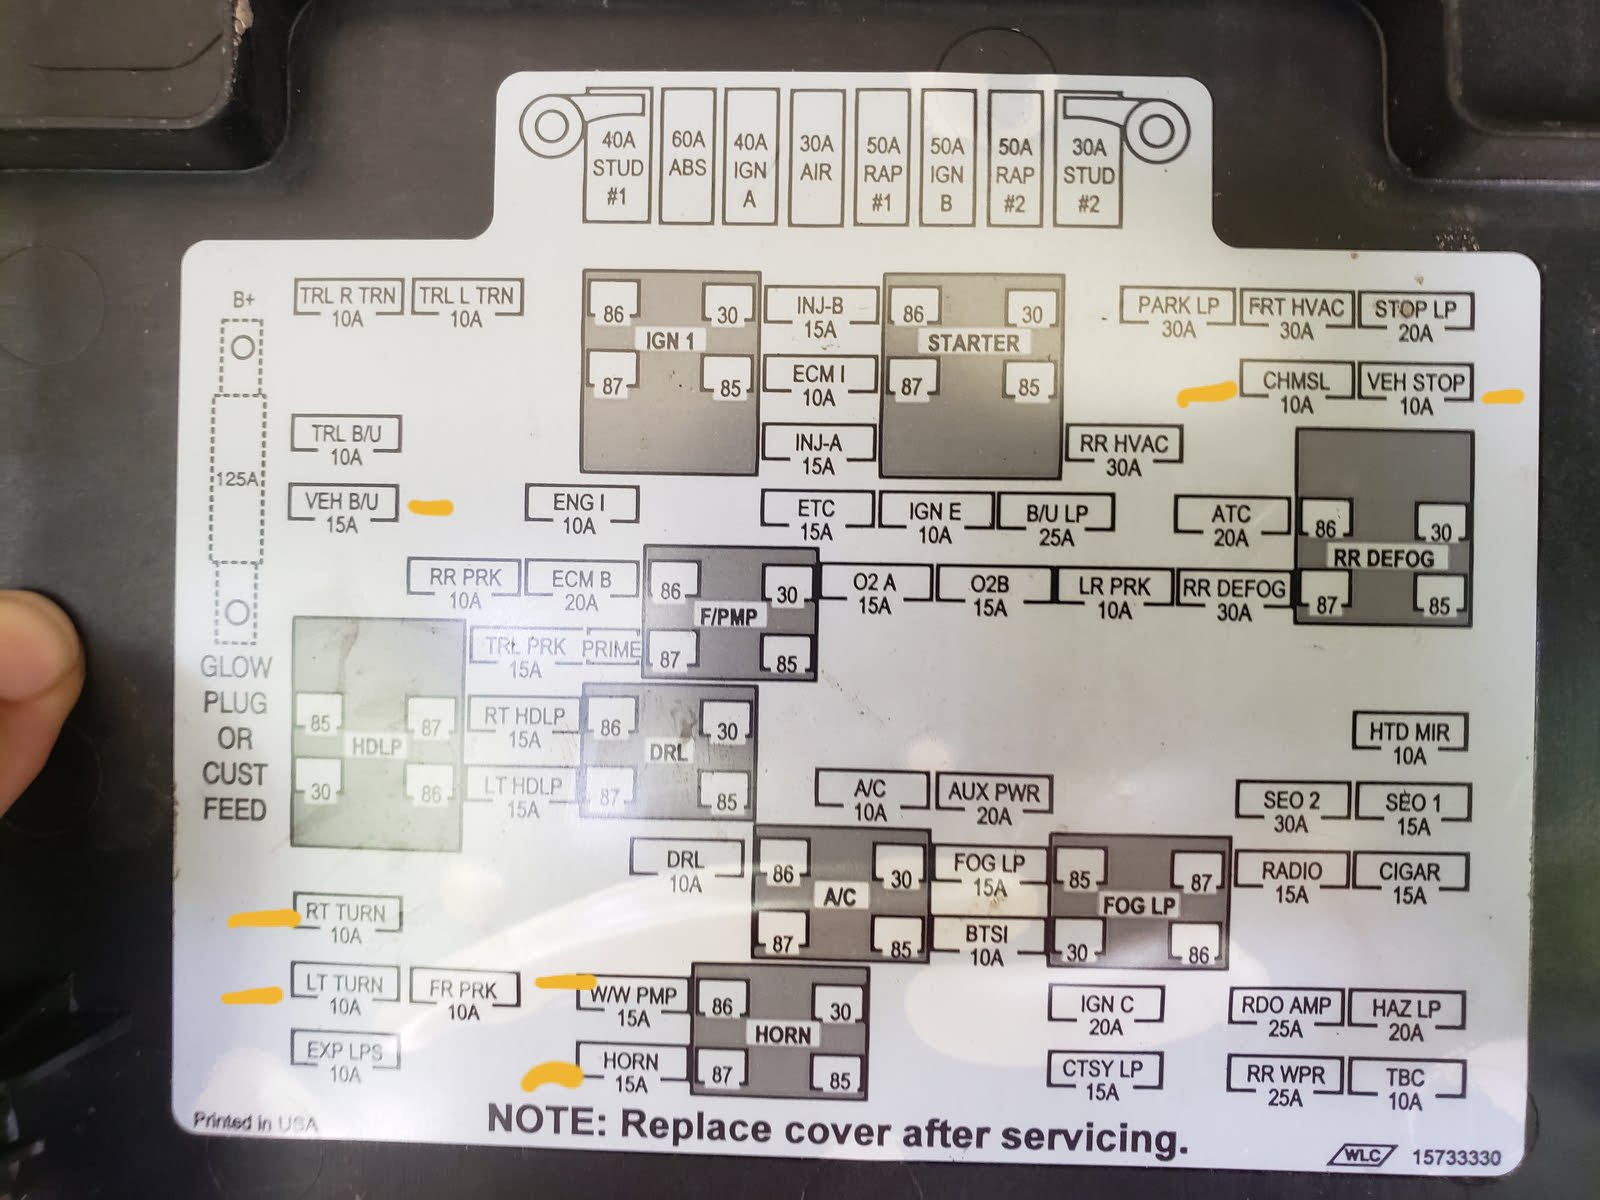
The second, and more critical, location is the Underhood Electrical Center, situated in the engine bay on the driver-side fender well. This center houses the high-amperage blade-style fuses and large relays responsible for major engine management systems. This is the nerve center for the truck’s operational health. It powers the fuel pump, cooling fan relays, and, crucially, the ECU. If your engine cranks but fails to start, this is your first point of inspection.
The relays contained within these boxes are electromagnetic switches that handle high-current loads, protecting the ignition switch from excessive thermal stress. You should observe the layout of these relays closely against the provided 2000 Chevy Silverado fuse box diagram, as identical relay housings often contain different internal pin configurations. Always ensure that when replacing a relay, the part number matches the OEM specification; using a generic relay with a different internal resistance value can cause the ECM to trigger a false diagnostic code or, in worse scenarios, lead to a localized circuit fire.
On GMT800 chassis vehicles, ensure the ignition is in the OFF position before pulling any fuses or relays from the Underhood Electrical Center. Failure to do so can result in voltage spikes that may damage the ECU or sensitive cabin modules.
Identifying Common 2000 Chevy Silverado Electrical Failures
Electrical failure in the 2000 Chevy Silverado often manifests as intermittent performance issues. Many owners wrongly suspect a worn timing chain or a failing oil pressure sensor when the real culprit is a oxidized terminal within the fuse block.
Illuminated check engine light: If you retrieve a code related to sensor reference voltage, inspect the fuses labeled IGN or ECM within the Underhood Electrical Center.
Instrument Cluster Blackout: This is frequently linked to a failing connection at the BCM (Body Control Module) or a blown fuse in the IP block.
Persistent Parasitic Draw: If your battery dies overnight, verify the relay states. A stuck relay for the HVAC or accessory power can leave components energized despite the ignition being off.
Erratic Coolant Flow or Temperature Readings: If your temp gauge is non-responsive, the circuit might be open due to a blown fuse protecting the sensor loop, rather than a failure of the coolant pump itself.
The BCM acts as a gateway for communication between the OBD-II port and the vehicle’s various modules. If you cannot establish a connection with your scanner, the issue may not be the scan tool, but a blown fuse providing power to the data link connector. Consult your Owner’s Manual in conjunction with the 2000 Chevy Silverado fuse box diagram to ensure you are checking the correct circuit path for the specific system failure. Remember that corrosion is a common failure point for these trucks; if a fuse appears intact but shows zero continuity, check for green or white oxidation on the blade contacts.
How to Diagnose and Test 2000 Chevy Silverado Fuses
Recommended Best Deal Products


Diagnostic accuracy relies on systematic testing. Do not rely on visual inspection alone, as blade-style fuses can develop micro-fractures that are not visible to the naked eye. To perform a test, set your multimeter to the continuity (ohms) setting.
1. Isolate the suspect circuit: Identify the specific amperage and function of the fuse using the 2000 Chevy Silverado fuse box diagram.
2. Physical removal: Use a fuse puller tool to extract the blade-style fuse. Do not use needle-nose pliers if possible, as they can mar the fuse terminals, leading to a loose fit upon reinstallation.
3. Continuity testing: Touch your multimeter probes to the two small exposed metal tabs on the top of the fuse. If the meter emits a beep or shows a value near zero ohms, the fuse is functional. An OL (Open Loop) reading indicates a blown circuit.
4. Load checking: If the fuse is good but the circuit is dead, use a test light connected to a known chassis ground. Probe the back of the fuse socket while the ignition is in the ON position. If the light does not illuminate, you have an upstream power supply failure, likely a faulty relay or an open wire in the harness.

Audible — Listen Free for 30 Days
One free credit a month and thousands of titles included.
Listen Free for 30 DaysWhen replacing fuses, you must maintain the specified amperage. Inserting a fuse with a higher amperage rating than the circuit was engineered for is a significant fire hazard. The wire gauge is specifically sized to the fuse rating; increasing the fuse size could cause the wire insulation to melt before the fuse blows. Always maintain the manufacturer’s torque spec if you are securing any grounding straps near the fuse block, as loose grounds can cause significant voltage drops across the entire distribution network.
Never attempt to bridge a blown fuse with metal wire or foil. This bypasses the safety mechanism intended to protect the ECU and other expensive electronics from current surges, which can lead to permanent component destruction.
Reference Table for 2000 Chevy Silverado Fuse Ratings
The following reference table outlines common circuit types found within the GMT800 electrical architecture. Ensure you verify these against the specific trim level of your 2000 Chevy Silverado, as optional equipment like power seats or trailer towing packages will modify these requirements.
| Circuit Name | Fuse Type | Typical Amperage |
|---|---|---|
| ECM/PCM (Engine Control) | Blade (MINI) | 15A |
| Fuel Pump | Blade (J-Case/Maxi) | 20A |
| Ignition Switch | Blade (Maxi) | 40A |
| OBD-II Data Link | Blade (MINI) | 10A |
| Cooling Fan | Maxi-Fuse | 50A |
This table serves as a baseline for troubleshooting. If you find a component consistently blowing its assigned fuse, do not simply replace it with a higher-rated fuse. This is indicative of a short-to-ground in the wiring harness or a component pulling excessive current. Check the harness for chafing, particularly near the intake manifold and the frame rails, which are common wear areas.
2000 Chevy Silverado Fuse Box Diagram Questions Answered
Recommended Best Deal Products


Can a blown fuse cause a false oil pressure light?
Yes. The oil pressure sensor sends a variable voltage signal back to the gauge cluster. If the gauge cluster or the ECU is not receiving consistent power due to a failing fuse connection or a corroded relay in the Underhood Electrical Center, it may default to a “no pressure” state. Always check the electrical integrity of the cluster supply before replacing mechanical components like the oil pressure sending unit.
How do I identify if the relay or the fuse is causing my engine no-start?
Using a voltmeter, check for voltage on both sides of the fuse. If you have battery voltage on both sides, the fuse is intact. Then, move to the relay. You should hear an audible “click” when the ignition is turned to the “ON” position. If no click is heard, the relay coil may be open, or it is not receiving the trigger signal from the ECU. Refer back to the 2000 Chevy Silverado fuse box diagram to ensure you are testing the fuel pump relay specifically.
Why does my diagnostic scan tool fail to power up?
The OBD-II diagnostic port in a 2000 Silverado is protected by the same fuse that powers the interior cigarette lighter or auxiliary power outlet. If you have a blown lighter fuse, your scan tool will likely not receive the 12V supply required to boot. Check the Instrument Panel fuse block for a 10A or 15A fuse labeled “CIG” or “AUX.”
Are there different diagrams for the 4.8L, 5.3L, and 6.0L engines?
While the physical layout of the Underhood Electrical Center is consistent across the GMT800 platform, certain fuse and relay assignments vary depending on engine options and factory-installed towing packages. Always verify the diagram printed on the inside of your fuse box cover, as this is the most accurate reflection of your specific truck’s wiring configuration at the time of assembly.
Audible Premium Plus — Annual Membership
12 audiobook credits up front, plus the full Audible catalogue.
See Annual PlansIf you are working on the electrical harness, standard automotive copper wire replacement should match the original gauge (AWG). Use high-quality heat-shrink butt connectors to prevent future corrosion in the engine bay environment.
Step-by-Step Guide to Understanding the 2000 Chevy Silverado Fuse Box Diagram
Identify – Locate the specific fuse panel corresponding to the failing circuit using the provided diagram.
Locate – Remove the protective plastic cover from the under-hood or instrument panel fuse box.
Reference – Match the suspect component to the legend to find the correct fuse number and relay position.
Connect/Route – Use a multimeter to verify voltage across the test ports on top of the fuses to ensure proper power flow.
Verify – Clear any stored diagnostic code using an OBD-II scanner and check if the check engine light remains off.
Troubleshoot – If power is absent at the fuse, inspect the under-box wiring harness for signs of heat damage or loose pins.