2006 Chevy Silverado Belt Diagram: Proper Routing (2026)

For the 2006 Chevy Silverado (4.8L, 5.3L, 6.0L V8), route the main serpentine belt around the crankshaft, under the water pump, up over the alternator, around the power steering pump, and over the idler pulley. Rotate the 15mm belt tensioner clockwise to slip the belt over the tensioner pulley.
📌 Key Takeaways
- Main serpentine drive belt requires a 15mm socket rotated clockwise to relieve spring tensioner pressure.
- Equipped with two belts: primary serpentine for alternator/water pump/PS and a lower 4-rib belt for the A/C compressor.
- Belt length varies by alternator rating: 93.0 inches (6PK2362) for 105/130-amp; 93.5 inches (6PK2375) for 145/160-amp.
- Most common failure points are seized idler pulley bearings and fatigued tensioner damping springs.
- DIY-friendly project requiring basic hand tools; professional service needed if crankshaft pulley wobbles or separates.
The 2006 Chevrolet Silverado represents the culmination of General Motors’ GMT800 platform, featuring an accessory drive architecture designed for extreme duty cycles. Whether servicing a work-truck Vortec 4.3L V6, a high-volume Gen III small block (4.8L, 5.3L, or 6.0L), or a heavy-duty 6.6L Duramax turbo-diesel, routing the serpentine system correctly is critical to maintaining proper component rotation, charging output, and thermal regulation. Misinterpreting a belt routing path can lead to water pump reversal, rapid edge cord wear, or immediate mechanical failure of the dynamic tensioner assembly. This guide provides exact pulley layouts, component designations, OEM dimensional specifications, and field-tested installation procedures for professional technicians and experienced mechanics servicing the 2006 Silverado platform.
2006 Chevy Silverado Belt Diagram by Engine Configuration


The front-end accessory drive (FEAD) layout on the 2006 Silverado varies fundamentally based on engine displacement and chassis payload class. GM engineered two distinct philosophies for this model year: a split dual-belt system on small-block V8 powerplants and single-belt serpentine runs on V6 and diesel applications.


Vortec 4.8L, 5.3L, and 6.0L Gen III V8 Dual Belt System


The Gen III V8 family (RPO codes LR4, LM7, L59, L33, LQ4, and LQ9) utilizes a dual-belt configuration that isolates the air conditioning compressor on an independent secondary drive. The primary serpentine belt drives the alternator, water pump, and power steering pump, while an inner, dedicated 4-rib belt drives the A/C compressor directly from an isolated rear groove on the harmonic balancer.
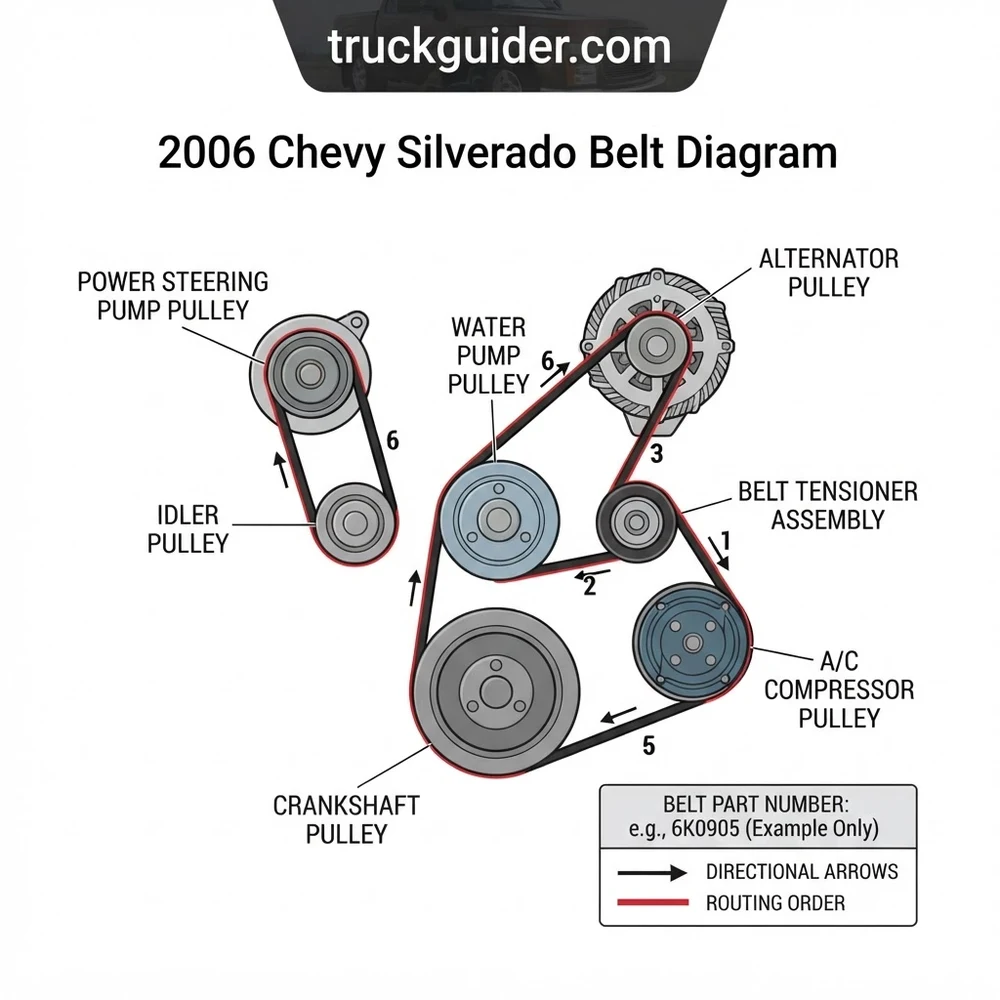
As shown in the primary pulley diagram, the main 6-rib belt routing path begins at the top outer face of the crankshaft pulley. The belt travels upward, looping counter-clockwise around the grooved water pump pulley, running across the smooth top of the water pump housing, up and over the ribbed alternator pulley located on the high driver-side accessory bracket. From the alternator, the belt drops down and wraps around the ribbed power steering pump pulley, runs under the grooved dynamic belt tensioner pulley located on the passenger cylinder head, travels over the smooth idler pulley positioned near the intake manifold centerline, and returns to the crankshaft. Understanding this path prevents reversing water pump impeller rotation, which causes instant thermal runaway.
Vortec 4.3L V6 Single Serpentine Belt Routing Path
Unlike the V8 family, the 4.3L Vortec (LU3) utilizes a single continuous 6-rib serpentine belt to run all engine accessories, including the air conditioning compressor. The belt leaves the grooved crankshaft pulley and routes directly up to the grooved water pump pulley. From the water pump, it routes over the top-mounted power steering pump and alternator, across an upper smooth idler pulley, down to the low-mounted passenger-side A/C compressor, and engages the dynamic spring-loaded belt tensioner before completing the circuit back to the crank. Because all accessories share this single friction drive, tensioner damping and pulley bearing runout must be inspected thoroughly during maintenance cycles.
Duramax 6.6L Diesel (LBZ and LLY) Accessory Drive Layout
Heavy-duty 2006 Silverado 2500HD and 3500 models equipped with the 6.6L Duramax diesel (eighth digit of VIN matching “D” for LBZ or “2” for late LLY) feature a robust 8-rib serpentine drive engineered to manage high torsional crankshaft spikes. Standard single-alternator diesel configurations route the 8-rib belt from the multi-groove crankshaft damper over the dual-bearing dynamic belt tensioner, around the high-output alternator, over an upper idler pulley, around the power steering pump, across the massive water pump hub, and around the air conditioning compressor. Fleet and emergency vehicles equipped with the dual-alternator option (RPO 8X2) run a modified belt routing path incorporating a secondary upper idler pulley to wrap the secondary passenger-side alternator without compromising surface arc contact on the primary charging unit.


On Gen III V8 engines, you cannot remove or install the inner A/C compressor belt without first removing the outer primary serpentine belt. Always inspect the inner belt for thermal micro-cracking even if you are only executing a primary belt replacement.
2006 Chevy Silverado Belt Part Numbers and Size Reference Guide


Accurate belt dimensioning on the 2006 Silverado depends heavily on the alternator amperage rating specified on the vehicle build sticker (located inside the glove box). GM fitted either a standard 105-amp unit (RPO KG8) or an optional high-output 145-amp / 160-amp unit (RPO KG3 or KW1). The higher-output alternators feature a larger casing diameter, shifting the center point of the alternator pulley outward and demanding a longer effective belt length. Installing a 105-amp belt on a 145-amp charging system will bottom out the dynamic tensioner arm against its stop, generating excessive lateral bearing loads and premature front pump seal failure.
| Engine & Application | GM OEM Belt Part Number | Aftermarket Part (Gates / Dayco) | Belt Size & Rib Count | Application Notes |
|---|---|---|---|---|
| 4.8L / 5.3L / 6.0L V8 Main | 12576447 | K060923 / 5060923 | 6-Rib; 92.3″ (2344 mm) | Standard 105-Amp Alternator (KG8) |
| 4.8L / 5.3L / 6.0L V8 Main | 12587570 | K060930 / 5060930 | 6-Rib; 93.0″ (2362 mm) | High-Output 145A/160A Alternator (KG3/KW1) |
| 4.8L / 5.3L / 6.0L V8 A/C | 12576444 | K040378 / 5040378 | 4-Rib; 37.8″ (960 mm) | Dedicated Lower Compressor Drive |
| 4.3L V6 Serpentine | 12576449 | K060950 / 5060950 | 6-Rib; 95.0″ (2413 mm) | Single Belt System with A/C |
| 6.6L Duramax Diesel | 97300649 | K081195 / 5081195 | 8-Rib; 119.5″ (3035 mm) | Single Alternator LBZ/LLY Engine |
| 6.6L Duramax Diesel | 97329618 | K081298 / 5081298 | 8-Rib; 129.8″ (3297 mm) | Dual Alternator Option (RPO 8X2) |
When selecting a replacement belt, verifying the belt part number via the Service Parts Identification (SPID) label ensures factory alignment. Cross-referencing against our technical specifications prevents the typical half-inch sizing errors that plague field replacements. If you are also executing an electrical system overhaul, review our technical guide on alternator amperage upgrade specs to match charging capacity with your exact FEAD pulley center-to-center distances.
Do not force a standard 92.3-inch belt onto a 145-amp alternator configuration. Forcing an undersized belt over the alternator pulley lip shears the internal tensile cords, which causes catastrophic belt delamination at highway operating speeds.
Step-by-Step 2006 Chevy Silverado Belt Routing and Installation

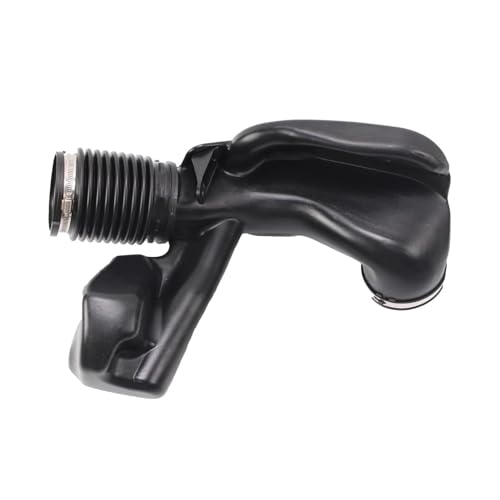

Executing a belt replacement on the 2006 Silverado requires systematic routing across alternating smooth and grooved surfaces. Ensure the ignition is disabled, the transmission is set to Park, and the engine is cool to the touch prior to beginning service.


- Clear the Upper Fan Shroud: Disconnect the negative battery terminal using an 8mm wrench. On models with mechanical clutch fans, unclip the upper radiator fan shroud halves by disengaging the plastic locking push-pins. Lift the upper half straight out to expose the accessory drive plane and water pump pulley.
- Relieve Primary Belt Tension: Locate the main drive dynamic belt tensioner on the passenger-side upper cylinder head bracket. Position a 15mm long-handle box wrench or dedicated serpentine belt tool onto the cast pulley hex bolt. Rotate the tensioner clockwise (toward the driver side) against internal spring pressure. Slip the slackened belt off the smooth water pump pulley first, then slowly release the tensioner arm back to its resting stop.
- De-thread and Extract the Serpentine Belt: Unthread the belt from around the upper idler pulley, the alternator pulley, the power steering pump pulley, and finally drop it clear of the lower crankshaft pulley (harmonic balancer). Carefully maneuver the belt around the fan blades one by one if the fan clutch remains mounted to the water pump hub.
- Remove the Dedicated A/C Belt (Gen III V8 Only): Locate the dedicated A/C belt tensioner on the lower passenger side of the engine block. Insert a 3/8-inch drive ratchet or breaker bar directly into the square drive aperture cast into the tensioner body. Rotate the tensioner arm clockwise to relieve spring force, slide the 4-rib belt off the compressor pulley, and slide it off the inner groove of the harmonic balancer. Inspect the balancer face for rubber elastomer separation; if radial runout exceeds 0.015 inches, perform our step-by-step harmonic balancer replacement procedure before installing new belts.
- Route the New A/C Compressor Belt: Feed the new 4-rib OEM belt over the outer crank pulley and seat it fully into the inner 4-groove track of the harmonic balancer. Wrap the lower run around the grooved A/C compressor clutch pulley. Rotate the lower tensioner clockwise, slip the belt under the smooth tensioner pulley face, and ease the tensioner back until dynamic contact is established.
- Thread the Primary Serpentine Belt: Begin threading the new 6-rib belt around the outer tracks of the lower crankshaft pulley. Work upward:
- Run the driver-side span down and fully around the grooved power steering pump pulley.
- Pull that segment directly upward and wrap it tightly around the grooved alternator pulley.
- Route the span coming from the passenger side of the crank pulley up and under the ribbed dynamic tensioner pulley.
- Loop the belt over the upper smooth idler pulley situated between the alternator and water pump brackets.
- Engage the Dynamic Tensioner for Final Slip-Fit: Verify that all belt ribs are perfectly nested inside the corresponding grooves on the crank, alternator, power steering, and tensioner pulleys. Rotate the main dynamic tensioner fully clockwise using your 15mm tool. Slip the smooth back of the belt over the flat, non-grooved surface of the water pump pulley. Release the tensioner slowly to seat the system.
- Inspect Final Pulley Rib Alignment: Use an inspection mirror and shop light to examine every grooved interface. A single rib running off the shoulder of the power steering pump or crankshaft pulley will shear off immediately upon engine crank. Reinstall the radiator fan shroud and secure all retaining clips.
Accessory Bracket & Pulley Torque Values:
• Dynamic Belt Tensioner Assembly Bolts: 37 lb-ft (50 N·m)
• Smooth Idler Pulley Retaining Bolt: 37 lb-ft (50 N·m)
• Power Steering Pump Mounting Bolts: 18 lb-ft (25 N·m)
• Water Pump Housing-to-Block Bolts: 11 lb-ft (15 N·m) first pass, 22 lb-ft (30 N·m) final pass.
Belt Tensioner Operation and Dynamic Tension Adjustment on 2006 Silverado


The 2006 Silverado does not utilize manual adjusters, jackscrews, or manual deck engagement mechanisms to set drive tension. Instead, GM engineered constant-force mechanical tensioners that rely on internal flat-wound torsional springs damped by internal friction pucks. Understanding the mechanics of these assemblies is vital for correctly interpreting wear indicators and ensuring consistent power delivery across all driven accessories.
Main Serpentine Automatic Belt Tensioner Mechanics and Hex Drive Sizing


The primary belt tensioner on the Vortec V8 uses an aluminum casting containing a calibrated torsional spring that applies continuous outward pressure against the ribbed side of the belt. The tensioner pulley bolt features a standard 15mm right-hand thread; turning this bolt clockwise pivots the cast arm against internal spring resistance to unload the belt. The casting features three raised indicator notches on the pivoting arm and a stationary alignment mark on the base plate.
When an OEM belt of the correct length is installed, the stationary mark must fall squarely within the dynamic operating window defined by the two outer notches on the casting. If the stationary line aligns with or bypasses the maximum elongation limit notch, the internal spring has bottomed out, meaning the belt is permanently stretched or an oversized part number was installed. Conversely, if the line rests below the minimum installation notch, the belt is undersized, placing extreme radial strain on the alternator and water pump bearings.
A/C Secondary Belt Tensioner Cast Indicators and Travel Limits
The lower secondary A/C tensioner operates using an internal coil mechanism damped to counteract severe air conditioning compressor clutch engagement shocks. Rather than a hex-head bolt, the lower tensioner arm features an integrated 3/8-inch female square drive socket cast directly into the metal frame. Service technicians must insert a 3/8-inch breaker bar directly into this receiver to articulate the arm. Like industrial deck engagement mechanisms used on commercial equipment to establish positive friction under load, this automotive dynamic tensioner keeps static baseline tension steady while absorbing high-frequency engagement spikes when the A/C clutch magnetic coil energizes.


Inspect the tensioner pulley for lateral bearing runout. With the belt removed, spin the pulley by hand; any roughness, rattling, or free-spinning without viscous resistance indicates bearing grease breakdown. Under operating loads, a worn tensioner pulley tilts off-axis by fractions of a degree, inducing continuous belt squeal and accelerated rib wear.
Critical 2006 Chevy Silverado Pulley Diagram Pitfalls and Sizing Errors
Technicians frequently encounter subtle installation and component matching errors on the 2006 Silverado FEAD system that lead to unexplained overheating, charging dropouts, and catastrophic belt shredding.
Reverse-Rotation Water Pump Pulley Routing Errors
The most severe routing mistake on the Gen III V8 engine involves improperly running the belt over the water pump pulley. The Vortec water pump utilizes a reverse-rotation impeller driven entirely by the smooth back of the serpentine belt. If a technician incorrectly routes the belt under the water pump rather than over its crown, the ribbed side engages the smooth pulley face, spinning the impeller clockwise instead of counter-clockwise. This immediately halts coolant flow through the cylinder heads while the dash gauge remains temporarily stable, resulting in localized head warping and blown head gaskets within minutes of operation. If your cooling system exhibits immediate boiling after belt replacement, refer to our comprehensive cooling system flushing guide to inspect coolant flow patterns and check for localized vapor locks.
Alternator Case Offset and Idler Pulley Bearing Alignment
Another widespread pitfall involves installing an aftermarket alternator without verifying pulley offset and casing depth. Alternators fitted to the 2006 Silverado feature two different front-housing-to-pulley-flange depths depending on whether the unit is an AD230 (105-amp) or an AD244 (145-amp) platform. If an incorrect remanufactured unit is bolted to the cast aluminum bracket, the pulley grooves can sit approximately 3mm to 5mm out of plane relative to the harmonic balancer and upper idler pulley. This misalignment causes the belt ribs to scrub aggressively against the pulley walls, generating fine rubber powder across the front engine cover and causing the belt to jump a groove under heavy wide-open-throttle acceleration.
Furthermore, the upper smooth idler pulley (mounted high on the driver side of the center bracket) absorbs extreme lateral loads. Because it operates on the non-grooved side of the belt, technicians often overlook its bearing condition. If this bearing seizes, the static friction will melt through a synthetic EPDM belt in less than sixty seconds of run time, throwing shrapnel into the fan shroud and severing nearby electrical harnesses.
Frequently Asked Questions About the 2006 Chevy Silverado Belt Diagram
How do I know if my 2006 Silverado has a 105-amp or 145-amp alternator?


Open the passenger glove box and locate the white Service Parts Identification (SPID) label listing the vehicle’s three-digit RPO codes. Look through the alphabetical listing for “KG8” (standard 105-amp alternator), “KG3” (145-amp alternator), or “KW1” (160-amp alternator). Alternatively, inspect the physical alternator casing: the 105-amp unit measures roughly 135mm across the stator diameter and has a solid front face, whereas the 145-amp unit measures roughly 144mm across and features larger cooling vents and dual external bridge rectifiers.
Can I replace the main serpentine belt without removing the A/C belt on a 5.3L Silverado?
Yes. Because the primary serpentine belt operates on the front outer track of the crankshaft pulley, it can be unthreaded, removed, and installed without disturbing the inner air conditioning belt. However, the reverse is not true: to replace the dedicated lower A/C compressor belt, you must completely remove the outer serpentine belt from the front track first.
Why does my new serpentine belt chirp immediately after installation?
Immediate belt chirp on a 2006 Silverado is almost always caused by laser-measurable pulley misalignment rather than a defective belt. The most frequent culprit is the power steering pump pulley, which is pressed directly onto the pump shaft. If the pump was recently replaced, the pulley may not have been pressed flush with the end of the shaft using the proper Kent-Moore installation tool. A secondary cause is a worn steel idler pulley bearing that has developed axial play, allowing the pulley to tip forward under spring load.
How does dynamic automotive tensioning differ from deck engagement belt drives?
While auxiliary equipment and power-take-off decks often utilize a manual over-center lever or cable deck engagement mechanism to physically move an idler into the belt path to initiate drive contact, the Silverado relies exclusively on a constant dynamic tensioner. This automotive assembly uses an internal spring to self-adjust continuously across varying engine RPMs, thermal expansion states, and transient load spikes, requiring zero manual operator intervention once properly seated.
What is the recommended replacement interval for GM Vortec drive belts?


Modern EPDM (Ethylene Propylene Diene Monomer) belts specified for the 2006 Silverado do not crack like older neoprene compounds; instead, they slowly lose rib material through microscopic friction shedding. Belts should be checked every 30,000 miles using a specialized rib depth gauge and replaced comprehensively at 90,000 to 100,000 miles. Replace the belt immediately if you detect sidewall fraying, oil saturation from a leaking front crankshaft seal, or if rib depth loss exceeds 10% of factory specifications.