2018 Chevy Silverado 1500 Exhaust Diagram: Component Breakdown 2026

The 2018 Chevy Silverado 1500 exhaust system follows a path from the engine manifolds to the catalytic converters, oxygen sensors, muffler assembly, and tailpipe. Key components include the Y-pipe collector, flange gaskets, hangers, and the resonator. Ensure proper alignment of the catalytic converter inlet flanges for a leak-free seal.
📌 Key Takeaways
- The system utilizes a 3-bolt flange connection at the catalytic converter inlet requiring high-heat gasket seals.
- Oxygen sensor locations are pre-cat and post-cat; ensure proper indexing to avoid fuel trim errors.
- Muffler hangers must be lubricated with silicone spray to prevent rubber dry-rot and vibration during removal.
- Standard exhaust manifold bolt torque spec is 18 lb-ft; replace hardware if corrosion is visible to prevent snap-offs.
- Exhaust leaks near the manifold usually indicate a failed gasket or cracked collector flange, requiring immediate professional welding or replacement.
For technicians and advanced enthusiasts, the 2018 Chevy Silverado 1500 exhaust diagram represents a complex emissions management system critical for performance and compliance. Whether you are addressing an exhaust leak, troubleshooting a P0420 catalytic converter efficiency code, or performing a custom system upgrade, understanding the routing and component hierarchy is essential. This system features varied configurations depending on the 4.3L V6, 5.3L V8, or 6.2L V8 EcoTec3 engines. Precise identification of manifold-to-tailpipe geometry, including sensor placement and muffler bypass configurations, ensures proper repairs. This guide provides the technical blueprint required to service these systems safely and efficiently while maintaining structural integrity according to OEM standards.
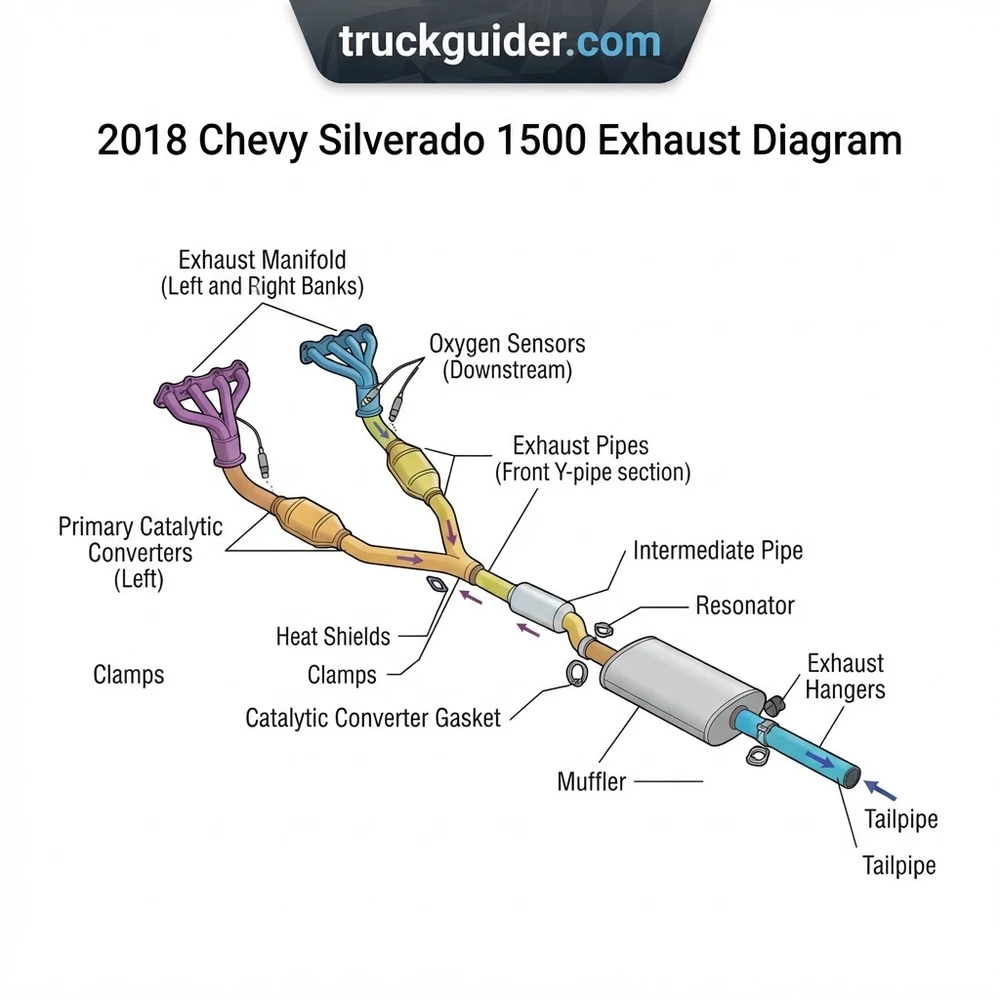
2018 Chevy Silverado 1500 Exhaust Diagram: Every Part Labeled
Recommended Best Deal Products


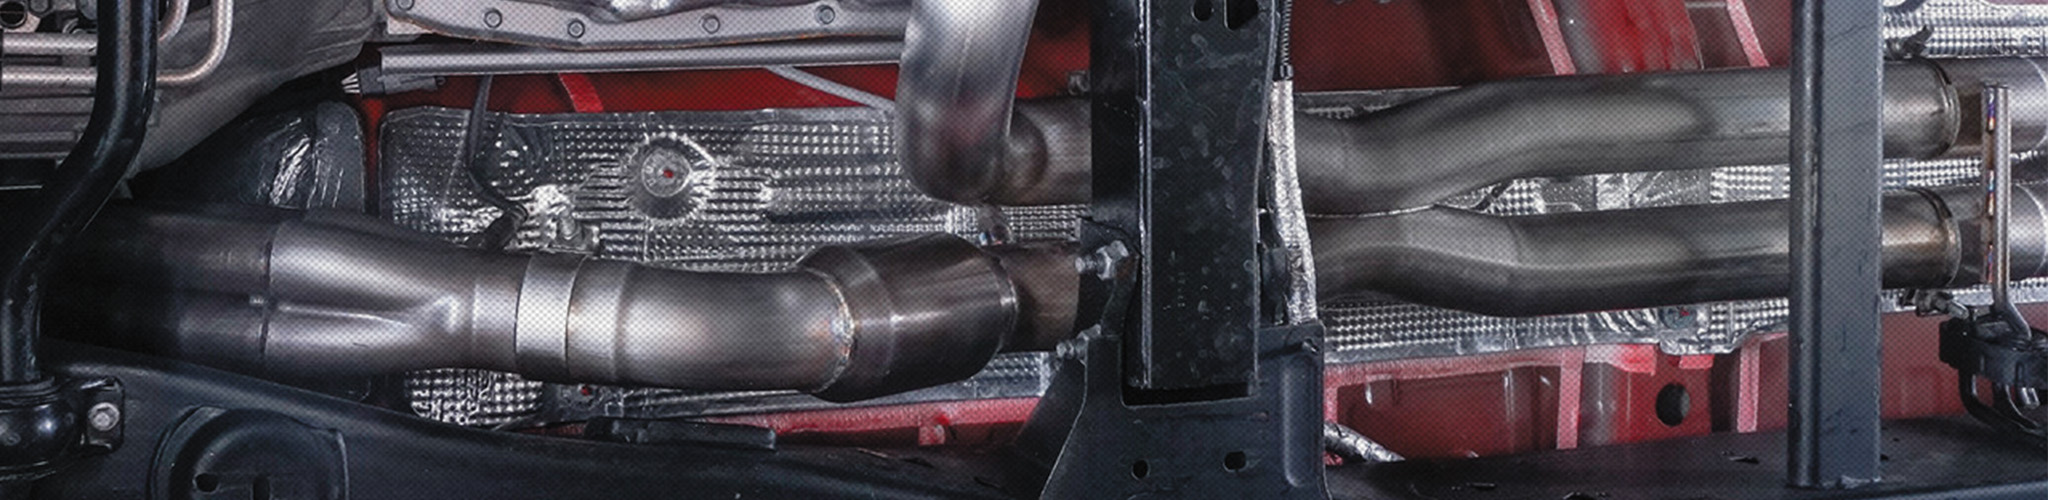
The exhaust architecture of the 2018 Silverado follows a modular construction designed for high flow and emissions control. Understanding the schematic begins at the cylinder head, where the cast iron exhaust manifolds serve as the primary collection point. These manifolds are secured with high-tensile bolts that frequently require heat induction for removal to prevent snapping in the cylinder head threads. Moving downstream, the system transitions to the downpipes, which house the primary catalytic converters. On V8 models, these are typically integrated into a Y-pipe configuration that balances pressure before reaching the mid-pipe.
A critical component for engine management shown in any accurate 2018 Chevy Silverado 1500 exhaust diagram is the Oxygen Sensor (O2) array. The Bank 1 and Bank 2 Sensor 1 units are located upstream of the catalytic converters, providing air-fuel ratio feedback to the Engine Control Module (ECM). Sensor 2 units, positioned downstream, monitor catalyst performance. Failure to correctly index these sensors or damaging the harness during exhaust removal is a common point of failure. These sensors utilize a zirconium dioxide element and require specific thread sealant or pre-applied anti-seize to ensure they can be serviced later.
Following the catalytic stage, the exhaust gas enters the intermediate pipe, which transitions into the muffler assembly. On stock configurations, the system utilizes a chambered muffler design engineered to cancel out low-frequency drone while maintaining acceptable backpressure. Depending on the wheelbase—be it the standard cab/short bed or the crew cab—the intermediate pipe length varies to accommodate the chassis configuration. Further along, the resonator sits before the tailpipe exit on specific trims to refine the sound profile. Finally, the tailpipe assembly terminates either behind the passenger rear wheel or directly out the rear bumper, depending on the Sport or Z71 off-road packages. Every junction point utilizes a multi-layer steel (MLS) gasket or a ball-and-socket flange, which relies on consistent torque specs to prevent carbon tracking and exhaust leaks.
When replacing any flanged connection, always replace the hardware with Grade 8 or stainless steel equivalents. OEM flanges often suffer from surface corrosion, which compromises the seal of new gaskets if not properly cleaned with a rotary wire brush.
2018 Chevy Silverado 1500 Exhaust Layout and Specifications

The 2018 Silverado powertrain options necessitate distinct exhaust configurations. The engineering team designed these systems to optimize torque curves specific to the 5.3L and 6.2L EcoTec3 engines. Below are the primary specifications regarding system layout and material tolerances for professional maintenance.
| Engine Displacement | Primary Piping Diameter | Exhaust Configuration |
|---|---|---|
| 4.3L V6 LV3 | 2.75 inch | Single Pipe, Single Exit |
| 5.3L V8 L83 | 3.00 inch | Single/Dual Exit Options |
| 6.2L V8 L86 | 3.50 inch | High-Flow Dual Configuration |
The 5.3L engine, the most common variant, typically employs a 3-inch main pipe. Upgrading to an aftermarket performance exhaust usually requires adherence to these baseline diameters to avoid inducing a loss of low-end torque—a direct result of decreased exhaust gas velocity. The 6.2L engine configuration utilizes a larger 3.5-inch diameter to accommodate higher cylinder pressures and mass airflow. Technicians must verify the vehicle’s RPO codes to ensure the exhaust replacement matches the factory emissions calibration, particularly when sourcing components for CARB-compliant states.
How to Service the 2018 Chevy Silverado 1500 Exhaust System
Recommended Best Deal Products


Servicing the exhaust on this chassis requires a methodical approach, specifically regarding rust mitigation and stress relief. Follow these steps to ensure a long-lasting, leak-free repair.
- Preparation and Safety: Elevate the vehicle on a certified two-post lift. Spray all manifold bolts and flange nuts with a high-grade penetrating catalyst. Allow 15 minutes of dwell time. Failure to treat these fasteners often leads to sheared bolts, which necessitates drilling and potentially removing the cylinder head.
- Sensor Removal: Disconnect all upstream and downstream O2 sensors before lowering any pipes. Use a dedicated 22mm oxygen sensor socket. If the sensor is seized, apply localized heat to the bung—not the sensor itself—to break the galvanic bond.
- Support the System: Before removing the exhaust hangers, use an adjustable jack stand to support the weight of the muffler and tailpipe assembly. Dropping the system suddenly can cause damage to the catalytic converter ceramic matrix due to shock or impact.
- Gasket Installation: When reinstalling flanges, use only OEM-grade MLS gaskets. Avoid silicone sealants, as these will contaminate the O2 sensor and cause premature failure. Torque all flange bolts in a cross-pattern to 35 lb-ft, then finalize to 45 lb-ft after a thermal heat cycle.
- Hanger Alignment: Ensure all rubber isolators are free of dry rot. If the tailpipe hits the hitch assembly, adjust the hanger tension by loosening the mid-pipe connection and rotating the system before tightening.
Exhaust Manifold Torque Specs: 18 lb-ft for initial tightening, 25 lb-ft final torque. Ensure engine block surface is clean of all debris to prevent gasket blowouts.
Common 2018 Chevy Silverado 1500 Exhaust Diagram Issues
The 2018 model year is prone to specific exhaust-related maladies that technicians should anticipate. The most frequent issue involves the deterioration of the heat shielding surrounding the catalytic converters. As these shields vibrate loose, they create a metallic, rattling sound, particularly at cold idle. This is often misdiagnosed as an internal converter failure. To fix this, inspect the welds and use stainless steel hose clamps to secure the shield firmly against the converter shell, ensuring it does not vibrate against other chassis components.
Another major failure point involves the O2 sensor wiring harness. Due to the high heat proximity of the exhaust manifold, the insulation on the O2 sensor pigtails can become brittle. If you receive a P0030 or P0135 code, verify the heater circuit voltage at the harness connector before replacing the sensor. You should observe 12V at the supply wire when the ignition is in the ‘Run’ position. If voltage is absent, inspect the fuse block in the engine compartment, as the sensor heating elements are protected by dedicated fuses that often trip during short-circuit events.
Exhaust leaks at the collector flange are also common, characterized by a persistent “ticking” noise that synchronizes with engine RPM. This indicates a failed gasket or a warped flange. If the leak persists after a new gasket is installed, use a precision straight-edge to verify the flatness of the mating surface. If the flange has warped beyond 0.005 inches, it must be machined or the component replaced entirely. For emissions-related testing, ensure the catalytic converter catalyst monitor is in the “Ready” state. If you recently disconnected the battery or cleared codes, the system requires a specific drive cycle—usually involving a combination of sustained highway driving and steady-state deceleration—to reset the emissions readiness monitors before the vehicle will pass a state inspection.
Never perform a “converter bypass” or use “test pipes.” These modifications violate federal emissions law and will trigger persistent OBD-II check engine light codes, preventing the vehicle from passing standard smog or emissions compliance testing.
2018 Chevy Silverado 1500 Exhaust Diagram Questions Answered
Recommended Best Deal Products


What are the primary differences in the exhaust diagram for the 4.3L versus the 5.3L?
The primary difference lies in the collector design. The 4.3L V6 system utilizes a single-bank manifold merge that enters a smaller diameter downpipe. The 5.3L V8 uses a true dual-bank setup that merges into a Y-pipe, requiring a different catalytic converter orientation and intermediate pipe length to accommodate the increased exhaust gas volume.
How do I identify a faulty O2 sensor versus a catalytic converter failure?
Utilize a professional-grade scan tool to monitor the “Oxygen Sensor Voltage” data stream. A functioning sensor will toggle between 0.1V and 0.9V. If the downstream sensor (Sensor 2) mimics the fluctuating waveform of the upstream sensor (Sensor 1), the catalytic converter is failing to process exhaust gases correctly. If the voltage is flat-lined at 0V or 0.45V, the sensor itself is likely the culprit.
Is it possible to replace just the muffler without changing the whole system?
Yes, the factory system is modular. You can cut the pipe behind the muffler and use a sleeve-style exhaust clamp to install a replacement. However, ensure the replacement muffler has the same inlet/outlet diameter as the factory pipe (typically 3 inches for a 5.3L) to maintain proper backpressure and avoid tuning issues.
What causes the persistent “ticking” noise near the engine bay?
This is almost always an exhaust manifold gasket leak. On the 2018 Silverado, the rear-most manifold bolts are subject to thermal expansion that can cause them to loosen or snap over time. Inspect the bolts for soot deposits; if the area around the bolt head is black, the seal has failed and the gasket must be replaced.
Proper maintenance of the 2018 Chevy Silverado 1500 exhaust system is vital for engine longevity and performance. By following the factory schematics and utilizing the correct torque specifications, technicians can effectively resolve common exhaust leaks, sensor malfunctions, and structural failures. Always prioritize OEM-spec components to avoid long-term emissions compliance issues and maintain the integrity of your Silverado’s powertrain.
Step-by-Step Guide to Understanding the 2018 Chevy Silverado 1500 Exhaust Diagram
Identify – Locate the exhaust path underneath the chassis, starting from the manifold collectors.
Locate – Confirm the position of all O2 sensors and heat shields to avoid damaging them during service.
Reference – Cross-reference the diagram to verify the orientation of flange gaskets and bolt patterns.
Connect/Route – Align the exhaust segments and install hangers into the rubber isolators to ensure proper stress relief.
Verify – Torque all flange bolts to manufacturer specifications and perform a leak test using a soapy water spray while the engine is cool.
Troubleshoot – If exhaust noise persists, check for manifold gasket leaks or loose hardware identified in the layout guide.