1999 Chevy Silverado Fuse Box Diagram: Layouts, GMT800 Variants, and Diagnostics Mapped Out

Locating the 1999 Chevy Silverado fuse box diagram is the most effective way to troubleshoot electrical failures, from flickering headlights to non-functional power windows. Whether you are dealing with a blown accessory fuse or a complex relay issue, having accurate information prevents unnecessary diagnostic costs. This guide provides the essential details for identifying your vehicle’s specific electrical layout.

How to Read This Chart
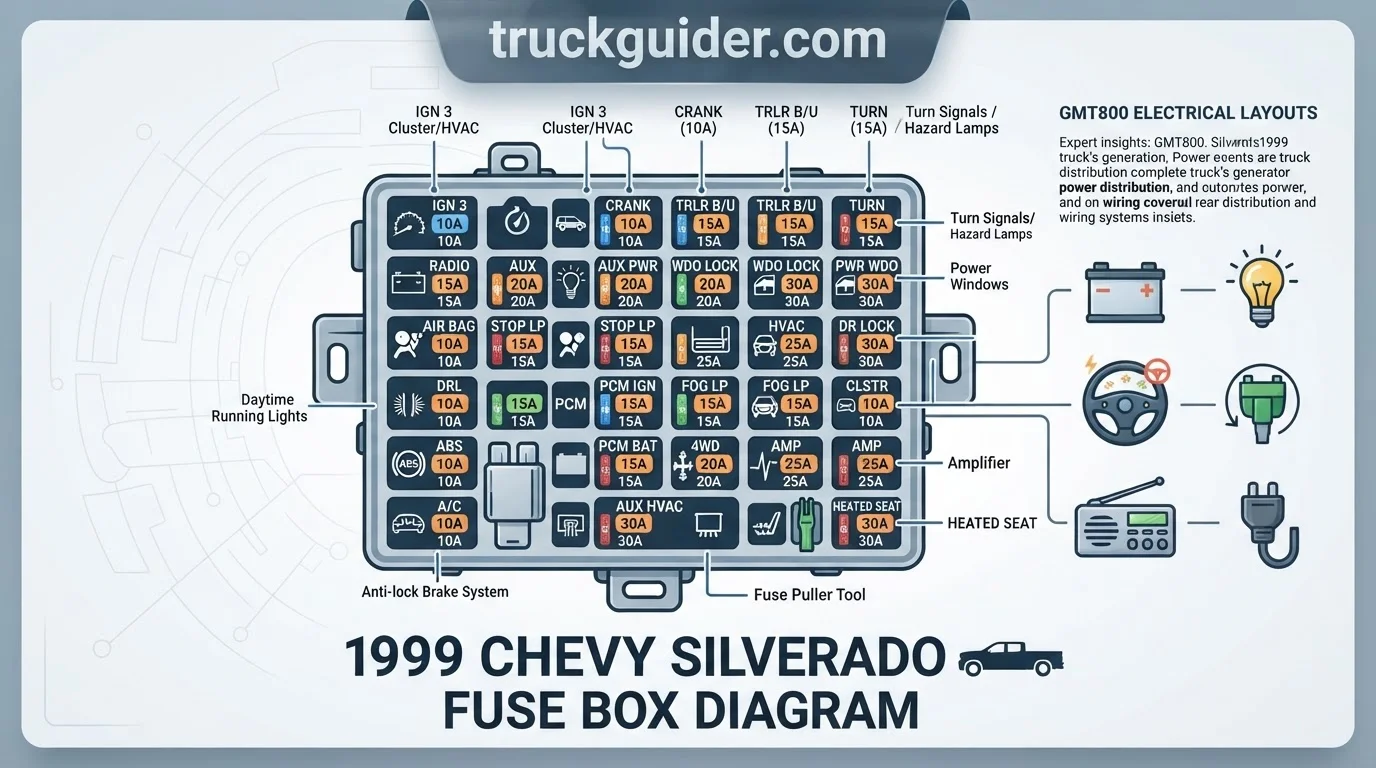
The chart above outlines the two distinct electrical zones found in the 1999 Silverado. The “Instrument Panel” block is accessible by opening the driver’s side door and removing the side dash cover. This panel manages low-amperage interior systems.

The “Underhood Electrical Center” is located on the driver’s side of the engine bay, protected by a black plastic cover. This box contains high-amperage fuses and relays essential for engine operation, such as the fuel pump, ignition system, and cooling fans. Always consult your specific trim-level manual for exact circuit assignments, as optional equipment like tow packages can modify individual slot layouts.
Essential Facts About the 1999 Chevy Silverado Fuse Box Diagram
Recommended Best Deal Products


Understanding the 1999 Chevy Silverado fuse box diagram requires recognizing that General Motors utilized a standardized platform for the first-generation Silverado. These diagrams are critical insights for owners because they define the electrical health of the truck. Fuses act as the primary defense against circuit overloads and potential fire hazards.

When you examine the diagram, you will notice different color-coded fuses. Each color corresponds to a specific amperage rating, such as 10A (red), 15A (blue), 20A (yellow), and 30A (green). Never replace a blown fuse with a higher-rated one, as this creates a significant risk of melting the wiring harness if a short-circuit occurs.
Diagnostic Details: Using the 1999 Chevy Silverado Fuse Box Diagram
When electrical components fail, the diagram serves as your primary diagnostic map. Start by identifying the specific symptom, such as a radio that won’t turn on or a headlight that remains dark. Locate the fuse corresponding to that circuit on the diagram to see if the internal metal bridge is broken.

If you identify a blown fuse, do not simply replace it and ignore the issue. A fuse that blows immediately upon replacement indicates a “hard short” in the circuit. In such cases, use the diagram to trace the wiring or check for frayed insulation that might be grounding out against the vehicle’s metal chassis.
📋
How to Read the 1999 Chevy Silverado Fuse Box Diagram Step by Step
Recommended Best Deal Products


Always turn off the ignition and remove the key from the cylinder before touching any fuse box components to prevent electrical arcing.
Determine if the failed system is under the hood or inside the dash, then remove the protective cover using the provided interior tool.
Match the blown fuse amp rating with a new one of identical value, ensuring the legs are fully seated into the socket terminals.

Audible — Listen Free for 30 Days
One free credit a month and thousands of titles included.
Listen Free for 30 Days🔎 How to Find Your Specific Fuse Configuration
Because the 1999 Silverado was produced in various trims (LS, LT, Z71), the fuse block might contain empty slots for optional features your truck may or may not possess. To confirm your exact setup, look for the fuse box cover underside.
Most GM vehicles of this era feature a molded-in legend or a decal on the inside of the fuse box lid. This represents the specific layout for your vehicle’s build date. If the sticker is missing or illegible, cross-reference your VIN with the online digital repositories mentioned in professional technical guides to ensure you are referencing the correct schematic.
✨ Key Benefits of Proper Maintenance
Recommended Best Deal Products


System Longevity
Regularly checking fuse connections prevents corrosion and electrical resistance, which protects expensive components like the ECM and alternator.
Cost Reduction
By performing your own electrical diagnostics using the correct diagram, you save on labor costs and avoid unnecessary mechanic visits for simple fuse swaps.
Never attempt to bypass a fuse by wrapping it in wire or foil. This is extremely dangerous and could lead to an electrical fire within your dashboard.
What If The Electrical Issue Persists?
If you have verified that the fuse is intact and the system still fails to operate, the issue likely resides in a relay, a switch, or the component itself. First, swap the suspected relay with an identical one from a non-critical circuit to test for functionality.
If swapping the relay does not resolve the problem, the issue may involve a broken ground wire or a failed motor/actuator. At this stage, professional diagnostic tools like a multimeter or scan tool become necessary. If you are uncomfortable tracing complex wiring harnesses, consult a certified automotive electrician. Minor electrical repairs generally range from $100 to $300 depending on the severity of the wiring fault.
1999 Chevy Silverado Fuse Box Diagram Questions Answered
Are all 1999 Silverado fuse boxes the same?
Most are consistent, but variations exist based on engine size (4.8L, 5.3L, 6.0L) and specific towing or convenience packages. Always verify against the sticker on your specific fuse box lid.
Audible Premium Plus — Annual Membership
12 audiobook credits up front, plus the full Audible catalogue.
See Annual PlansCan I pull fuses while the engine is running?
It is strongly recommended to turn the ignition off before pulling any fuses. Pulling a fuse while the circuit is live can cause power surges that might damage sensitive electronic control modules.
Why does my fuse box smell like burnt plastic?
A burning smell suggests that a wire or fuse connection is overheating due to excessive resistance. This is a fire risk—immediately locate the affected circuit and have the wiring inspected by a professional.
In summary, the 1999 Chevy Silverado fuse box diagram is an essential resource for any DIY owner. By understanding the location and function of these electrical centers, you can confidently address common issues. Always prioritize safety, match your fuse ratings exactly, and seek professional help if you suspect a deeper wiring fault. Keep these facts handy to ensure your classic Silverado remains reliable for years to come.
Key Takeaways
-
✓
Locate the primary interior fuse panel behind the driver’s side dashboard access door. -
✓
Identify engine bay relay center modules for high-amperage components like cooling fans. -
✓
Distinguish between GMT800 and earlier GMT400 electrical architectures for accurate parts matching. -
✓
Use the identification label on the fuse box cover to cross-reference specific circuit facts. -
✓
Perform safe testing by using a multimeter to check for continuity across fuse terminals.
❓ Frequently Asked Questions
1
What is the 1999 Chevy Silverado fuse box diagram?
The diagram is a technical map outlining the location and function of each fuse and relay within the vehicle’s electrical centers. It provides essential info on which circuit corresponds to specific components like headlamps, fuel pumps, and climate control, allowing for rapid identification during maintenance.
2
How does the fuse box identification system work?
The system utilizes a color-coded and numbered grid labeled on the underside of the fuse panel cover. Each slot is assigned an amperage rating and a corresponding load device. By matching your electrical issue to the diagram, you can pinpoint the exact fuse responsible for that circuit’s power.
3
Why is the GMT800 electrical architecture unique?
The GMT800 platform introduced a more integrated electrical system compared to the older GMT400. It features centralized relay centers and more advanced body control modules, which changed how power is distributed throughout the truck. These insights are critical when swapping parts or performing advanced electrical diagnostics.
4
What are the benefits of DIY fuse troubleshooting?
Troubleshooting fuses yourself saves on professional labor costs and prevents unnecessary tow bills. By gaining these facts and insights, you empower yourself to resolve minor electrical shorts quickly and reliably, ensuring your vehicle remains operational without waiting for shop availability.
5
How can I get started with electrical testing?
Start by identifying the problematic circuit using the diagram. Use a test light or digital multimeter to check for voltage on both sides of the fuse while it is installed. If one side has power and the other does not, the fuse is blown and needs immediate replacement.
6
Where is the interior fuse box located on a 1999 Silverado?
The interior fuse block is located on the driver-side end of the dashboard; it is only visible when the driver’s door is fully opened.
![Why Are Fog Lights Yellow? The Science of Better Visibility [2026]](https://truckguider.com/wp-content/uploads/2026/03/why-are-fog-lights-yellow-featured.webp)

![Best Aftermarket Rear Bumpers [2026]](https://truckguider.com/wp-content/uploads/2026/03/aftermarket-rear-bumper-featured.webp)