Chevy Silverado Serpentine Belt Diagram 2026: Proper Routing

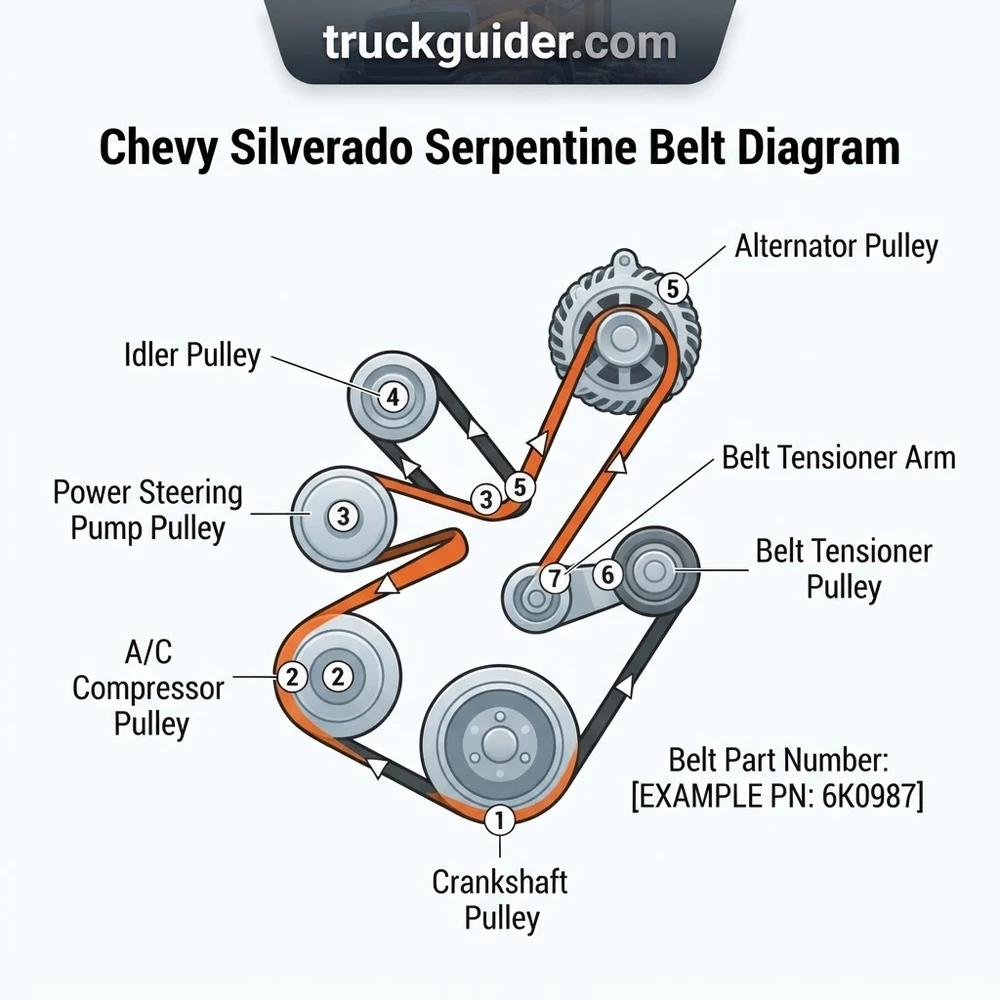
The Chevy Silverado serpentine belt routing path typically winds around the crankshaft, water pump, alternator, power steering pump, and A/C compressor. Use a 15mm or 18mm wrench on the belt tensioner to release pressure. Ensure the grooved side of the belt matches the pulley ribs precisely to prevent premature failure or slippage.
📌 Key Takeaways
- Standard V8 Chevy Silverado belt lengths typically range from 95 to 105 inches depending on the specific engine displacement.
- Always verify the idler pulley for signs of surface glazing or lateral play when replacing the main belt.
- The automatic belt tensioner uses a spring-loaded mechanism; avoid using excessive force that might damage the tensioner mounting bolt.
- The most common mistake is skipping a pulley groove, which causes the belt to shred or jump off during high-RPM operation.
- Seek professional assistance if the belt tensioner appears frozen or if you identify significant oil contamination on the belt surface.
The serpentine belt system in a Chevy Silverado is a critical infrastructure component that facilitates power transfer from the crankshaft to essential engine-driven accessories. Whether you are operating a 4.3L V6, 5.3L Vortec, or the heavy-duty 6.6L Duramax, the belt routing path remains a vital maintenance focal point. A compromised belt leads to immediate failure of the alternator, water pump, and power steering, potentially causing catastrophic engine overheating or loss of vehicle control. Utilizing a precise Chevy Silverado serpentine belt diagram is the professional standard for ensuring correct deck engagement and avoiding the costly repercussions of misaligned pulleys. This technical guide provides the data required for accurate belt replacement and system verification.


Understanding the Chevy Silverado Serpentine Belt Diagram and System Layout

A comprehensive analysis of the Chevy Silverado serpentine belt diagram reveals a sophisticated accessory drive system designed for high-torque output and longevity. Unlike older V-belt configurations, the serpentine system utilizes a single, continuous belt to drive all engine accessories simultaneously. Central to this system is the automatic belt tensioner, which is engineered to maintain constant pressure against the belt to compensate for thermal expansion and standard rubber degradation. Failure to adhere to the routing path depicted in the diagram can result in reversed rotation for accessories like the water pump, leading to immediate thermal failure.
The crankshaft pulley acts as the primary driver for the entire array. As the harmonic balancer rotates, it transmits kinetic energy through the serpentine belt to the alternator, which manages the vehicle’s 12V electrical system, and the power steering pump, which operates at high hydraulic pressures. In modern Silverado configurations, the belt must also clear the idler pulley, which serves as a fixed-position guide to increase the belt’s wrap angle around the driven components.
Analyzing the Role of the Automatic Belt Tensioner

The tensioner assembly is the most critical mechanical component within the routing path. Its internal spring mechanism provides the necessary force to keep the belt taut across all pulleys. When inspecting the system, you must check the tensioner for “flutter,” which indicates a weak or failing spring. The tensioner arm is designed with a specific travel range; if the belt is installed incorrectly or the incorrect size is used, the arm may rest outside its intended operating window, leading to premature bearing failure in the alternator or power steering pump.
The Importance of Pulley Alignment and Deck Engagement
Optimal deck engagement occurs when the ribs of the serpentine belt sit perfectly within the grooves of the engine pulleys. Even a one-groove misalignment—often referred to as “rib walk”—can lead to belt shredding within minutes of operation. According to OEM technical bulletins, the idler pulley must be inspected for surface scoring or bearing play during every belt change. If the diagram shows a specific routing path, it is because that path ensures maximum surface contact area (arc of contact) on the alternator and water pump pulleys to prevent slippage under heavy load conditions.
Always verify your specific RPO (Regular Production Option) codes before sourcing parts. Silverado models equipped with heavy-duty cooling or dual alternator setups often utilize different belt lengths than standard light-duty variants.
Chevy Silverado Serpentine Belt Part Numbers and Specs
Selecting the correct component requires cross-referencing your engine code against the manufacturer’s specified belt size. Using an aftermarket belt that deviates by even 10mm in effective length will force the tensioner arm to its physical stop, causing excessive stress on the internal spring and eventual accessory failure. The following table identifies standard part specifications for common Silverado engine configurations.
| Engine Displacement | Belt Rib Count | Standard OEM Part Ref |
|---|---|---|
| 4.3L V6 (Gen V) | 6-Rib | 12634351 |
| 5.3L V8 (L83/L84) | 6-Rib | 12634350 |
| 6.2L V8 (L86/L87) | 6-Rib | 12634349 |
| 6.6L Duramax (L5P) | 8-Rib | 12683842 |
Interpreting Belt Sizes and Material Compositions
Belt sizing is standardized by the Effective Length (EL) and the number of ribs. Most Silverado belts are EPDM (Ethylene Propylene Diene Monomer) rubber, which provides superior resistance to heat and ozone compared to older neoprene variants. When selecting a replacement, confirm the belt is “serpentine profile” compatible to match the specific pulley groove depth. Failure to select the correct material may result in the belt “glazing,” where the contact surface becomes smooth and loses its coefficient of friction, leading to audible chirping under cold start conditions.


For most V8 engines, a belt deflection of approximately 1/2 inch (13mm) is acceptable at the longest unsupported span between pulleys. Exceeding this indicates a weakened tensioner spring.
How to Read the Chevy Silverado Serpentine Belt Diagram
Navigating the routing path requires a systematic approach to prevent torque-induced injury and ensure proper seating of the belt. The process involves de-tensioning the system, threading the belt through the serpentine maze, and verifying the seating on every pulley face. Before beginning, ensure the ignition is locked out to prevent accidental engine rotation.
1. Locate the belt tensioner pulley using the pulley diagram as your reference. Most V8 models require a 15mm or 18mm socket depending on the year of production.
2. Insert a long-handle serpentine belt tool or a 3/8″ drive breaker bar into the tensioner arm slot. Rotate the arm clockwise (for most models) to collapse the spring and release pressure from the belt.
3. Begin removal by sliding the belt off the most accessible smooth idler pulley. This minimizes the risk of the belt snapping back under spring tension.
4. Route the new belt according to the diagram, starting at the crankshaft pulley (the lowest point in the engine bay) to ensure the ribs align precisely with the balancer grooves.
5. Thread the belt around the power steering pump and water pump, ensuring the smooth side of the belt contacts the flat-faced idler pulleys.
6. Save the tensioner pulley for the final step. Re-compress the tensioner, slide the belt into its final position, and slowly release the tensioner arm.
7. Conduct a final visual inspection to confirm every rib is fully seated on every pulley. If the belt sits even slightly off-center, it will result in rapid fraying.
Addressing A/C Compressor Routing Variations
Certain Silverado models feature secondary accessory drives, particularly for the A/C compressor. In these configurations, ensure the belt path does not create a conflict between the A/C clutch engagement and the main serpentine routing. The diagram for these specific vehicles will clearly indicate if a secondary belt is utilized. If your vehicle uses a dual-belt system, prioritize the primary drive belt replacement first, as it carries the load for the alternator and water pump, which are critical for engine operation.
Never place your fingers between the belt and pulley while the engine is running or while manipulating the tensioner. Use a dedicated serpentine tool with sufficient leverage to keep your hands clear of the pinch point.
Tensioner Maintenance and Belt Deflection Notes
The longevity of your drive system depends heavily on the health of the belt tensioner. Manufacturers suggest that the tensioner should be replaced every second or third belt change, as the internal hydraulic or spring damping mechanism fatigues over time. A common symptom of a worn tensioner is an audible “slap” or vibration during idle or during rapid engine acceleration (RPM blips).
Using a Belt Wear Gauge for System Diagnostics
A serpentine belt wear gauge is an essential diagnostic tool for identifying EPDM rubber degradation. EPDM does not show traditional cracks as quickly as older rubber compounds; instead, it loses material from the rib sides. Use the gauge to measure the rib depth. If the ribs have lost significant thickness, the belt will ride too deep into the pulley grooves, reducing the grip and causing the system to lose electrical output or cooling efficiency.
Signs of Pulley Misalignment and Bearing Failure
If you hear a persistent squeal that does not change with engine temperature, inspect the idler pulley bearings. Use a stethoscope to isolate the sound to the specific pulley. If the idler pulley shows lateral play (wobble), the bearing has failed, and the entire pulley must be replaced. Ignoring a seized idler pulley will cause the belt to melt instantaneously due to the friction of a non-rotating surface, leading to a complete shutdown of all engine accessories.



Chevy Silverado Serpentine Belt Diagram Questions Answered
Can I use a belt that is slightly longer than OEM specifications?
No. A longer belt will prevent the tensioner from maintaining the correct preload force, leading to belt slip and eventual accessory damage. Always use the length specified by the OEM part number, which accounts for the specific pulley diameter and configuration of your engine model year.
What causes the serpentine belt to jump off the pulleys?
Usually, this is caused by a failed tensioner or a seized idler pulley. If the tensioner spring is weak, it cannot handle the fluctuations in torque during engine operation. Additionally, debris stuck in the pulley grooves can force the belt out of alignment during high-RPM transients.
How often should the belt be inspected?
Under standard operating conditions, inspect the belt every 15,000 miles. For trucks used in towing or heavy-duty environments, perform an inspection every 7,500 miles. Focus on checking the tensioner arm indicator marks; if the indicator has moved past the “service” line, the belt is stretched and requires immediate replacement.
Is it necessary to replace the idler pulley when changing the belt?
While not strictly mandatory, it is industry best practice to replace the idler pulley if the vehicle has exceeded 100,000 miles. The cost of the pulley is nominal compared to the risk of a roadside breakdown caused by a seized bearing. Replacing both simultaneously resets the maintenance interval for the entire drive system.
Can I use belt dressing to stop squealing?
Avoid using belt dressing or spray lubricants. These products are temporary fixes that can degrade the EPDM material and cause the belt to attract dirt and grime. If the belt is squealing, it is a mechanical signal that the belt is worn or the pulley is misaligned; diagnose the root cause rather than masking the symptom.
Step-by-Step Guide to Understanding the Chevy Silverado Serpentine Belt Diagram
Identify – Verify the correct belt part number using your specific engine displacement and VIN.
Locate – Find the automatic belt tensioner and identify the routing path using the under-hood sticker or diagram.


Reference – Use the pulley diagram to visualize the correct placement of the ribbed side versus the smooth back of the belt.
Connect/Route – Thread the belt around all static pulleys, leaving the smooth idler or tensioner as the final contact point.
Verify – Check that every rib is perfectly aligned within the pulley tracks; rotate the engine manually to ensure no displacement occurs.
Troubleshoot – If the belt squeals or vibrates, re-check the tensioner and ensure the belt is not inverted on any pulley.