Dodge Ram 1500 Transmission Cooler Lines Diagram: Guide
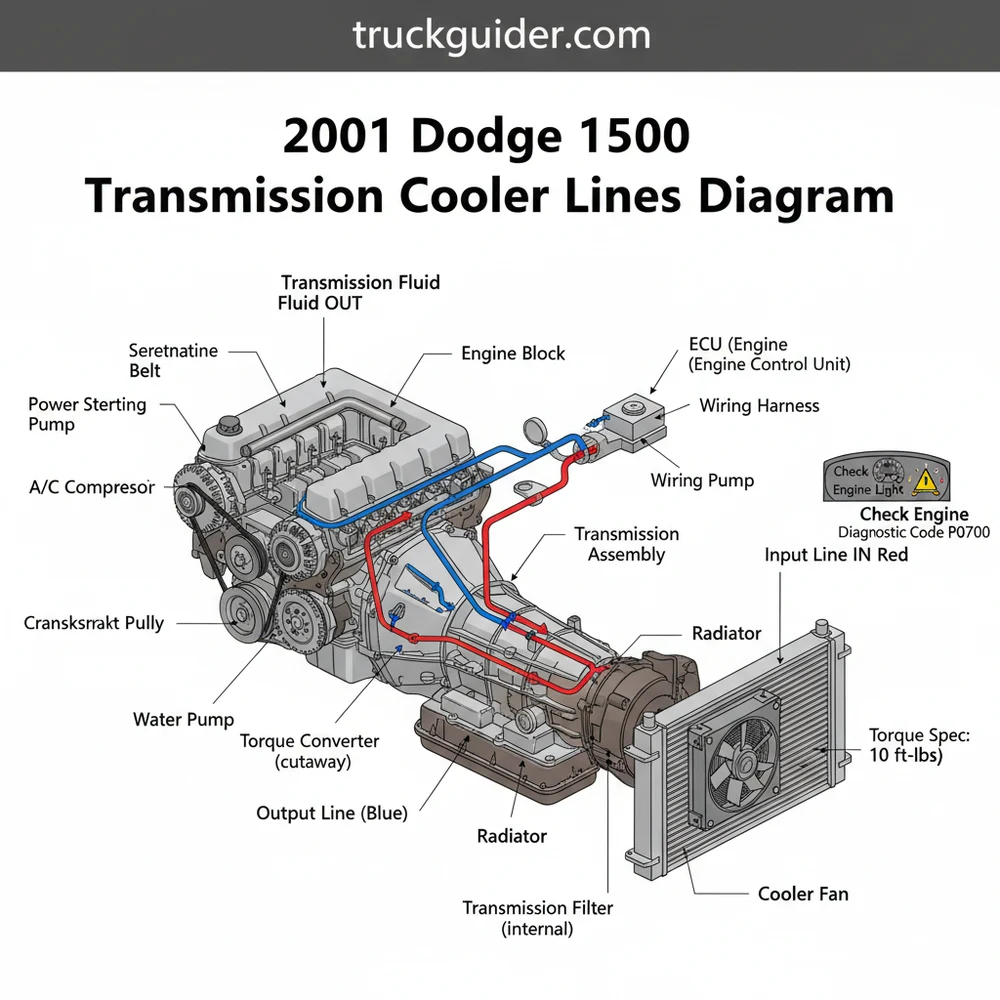
The diagram illustrates two metal lines running from the passenger side of the transmission case to the radiator. The lower port on the transmission is usually the pressure (hot) out-feed, while the upper port is the return (cool) line. Correct routing is essential to ensure fluid passes through the cooler before returning to lubricate the gears.
📌 Key Takeaways
- Identifies the flow direction between the transmission case and radiator
- Distinguishes between the high-pressure feed line and the return line
- Crucial for preventing transmission overheating and fluid loss
- Use flare nut wrenches to prevent stripping the soft metal fittings
- Necessary when installing an auxiliary cooler or replacing rusted factory lines
Maintaining the health of your heavy-duty truck often comes down to understanding the plumbing that keeps vital fluids moving. If you are currently working on your second-generation Dodge truck, finding a clear and accurate 2001 dodge ram 1500 transmission cooler lines diagram is essential for preventing catastrophic gearbox failure. These lines are responsible for transporting hot transmission fluid from the 46RE or 42RE transmission to the radiator and auxiliary cooler, then back to the transmission at a reduced temperature. Having the correct diagram ensures you can identify which line is the pressure (hot) side and which is the return (cold) side, helping you avoid common installation errors. In this comprehensive guide, you will learn how to interpret the routing of these lines, recognize the specific components involved, and master the steps required to replace or repair them to keep your vehicle on the road.
Detailed Breakdown of the Transmission Cooler Line Diagram
The transmission cooling system on the 2001 Dodge Ram 1500 is a dual-stage loop designed to manage the high thermal loads generated by towing and hauling. When looking at a 2001 dodge ram 1500 transmission cooler lines diagram, you will notice two distinct metal tubes running along the passenger side of the engine block, eventually transitioning into flexible hoses or continuing as steel lines toward the front of the vehicle.
The primary components identified in the diagram include the “To Cooler” line (the pressure line) and the “From Cooler” line (the return line). On the 46RE transmission commonly found in the 5.2L and 5.9L V8 models, the front port (closest to the engine) is the high-pressure output. This line carries the hot fluid forward. The rear port is the return inlet, where cooled fluid re-enters the transmission case to lubricate the geartrain.
The diagram also highlights several critical junctions. For most 2001 models, the fluid first enters the bottom of the radiator tank. This is where the initial heat exchange occurs as the engine’s coolant flow absorbs the transmission’s heat. From there, the fluid travels through an auxiliary “stacked plate” or “tube and fin” cooler located in front of the AC condenser. The diagram illustrates how these lines are secured using a combination of quick-connect fittings and threaded flare nuts. Understanding these connections is vital because the 2001 model year is notorious for leaks at the check valve—a small cylindrical component integrated into the pressure line designed to prevent fluid drain-back, which can often become clogged and restrict flow.
On the 2001 Dodge Ram 1500, the transmission fluid flows from the front transmission port to the radiator, then to the external cooler, and finally back to the rear transmission port. Reversing these lines can lead to inefficient cooling and potential internal damage.
Step-by-Step Guide to Interpretation and Installation
📤 Share
💾 Download
Reading a 2001 dodge ram 1500 transmission cooler lines diagram is the first step toward a successful DIY repair. To translate that visual information into physical work on your truck, follow these structured steps.
1. Identify the Transmission Ports: Locate the two brass fittings on the passenger side of the transmission. According to the diagram, the port closest to the bellhousing is your “Out” port. The port further back, toward the tailshaft, is your “In” port.
2. Trace the Hot Line Path: Follow the line from the front port. It should run along the engine block, usually secured by a bracket near the starter or oil pan. It then moves toward the passenger side of the radiator.
3. Locate the Check Valve: On the pressure line, usually near the radiator inlet, you will find a thicker section of pipe. This is the check valve. Ensure the arrow on the valve (if present) points toward the radiator, following the direction of fluid flow.
4. Connect to the Heat Exchanger: The fluid enters the radiator’s internal cooler. Ensure the fittings are clean. Use a dedicated line wrench to prevent stripping the soft brass threads on the radiator.
5. Route to the Auxiliary Cooler: Most 2001 Rams come with an “Off-Road” or “Towing” package that includes an external cooler. The line exits the radiator and goes into the auxiliary cooler.
6. Return the Fluid: The final line in the diagram exits the auxiliary cooler and runs all the way back to the rear port of the transmission. This line should be kept clear of the exhaust manifold and any moving parts like the accessory belt or steering linkage.
7. Secure with Brackets: Use the factory clips and brackets shown in the diagram. Vibrations can cause steel lines to rub against the frame, leading to pinhole leaks over time.
8. System Flush and Level Check: Once the lines are installed according to the diagram, start the engine and move through the gears. Check the fluid level in “Neutral” (not Park) as per Dodge specifications for this era.
Many owners choose to “delete” the factory check valve by replacing that section of the line with a high-pressure rubber hose or a straight steel line. This prevents the common issue of the valve sticking shut and burning out the transmission, but you must ensure you don’t allow the fluid to drain out of the torque converter during long periods of sitting.
Required Tools and Materials:
- ✓ Flare Nut Wrench Set (3/8″, 1/2″, 5/8″)
- ✓ Quick-Disconnect Tool (for radiator fittings)
- ✓ Drain Pan and Shop Rags
- ✓ ATF+4 Transmission Fluid (Dodge specific)
- ✓ Safety Glasses and Gloves
Never use generic “Dexron” or “Mercon” fluid in a 2001 Dodge Ram 1500 transmission. These units are highly sensitive and require ATF+4. Using the wrong fluid can cause shuddering and premature clutch wear, regardless of how well your cooler lines are installed.
Common Issues and Troubleshooting with Transmission Lines

Even with a perfect 2001 dodge ram 1500 transmission cooler lines diagram in hand, problems can arise. The most frequent issue is corrosion. Since these trucks are often used in work environments or snow-prone areas, the steel lines are susceptible to rust, especially where they are held by plastic clips that trap moisture.
Another common failure point is the quick-connect fitting at the radiator. Over time, the internal O-ring hardens and fails, leading to a slow drip. If you notice a red puddle under the front bumper, this is likely the culprit. Furthermore, if your transmission is overheating, it may trigger a diagnostic code stored in the ECU. While the 2001 Ram uses an older computer system, it is still compatible with OBD-II scanners. A “check engine light” may appear with a code like P0711 (Transmission Fluid Temperature Sensor Performance). In such cases, the diagram helps you verify if a pinched line or a clogged check valve is obstructing the flow, causing the temperature spike.
The relationship between the transmission cooling and the engine cooling is also critical. If your accessory belt fails or the fan clutch weakens, the airflow through the transmission cooler is reduced. This can lead to a “cascade failure” where high engine temps lead to high transmission temps. Always check for consistent coolant flow through the radiator to ensure the transmission heat exchanger is working effectively.
Diagnostic Codes and Electronic Monitoring
While the 2001 dodge ram 1500 transmission cooler lines diagram deals with the mechanical flow of fluid, the modern DIYer should also understand the electronic side. The ECU (Engine Control Unit) monitors the transmission’s health through various sensors. If a line becomes severely restricted, the fluid temperature will rise rapidly.
When you hook up an OBD-II scanner, you can monitor “Live Data” to see the transmission fluid temperature in real-time. If you see temperatures exceeding 220°F during normal driving, it is a sign that your cooling loop is compromised. It could be a collapsed rubber section of the line or a blockage within the auxiliary cooler itself. The diagram allows you to perform a “flow test”—by safely disconnecting the return line and placing it in a bucket, you can briefly start the truck to see if a steady stream of fluid is being pumped through the entire loop. If only a trickle appears, you know the blockage is somewhere between the transmission outlet and the return line.
Tips and Best Practices for Maintenance
To ensure the longevity of your transmission and the integrity of your cooling lines, follow these professional maintenance recommendations:
1. Inspect for Rubbing and Chafing
The 2001 Dodge Ram engine bay is a high-vibration environment. Ensure that the cooler lines are not in contact with the sharp edges of the frame or the movement of the timing chain cover area. Use rubber grommets or sections of heater hose as “insulators” where lines pass through tight spots.
2. Adhere to Torque Specs
When tightening the fittings into the transmission case, do not over-tighten. The transmission case is aluminum, and the fittings are usually steel or brass. The typical torque spec for these fittings is approximately 18-22 ft-lbs. Over-torquing can crack the transmission case, turning a simple line replacement into a nightmare scenario.
3. Upgrade to Braided Stainless Lines
If you are replacing rusted-out factory lines, consider upgrading to braided stainless steel hoses with AN fittings. These are much more resistant to corrosion and offer better flexibility, making them easier to route than the rigid steel lines shown in the standard 2001 dodge ram 1500 transmission cooler lines diagram.
4. Perform Annual Cleanings
Road debris, mud, and insects can clog the external transmission cooler. Every year, use a low-pressure hose to wash out the fins of the auxiliary cooler. This ensures that the air pulled in by the fan (driven by the accessory belt) can actually pass through the fins to cool the fluid.
Summary of the Cooling Loop Strategy
The 2001 Dodge Ram 1500 relies on a specific sequence of cooling to protect its internal clutches and bands. By following the 2001 dodge ram 1500 transmission cooler lines diagram, you are upholding the engineering logic that balances heat between the engine coolant and the ambient air.
Whether you are troubleshooting a check engine light or performing a routine inspection, remember that the “front is out, rear is in” rule is your North Star for this vehicle. Keeping the fluid clean, the lines clear of obstructions, and the fittings tight will prevent the most common causes of transmission failure in these classic trucks. By understanding the mechanical routing and using modern tools like OBD-II scanners to monitor performance, you can keep your Dodge Ram 1500 performing at its peak for years to come. Professional-grade maintenance starts with accurate information, and with this diagram and guide, you are well-equipped to handle any transmission cooling challenges that come your way.
Frequently Asked Questions
Where are the transmission cooler lines located?
These lines are located on the passenger side of the transmission housing, extending forward along the frame toward the radiator. They are typically held in place by plastic or metal clips to prevent them from vibrating against the engine block or the hot exhaust manifold during vehicle operation.
What does the transmission cooler lines diagram show?
The diagram shows the specific routing path for the fluid, highlighting which port on the transmission connects to the top or bottom of the radiator. It helps mechanics visualize the circuit, ensuring that the fluid flows through the cooling fins efficiently before returning to the transmission sump.
How many connections do these lines have?
Each line features two primary threaded connections: one at the transmission port and one at the radiator or external cooler. It is vital to tighten these to the correct torque spec. Some systems may also include a check valve or a junction for an additional auxiliary cooling unit.
What are the symptoms of bad transmission cooler lines?
Common symptoms include visible red fluid leaks, low fluid levels, and transmission slipping. While a leak doesn’t always trigger a check engine light immediately, resulting overheating can cause the ECU to log a diagnostic code related to gear ratio errors or fluid temperature via the OBD-II system.
Can I replace these lines myself?
Yes, this is a manageable DIY task for those with basic tools. The most difficult part is maneuvering the rigid lines around the engine bay. Using a diagram ensures you don’t swap the feed and return lines, which could lead to cooling inefficiencies and potential transmission damage.
What tools do I need for this task?
You will need flare nut wrenches to safely loosen fittings, a drain pan, and new O-rings or seals. After installation, it is wise to use a scan tool on the OBD-II port to monitor real-time fluid temperatures, ensuring the ECU is receiving correct data from the temperature sensor.