Dodge Ram 4WD Vacuum Diagram: Easy Setup Guide
The Dodge Ram 4wd vacuum diagram illustrates the path from the engine source to the CAD actuator and HVAC controls. It ensures the blower motor pushes air through the evaporator and condenser effectively. Using this guide helps you restore proper vent switching and 4×4 engagement by identifying leak points in the lines.
📌 Key Takeaways
- Identifies vacuum routing for 4WD engagement and HVAC mode doors
- The CAD actuator is the most critical component to verify
- Engine heat often causes vacuum lines to become brittle and crack
- A handheld vacuum pump is essential for testing line integrity
- Use this diagram when vents default to defrost or 4WD fails
If you are a Dodge Ram owner experiencing issues with your climate control vents or finding that your front wheels are not engaging in 4WD, you are likely dealing with a vacuum-related failure. Understanding a dodge ram 4wd vacuum diagram is essential for diagnosing these interconnected systems, as the vacuum pressure generated by your engine or vacuum pump serves multiple roles, from shifting the transfer case to directing air through your dashboard vents. In this guide, we will provide a comprehensive breakdown of the vacuum routing, explaining how the vacuum supply interacts with the HVAC system to ensure your cabin stays comfortable and your drivetrain stays capable. By the end of this article, you will be able to identify every vacuum line, understand the role of various actuators, and troubleshoot common leaks that plague these vehicles.
Decoding the Dodge Ram Vacuum System and HVAC Diagram
The vacuum system in a Dodge Ram is a complex web of plastic tubing, rubber connectors, and pneumatic actuators. To the untrained eye, the dodge ram 4wd vacuum diagram looks like a “spaghetti” of lines, but it is organized by function and color. The primary source of vacuum originates at the intake manifold on gasoline engines or a belt-driven/electric vacuum pump on diesel models. From this source, a main “supply” line runs to a vacuum reservoir or “tank,” which stores negative pressure to ensure the system works even under heavy engine load when manifold vacuum drops.
Inside the cabin, the vacuum system is responsible for the mechanical movement of the doors within the air handler. While the blower motor provides the force to move air, the vacuum actuators determine its direction. On many Dodge Ram models, the vacuum lines are color-coded: a black line usually represents the main supply, a red line might control the recirculation door (closing off outside air), a yellow line often controls the floor vents, and a blue or green line typically manages the defrost and dash vent settings. If you lose vacuum pressure due to a cracked line in the engine bay, the system is designed to default to “Defrost” mode as a safety feature, ensuring you can always clear your windshield.
The HVAC system is not just about vacuum, however. It relies on a delicate balance between the refrigerant cycle and the heat exchange process. While vacuum directs the air, the compressor pumps refrigerant through the condenser (located in front of the radiator) and into the evaporator hidden inside the dashboard. Simultaneously, the heat exchanger (heater core) provides warmth from the engine coolant. The vacuum diagram serves as the roadmap for how the air handler chooses between these thermal sources and pushes air through the return duct and out to the passengers.
Step-by-Step Guide to Reading and Implementing the Diagram
📤 Share
💾 Download
Interpreting a dodge ram 4wd vacuum diagram requires a systematic approach. You aren’t just looking for tubes; you are looking for a continuous circuit of pressure. If that circuit is broken anywhere, the entire downstream system fails. Follow these steps to map out your vehicle’s system accurately.
Most Dodge Rams utilize a vacuum-actuated Central Axle Disconnect (CAD) on the front axle. A leak in the vacuum lines going to the front axle will often cause the HVAC system to stop switching vents, as they share the same vacuum reservoir.
- ✓ Step 1: Locate the Vacuum Source. Open the hood and find the main vacuum port. On gas engines, this is on the driver’s side or rear of the intake manifold. On diesels, look for the vacuum pump near the power steering pump or the firewall.
- ✓ Step 2: Inspect the Check Valves. Look for small, plastic disc-shaped components in the lines. These are one-way check valves. They ensure that vacuum stays trapped in the system when the engine is turned off or under acceleration. If these fail, your vents will flip to defrost every time you hit the gas pedal.
- ✓ Step 3: Trace the Line to the Transfer Case. For 4WD models, a line runs down to a four-port switch on top of the transfer case. When you move the 4WD lever, this switch redirects vacuum to the front axle’s CAD actuator to lock the hubs.
- ✓ Step 4: Locate the Firewall Pass-Through. Find the thin plastic line that enters the passenger compartment through the firewall. This is the lifeblood of your HVAC control head.
- ✓ Step 5: Identify the HVAC Mode Switch. Behind your dashboard’s climate control knobs, the vacuum line connects to a rotary switch. This switch has several ports that distribute vacuum to the specific actuators (defrost, floor, etc.) based on your selection.
- ✓ Step 6: Test the Actuators. Each vacuum pod (actuator) has a rubber diaphragm. You can test these by applying manual vacuum with a hand pump. If the rod moves and holds position, the actuator is healthy.
To perform these tasks effectively, you will need a few basic tools: a handheld vacuum pump with a gauge, a set of needle-nose pliers, and small sections of rubber vacuum hose (usually 1/8″ or 5/32″ ID) to bridge any broken plastic lines.
Always wear eye protection when working near the engine. If your Dodge Ram is a diesel, ensure the vacuum pump is not leaking oil into the vacuum lines, as oil will degrade the rubber diaphragms in your HVAC actuators and 4WD system, leading to a costly full-system failure.
Common Issues and Troubleshooting
📤 Share
💾 Download
The most frequent problem owners encounter is the “Default to Defrost” symptom. This happens when the HVAC control head loses its vacuum supply. Because the doors inside the air handler are spring-loaded, they naturally return to the defrost position if no vacuum is present to pull them elsewhere. By using the dodge ram 4wd vacuum diagram, you can quickly determine if the leak is under the hood or under the dash.
If your 4WD light is flashing or the front axle isn’t engaging, the issue often lies in the vacuum lines running along the frame rail to the front axle. These lines are exposed to road debris, ice, and heat, causing them to become brittle and snap. A leak here doesn’t just stop the 4WD from working; it creates a “vacuum leak” for the entire vehicle, which can affect engine idling and the operation of the blower motor’s air distribution.
Another common failure point is the vacuum reservoir. These plastic boxes are often hidden under the battery tray or near the cowl. Battery acid can drip onto the reservoir, eating through the plastic and creating a pinhole leak. If your HVAC vents switch properly at idle but move to defrost when you are climbing a hill or accelerating, your reservoir or check valve is almost certainly the culprit.
To find a hidden vacuum leak, use a small piece of mechanic’s stethoscope or a length of garden hose. Hold one end to your ear and move the other along the vacuum lines while the engine is running. You will hear a distinct ‘hissing’ sound when you pass over a leak.
Integrating HVAC Components for Peak Performance
While the vacuum diagram explains how air is directed, the quality of that air depends on the mechanical health of your HVAC components. The compressor must be able to pressurize the refrigerant effectively, and the condenser must be clear of debris to shed heat. If your vacuum system is working perfectly (vents are switching correctly) but the air isn’t cold, your issue lies within the refrigerant cycle rather than the vacuum routing.
The air handler is the central hub where all these systems meet. Inside this box, the blower motor pushes air through either the evaporator (to cool it) or the heat exchanger (to warm it). If you notice a musty smell or water on the passenger floorboard, your evaporator drain is likely clogged, which has nothing to do with vacuum but everything to do with cabin comfort. Furthermore, the return duct must be kept clear of obstructions like napkins or debris that might have fallen through the dashboard vents, as restricted return air can cause the evaporator to freeze over, regardless of how well the vacuum actuators are functioning.
For long-term maintenance, it is recommended to replace aging plastic vacuum lines with high-quality silicone tubing. Silicone is much more resistant to heat and ozone than the factory plastic, meaning it won’t become brittle over time. When replacing components, always ensure that the vacuum connectors are tight; a loose fit can lead to intermittent issues that are incredibly frustrating to diagnose.
Maximizing System Longevity and Final Thoughts
Maintaining the vacuum system on your Dodge Ram is one of the most cost-effective ways to ensure vehicle reliability. Most vacuum-related repairs cost less than $20 in materials (hose and connectors) but can save you hundreds in professional diagnostic fees. By keeping a copy of the dodge ram 4wd vacuum diagram in your glovebox, you are prepared for the most common “gremlins” that these trucks face.
In summary, the vacuum system is a shared resource. Whether you are shifting into 4WD for a snowy climb or simply trying to get the A/C to blow through the dash vents on a hot day, you are relying on the same source of negative pressure. Regularly inspecting the lines near the heat-heavy areas of the engine and ensuring the check valves are operating in the correct direction will keep your HVAC system—including the compressor, condenser, and blower motor—working in perfect harmony.
Remember, if your vents are stuck on defrost, don’t immediately assume the control head is broken. Start at the vacuum source, follow the diagram through the check valves and reservoir, and only then move inside the cabin. Most of the time, the fix is a simple piece of rubber hose away. By understanding the relationship between the 4WD engagement and the air handler, you become a much more capable DIY mechanic, ensuring your Dodge Ram stays on the road and comfortable for years to come.
Frequently Asked Questions
Where is the vacuum reservoir located?
The vacuum reservoir on a Dodge Ram is typically located on the passenger side firewall or tucked under the battery tray. The vacuum pump, if equipped (diesel models), is found on the driver’s side of the engine block. Finding these is the first step in tracing the lines through the engine bay.
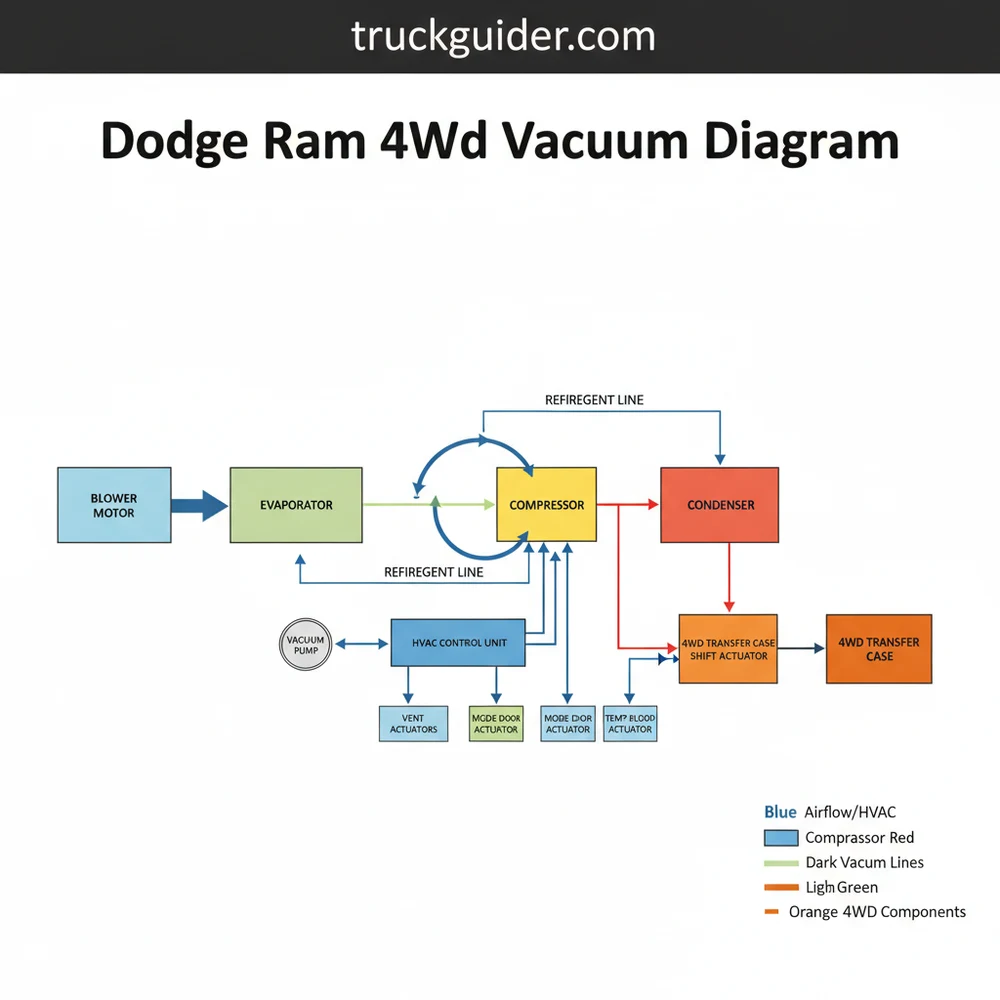
What does this vacuum diagram show?
The Dodge Ram 4wd vacuum diagram shows the complex network of hoses connecting the vacuum source to the transfer case switch and HVAC actuators. It maps out how air pressure moves the mode doors and the central axle disconnect, allowing for seamless transitions between cooling, heating, and four-wheel-drive modes.
How many connections does the CAD actuator have?
The CAD actuator on the front axle typically features two vacuum connections. One line provides vacuum to engage the sliding collar for 4WD, while the other provides vacuum to disengage it for 2WD. These lines must be connected to the correct ports on the transfer case switch for the system to function.
What are the symptoms of a bad vacuum line?
Common symptoms include the HVAC system defaulting to defrost regardless of settings, or the 4WD light failing to illuminate. If the compressor isn’t cycling or refrigerant isn’t cooling, check the vacuum-controlled heater control valve. Leaks often cause a hissing sound behind the dashboard or near the blower motor housing.
Can I replace these lines myself?
Yes, replacing vacuum lines is a straightforward DIY task that requires patience more than specialized mechanical skill. Most lines are easily accessible in the engine bay. By following the diagram, you can replace brittle plastic lines with durable rubber vacuum hoses to restore system integrity and improve HVAC airflow.
What tools do I need for vacuum testing?
To diagnose vacuum issues, you need a handheld vacuum pump with a gauge, a pair of needle-nose pliers, and a sharp utility knife for cutting new hoses. The gauge helps you isolate leaks in the evaporator case or lines, while the pliers assist in removing stuck fittings from the actuators.

![Dodge Ram Extended Cab Guide: Quad Cab vs. Crew Cab [2026]](https://truckguider.com/wp-content/uploads/2026/03/dodge-ram-extended-cab-featured-768x403.webp)
![How to Identify Your Transmission: 4 Ways to Find It [2026]](https://truckguider.com/wp-content/uploads/2026/03/how-do-i-know-what-transmission-i-have-featured.webp)