DPF Pressure Sensor Location: Cummins, Power Stroke & Duramax Guide
The Unsung Hero of Your Emissions System: The DPF Pressure Sensor
In the complex ecosystem of a modern diesel truck’s aftertreatment system, few components play such a critical yet understated role as the Diesel Particulate Filter (DPF) pressure sensor. While small in size, its function is monumental. A failure of this sensor can set off a chain reaction leading to catastrophic and costly damage to your truck’s DPF and, ultimately, its engine. Understanding its location, function, and failure symptoms is not just a matter of technical curiosity—it’s essential knowledge for any diesel truck owner.
What is a DPF Differential Pressure Sensor?
Formally known as the DPF differential pressure sensor, this device is a key part of the emissions control system mandated by increasingly stringent regulations. Its primary function is to measure the exhaust backpressure across the Diesel Particulate Filter. By constantly monitoring this pressure, it provides the truck’s main computer—the Powertrain Control Module (PCM) or Engine Control Unit (ECU)—with a precise measurement of how much soot has accumulated inside the DPF.
This sensor acts as the gatekeeper for the DPF regeneration process—a self-cleaning cycle where the exhaust temperature is raised to over 1,100°F (600°C) to burn the trapped soot into a fine ash.1 Without accurate data from this sensor, the regeneration cycle never begins, and the DPF will inevitably clog.
Why It’s a Non-Negotiable Component for Your Diesel Engine’s Health
A faulty DPF pressure sensor is far more than a minor inconvenience that triggers a check engine light. It is a direct threat to the longevity and performance of your diesel engine. When the sensor fails, it can no longer signal the ECU to initiate regeneration. As a result, the DPF becomes completely obstructed with soot.
This blockage creates immense backpressure in the exhaust system. This pressure can force abrasive soot particles back into the engine’s combustion chambers, where they contaminate the engine oil and cause premature, accelerated wear on critical components like bearings. A clogged DPF is an expensive problem to fix, with professional cleaning or replacement often costing thousands of dollars. The proactive diagnosis and replacement of a relatively inexpensive sensor is a low-cost insurance policy against a high-cost DPF and engine failure.
How It Works: Translating Soot into Signals
The DPF pressure sensor operates on a simple but ingenious principle. To protect it from the extreme temperatures of the exhaust system, the sensor itself is typically mounted remotely in the engine bay or on the chassis. It’s connected to the DPF via two small-diameter, heat-resistant silicon hoses.
- Upstream Hose: Connects to a port on the exhaust pipe before the DPF.
- Downstream Hose: Connects to a port after the DPF.
The sensor continuously measures the pressure from both hoses and calculates the difference, or “differential”.
- Low Pressure Differential: When the DPF is clean, exhaust flows through it easily, and the pressure difference between the upstream and downstream hoses is minimal.
- High Pressure Differential: As soot accumulates and clogs the filter’s pores, it becomes harder for exhaust to pass through. This causes pressure to build up on the upstream side, creating a large pressure difference.
This pressure reading is converted into a voltage signal that is sent to the ECU. Once the pressure differential crosses a pre-programmed threshold, the ECU determines the DPF is full and initiates the regeneration cycle to burn off the soot.
DPF System and Sensor Connections
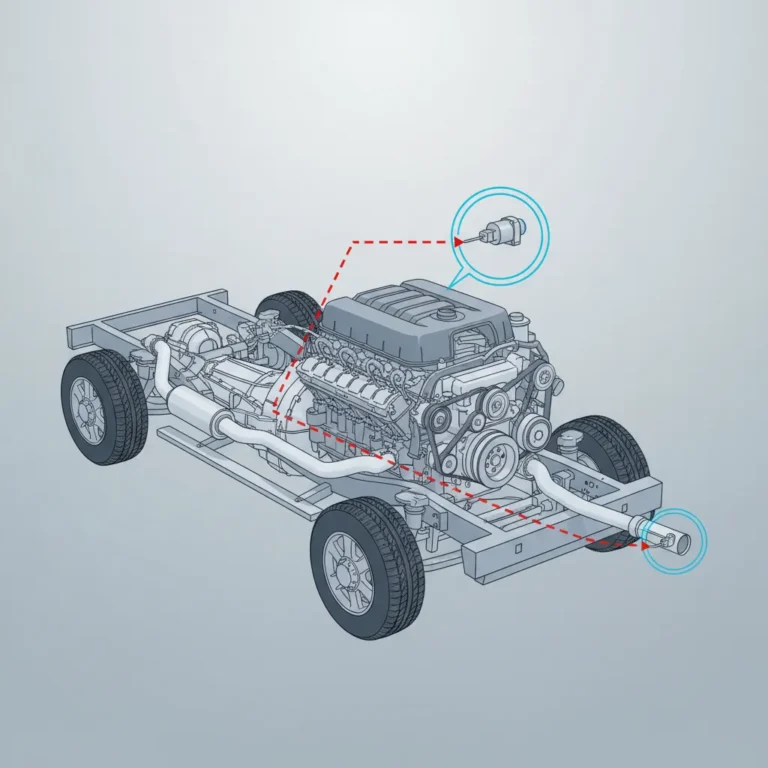
A simplified diagram would show the flow of exhaust gas from the engine through the exhaust pipe. The pipe first passes through a component labeled “Diesel Oxidation Catalyst (DOC)” and then into a larger component labeled “Diesel Particulate Filter (DPF).” Two small tubes are shown connected to the exhaust pipe: one labeled “Upstream Hose” before the DPF and one labeled “Downstream Hose” after the DPF.
These hoses lead to a separate, smaller box labeled “DPF Differential Pressure Sensor.” An electrical wire connects this sensor box to a larger box labeled “Engine Control Unit (ECU/PCM).” This visual clarifies how the sensor measures pressure across the filter to determine soot load.
The DPF Pressure Sensor Explained
An interactive guide to the small sensor that plays a huge role in your diesel’s exhaust system and regeneration cycles.
What Does a DPF Pressure Sensor Do?
The Diesel Particulate Filter (DPF) pressure sensor, also called a “differential pressure sensor,” is the “brain” that tells your truck’s computer (ECU) how full the DPF is. It works by measuring pressure at two points: one *before* the filter and one *after*. As the DPF traps soot, the pressure before the filter increases. The sensor detects this *difference* (delta) in pressure.
How It Works: A Simplified Flow
When the pressure difference hits a pre-set level, the sensor signals the ECU, which then initiates a DPF regeneration cycle to burn off the trapped soot.
DPF Pressure Sensor Location
This is the most common question. The sensor is **NOT** typically bolted directly to the DPF filter itself. Instead, it’s located away from the high heat of the exhaust, usually in the **engine bay**, mounted to the **firewall**, or on a bracket near the engine block.
The easiest way to find it: Locate your DPF in the exhaust system, find the two small metal pipes welded to it (one before, one after), and follow the rubber hoses attached to them. These hoses lead directly to the sensor.
Typical Location Schematic
Engine Bay
Exhaust System (Under Vehicle)
Symptoms of a Failing Sensor
A bad sensor sends incorrect data to the ECU, leading to major problems. This chart shows the common consequences and their typical severity.
Common Diagnostic Trouble Codes (DTCs)
If your check engine light is on, a bad DPF pressure sensor will often trigger one of these specific codes. This is the most reliable way to diagnose the issue.
| DTC Code | Description |
|---|---|
| P2452 | DPF Pressure Sensor ‘A’ Circuit |
| P2453 | DPF Pressure Sensor ‘A’ Circuit Range/Performance |
| P2454 | DPF Pressure Sensor ‘A’ Circuit Low |
| P2455 | DPF Pressure Sensor ‘A’ Circuit High |
| P2456 | DPF Pressure Sensor ‘A’ Circuit Intermittent |
DPF Sensor vs. EBP Sensor: Key Differences
It’s easy to confuse the DPF pressure sensor with the EBP (Exhaust Back Pressure) sensor. They are different parts with different jobs.
| Feature | DPF Pressure Sensor | EBP Sensor |
|---|---|---|
| Primary Function | Measures DPF soot level to trigger regeneration. | Measures manifold pressure to control the turbocharger (VGT). |
| How it Measures | Differential Pressure (2 Hoses) | Absolute Pressure (1 Hose/Port) |
| Typical Location | Engine bay, connected to DPF via hoses. | On or near the exhaust manifold, pre-turbo. |
Further Reading & Resources
Understanding your DPF system is key to long-term truck health. If your filter is already clogged, or if you’re exploring other options, these resources can help.
Internal Resources
- How to Unclog a DPF Filter: A Complete Guide
- What is a DPF Delete? Pros, Cons, and Legality
Pinpointing the DPF Pressure Sensor Location: A Manufacturer’s Guide
Finding the DPF pressure sensor can be challenging because its location varies significantly between manufacturers and even model years. However, there are common principles and specific locations for the most popular truck engines.
General Location: Where to Start Your Search
The DPF pressure sensor is almost never mounted directly onto the hot DPF housing. To protect its sensitive electronics from extreme heat, manufacturers place it in a cooler location within the engine bay or along the truck’s frame. Common mounting points include:
- The firewall at the back of the engine compartment.
- Bolted to the side of the engine block.
- Attached to a bracket on the side of the transmission.
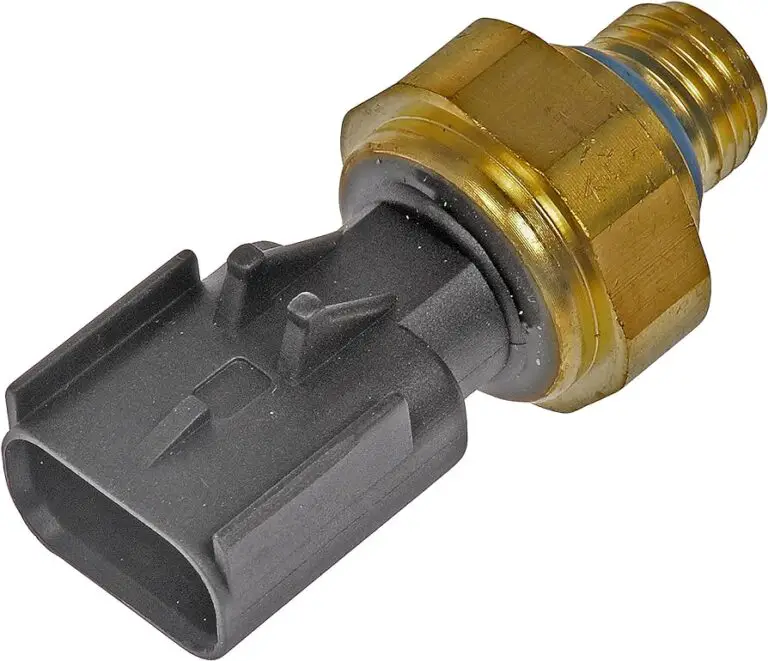
The most reliable way to find the sensor is not to look for the sensor itself, but to first locate its hoses. Find the DPF in your truck’s exhaust system (a large canister, usually after the catalytic converter). Look for two small-diameter rubber or silicon hoses attached to ports on the exhaust pipe just before and after the DPF. Carefully trace these hoses back into the engine bay or along the frame rail. They will lead you directly to the sensor, which is identifiable by its two hose connections and a single electrical plug.
DPF Pressure Sensor Location on a Cummins 6.7L
For owners of Ram 2500 and 3500 trucks equipped with the 6.7L Cummins engine, the DPF pressure sensor is typically found on the passenger side of the vehicle. A common location, especially on models around 2011, requires crawling under the truck. Look on the exhaust (passenger) side of the transmission, often near the bell housing. You will see a small sensor with two hoses and an electrical connector attached to a bracket. In heavy-duty applications like Peterbilt trucks with a Cummins ISX engine, the sensor is part of the larger aftertreatment assembly, and its connecting tubes are notoriously prone to becoming clogged with soot.
DPF Pressure Sensor Location on a Ford 6.7L Power Stroke
DPF Pressure Sensor Location on a 6.6L Duramax (LML/L5P)
| Engine | Common Location | Key Identifiers |
| Cummins 6.7L | Passenger side of the vehicle, on or near the transmission bell housing. | Look under the truck. The sensor is mounted to a bracket with two small hoses and one electrical plug. |
| Ford 6.7L Power Stroke | Passenger-side frame rail, often near the transmission crossmember. | Follow the two small-diameter hoses from the DPF assembly along the frame. |
| GM 6.6L Duramax | Passenger side of the engine bay, on a bracket at the rear of the engine or on the firewall. | Trace the pressure hoses from the DPF up into the engine compartment. |
Red Flags: Recognizing the Symptoms of a Failing DPF Pressure Sensor
Performance Issues: From Sluggish Acceleration to Limp Mode
- Poor or Sluggish Acceleration: The truck feels heavy and unresponsive.
- Reduced Engine Power: A noticeable loss of horsepower and torque, especially under load.
- Difficulty Revving: The engine may struggle to rev past a certain RPM.
- Limp Mode: In advanced stages, the ECU will protect the engine by activating a “limp home mode,” which severely restricts power and speed.
Dashboard Warnings: Check Engine Light and DPF Messages
Your truck’s onboard diagnostic system will almost certainly alert you to the problem. Look for:
- Check Engine Light (CEL): The ECU will log a fault code related to the sensor’s circuit, illuminating the CEL or Malfunction Indicator Lamp (MIL).
- DPF Warning Light: Many trucks have a specific warning light that indicates the DPF is full and requires regeneration.
- Instrument Cluster Messages: You may see messages such as “Exhaust Filter Full” or “Clean Exhaust Filter”.
Telltale Signs: Fuel, Smoke, and Heat
Other physical symptoms are clear indicators of a struggling DPF system:
- Poor Fuel Economy: The engine has to work much harder to push exhaust through the clogged filter, leading to a significant increase in fuel consumption.
- Increase in Black Smoke: A clogged DPF can no longer effectively trap soot, leading to visible black smoke from the exhaust, especially during acceleration.
- High Temperatures: The strain on the engine and the restricted exhaust flow can cause both engine and transmission temperatures to run higher than normal.1
| Symptom Category | Specific Symptom | The “Why” |
| Engine Performance | Sluggish acceleration, reduced power, limp mode | The engine is being choked by excessive exhaust backpressure from the clogged DPF. |
| Dashboard Lights | Check Engine Light, DPF warning light, DIC messages | The ECU has detected a fault in the sensor’s electrical circuit or an overly full DPF. |
| Fuel & Exhaust | Increased fuel consumption, black smoke from tailpipe | The engine is working harder and burning fuel inefficiently due to the blockage. |
| Operating Temps | High engine and transmission temperatures | The restricted exhaust flow and increased engine strain generate excess heat. |
Decoding the Faults: A Guide to DPF Pressure Sensor Trouble Codes (DTCs)
Understanding “Circuit Low,” “Circuit High,” and “Range/Performance”
- “Circuit Low” (P2454): This means the sensor’s voltage signal to the ECU is below the specified range (typically under $0.4 V$).28 This often indicates an open circuit, a short to ground in the wiring, or a complete sensor failure.
- “Circuit High” (P2455): This indicates the voltage signal is above the specified range (typically over $4.8 V$). This is commonly caused by a short to power in the wiring harness.
- “Range/Performance” (P2453): This is a plausibility code. It means the sensor is producing a voltage, but the reading is erratic or doesn’t make sense to the ECU based on other engine parameters.34 This can be caused by a failing sensor, but it very often points to a physical problem like clogged hoses, an exhaust leak before the sensor, or even hoses that have been connected to the wrong ports.
Detailed Breakdown of Common Codes
P2453 – DPF Pressure Sensor ‘A’ Circuit Range/Performance
- Meaning: The ECU has detected a signal from the sensor that is implausible, erratic, or outside the expected range for the current engine operating conditions.
- Common Causes: Clogged or damaged sensor hoses, a faulty sensor, an exhaust leak affecting pressure readings, wiring or connector issues, or hoses connected to the wrong ports.
P2454 – DPF Pressure Sensor ‘A’ Circuit Low
- Meaning: The ECU has detected a continuously low voltage signal from the sensor circuit, indicating a potential electrical failure.
- Common Causes: An open or shorted wire in the sensor circuit, a faulty DPF pressure sensor, clogged sensor tubes giving a false “zero” reading, or an empty Diesel Exhaust Fluid (DEF) tank preventing regeneration and leading to secondary faults.
P2455 – DPF Pressure Sensor ‘A’ Circuit High
- Meaning: The ECU has detected a continuously high voltage signal from the sensor circuit, suggesting a short to power.
- Common Causes: A short circuit to a voltage source in the wiring harness, a faulty sensor that has failed internally, or severely plugged sensor tubes creating maximum backpressure readings.
Related Codes That Can Point to a Bad Sensor
Sometimes, the DPF pressure sensor is the root cause of other DPF-related codes.
- P244A (DPF Differential Pressure Too Low): This code can be set if the sensor hoses are disconnected or if the DPF itself is cracked or missing, but a faulty sensor stuck in a low reading state can also be the cause.
- P2463 (DPF Restriction – Soot Accumulation): This code directly indicates a clogged DPF. While many issues can cause this, a primary suspect should always be a faulty DPF pressure sensor that failed to trigger regeneration in the first place.
| DTC | Definition | What It Means in Plain English | Most Likely Causes |
| P2453 | DPF Pressure Sensor ‘A’ Circuit Range/Performance | The sensor’s readings are erratic or don’t make sense to the truck’s computer. | 1. Clogged sensor hoses. 2. Faulty sensor. 3. Exhaust leak. 4. Wiring issue. |
| P2454 | DPF Pressure Sensor ‘A’ Circuit Low | The sensor is sending a voltage signal that is too low or no signal at all. | 1. Open/short in wiring. 2. Faulty sensor. 3. Disconnected hoses. |
| P2455 | DPF Pressure Sensor ‘A’ Circuit High | The sensor is sending a voltage signal that is too high. | 1. Short to power in wiring. 2. Faulty sensor. 3. Severely blocked hoses. |
| P2463 | DPF Restriction – Soot Accumulation | The DPF is clogged with soot. | 1. Failed regeneration cycles (often due to a faulty DPF pressure sensor). 2. Other engine issues causing excess soot. |
DIY Diagnostics: How to Test Your DPF Pressure Sensor
Step 1: The Visual Inspection (The First and Easiest Check)
- Let the Exhaust Cool: The exhaust system gets extremely hot. Allow the truck to cool down for at least an hour before working near it.
- Inspect the Sensor Body: Locate the sensor and check its plastic housing for any signs of cracking, melting, or physical damage.
- Inspect the Wiring: Carefully trace the sensor’s wiring harness. Look for any insulation that is melted, chafed, or brittle. Unplug the connector and check for corrosion or bent pins inside.
- Inspect the Hoses: This is the most critical step. Check the two silicon hoses along their entire length for cracks, kinks, or signs of melting. Disconnect them from the sensor and the exhaust ports and check for blockages. It’s very common for these hoses to get clogged with soot.1 You can often clear them by blowing compressed air through them.
Step 2: Testing with a Multimeter (Confirming Electrical Integrity)
- Identify the Wires: Consult your vehicle’s service manual to identify the three wires: 5-Volt Reference, Ground, and Signal.
- Test with Ignition On, Engine Off: Turn the ignition to the “ON” position without starting the engine. Set your multimeter to DC Volts.
- Place the black probe on a good chassis ground.
- Carefully touch the red probe to the back of each wire’s pin in the connector.
- You should read approximately 5 volts on the reference wire, 0 volts on the ground wire, and a baseline voltage (typically 0.5V to 1.5V) on the signal wire.
- Test with Engine Running: Start the engine. With the multimeter still connected to the signal wire and ground, have a helper gently rev the engine. You should see the signal voltage increase smoothly as the RPMs and exhaust pressure rise. If the voltage remains stuck or doesn’t change, the sensor is likely faulty.
Step 3: Using a Pressure Gauge (The Definitive Test)
- Measure Physical Pressure: With the engine idling, carefully detach both hoses from the sensor. Use a low-pressure gauge (an exhaust backpressure gauge with a 0-15 PSI range is ideal) to measure the pressure coming from each hose. The upstream hose (before the DPF) should have a slightly higher pressure reading than the downstream hose.
- Compare to Signal Voltage: Reconnect the hoses to the sensor and back-probe the signal wire again. The voltage reading should logically correspond to the pressure differential you just measured. For example, a reading of 1 PSI on the upstream hose and 0.5 PSI on the downstream might produce a signal of around 0.8 volts. If the physical pressure changes when you rev the engine but the sensor’s voltage does not, or if the voltage reading seems completely mismatched with the pressure, the sensor has failed and must be replaced.
Repair and Replacement: What Are Your Options?
Can You Clean a DPF Pressure Sensor and Its Hoses?
- Hoses: Disconnect the hoses and use compressed air to blow them out. If they are oily or stubborn, a degreaser or solvent can be used, followed by a final blast of air to ensure they are dry.
- Ports: Use a small pick or wire brush to carefully clean out the metal ports on the exhaust pipe where the hoses connect.
Step-by-Step Guide to Replacing a Faulty Sensor
Replacing the sensor is a straightforward job for a DIY mechanic.
- Safety First: Ensure the engine is completely cool and disconnect the negative battery terminal.
- Disconnect Electrics: Press the release tab and carefully unplug the electrical connector from the sensor.
- Remove Hoses: Use pliers to loosen the spring clamps on the two rubber hoses and slide them down. Gently twist and pull the hoses off the sensor’s ports.
- Unbolt the Sensor: The sensor is typically held onto a bracket by one or two small bolts (often 8mm or 10mm). Remove these bolts and take the old sensor off the vehicle.
- Install the New Sensor: Bolt the new sensor onto the bracket, reconnect the hoses and secure them with the clamps, and plug in the electrical connector until it clicks.
- Final Steps: Reconnect the negative battery terminal. Use an OBD-II scanner to clear any stored fault codes. Start the truck and check for any remaining warning lights.
Cost Analysis: DPF Pressure Sensor Replacement Cost
- Part Cost: The DPF pressure sensor itself is relatively inexpensive. Aftermarket sensors can range from $35 to $150, while OEM parts from the dealer may cost between $150 and $300+.
- Labor Cost: If you take your truck to a professional shop, the labor for this replacement is minimal. The job typically takes less than an hour. Expect labor costs to be between $50 and $100.
- Total Replacement Cost: For a professional replacement, you can expect a total cost in the range of $150 to $400.