Head Bolt Torque Specs: The Definitive Guide for Trucks (Ford, Ram, GM)
The Unseen Force: Why Head Bolt Torque is About Stretch, Not Tightness
Introduction: The Most Critical Measurement in Your Engine
Replacing a cylinder head gasket is one of the most demanding and high-stakes repairs a technician or DIY enthusiast can undertake. It requires precision, patience, and a deep understanding of the forces at play within an engine. At the heart of this procedure lies a single, critical process: correctly torquing the head bolts. A common and dangerous misconception is that “tighter is better.” In reality, the specified torque value is not a measure of tightness at all. It is a carefully calculated proxy measurement for the real goal: achieving a precise amount of bolt stretch.
Think of a head bolt not as a simple fastener, but as a highly engineered spring.1 When torque is applied, the bolt begins to stretch. This elongation creates tension, and that tension generates the immense clamping force required to hold the cylinder head firmly firmly against the engine block. This force must be strong enough and uniform enough to contain the violent combustion pressures that can exceed 1,400 PSI inside each cylinder.2
The “rubber band” analogy is a useful way to visualize this principle. If a rubber band is too loose, it provides no holding force. If it’s stretched too far, it weakens and breaks. A head bolt operates similarly. If under-tightened, it fails to enter its “elastic range” and provides insufficient clamping force, leading to leaks. If over-tightened, it can be stretched beyond its design limits into a point of permanent weakness (yield) or outright failure (shear).1 The entire science of head bolt torque is dedicated to stretching this “metal rubber band” to the exact point where it provides maximum, consistent clamping force without compromising its integrity.
The Critical Art of Head Bolt Torque
A Data-Driven Guide to a Perfect Engine Seal
The Single Point of Failure
90%
Of catastrophic head gasket failures are directly linked to improper head bolt torque procedures.
It’s the most critical measurement in an engine rebuild.
What is Clamping Force?
It’s not about “tightness.” Torque is the measurement of twist used to stretch a bolt like a precision spring. This stretch creates the immense, uniform clamping force required to seal the head gasket against combustion pressure.
Bolt Types: TTY vs. Standard
Not all bolts are created equal. Using the wrong type or re-using a “one-time” bolt guarantees failure.
| Bolt Type | Characteristic | Action |
|---|---|---|
| Standard / Torque-to-Angle | Stretches within its elastic limit. | Reusable (if in spec). |
| Torque-to-Yield (TTY) | Stretches *past* its elastic limit. | Must Be Replaced Every Time. |
The #1 Variable: Lubrication
Using the wrong lubricant (or none) dramatically alters the clamping force, even if your wrench reads the same. This chart shows the *actual* clamping force applied when the spec calls for 70 ft-lbs with oil.
Using moly lube when oil is specified can over-torque the bolt by 40%, leading to block damage or bolt failure.
The Critical Path: Torque Sequence & Stages
Always follow the *exact* manufacturer-specified pattern (e.g., spiral from the center out) and multi-stage process. This ensures the head is drawn down evenly, preventing warpage.
Common (and Costly) Mistakes
Re-using TTY Bolts
They are permanently stretched. They will not clamp correctly and will likely fail or snap.
Guessing the Lube
Moly vs. oil vs. dry can change clamping force by over 40%, as shown in the chart above.
Ignoring the Sequence
This is the primary cause of head warping, creating “high” and “low” spots that the gasket cannot seal.
“Dirty” or Damaged Threads
Corrosion or debris increases friction, making the wrench *click* before the bolt is actually at torque.
The Physics of Clamping Force: A Battle Against Pressure and Friction
The job of the head bolts is to create a clamping force that overcomes the “lift-off force” generated during the engine’s combustion cycle. For a typical truck engine with a 4.25-inch cylinder bore, the cylinder pressure can generate nearly 20,000 pounds of force trying to lift the head off the block with every power stroke. Engineers calculate that the total clamping force must be roughly three times this amount to ensure a reliable seal, meaning the head bolts for a single cylinder must collectively provide nearly 60,000 pounds of clamping force.2
Achieving this precise clamping force is complicated by a massive and highly variable factor: friction. It is a startling fact that as much as 90% of the torque applied with a wrench is consumed simply overcoming friction, not stretching the bolt. This friction occurs in two main areas:
- 45-55% is lost to friction between the underside of the bolt head (or washer) and the cylinder head surface.
- 35-45% is lost to friction between the male bolt threads and the female threads in the engine block.
This leaves a mere 10% of the applied torque to do the actual work of stretching the bolt and creating the clamping load.2
This overwhelming influence of friction is the single greatest challenge to achieving an accurate clamping force. Friction is not a constant; it changes dramatically based on factors like thread condition (clean vs. dirty, smooth vs. damaged), surface finish, and the presence or absence of lubrication.1 If a technician tightens a bolt with dirty or unlubricated threads, a huge portion of the applied torque is wasted overcoming this extra friction. The torque wrench will “click” at the specified value, but because so little of that force actually went into stretching the bolt, the resulting clamping force will be dangerously low.1 This is precisely why modern torquing procedures are so complex; they are not just about tightening bolts, but about meticulously controlling the variable of friction to ensure a predictable and uniform clamping force across the entire cylinder head.
Know Your Hardware: Conventional vs. Torque-to-Yield (TTY) Head Bolts
The technology of head bolts has evolved significantly to meet the demands of modern engines. Understanding the two primary types of bolts—conventional and Torque-to-Yield (TTY)—is essential for any cylinder head job.
Conventional “Elastic” Bolts: The Old Guard
For many years, engines used conventional head bolts made from high-strength steel. These fasteners are designed to be tightened to a point where they stretch but remain entirely within their elastic phase. This means that as long as the bolt is not over-tightened, it will behave like a perfect spring, returning to its original, uninstalled length when the load is removed.3
Because they are not designed to be permanently deformed, conventional bolts can sometimes be reused. However, this is only permissible if they pass a rigorous inspection. A technician must check for any signs of thread damage, corrosion, or pitting. Most importantly, the overall length of the bolt must be measured and compared to the manufacturer’s specification for a new bolt. If a bolt has been stretched beyond its specified length, it means it was over-torqued at some point and entered its plastic deformation phase, rendering it unsafe for reuse.4
Torque-to-Yield (TTY) Bolts: The Modern Standard
Virtually every modern truck engine, from a Ford Powerstroke to a GM Duramax or Ram Hemi, uses Torque-to-Yield (TTY) head bolts, also known as “stretch bolts”.6 These fasteners represent a more advanced approach to achieving a reliable seal.
A TTY bolt is engineered to be tightened beyond its elastic limit and into the plastic phase of deformation. This process intentionally and permanently elongates, or “stretches,” the bolt.8 This may seem counterintuitive, but it solves two major engineering challenges:
- More Uniform Clamping Force: By taking the bolt to its specific yield point, engineers can achieve a much more consistent clamping force from one bolt to the next. This method largely bypasses the inaccuracies introduced by friction. Using a simple torque value can result in clamping force variations as high as ±30%. The torque-plus-angle method used for TTY bolts narrows this variance to a much more precise ±10%.3
- Compatibility with Modern Engines: The rise of engines with cast iron blocks and aluminum cylinder heads introduced a new problem: different rates of thermal expansion. Aluminum expands and contracts much more than cast iron as the engine heats and cools. A TTY bolt, which acts like a very stiff spring once yielded, is better able to maintain a constant clamping pressure during these thermal cycles, preventing gasket failure.3
Bolt Deformation Phases Diagram
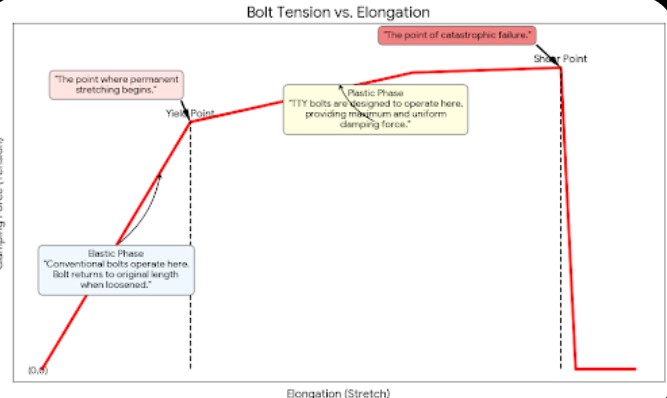
A line chart will be created to illustrate the physical states of a bolt under tension.
- Title: Bolt Tension vs. Elongation
- Y-Axis: Clamping Force (Tension)
- X-Axis: Elongation (Stretch)
- Chart Data: The chart will show a line that starts at (0,0), rises linearly (Elastic Phase), then curves at the Yield Point, flattens out (Plastic Phase), and finally drops off at the Shear Point (breakage).
- Annotations:
- Elastic Phase: “Conventional bolts operate here. Bolt returns to original length when loosened.”
- Yield Point: “The point where permanent stretching begins.”
- Plastic Phase: “TTY bolts are designed to operate here, providing maximum and uniform clamping force.”
- Shear Point: “The point of catastrophic failure.”
The Golden Rule: Why TTY Bolts Are Strictly Single-Use
There is one unbreakable rule when working with Torque-to-Yield bolts: they must be replaced every time they are removed. There are absolutely no exceptions to this rule.
The reason is rooted in their design. The first time a TTY bolt is installed and torqued to its final angle specification, it is permanently stretched. This initial stretch weakens the bolt slightly but places it in the ideal zone for clamping force.10 If a technician were to reuse this already-stretched bolt, the second tightening sequence would stretch it even further, pushing it dangerously close to its ultimate shear point. A reused TTY bolt cannot provide the designed clamping force and is highly likely to break during installation or, even worse, during engine operation.4
Visual evidence of this permanent elongation is striking. When a used TTY bolt is placed next to a new one, the used bolt is often visibly longer by several millimeters.10 This permanent stretch is proof that the bolt has done its job once and must be retired. Attempting to save a few dollars by reusing TTY bolts is a gamble that risks catastrophic engine failure.
The Mechanic’s Playbook: A Step-by-Step Guide to Perfect Torque
Executing a proper head bolt torque procedure is a methodical process where preparation and adherence to specifications are paramount. Skipping any step or taking a shortcut will compromise the integrity of the entire repair.
Step 1: Sourcing the Correct Specifications (The Hierarchy of Truth)
Before a wrench is ever turned, the correct torque specifications and sequence must be identified. These specs are not universal; they are part of a precisely engineered system of components. The source of these specs must be chosen carefully, following a clear hierarchy of authority:
- The OEM Factory Service Manual: For a stock engine with original components, the vehicle manufacturer’s service manual is the absolute source of truth. It contains the exact specifications, sequence, and procedures developed by the engineers who designed the engine.12
- The Aftermarket Gasket Manufacturer: When using an aftermarket head gasket, such as one from Fel-Pro, it is critical to consult the instructions included with the gasket. The gasket manufacturer may provide different torque specifications or procedures that are tailored to the unique materials and construction of their product. In these cases, the gasket maker’s instructions supersede the OEM manual.13
- The Performance Fastener Manufacturer: If upgrading to high-performance aftermarket head bolts or studs, such as those from ARP, it is mandatory to use the torque specifications and proprietary lubricants provided by that manufacturer. Their specs are based on the superior metallurgy of their fasteners and will differ significantly from OEM specs.15
It is critical to understand that the head bolts, head gasket, and lubricant function as an interconnected system. The torque specification is the instruction that makes that system work. Using ARP bolts with OEM torque specs, or an OEM gasket with Fel-Pro specs, is mixing and matching components from different systems and will almost certainly lead to an incorrect clamping load and premature failure.17
Step 2: Preparation is 90% of the Job
The accuracy of the final torque reading is almost entirely dependent on the quality of the preparation work. Meticulous cleaning and proper lubrication are non-negotiable.
- Cleaning: Every threaded hole in the engine block must be perfectly clean and dry. Use a thread chaser (which reforms threads, unlike a cutting tap which removes material) to clear out any old sealant, rust, or debris. Blow the holes out with compressed air to ensure no liquid (coolant, oil) or debris remains at the bottom. Any foreign material will create hydraulic pressure or friction, preventing the bolt from seating properly and yielding a false torque reading.1 The threads on the bolts themselves must also be spotlessly clean.
- Inspection: Carefully inspect every bolt, even new ones, for any signs of shipping damage or manufacturing defects in the threads. When considering the reuse of conventional bolts, measure their free length with a caliper and compare it to the service manual’s maximum allowable length. If any bolt is stretched, it must be discarded.4
- Lubrication: This is one of the most critical steps for controlling the friction variable. Unless the manufacturer specifies otherwise, apply a light coat of clean engine oil to the threads of each bolt and, just as importantly, to the underside of the bolt head and any washers used.17 This ensures a smooth, consistent application of torque. For aftermarket fasteners like ARP, use only their specified assembly lubricant.16
Step 3: The Tightening Pattern—Preventing a Warped Head
The sequence in which the head bolts are tightened is just as important as the final torque value. The goal is to apply pressure evenly across the entire surface of the head gasket, allowing it to compress uniformly. The standard procedure for virtually all engines is to start with the centermost bolts and work outwards in a spiral or crisscross pattern.12
Imagine pressing down on the lid of a container of food. If you press down on one corner first, the lid tilts, and the contents squeeze out the opposite side. The same principle applies to a cylinder head. Tightening the bolts out of sequence can cause the head to bow or tilt, creating high and low pressure spots on the gasket. This uneven load will crush the gasket in one area while leaving it too loose in another, creating a guaranteed path for leaks and potentially warping the cylinder head itself.21 The manufacturer’s specified sequence is the only correct way to ensure an even clamp.
Generic Tightening Pattern Diagram
A simplified diagram of a 10-bolt cylinder head will be shown.
- Title: Typical Center-Out Tightening Sequence
- Layout: A rectangle representing the cylinder head with 10 circles for the bolts.
- Numbering: The bolts will be numbered to illustrate the pattern, starting in the middle and spiraling outward:
9 5 1 3 7 8 4 2 6 10 - Caption: “Always follow the manufacturer’s specific sequence, which typically starts in the center and moves outward to ensure even clamping pressure.”
Step 4: Executing the Torque Procedure
With the components prepared and the sequence understood, the final step is the careful execution of the tightening process. This is always done in multiple stages to gradually apply the load.
- The Multi-Stage Approach: Never tighten a head bolt from finger-tight to its final torque in a single pass. The procedure will always specify several steps. For example, the first pass might be to tighten all bolts in sequence to 25 lb-ft, the second pass to 50 lb-ft, and so on.12 This multi-stage process gradually compresses the gasket and allows the head and block to settle together before the final, critical clamping force is applied.
- The Torque-Angle Method in Action: For engines with TTY bolts, the final stage is what sets them apart. The process requires two specific tools: a calibrated torque wrench and a torque angle gauge.
- Initial Torque (Pre-load): Use the torque wrench to tighten all bolts, in the specified sequence, to the initial torque value listed in the manual (e.g., 41 lb-ft). This step ensures that every bolt starts from an identical, uniform baseline of tension.8
- Final Angle Rotation: Attach the torque angle gauge to the wrench and socket. Place it on the first bolt in the sequence and zero out the gauge. Then, turn the wrench smoothly in a single motion until the needle indicates the specified angle of rotation (e.g., 90 degrees). Repeat this for every bolt, in sequence.6 This final angle turn is what physically stretches the TTY bolt past its yield point and into the plastic region, achieving the final, precise clamping force that is largely independent of friction.24
Torque Specification Tables for Popular Truck Engines
Disclaimer: The following tables are provided for general reference and educational purposes only. Engine designs and specifications can change between model years. It is absolutely essential to consult the official factory service manual or the component manufacturer’s instructions for your specific vehicle’s year, model, and engine before beginning any repair.
The value of these tables is in consolidating complex, multi-step procedures into a clear, easy-to-read format. This reduces the risk of misinterpreting a dense paragraph of instructions during a critical phase of the engine assembly.
Table 1: Ford 6.7L Powerstroke Head Bolt Torque Specs (2011+)
The 6.7L Powerstroke uses a multi-stage, torque-plus-angle procedure with two different sizes of TTY bolts. All bolts must be replaced.
| Bolt Type | Stage | Torque Spec | Angle Spec | Notes |
| Main Vertical Bolts (M14) | 1 | 15 lb-ft (20 Nm) | – | Apply to all main bolts in sequence. |
| Main Vertical Bolts (M14) | 2 | 36 lb-ft (49 Nm) | – | Repeat this step 3 times for a total of four torque passes. |
| Main Vertical Bolts (M14) | 3 | – | +90° | |
| Main Vertical Bolts (M14) | 4 | – | +90° | |
| Main Vertical Bolts (M14) | 5 | – | +90° | Total of 270° angle turn after initial torque. |
| Minor Bolts (M8) | 6 | 22 lb-ft (30 Nm) | – | Tighten after all main bolt steps are complete. |
Table 2: GM 6.6L Duramax (LML/L5P) Head Bolt Torque Specs (2011+)
The Duramax platform also uses a multi-stage, torque-plus-angle method with M12 and M8 TTY bolts, which must be replaced.
| Bolt Type | Stage | Torque Spec | Angle Spec | Notes |
| Main Bolts (M12) | 1 | 37 lb-ft | – | Follow OEM sequence. |
| Main Bolts (M12) | 2 | 59 lb-ft | – | |
| Main Bolts (M12) | 3 | – | +60° | |
| Main Bolts (M12) | 4 | – | +60° | Total of 120° angle turn. |
| Inner Bolts (M8) | 5 | 18 lb-ft | – | Tighten after all M12 steps are complete. |
Table 3: Ram 5.7L & 6.4L GEN III Hemi Head Bolt Torque Specs (2009+)
The Gen III Hemi engines found in Ram trucks utilize a similar multi-bolt size, multi-stage TTY procedure. All bolts must be replaced.
| Bolt Type | Stage | Torque Spec | Angle Spec | Notes |
| Main Bolts (M12, #1-10) | 1 | 25 lb-ft | – | Follow OEM sequence for all bolts. |
| Inner Bolts (M8, #11-15) | 2 | 15 lb-ft | – | |
| Main Bolts (M12, #1-10) | 3 | 40 lb-ft | – | |
| Inner Bolts (M8, #11-15) | 4 | 25 lb-ft | – | This is the final torque for M8 bolts. |
| Main Bolts (M12, #1-10) | 5 | – | +90° | This is the final step for M12 bolts. |
Aftermarket Upgrades: The Case for ARP Head Studs
For high-performance, high-boost, or heavy-duty applications, many builders choose to upgrade from factory TTY head bolts to aftermarket head studs, with Automotive Racing Products (ARP) being the industry leader. This upgrade offers significant advantages but requires adherence to a completely different installation philosophy.
Bolts vs. Studs: What’s the Difference?
The primary advantage of a head stud over a head bolt lies in how it achieves clamping force.
- A bolt is twisted directly into the engine block. This action creates both torsional (twisting) stress and the desired axial (stretching) stress on the fastener. The torsional stress interferes with an accurate torque reading.
- A stud is threaded into the block until it is only hand-tight. The cylinder head is then placed over the studs, and washers and nuts are used on top to apply the clamping force. By tightening the nut instead of the entire fastener, the stud is subjected almost exclusively to pure axial stress. This eliminates the torsional variable and allows for a much more accurate and consistent translation of torque into clamping force.
The ARP Procedure: A Different Philosophy
ARP fasteners are not a simple bolt-in replacement; they are a complete fastening system that operates under a different set of rules.
- ARP Ultra-Torque Lubricant: It is absolutely mandatory to use ARP’s proprietary Ultra-Torque fastener assembly lubricant on the stud threads (that the nut will engage), the nut face, and the washers.16 This lubricant is not just a suggestion; it is a critical component of the system. ARP has engineered it to have a specific, highly consistent coefficient of friction. Using standard engine oil or another anti-seize compound will alter this friction value, resulting in a significantly different (and incorrect) amount of bolt preload at the specified torque, which can lead to head gasket failure.15
- Torque-Only Method: ARP studs are fabricated from extremely high-strength steel alloys that are designed to achieve their clamping force while remaining within their elastic range. Because of this superior material strength, they do not need to be yielded. Therefore, ARP studs do not use the torque-angle method. Instead, they are tightened in several equal steps (typically three) to a final, specific torque value, such as 90 or 125 lb-ft.16
- Reusability: Because they are not permanently stretched, ARP head studs are fully reusable, making them a long-term investment for engines that may be disassembled multiple times.
Upgrading to ARP is not just about installing a stronger part; it’s about adopting a different, more precise system of achieving clamping force. This system offers higher strength and reusability but demands absolute adherence to ARP’s specific procedures and the mandatory use of their engineered lubricant.
Conclusion: Torque is a Science, Not an Opinion
The process of correctly torquing cylinder head bolts is a testament to the precision required in modern engine building. It is a procedure where “close enough” is never good enough and where “feel” is a dangerous substitute for data. The successful outcome of a head gasket replacement hinges on understanding and respecting the underlying science.
The most critical takeaways are clear:
- Torque is simply the measurement used to achieve the real goal: a precise amount of bolt stretch, which creates the necessary clamping force.
- Modern Torque-to-Yield (TTY) bolts are designed to be stretched into their plastic range and are strictly single-use. Reusing them is a direct path to failure.
- The procedure is as important as the specification. Meticulous cleaning, correct lubrication, and strict adherence to the multi-stage tightening sequence are non-negotiable steps for a reliable seal.
- Always use the correct specifications for your specific combination of parts. OEM, aftermarket gasket, and performance fastener manufacturers provide specs for their engineered systems; they cannot be mixed and matched.
Taking the time to research the correct specifications and execute the procedure with scientific precision is the single most important investment a mechanic can make in the long-term health and reliability of their engine.
Frequently Asked Questions (FAQ)
Q1: Can I reuse my head bolts?
A: This depends entirely on the type of bolt. If your engine uses conventional (non-TTY) bolts, they can potentially be reused, but only if they pass a thorough inspection for any damage, corrosion, or stretching beyond the manufacturer’s specified length. However, Torque-to-Yield (TTY) bolts, which are used in almost all modern trucks, are designed to permanently stretch and must ALWAYS be replaced with a new set after being removed. Reusing TTY bolts is extremely risky and can lead to improper torque, broken bolts, and catastrophic head gasket failure.4
Q2: What happens if I over-torque my head bolts?
A: Over-torquing is just as damaging as under-torquing. It can stretch a bolt beyond its designed yield point, permanently weakening it and reducing its clamping ability. In severe cases, it can strip the threads in the engine block, crack or warp the cylinder head, or physically crush the head gasket. Any of these outcomes will result in immediate leaks and require extensive, costly repairs to correct.1
Q3: What is a torque angle gauge and do I really need one?
A: A torque angle gauge is a specialized tool that measures the angle of rotation applied to a fastener after an initial torque has been set. If your engine’s service manual specifies a final tightening step in degrees (e.g., “+ 90°”), then this tool is absolutely essential. It is the only way to accurately perform the final stretching procedure for TTY bolts. Attempting to “eyeball” the angle is highly inaccurate and will result in an incorrect and uneven clamping force.6
Q4: Where is the best place to find the torque specs for my specific truck?
A: The most reliable and authoritative source is always the official factory service manual for your vehicle’s specific year, engine, and model. These manuals contain the precise procedures and specifications developed by the original engineers. Reputable online repair databases and the instructions provided by quality aftermarket gasket manufacturers (like Fel-Pro) are also excellent sources. Be wary of generic charts or forum posts that do not specify the exact application.12
Q5: Do I need to re-torque the head bolts after driving for a while?
A: For modern engines equipped with TTY bolts and Multi-Layer Steel (MLS) head gaskets, re-torquing is not required or recommended. The TTY fastening system is specifically designed to achieve and maintain its target clamping force throughout the engine’s service life without subsequent adjustment. The practice of re-torquing after a break-in period applies to older engine designs that used conventional bolts and softer composition gaskets, but it is not a standard procedure for today’s vehicles. Always follow the explicit instructions in your service manual.8