U010C Code 6.7 Cummins Fix? The Ultimate Guide to Diagnosis and Repair
The check engine light glows on the dashboard, and the robust power you expect from your 6.7L Cummins engine has vanished. Instead of a confident roar, you get a sluggish response, a weak exhaust brake, and a general sense that your powerhouse Ram is struggling. A quick scan reveals the culprit: Diagnostic Trouble Code (DTC) U010C. While the technical definition sounds complex, this code points to a very specific and common issue on these legendary diesel engines.
This guide is the single, most comprehensive resource you will need to understand, diagnose, and resolve the U010C code. Whether you’re a seasoned DIY mechanic ready to turn some wrenches or a truck owner who wants to walk into the repair shop armed with knowledge, this article will provide a clear roadmap from problem to solution.
Understanding Code U010C
A Visual Guide for 6.7L Cummins Engines
U010C: Lost Communication
This diagnostic trouble code (DTC) indicates that the Engine Control Module (ECM) has lost its communication link with the Turbocharger Control Module (TCM), often located on the turbo actuator.
Common Symptoms
If your truck has code U010C, you will likely experience one or more of these critical symptoms.
Check Engine Light
The most obvious sign. The Malfunction Indicator Lamp (MIL) will be illuminated.
Reduced Engine Power
The truck may enter a “limp mode” to protect the engine, severely limiting acceleration and power.
Poor Turbo Performance
You may notice a lack of boost, unusual noises from the turbo, or excessive smoke from the exhaust.
Most Common Causes
While several issues can trigger U010C, data shows that some causes are far more frequent than others.
Affected 6.7L Cummins Models
This code is prevalent in Ram trucks equipped with the 6.7L Cummins engine, particularly those using a variable-geometry turbo (VGT).
- Ram 2500 (Typically 2007.5+)
- Ram 3500 (Typically 2007.5+)
- Ram 4500/5500 Chassis Cabs
- Other models using the Cummins 6.7L ISB engine.
Note: The introduction of the Holset VGT in 2007.5 made this communication link critical.
Diagnostic & Repair Flow
This flowchart outlines the step-by-step diagnostic process. Do not skip steps, as wiring issues are often mistaken for faulty components.
Check wiring harness to turbo actuator for kinks, burns, or breaks.
Test actuator connector for power, ground, and CAN +/- signals.
(Component is likely faulty).
(Trace wiring for fault).
Estimated Repair Costs
Costs vary widely based on whether it’s a simple wiring fix or a full component replacement. This chart shows estimated part and labor costs.
Key Takeaway
Code U010C is a critical communication fault that should be diagnosed immediately to prevent further engine or turbo damage. While a faulty actuator is a common culprit, **always inspect the wiring harness first.**
A simple, inexpensive wiring repair is often misdiagnosed as an expensive component failure.
Understanding the U010C Code: What Your Truck is Telling You
To fix the problem, it’s essential to first understand the language your truck is speaking. The U010C code is not a simple sensor failure; it’s a breakdown in a critical communication network that manages your engine’s performance.
What U010C “Lost Communication” Really Means
The official definition for DTC U010C is “Lost Communication With Turbocharger/Supercharger Control Module A”. This is a network communication code, identified by the “U” prefix, which indicates a problem with the data flow between electronic modules, not necessarily a direct mechanical failure.
Think of it this way: your engine’s main computer, the Powertrain Control Module (PCM), is constantly sending instructions to and receiving status updates from the turbocharger’s dedicated controller. When the PCM sends a message and gets no reply, it’s like a dead phone line. After repeated failed attempts, the PCM logs the U010C code and illuminates the check engine light to alert you that this vital conversation has stopped. The communication loss is almost always a symptom of a deeper issue—a physical component has failed, rendering it unable to talk on the network.
A Quick Look at Your 6.7 Cummins VGT System
The heart of this issue lies with the sophisticated Variable Geometry Turbocharger (VGT) used on 6.7L Cummins engines in Ram 2500 and 3500 models from 2007.5 to the present. Unlike a traditional fixed turbo, a VGT contains a set of adjustable vanes. These vanes can change their angle to precisely control exhaust gas flow against the turbine wheel.
At low engine speeds, the vanes narrow to increase exhaust gas velocity, spooling the turbo up quickly for excellent throttle response and torque. At high engine speeds, they open up to maximize airflow and prevent over-boosting. This technology is what gives the 6.7L Cummins its broad, flat torque curve and also enables the powerful electronic exhaust brake, which uses the same vanes to create backpressure.
Key Players in the Communication Chain
Three main components must work in perfect harmony. When one fails, the U010C code is the result.
- The Powertrain Control Module (PCM): This is the master computer, the “brain” of your truck’s engine and transmission. It analyzes dozens of inputs (throttle position, engine speed, load) to decide how much boost is needed and sends the appropriate command.
- The Controller Area Network (CAN bus): This is the truck’s internal nervous system. It’s a two-wire network (CAN High and CAN Low) that allows the PCM, instrument cluster, ABS module, and—crucially—the turbo controller to share data at high speeds.
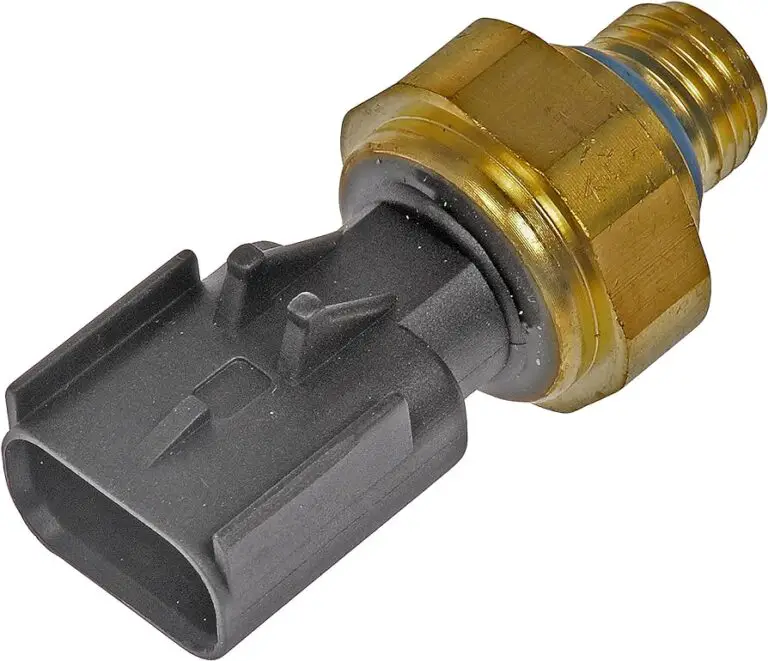
- The Turbo Actuator (Turbocharger Control Module): This is the central figure in the U010C saga. It’s a “smart” electronic motor bolted directly to the side of the turbocharger. It receives commands from the PCM over the CAN bus and physically moves a lever that adjusts the VGT vanes. On modern Cummins engines, this actuator is the control module; it has its own internal circuit board that is responsible for communicating with the rest of the truck.7 It lives in an incredibly harsh environment of extreme heat and vibration, often described as sending a smartphone to work in a volcano.
Symptoms and Severity: Is It Safe to Keep Driving?
The U010C code is not one to be ignored. The symptoms are immediately noticeable and the potential for collateral damage is significant.
Common Symptoms of a U010C Fault
If your truck is displaying a U010C code, you will likely experience several of the following performance issues.
| Symptom | Description | Why It Happens |
| Check Engine Light | The Malfunction Indicator Lamp (MIL) is illuminated on your dashboard. | The PCM has detected and logged the “lost communication” fault. |
| Significant Loss of Power | The truck feels extremely sluggish and slow to accelerate, as if the turbo isn’t working at all. | The VGT vanes are stuck in a default (often open) position, preventing the turbo from building boost pressure effectively. |
| Poor/Inoperable Exhaust Brake | The exhaust brake function is weak or completely non-existent. | The actuator is unable to receive the command to close the VGT vanes, which is how the exhaust brake creates engine-braking force. |
| Reduced Fuel Economy | You’ll notice a drop in your average miles per gallon. | Without proper boost control, the engine’s combustion process is inefficient, requiring more fuel to produce power. |
| Excessive Black Smoke | In some instances, puffs of black smoke may appear from the exhaust during acceleration. | The lack of boost can create a rich air-fuel mixture (too much fuel, not enough air), resulting in incomplete combustion. |
| Whining or Grinding Noises | A high-pitched squeal or grinding sound from the engine bay. | This is a very serious sign that indicates a mechanical failure within the turbocharger itself, such as bearing failure. |
The Risks of Ignoring the Code: More Than Just Power Loss
While your truck may still start and drive with an active U010C code, continuing to operate it is strongly discouraged. The risks extend far beyond poor performance:
- Safety Hazard: A non-functional exhaust brake dramatically increases stopping distances and brake wear, creating a significant safety risk, especially when towing or descending steep grades.
- Component Strain: The engine is forced to work harder without the aid of proper turbocharging, putting extra stress on internal components.
- DPF Damage: The inefficient combustion caused by a malfunctioning VGT system can lead to excessive soot production. This can quickly overwhelm and clog the Diesel Particulate Filter (DPF), a critical and extremely expensive emissions component.
- Catastrophic Turbo Failure: If the underlying cause is a mechanical issue within the turbo, continued operation could lead to the turbo completely seizing or the compressor wheel disintegrating, potentially sending metal fragments into your engine’s intake system.
Finding the Root Cause: A Step-by-Step Diagnostic Plan
A logical diagnostic process is key to avoiding unnecessary expenses. By starting with the simplest checks and moving to more complex tests, you can pinpoint the exact cause of the communication failure.
Level 1: The Simple Driveway Checks (Before You Touch a Tool)
Before ordering any parts, perform these preliminary checks. They are simple, require minimal tools, and can sometimes reveal an easy fix.
- Clear the Code: Use a basic OBD-II scanner to clear the U010C code. Sometimes, a temporary electronic glitch can set a fault. Drive the truck and see if the code returns immediately. If it does, the problem is persistent. Some owners report the code appearing intermittently at first, sometimes going away for weeks or months before becoming permanent.
- Check the Battery: A weak battery or poor connections can wreak havoc on a vehicle’s sensitive electronic modules, often causing a flurry of communication codes. Ensure your battery terminals are clean and tight, and have the battery load-tested to confirm it’s healthy.
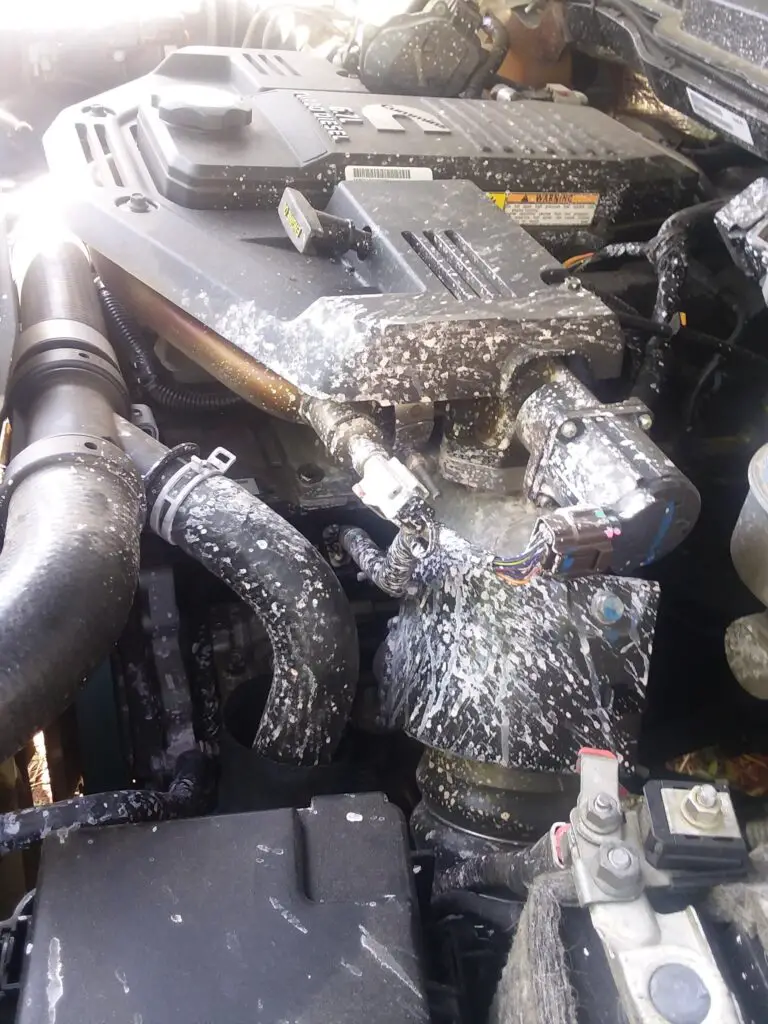
- Visual Inspection: Open the hood and carefully inspect the wiring harness that runs to the turbo actuator. Look for any signs of chafing, melting, or physical damage. It’s not uncommon for a failed serpentine belt to slap against and damage this harness, causing an open or shorted wire.10
- Check the Fuses: This is a five-minute check that could save you hundreds of dollars. Using your owner’s manual, locate the fuse box (the Totally Integrated Power Module, or TIPM) and check all fuses related to the engine and powertrain control modules. Several owners have found that a single blown fuse was the sole cause of their U010C code. For 2011 models, fuse M21 has been specifically identified as a potential culprit.
Level 2: Electrical Testing for the Advanced DIYer
If the simple checks don’t resolve the issue, the next step is to test the circuit between the PCM and the actuator. This requires a digital multimeter and some confidence in electrical diagnostics. The test is performed at the 4-pin harness connector that plugs into the actuator.
- Check for Power and Ground: Disconnect the harness from the actuator. Turn the ignition key to the “ON” position (engine off). Set your multimeter to DC volts. Place the black probe on a good chassis ground and the red probe into the terminal for pin 4. You should see a reading of approximately 12 volts. Repeat this for pin 1. If you have 12 volts at both, it confirms the actuator is receiving power and has a good ground connection. A test light is also recommended here, as it will confirm the circuit can carry a load, not just show “ghost voltage”.
- Check the CAN Bus Circuit: Turn the ignition key “OFF”. Set your multimeter to measure resistance (Ohms). Measure the resistance between pin 2 and pin 3 of the harness connector. The reading should be approximately 60 ohms (${\Omega}$). This reading confirms the integrity of the CAN bus circuit and its terminating resistors. A reading of 120 ohms (${\Omega}$) indicates a break in one of the wires, while a reading near 0 ohms (${\Omega}$) indicates a short between the two wires.
Interpreting the Results: If power or ground is missing, the fault lies in the wiring, a fuse, or the PCM itself. If the CAN bus resistance is incorrect, there is a fault in the data network wiring. If both the power/ground and CAN bus tests pass, the wiring is good, and the fault is almost certainly internal to the turbo actuator itself. For a deeper look into your truck’s wiring, our guide on the can provide additional context.
Level 3: The Definitive Mechanical Check (Is the Turbo Itself the Problem?)
This is the single most important diagnostic step to perform before you spend any money on parts. It reveals the true root cause of most actuator failures. The electronics in the actuator are robust, but the small electric motor inside is not designed for immense physical strain. The number one reason an actuator motor burns out is that it’s trying to move VGT vanes that are physically stuck.
This sticking is caused by a buildup of soot and carbon inside the turbine housing, a natural byproduct of diesel combustion. Over time, this buildup can act like cement, restricting the movement of the vanes. The actuator fights against this resistance until its motor overheats and fails, severing communication with the PCM and triggering the U010C code.
To check this, you must first remove the actuator (see Part VI for instructions). With the actuator removed, you can access the sector gear on the turbo that the actuator controls.
- The “Finger Test”: Using your finger, manually move the gear/lever back and forth through its full range of travel. It should move smoothly from stop to stop, a distance of about one inch. You should feel a distinct metallic “clunk” as it hits the mechanical limit at each end.
- The Critical Decision Point:
- If the lever moves freely: The turbo is mechanically sound. You can confidently proceed with replacing only the actuator.
- If the lever is stiff, gritty, or completely seized: The turbocharger is the root of the problem. Do not install a new actuator on a stuck turbo. The new actuator will be subjected to the same extreme strain and will fail in a short amount of time, wasting your money and effort. This mechanical binding is why a knowledgeable mechanic may recommend replacing the entire turbo assembly, even when the code only points to the actuator. They are addressing the cause, not just the symptom.
Your Repair Roadmap: Options, Costs, and Recommendations
Once you’ve diagnosed the problem, it’s time to map out the repair. This involves choosing the right parts and understanding the costs, whether you do it yourself or hire a professional.
The Core Decision: Actuator Only or Full Turbo Replacement?
Your diagnostic findings from Part IV will dictate your path forward:
- Scenario A (Actuator Only): If your turbo vanes passed the “finger test” with flying colors, you are in the most common and cost-effective scenario. The solution is to replace the turbo actuator.
- Scenario B (Full Turbo): If the vanes were stuck, you must address the turbocharger itself. Your options include a new OEM turbo, a quality remanufactured unit, or an aftermarket performance turbo. Attempting to clean the turbo is possible but often provides only a temporary fix.
Choosing Your Parts: A Comparison of Replacement Actuators
Not all replacement actuators are created equal. Understanding the differences is key to a reliable, long-lasting repair.
| Part Type | Pros | Cons | Best For… |
| New OEM/Holset | Perfect fitment and function as designed by the manufacturer. | Expensive; prone to the same original design flaws that led to the initial failure. | Owners who insist on using only original equipment parts and are willing to accept the potential for a repeat failure down the road. |
| Quality Remanufactured | An original unit rebuilt with upgraded internal components to address known failure points. More reliable than a new OEM part and more affordable. | Quality can vary between rebuilders. It’s crucial to choose a reputable source. | The majority of owners. This option provides the best balance of enhanced reliability, proven performance, and value. |
| New Aftermarket | Often the lowest initial purchase price. | Quality can be inconsistent. Internal electronics may not match OEM specifications, potentially leading to performance issues or a shorter lifespan. | Budget-focused repairs where the lowest part cost is the primary concern, accepting a higher risk of premature failure. |
| Upgraded Aftermarket | Redesigned for superior durability. Some models, like those from City Diesel, are “self-learning” and do not require scan tool calibration. | Typically the most expensive actuator-only option. | DIY installers who lack an advanced scan tool, or owners seeking a robust, “fix-it-and-forget-it” solution. |
The Cost of Repair: A Detailed Breakdown
The financial investment to fix the U010C code can vary dramatically based on the root cause and whether you perform the labor yourself. The following table provides realistic cost estimates based on market data.
| Repair Scenario | Parts Cost | Estimated Labor Cost | Special Tools/Needs | Estimated Total Cost |
| DIY Actuator Replacement | $500 – $1,000 [17, 18, 19] | $0 | Scan tool for calibration (~$200) or rental fee, unless using a no-cal unit.[17, 18] | $500 – $1,200 |
| Professional Actuator Replacement | $800 – $1,300 (with markup) | $250 – $500 (1.5-2.5 hrs) [20, 21] | None | $1,050 – $1,800 |
| DIY Full Turbo Replacement | $1,500 – $3,000+ 1 | $0 | Standard tools + scan tool for actuator calibration. | $1,700 – $3,200+ |
| Professional Full Turbo Replacement | $2,000 – $3,500+ (with markup) | $500 – $1,000+ | None | $2,500 – $5,000+ |
The Critical Final Step: Why Actuator Calibration is Non-Negotiable
For most replacement actuators (OEM and remanufactured), you cannot simply bolt the new part on and start the engine. The new actuator must be electronically calibrated to the PCM.
This process involves using a capable bidirectional scan tool to run a specific routine called “VGT Electronic Actuator Installation and Calibration”. During this routine, the PCM commands the actuator to sweep through its full range of motion. This allows the PCM to learn the precise electronic start and stop points of the new motor, ensuring accurate vane control.
Skipping this step will result in poor performance, incorrect boost levels, and potentially new trouble codes. Reputable rebuilders like(https://circuitboardmedics.com/) may offer calibration tool rentals along with their remanufactured actuators.
DIY Guide: How to Replace the 6.7 Cummins Turbo Actuator
For the confident DIYer, replacing the actuator is a manageable but involved job. Following these steps carefully is crucial for success.
Disclaimer and Difficulty Rating
- Difficulty: 4 out of 5. Requires mechanical skill, the right tools, and attention to detail.
- Estimated Time: 2-4 hours.
Tools and Parts Checklist
- Parts:
- Replacement Turbo Actuator
- New Actuator Gaskets
- 4.5 Gallons of appropriate engine coolant
- Tools:
- Socket Set (Metric)
- 5mm Allen Head Socket/Wrench
- T20 or T15 Torx Bit (depending on replacement part)
- Large Drain Pan (at least 4.5-gallon capacity)
- Pliers
- Torque Wrench (inch-pounds)
- Capable Bidirectional Scan Tool (e.g., Autel, Snap-on) for calibration.
Step-by-Step Installation Instructions
This procedure synthesizes best practices from multiple technical guides.
- Disconnect Batteries: Always begin by disconnecting both negative battery terminals.
- Drain Coolant: Place a large drain pan under the radiator. Open the radiator cap or coolant reservoir cap to allow air in. Open the radiator drain valve (petcock) on the bottom driver’s side and allow the system to drain completely. This step is critical; coolant leaking into the new actuator’s electronics will destroy it.
- Gain Access: For the best access to the turbo, remove the passenger-side front wheel and the plastic inner fender liner.
- Remove Old Actuator: Locate the actuator on the passenger side of the turbo. Unplug the 4-pin electrical connector. Remove the four 5mm Allen head bolts holding the actuator to the turbocharger housing. Carefully pull the actuator straight back and off the turbo.
- PERFORM MECHANICAL CHECK: This is your moment of truth. As described in Part IV, manually test the turbo’s sector gear for smooth, free movement. Do not proceed if it is stuck.
- Prepare New Actuator: Some replacements are a “half-shell” design, requiring you to reuse the gear-housing portion of your old actuator. If so, remove the T20/T15 Torx screws, separate the halves, and attach the old gear housing to the new electronics half. Ensure the inside is perfectly clean and dry.
- Mount New Actuator: Ensure the mounting surface on the turbo is clean. Place the new gasket. Carefully slide the new actuator onto the turbo, ensuring the gears mesh correctly. The actuator should sit perfectly flush against the housing before you insert any bolts.
- Torque to Spec: Install the four new Allen bolts. Tighten them in a crisscross pattern to ensure even pressure. Torque the bolts to approximately 80 inch-pounds. Do not overtighten.
- Reconnect and Refill: Plug the electrical harness securely into the new actuator. Double-check that the wiring is routed away from hot exhaust components. Close the radiator drain and refill the cooling system with the correct type of coolant.
Performing the Calibration
If your replacement actuator requires calibration, follow this two-stage process with your scan tool.
- Installation Routine: Navigate to the special functions or action tests menu in your scan tool. Select the “VGT Electronic Actuator Installation” test and run it. This electronically syncs the new actuator with the PCM.
- Calibration Routine: Once the installation routine passes, select the “VGT Actuator Self-Calibration” test. This will command the actuator to sweep its full range to learn its physical limits.
- Confirmation: The scan tool should display a “Success” or “Pass” message. Once confirmed, you can clear any remaining DTCs, start the engine, check for leaks, and perform a test drive.
Conclusion: Getting Your Cummins Back to Full Power
The U010C code on a 6.7L Cummins, while intimidating, is a solvable problem. The key to a successful and lasting repair lies in a methodical approach. By understanding that the communication code is merely the final symptom in a chain that often begins with a mechanical issue, you can avoid the costly mistake of treating the symptom instead of the disease.
The diagnostic journey—from simple fuse checks to the critical “finger test” of the turbo vanes—empowers you to make an informed decision between replacing just the actuator or the entire turbo assembly. Armed with a clear understanding of parts options, costs, and the non-negotiable calibration process, you can confidently restore the performance, reliability, and towing prowess your Cummins engine was built for. To keep your truck in peak condition, explore our other(https://truckguider.com/).
Frequently Asked Questions (FAQs)
Q1: What is the most common cause of a U010C code on a 6.7 Cummins?
A: The most common cause is a failed electronic turbo actuator. This failure is frequently triggered by the underlying mechanical issue of sticking VGT vanes inside the turbocharger, which is caused by soot and carbon buildup over time.
Q2: Can I just delete the VGT turbo to fix this?
A: Some owners, particularly those with modified or “deleted” trucks, replace the VGT with a simpler, fixed-geometry turbo. While this can be a reliable solution, it eliminates the integrated electronic exhaust brake and can create emissions compliance issues. It is a major modification, not a simple fix for the U010C code.
Q3: My U010C code comes and goes. What does that mean?
A: An intermittent code often signals an early-stage failure. The cause could be a failing electronic component inside the actuator, a loose wiring connection, or even a fuse with a hairline crack that loses contact with vibration. It is a warning sign that will likely become a permanent, hard fault in the near future.
Q4: Do I really need a special scan tool to replace the actuator?
A: For most OEM, Mopar, and standard remanufactured actuators, yes. The electronic calibration step is mandatory for the actuator to function correctly with the PCM. However, some aftermarket brands, such as City Diesel, offer redesigned actuators that are “no-calibration-required,” which can be a significant advantage for a DIY repair.
Q5: A mechanic quoted me $3,500 to fix the U010C code. Is that a rip-off?
A: Not necessarily. A quote in that range is consistent with the cost of a full turbocharger assembly replacement at a professional repair shop.16 It is highly likely the mechanic performed a diagnostic and found that the VGT vanes inside your original turbo are seized. In that case, replacing the entire turbo is the correct and necessary repair to prevent a repeat failure of the actuator. Always ask the shop to explain their diagnostic findings.