Valve Cover Torque Specs: The Ultimate Guide for Truck Engines
Introduction: More Than Just a Lid for Your Engine
Sitting atop your truck’s cylinder head is a component that many see as little more than a protective lid: the valve cover. While its name is straightforward, its role is far more critical than it suggests. The valve cover, also known as a rocker cover or cam cover, is a precision-engineered component that serves as the engine’s first line of defense, protecting the intricate valvetrain—rocker arms, springs, and lifters—from dirt, debris, and the elements.
More importantly, it works in concert with a gasket to create a vital seal, keeping engine oil contained where it belongs: circulating through the cylinder head to lubricate these fast-moving parts. This simple-looking seal is ground zero for one of the most common and frustrating issues a truck owner can face: the persistent oil leak. The difference between a clean, dry engine bay and one coated in a grimy film of oil often comes down to one simple, yet frequently overlooked detail: the torque applied to the valve cover bolts. Getting this specification right is a fundamental part of your truck’s routine engine maintenance and the key to a leak-free seal.
The Anatomy of a High-Performance Automotive Blog Post
A Data-Driven Approach to Content Creation for “Valve Cover Torque Specs”
Section 1: The Content Blueprint
Authoritative content isn’t just written; it’s engineered. Starting with the keyword “valve cover torque specs,” our goal is to build a comprehensive resource. This begins with a clear plan that balances deep research, quality writing, and strategic optimization.
Effort Allocation
A breakdown of project time, prioritizing research and writing to ensure depth and accuracy.
Section 2: Foundation of Deep Research
To capture search intent, we go beyond the main keyword. We analyze the search results page (SERP) to identify key entities (like gaskets, bolt patterns, and units) and map out all related questions a user might have.
Semantic Research Flow
This flow ensures we cover the topic completely, from the primary query to all related user needs.
3. Identify Key Entities & Synonyms
- gasket
- in-lbs
- ft-lbs
- bolt pattern
- oil leak
- sequence
Related Question Analysis
Prioritizing questions based on user intent and search volume. “Why” it’s important is a key topic to address.
Section 3: Authority & Engagement
Trust is paramount. We build authority by citing reputable external sources (like OEM manuals) and linking to relevant internal content. Visuals are planned to simplify complex data, making the content more engaging and understandable.
Visual Asset Plan
A clear plan for visuals is crucial. A data table for specs and a bolt pattern diagram are high-priority assets for this topic.
Section 4: Final Optimization & Launch
The final step is to package the content for search engines and users. A compelling meta title and description capture the click, while a thorough FAQ section answers final user questions, establishing complete topical authority.
Optimized Metadata
Valve Cover Torque Specs: The Complete Guide (Chart & Sequence)
Find all valve cover torque specs in ft-lbs and in-lbs. Learn the correct bolt pattern, sequence, and why it’s critical to prevent oil leaks.
Key FAQ Topics
- What happens if you overtighten valve cover bolts?
- How to convert inch-pounds (in-lbs) to foot-pounds (ft-lbs)?
- Do you need to use RTV sealant on a valve cover gasket?
- What are the symptoms of a bad valve cover gasket?
Section 5: The Result: An Authoritative Asset
By following this data-driven process, the final article is not just a blog post, but a comprehensive resource engineered to rank. The primary goal is to capture sustainable, long-term organic traffic by being the best possible answer for the user’s query.
This strategic approach transforms a simple keyword into a valuable, traffic-driving asset that builds the site’s authority and serves its audience effectively.
Projected Traffic Sources
The content is heavily optimized for organic search, which is expected to be the dominant traffic driver.
Why Precision Matters: The Science Behind Torque Specs
In mechanics, "tight" is a subjective term, but "torque" is a precise measurement of rotational force. When a bolt is tightened, it stretches minutely, acting like a spring. This stretching creates a specific amount of clamping force, or "pre-load," which holds the two components together and prevents the fastener from vibrating loose. The manufacturer's torque specification is not an arbitrary number; it is the result of careful engineering designed to achieve the exact clamping force needed for a perfect, durable seal across the entire gasket surface.
The critical need for this precision has become more pronounced as engine technology has evolved. Decades ago, many engines featured stamped steel valve covers paired with thick, forgiving cork gaskets. This combination could often tolerate a bit of over-tightening; the worst outcome was typically a warped cover. This environment fostered a culture where an experienced mechanic's "feel" was often sufficient.
However, modern truck engines have shifted dramatically towards materials chosen for their light weight and strength, such as cast aluminum and, increasingly, rigid plastic composites. While these materials resist warping, they are significantly more brittle and unforgiving. An uneven or excessive application of force that would merely bend an old steel cover can easily crack a modern composite one, turning a simple gasket replacement into a costly component failure. This evolution in materials is the primary reason why the old-school approach of "tight enough" is no longer acceptable. For today's engines, a calibrated torque wrench is not a luxury—it is an absolute necessity.
The High Cost of "Good Enough": Over-tightening vs. Under-tightening
Deviating from the manufacturer's specified torque value, in either direction, can lead to a cascade of problems ranging from minor annoyances to severe engine damage. Understanding these consequences underscores the importance of getting it right the first time.
The Dangers of Over-tightening: When Tighter Isn't Better
The instinct to give a bolt "one extra turn for good measure" can be catastrophic when it comes to valve covers. Applying excessive torque leads to several distinct failure modes.
- Crushed & Extruded Gaskets: A gasket is designed to be compressed to a specific thickness to create a seal. Overtightening crushes it beyond this limit, permanently deforming it and destroying its sealing ability. In many cases, the gasket material is squeezed out from between the cover and the head, a phenomenon known as "extrusion," which creates a guaranteed path for oil to escape.
- Warped or Cracked Covers: On older stamped steel covers, excessive force will cause the bolt rails to bend upwards, lifting the sealing surface away from the gasket between the bolts and causing a leak. On modern plastic or cast aluminum covers, the outcome is worse. These brittle materials do not bend; they crack, often requiring a complete replacement of the valve cover itself.
- Damaged Fasteners & Threads: The bolts themselves have a limit. Overtightening can stretch them past their point of elasticity or shear them off completely. Even more alarming is the risk of stripping the threads in the cylinder head. Since most cylinder heads are made of aluminum, a softer metal, the threads are highly susceptible to damage. Repairing stripped threads in a cylinder head is a complex and expensive procedure that can dwarf the cost of the original job.
The Problems with Under-tightening: The Slow Leak That Drives You Mad
Leaving bolts too loose is an equally problematic, though less immediately destructive, error. The consequences often manifest over time, leading to frustrating and hard-to-diagnose issues.
- Obvious Oil Leaks: This is the most common result. Insufficient clamping force allows oil, under pressure from the engine's crankcase ventilation system, to seep past the gasket. This can start as a minor weep but can develop into a significant leak that coats the engine, drips onto the hot exhaust manifold causing a burning smell, and lowers the engine oil level.
- Hidden Vacuum Leaks: On many modern engines, the valve cover is an integral part of the Positive Crankcase Ventilation (PCV) system. A poor seal can allow unmetered air to be drawn into the engine, creating a vacuum leak. This can lead to symptoms that seem unrelated to the valve cover, such as a rough, fluctuating, or inconsistent idle speed.
- Vibration and Loosening: An under-torqued bolt is susceptible to the engine's natural vibrations. Over thousands of miles, these vibrations can cause the bolts to back out further, turning what was once a properly seated cover into a loose component with a major leak.
Interestingly, finding loose valve cover bolts may not always mean they were installed incorrectly. Over time and thousands of heat cycles, a valve cover gasket can become hard, brittle, and compressed. As the gasket shrinks in thickness, it reduces the clamping force exerted by the bolts, making them effectively loose. For this reason, if a leak is suspected, a valuable first diagnostic step is to check the torque of the existing bolts. Carefully tightening them to the correct specification may resolve the leak, at least temporarily, and can save the time and expense of a full gasket replacement.
The Pro's Playbook: The Art and Science of Tightening
Achieving a perfect, lasting seal involves more than just knowing the final torque value. Professional technicians understand that the process of tightening is equally important. Following two key principles—the tightening sequence and staged tightening—ensures that clamping force is applied evenly across the entire gasket.
The Golden Rule: The Tightening Sequence
For any rectangular or irregularly shaped cover, there is a universal rule: always start tightening the fasteners in the center and work your way outwards in a spiral or criss-cross pattern. This method is critical because it evenly distributes the pressure from the center, pushing any slack in the gasket towards the outer edges. Attempting to tighten from one end to the other can cause the cover to pivot or buckle in the middle, creating uneven pressure and a guaranteed leak.
- Visual Plan: Imagine a valve cover with 10 bolts, five along the top and five along the bottom. The correct sequence would start with the two centermost bolts, then move to the next pair outwards in a criss-cross fashion, and continue until the outermost bolts are tightened.

Tightening in Stages for a Perfect Seal
To further ensure even compression, professionals rarely tighten a bolt to its final torque in a single pass. A multi-stage approach allows the gasket to compress gradually and evenly.
- Step 1: Hand-Tight: Install all bolts and turn them by hand or with a nut driver until they are just snug. This ensures the cover is properly positioned and the gasket is seated.
- Step 2: Partial Torque: Using a torque wrench, follow the correct tightening sequence and tighten each bolt to approximately 50% of its final specified value.
- Step 3: Final Torque: Go through the entire sequence again, this time bringing each bolt to its final, manufacturer-specified torque value.
- Step 4: The Second Pass (If Required): Some procedures, particularly for Duramax engines, specify torquing the bolts a second time after the gasket has had a moment to settle. This ensures the final clamping force is accurate.
The Great Debate: Do You Really Need a Torque Wrench?
While some experienced mechanics working on older, more forgiving engines may rely on their "educated elbow," this practice is strongly discouraged for any modern truck engine. Human feel is notoriously unreliable and subjective, especially at the very low torque values required for valve covers.
The correct tool for this job is a calibrated torque wrench, and specifically, one that measures in inch-pounds (in-lbs) or Newton-meters (N-m). Most valve cover specifications are too low to be measured accurately by a standard foot-pound (ft-lb) torque wrench, which is designed for much higher values like those for lug nuts or suspension components. Using a ft-lb wrench at the very bottom of its scale is highly inaccurate and risks significant over-tightening. If a specification is only available in ft-lbs, the conversion is simple: multiply the ft-lb value by 12 to get the equivalent in-lbs. According to fastener science experts, a consistent and correct tightening procedure is paramount for joint integrity.
The Definitive Torque Spec Chart for Popular Trucks
The most critical piece of information is the correct torque specification for your specific engine. This section provides a master reference chart, but it is essential to remember the golden rule: the Factory Service Manual (FSM) for your truck's exact year, make, and model is always the ultimate authority.
Where to Find Official Specs for YOUR Truck
If you plan on doing serious work on your vehicle, investing in a quality repair manual is essential.
- Factory Service Manuals (FSM): Produced by the vehicle manufacturer, these are the gold standard, providing the most accurate and detailed information available. They can often be purchased in print or digital formats.
- Online Subscription Services: Professional-grade resources like (https://www.alldata.com/diy-us/en) and Mitchell1 offer online access to OEM repair information, including torque specs, procedures, and Technical Service Bulletins (TSBs).
- DIY-Friendly Manuals: For decades, brands like Haynes and Chilton have provided accessible, step-by-step manuals that are excellent for the home mechanic and contain the vast majority of torque specs needed for common jobs. Exploring options for choosing the best online repair manual for your truck can save significant time and prevent costly mistakes.
Torque Specification Master Table
The following table consolidates valve cover torque specifications for popular truck engines based on extensive research. Always confirm the spec for your specific application.
| Manufacturer | Engine | Years | Component | Torque Spec (in-lbs) | Torque Spec (N-m) | Notes / Procedure |
| Chevrolet/GMC | 6.6L Duramax LB7 | 2001-2004 | Lower Valve Cover Bolts | 89 in-lbs | 10 N-m | - |
| Upper Valve Cover Bolts | 71 in-lbs | 8 N-m | Torque twice | |||
| Chevrolet/GMC | 6.6L Duramax LLY | 2004.5-2005 | Lower Valve Cover Bolts | 89 in-lbs | 10 N-m | - |
| Upper Valve Cover Bolts | 71 in-lbs | 8 N-m | Torque twice | |||
| Chevrolet/GMC | 6.6L Duramax LBZ/LMM | 2006-2010 | Lower Valve Cover Bolts | 89 in-lbs | 10 N-m | - |
| Upper Valve Cover Bolts | 71 in-lbs | 8 N-m | Torque twice | |||
| Chevrolet/GMC | 6.6L Duramax LML | 2011-2016 | Lower Valve Cover Bolts | 89 in-lbs | 10 N-m | - |
| Upper Valve Cover Bolts | 89 in-lbs | 10 N-m | ||||
| Chevrolet/GMC | 6.6L Duramax L5P | 2017-2024 | Valve Cover Bolts | 89 in-lbs | 10 N-m | First Pass: 89 in-lbs, Second Pass: Tighten an additional 90° |
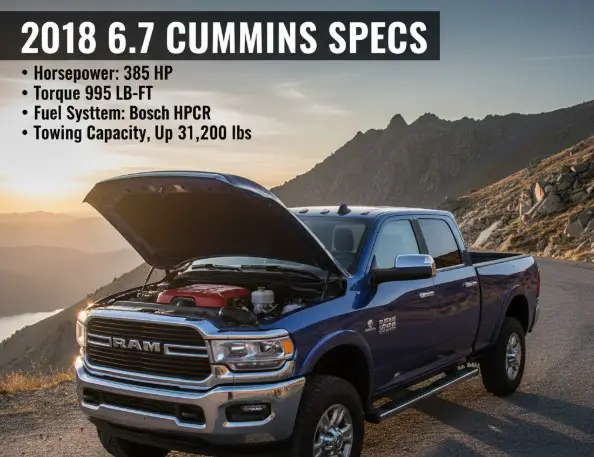
| Dodge/RAM | 5.9L/6.7L Cummins | Various | Rocker Lever Housing & Valve Cover Bolts | 212 in-lbs | 24 N-m | Applies to all bolts for this assembly |
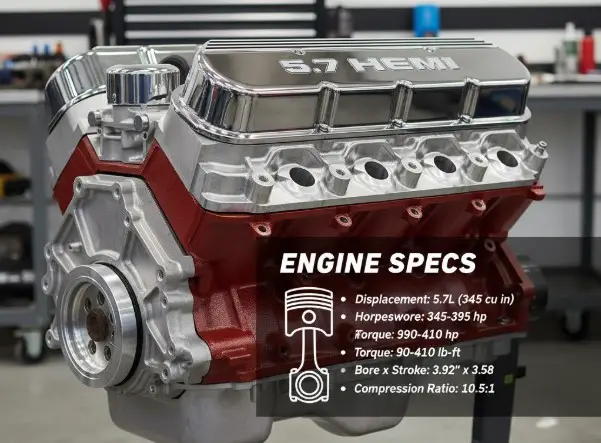
| Dodge/RAM | 5.7L HEMI | Various | Valve Cover Bolts | 89 in-lbs | 10 N-m | Tighten in 3 stages: hand-tight, 45 in-lbs, then 89 in-lbs |
| Ford | 6.0L Power Stroke | 2003-2007 | Crankcase Breather Nuts (Under Cover) | 62 in-lbs | 7 N-m | Note: This is for the breather assembly under the main cover |
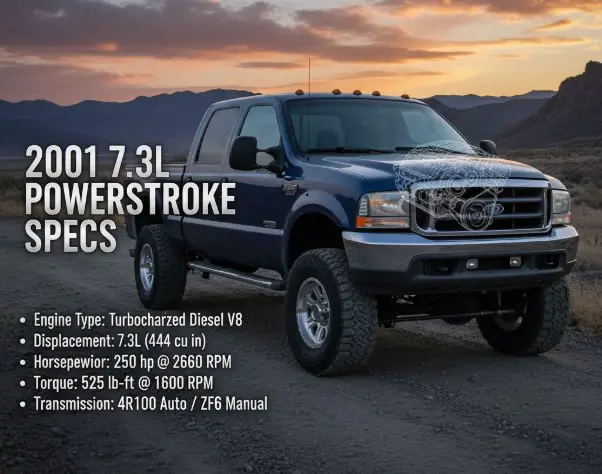
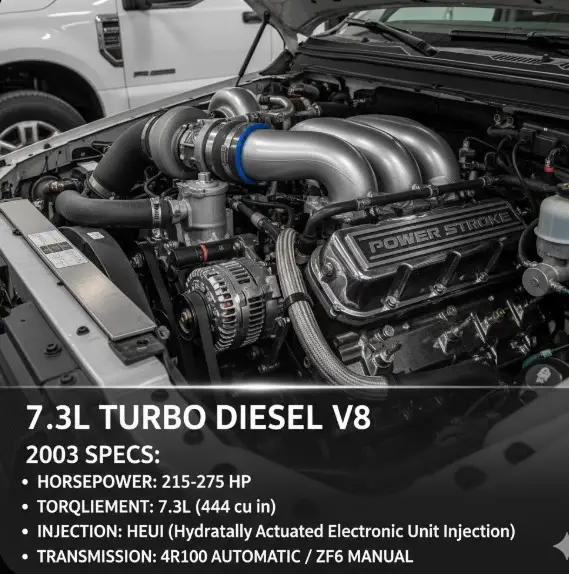
| Ford | 7.3L Power Stroke | 1994-2003 | Valve Cover Bolts | 97 in-lbs | 11 N-m | Source: Ford FSM |
| General | Aftermarket Fabricated Aluminum Covers | Various | Valve Cover Bolts | 60-72 in-lbs | 7-8 N-m | General guideline; always follow manufacturer instructions |
Conclusion: Torque It Right, Keep It Sealed
Successfully replacing a valve cover gasket and preventing future leaks hinges on three fundamental pillars: using the Correct Specification, following the Correct Sequence, and using the Correct Tool. While it may be tempting to rely on guesswork, the potential consequences—from persistent oil leaks to cracked components and stripped threads—are simply not worth the risk.
Taking an extra 15 minutes to look up the proper torque value, follow the center-out pattern, and use a calibrated inch-pound torque wrench is a small investment in time that pays huge dividends. It ensures the job is done to a professional standard, providing peace of mind and protecting the long-term health of your engine. Armed with the right knowledge and a methodical approach, you can tackle this common maintenance task with the confidence of a seasoned pro.
Frequently Asked Questions (FAQ)
What happens if I over-torque my valve cover bolts?
Over-torquing valve cover bolts can cause a host of problems. It can crush the gasket, causing it to fail and leak. It can warp a stamped metal cover or, worse, crack a modern plastic or cast aluminum cover. The most severe consequence is stripping the threads in the aluminum cylinder head or breaking a bolt, both of which require difficult and costly repairs.
Can I reuse my valve cover bolts?
In most cases, valve cover bolts can be reused as they are not typically "torque-to-yield" fasteners (which are designed to stretch permanently and must be replaced). However, many high-quality gasket kits come with new bolts and rubber grommets. It is always best practice to use the new hardware provided, as the old grommets can become hard and brittle, leading to leaks even if the main gasket is new.
What's the difference between inch-pounds and foot-pounds?
Inch-pounds (in-lbs) and foot-pounds (ft-lbs) are both units of torque, but on a different scale. There are 12 inch-pounds in 1 foot-pound. Valve cover torque specs are very low, typically in the range of 70-110 in-lbs. Using a ft-lb torque wrench for such a low value is highly inaccurate and will likely result in over-tightening. Always use an in-lb torque wrench for this job.
Do I need to use RTV sealant with my valve cover gasket?
This depends entirely on the engine and gasket design. You should never apply sealant to the entire gasket unless explicitly instructed by the manufacturer. However, it is common practice to apply a small dab of a specific, non-hardening sealant like Permatex #2 or a sensor-safe RTV silicone at sharp corners or joints, such as where a timing cover meets the cylinder head.35 These are natural stress points where a small amount of sealant can prevent a leak. Always consult your service manual for the correct procedure.
How do I know if my valve cover is leaking?
The signs of a leaking valve cover gasket are usually clear. Look for visible oil running down the side of the cylinder head or engine block. You may notice a burning oil smell, which is often caused by oil dripping onto the hot exhaust manifold. Over time, a leak will cause a buildup of greasy dirt and grime on the engine. Finally, a significant leak can lead to a noticeable drop in your engine's oil level between changes.