1995 Chevy Silverado Bulb Chart: 2026 Component Breakdown

The 1995 Chevy Silverado bulb chart specifies high-intensity discharge or halogen requirements. Key bulbs include the 6054 for headlamps, 2057 for turn/tail signals, and 194 for side markers. Always verify the terminal configuration and system voltage before installation to prevent short circuits or premature failure of the lighting components.
📌 Key Takeaways
- Headlight units utilize the 6054 sealed beam halogen standard for 12V systems.
- The interior instrument cluster utilizes 194 and 168 bulbs for illumination.
- Always wear nitrile gloves; oil from fingers reduces quartz halogen bulb life by 30%.
- Corroded socket contacts are the most frequent cause of intermittent lighting failure.
- Consult a professional if the multi-function turn signal switch exhibits excessive heat or smoke.
Maintaining the lighting integrity of a GMT400 platform vehicle requires precise adherence to factory electrical standards. Whether you are performing a routine restoration or diagnosing a persistent illumination failure, having an accurate 1995 Chevy Silverado bulb chart is essential for identifying the correct component and configuration. This vintage of Silverado utilizes a combination of composite housing and sealed beam systems, each demanding specific base types and wattage tolerances. Understanding the underlying circuit structure and the blueprint of the factory wiring harness ensures you maintain the necessary voltage drop requirements for both halogen and incandescent setups. This guide provides the technical data necessary to navigate the electrical system of your 1995 truck with professional accuracy.

Prime for Young Adults — 6 Months Free
Students and 18–24s get six months of Prime free, then half price.
Start 6 Months Free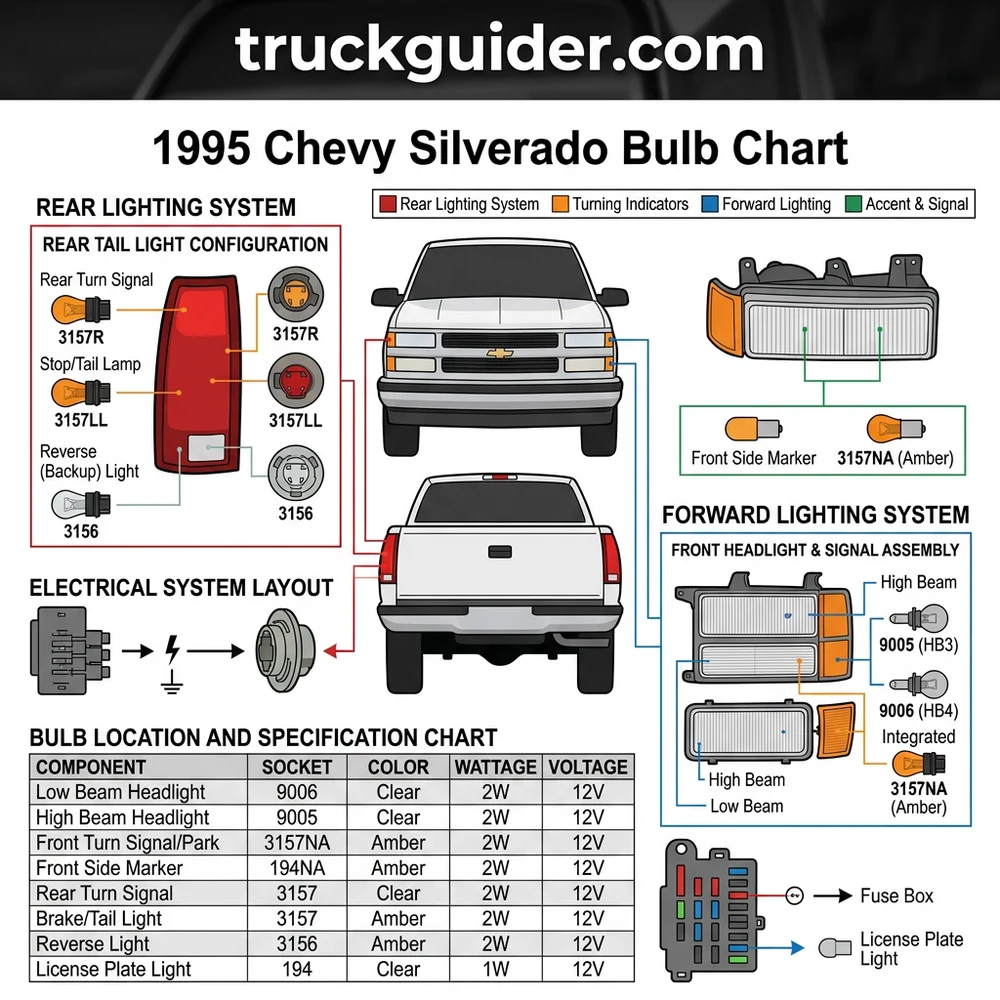
1995 Chevy Silverado Bulb Chart and Technical Specifications
Recommended Best Deal Products


The lighting configuration for the 1995 Chevrolet Silverado varies based on whether your vehicle is equipped with the standard sealed beam rectangular housings or the upgraded composite lens assemblies. These components operate on a 12-volt DC system, requiring specific base configurations to maintain contact stability within the sockets. Using incorrect bulb wattages or incompatible materials can result in melted connectors or premature wiring harness degradation. The following table serves as your primary reference for component identification across the 1995 GMT400 platform.
| Lighting Component | Bulb Part Number | Application Notes |
|---|---|---|
| High/Low Beam (Sealed Beam) | H6054 | Rectangular Glass Housing |
| High Beam (Composite) | 9005 | Single Filament |
| Low Beam (Composite) | 9006 | Single Filament |
| Front Turn/Parking | 2057NA | Amber/Dual Filament |
| Tail/Stop/Turn | 2057 | Dual Filament |
| Back-up Light | 1156 | Single Filament |
| License Plate | 194 | Wedge Base |
When servicing the GMT400 lighting system, note that the 2057 bulb is a direct industry standard replacement for the factory original, though 1157 bulbs are physically identical. However, the 2057 provides specific filament positioning calibrated for the 1995 reflector housing geometry; using 1157 may result in reduced light output or improper beam patterns.
The structural layout of the 1995 Silverado electrical architecture relies heavily on the ground integrity of the chassis. When consulting the bulb chart, technicians must ensure that the socket contact points are free of corrosion. Oxidized terminals significantly increase resistance, which leads to flickering or premature bulb failure. For composite headlight systems, the 9005 and 9006 bulbs feature plastic base locks that are susceptible to heat fatigue. Inspecting the socket housing for melting or deformation is a mandatory part of any bulb replacement procedure on this vehicle platform.
Replacing Your Lighting: A 1995 Chevy Silverado Bulb Chart Walkthrough

Replacing lighting components on a 1995 Chevrolet Silverado requires a methodical approach to prevent damage to the plastic retainers and alignment hardware common in the GMT400 era. Unlike modern automotive layouts, these assemblies often utilize metal spring clips or threaded plastic adjusters that can become brittle over time due to heat exposure. Following this systematic blueprint for replacement ensures both structural integrity and correct beam alignment.
- Preparation: Disconnect the negative battery cable to prevent accidental shorting, particularly when working with the high-current headlight circuits. Ensure your hands are clean and free of oils; oil residue on a halogen bulb (like the 9005/9006 series) will cause localized hotspots, significantly shortening the bulb’s service life.
- Accessing Composite Housings: The composite headlight assembly is secured by vertical spring-loaded retainers. Pull the two metal tabs upward to release the housing from the header panel. Once released, carefully pull the assembly forward to expose the back of the headlight unit.
- Bulb Extraction: Rotate the bulb socket counter-clockwise to unlock it from the housing. Depress the locking tab on the wire harness connector and pull outward. Do not pull on the wires; apply pressure only to the plastic connector body to prevent conductor fatigue.
- Component Seating: Inspect the rubber weather-seal O-ring on the new bulb. If the seal is cracked or deformed, moisture ingress will occur, leading to reflector tarnishing. Insert the new bulb, aligning the tabs precisely with the housing grooves, and rotate clockwise until you feel the tactile ‘click’ of the locking mechanism.
- Alignment and Verification: Reinstall the headlight housing, ensuring the vertical tabs are fully seated. Once the bulb is installed, perform a test by activating the low and high beams. If the beam pattern appears significantly lower or higher than previously recorded, verify that the bulb base is fully flush against the housing seat.
Never attempt to adjust the vertical or horizontal aim of your headlights by turning the plastic adjuster screws while the engine is running or the vehicle is in gear. Ensure the vehicle is parked on a level surface at least 25 feet away from a flat wall to verify the beam pattern matches standard OEM specifications.
For the turn signal and stop lamps, the process involves removing the rear tail lamp housing screws. On the 1995 Silverado, these are typically Philips or Torx-head screws accessible from the exterior. Once the lens is removed, the sockets are accessed from the rear. Use dielectric grease on the base of any replacement bulb to prevent galvanic corrosion, a common failure point for these rear lighting systems due to their exposure to road salt and moisture. Consistent maintenance of these contacts is vital for preventing the dreaded “ghosting” or dim brake light symptoms that plague high-mileage GMT400 units.
Troubleshooting 1995 Chevy Silverado Lighting and Electrical Issues
Electrical gremlins in the 1995 Chevy Silverado usually trace back to two primary culprits: poor grounding or a failing flasher relay. Because the truck uses a relatively simple circuit configuration, identifying the source of a fault requires a systematic analysis of the wiring harness. Use the following diagnostic criteria to narrow down your electrical failure.
- Hyper-flash Symptoms: If your turn signals flash at an accelerated rate, it is almost exclusively due to an incorrect load in the circuit. If you have recently upgraded to LED bulbs, the relay will not detect the required resistance. You must either install an electronic LED-compatible flasher relay or a load resistor in parallel with each bulb.
- Intermittent Failure: If lights pulse or flicker, check the ground terminal located near the radiator support for the headlights, or the frame ground near the rear crossmember for tail lamps. These connections are notorious for accumulating rust, which increases circuit resistance and creates an unstable current flow.
- Flasher Relay Performance: The factory flasher unit is located under the dash, near the steering column. If you experience total failure of turn signal operation, first test for 12V constant power at the relay input. If power is present but output is absent, the mechanical contacts within the relay have likely oxidized.
- Dim Illumination: If bulbs appear dim even when the alternator is outputting 14.2V, check the voltage drop across the headlight switch. The 1995 Silverado headlight switch is a known point of high resistance; if the switch feels warm to the touch, the internal contacts are failing, and the switch should be replaced to prevent an electrical fire.
- Wire Harness Integrity: Inspect the loom behind the front bumper. Road debris often slices into the thin-gauge insulation, causing short-to-ground faults that blow fuses immediately upon activation. Use heat-shrink butt connectors for all repairs; electrical tape is insufficient for the high-vibration environment of a pickup truck.
For those interested in upgrading their electrical capacity, refer to our related technical documentation on “GMT400 Alternator Upgrades” and “Headlight Relay Harness Kits.” Adding a dedicated relay harness allows the headlights to draw power directly from the battery rather than through the dashboard switch, significantly improving light output and switch longevity.
1995 Chevy Silverado Bulb Chart Questions Answered
Can I use LED bulbs in my 1995 Chevy Silverado housing?
You can convert to LED, but it requires more than just a bulb swap. The reflector housings in the 1995 model were engineered for the specific filament placement of halogen/incandescent bulbs. Using an LED bulb without an adjustable focus collar will scatter light, causing glare for oncoming traffic. Furthermore, you will need an electronic flasher relay to avoid the hyper-flash condition caused by the lower current draw of LEDs.

Audible — Listen Free for 30 Days
One free credit a month and thousands of titles included.
Listen Free for 30 DaysWhat is the cause of my tail lights working but my brake lights failing?
This is a common issue on the GMT400 platform related to the turn signal switch assembly in the steering column. Because the brake signal travels through the turn signal switch, a worn switch contact can interrupt the brake signal while leaving the tail/running light circuit intact. First check the bulbs and fuses, but if those are functional, test for 12V output at the turn signal switch connector on the steering column.
Why does my headlight beam look “yellow” or dim?
Beyond simple bulb aging, dim headlights on a 1995 Silverado are frequently caused by plastic lens oxidation or low voltage at the socket. If your lens is cloudy, a restoration kit can help; however, if the lens is clear and the light is still dim, measure the voltage at the bulb socket with the engine running. If you see anything below 13V, the wiring harness or headlight switch has developed high resistance that must be repaired.
Is the 1995 Silverado bulb chart identical for all trim levels?
The bulb specifications remain consistent across the W/T, Cheyenne, Scottsdale, and Silverado trims for the 1995 model year. The primary difference is whether the vehicle came equipped with standard sealed beams or the optional composite headlight assemblies. Always verify your specific housing type before purchasing replacement bulbs to ensure you have the correct base configuration.
Step-by-Step Guide to Understanding the 1995 Chevy Silverado Bulb Chart
Identify – Verify the failing light component and correlate it with the specific part number in the chart.
Locate – Access the rear of the lamp assembly or lens structure using the provided diagram layout.
Reference – Match the current bulb configuration to the required part number to ensure proper voltage compatibility.
Connect/Route – Secure the new bulb into the socket, ensuring that the electrical pins align with the harness terminals.
Verify – Activate the light system and check for proper output and consistent brightness before replacing any covers.
Audible Premium Plus — Annual Membership
12 audiobook credits up front, plus the full Audible catalogue.
See Annual PlansTroubleshoot – If the bulb fails to light, test the harness connection with a multimeter to ensure current is present.