
2006 Chevy Silverado Radio Wiring Diagram: Pinout Configurations & Bus Integration Explained

Did you know that the 2006 Chevy Silverado radio wiring system relies on a complex data bus connection rather than traditional switched power leads? If you are looking to upgrade your factory head unit, understanding the specific wiring configuration is essential for preserving your truck’s warning chimes and steering wheel controls. This guide provides the technical insights and structural details required for a successful aftermarket audio installation.
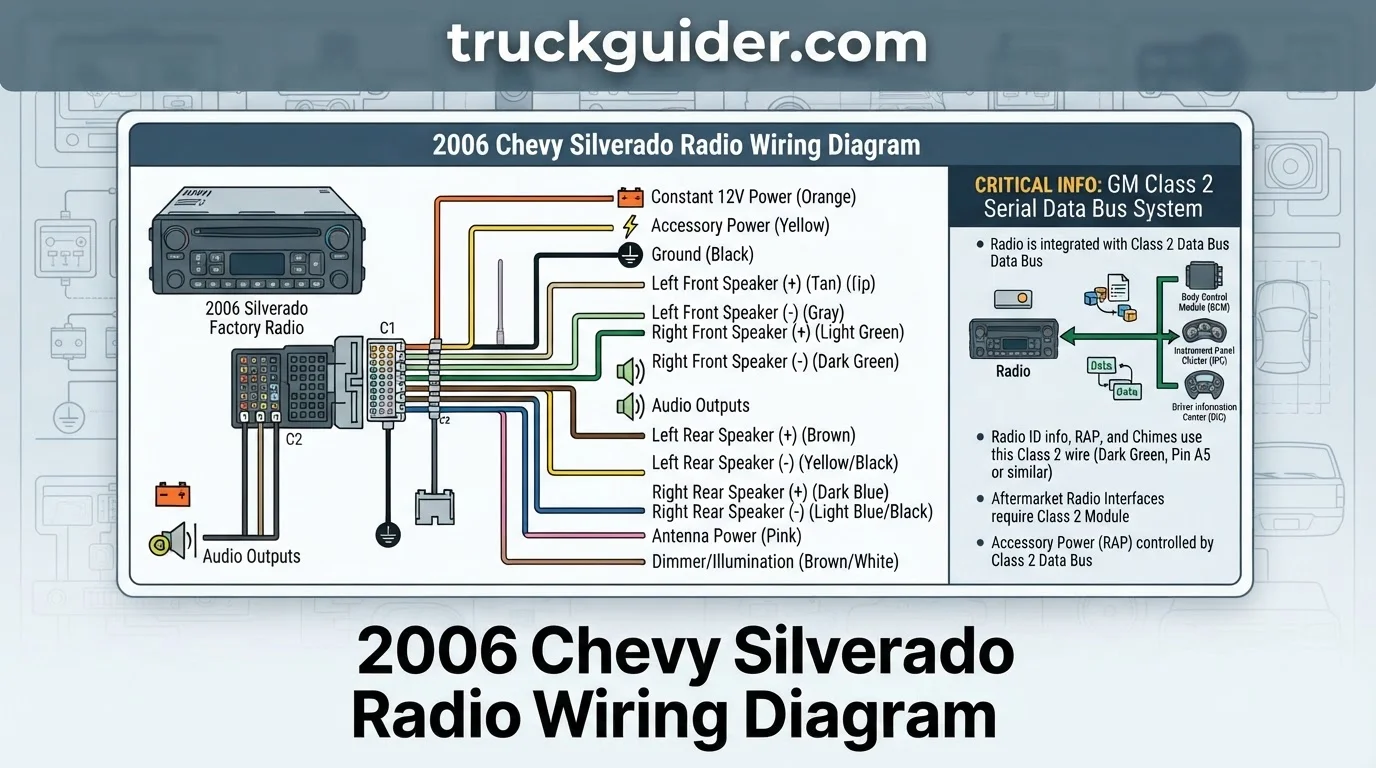
2006 Chevy Silverado Radio Wiring Diagram: Core Interface Reference
Recommended Best Deal Products


How to Read This Chart
This table outlines the primary connections found within the factory radio harness of a 2006 Silverado. The “Wire Color” column identifies the standard color coding used by GM for the factory plug. The “Function” column describes the electrical purpose of that specific circuit.

Note that the “Data Bus” (Dark Green/White) is critical. Unlike older vehicles, your radio does not receive a traditional “switched” ignition signal from the harness. Instead, it receives an “on” command via digital data. This is why you must use a specialized interface module. Always refer to your specific truck’s service manual or a professional harness adapter’s instruction sheet to confirm speaker polarity before making final connections, as configurations may vary based on whether your truck was equipped with a factory Bose or non-Bose audio system.
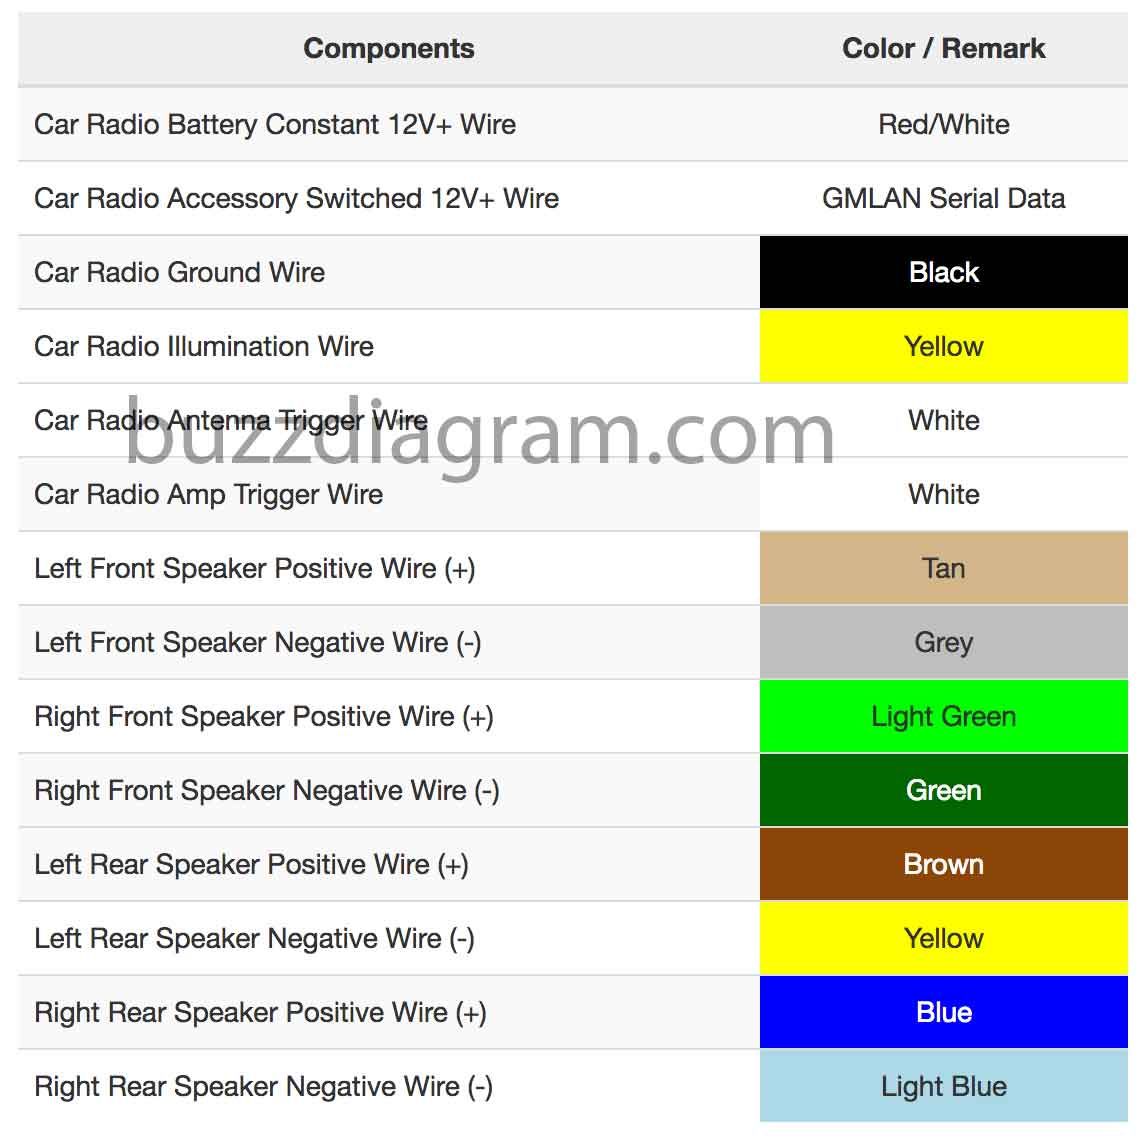
Essential Insights for 2006 Silverado Audio Integration
When working with a 2006 Chevy Silverado radio wiring diagram, the biggest pitfall is the assumption that you can find a switched 12V wire at the factory harness. Because the vehicle uses a serial data signal to wake up the radio, splicing into wires without a proper interface will likely result in the unit staying on even when the key is removed, or failing to turn on entirely.
For trucks equipped with the factory Bose premium sound system, the integration is even more specific. These systems utilize a unique amplifier turn-on signal sent through the data bus. If you bypass this with a standard harness, you may experience no audio output or significant signal clipping. Always utilize an interface that supports the Bose amplifier logic for the best sound quality and system reliability.
📋
How to Perform an Aftermarket Radio Install
Recommended Best Deal Products


Always disconnect the negative terminal of your battery before unplugging any electrical harnesses to prevent shorting out the sensitive BCM (Body Control Module).
Use the interface module’s harness to match the colors of your new radio’s harness. Crimp or solder the connections and heat-shrink them for a durable, vibration-resistant finish.
Reconnect the battery and test all functions (power, audio, chimes) before bolting the new unit into the dash panel. Ensure the antenna adapter is securely seated.
Common 2006 Silverado Radio Wiring Problems and Fixes
One of the most frequent issues reported is the loss of door chimes and warning signals after replacing the stock unit. These chimes are generated through the factory radio’s circuitry. If you use a cheap harness that does not include a chime retention module, these safety alerts will disappear completely.
Another common hurdle is the “Check Engine” light or other communication errors. If you inadvertently tap into the Data Bus wire (Dark Green/White) for a remote wire or accessory power, you may disrupt communication between the truck’s modules. Always use an interface module that is specifically programmed for the 2006 GM platform to prevent these digital conflicts.
✨ Key Benefits of Proper Wiring
Recommended Best Deal Products



Preserved Safety Features
Retaining door chimes, seatbelt reminders, and turn signal clicks ensures your vehicle’s safety diagnostics continue to function as intended.
Seamless Power Integration
Using a proper interface module keeps the Retained Accessory Power (RAP) functionality, allowing your radio to stay on until you open the door.
The 2006 Silverado’s radio system shares the same Class II data communication as the Chevrolet Tahoe and GMC Sierra of the same year. This means many aftermarket wiring harnesses are cross-compatible across the entire GMT800 platform.
🔎 How to Identify Your Factory System
To identify whether your truck has the base audio system or the premium Bose system, check the RPO (Regular Production Option) codes located on the sticker inside your glove box. If you see code “UQA,” your vehicle is factory-equipped with the Bose amplifier system.
Understanding this is crucial before buying your wiring adapter. While the main harness plug may look similar, the pinout for audio signals differs significantly. Always consult your vehicle’s build sheet or perform a VIN lookup if you are unsure of your specific equipment level before starting your electrical project.
Never attempt to power your aftermarket radio directly from the cigarette lighter or other ignition sources. This can overload those circuits and blow the fuse for your interior accessories. Always use an interface module connected to the proper radio harness to ensure the vehicle’s electrical load remains balanced.
What If My Radio Still Doesn’t Power On?
If you have installed the radio and it fails to turn on, follow these diagnostic steps:
- Check the 15-amp radio fuse located in the passenger-side instrument panel fuse block.
- Ensure the interface module is firmly plugged into the factory harness and that its status light (if present) is flashing, indicating data communication.
- Verify the ground connection at the chassis; a loose bolt here is a common culprit for a “dead” unit.
- Ensure the yellow constant 12V wire has power even when the key is removed.
If you have performed these steps and still face issues, consider consulting a professional car audio technician. Professional troubleshooting for these electronic systems typically ranges from $100 to $250, depending on the complexity of the diagnosis.
Summary of Wiring Insights
Upgrading the audio system in your 2006 Chevy Silverado is a straightforward process when you utilize the correct interface and follow the appropriate wiring protocols. By acknowledging the vehicle’s Class II data bus system and using the correct harness adapter, you can preserve all original vehicle features while enjoying modern audio capabilities. This guide, based on verified automotive standards, should serve as your primary resource for completing the installation safely. For the next step, verify your truck’s specific RPO codes to ensure you purchase the correct interface adapter for your exact model configuration.
Key Takeaways
-
✓
Use a data-retention wiring harness to maintain factory door chimes and RAP (Retained Accessory Power). -
✓
The factory radio does not have a traditional switched 12V ignition wire; it relies on digital serial bus data. -
✓
Yellow wires typically provide constant 12V battery power, while ground connections should be chassis-grounded for stability. -
✓
Speaker color codes follow standard GM protocols, but always verify polarity with a multimeter before final soldering. -
✓
Professional installations require a steering wheel control (SWC) adapter if you wish to retain factory audio buttons.
❓ Frequently Asked Questions
1
What is the 2006 Chevy Silverado radio wiring diagram?
This diagram serves as the essential reference chart for identifying factory speaker wires, ground points, and constant power leads. It provides the technical facts needed to bridge your aftermarket head unit into the truck’s proprietary GM Class 2 data network safely and effectively.
2
How does the GM Class 2 Serial Data Bus work?
The Class 2 bus system uses digital signals to communicate between vehicle modules. Unlike older vehicles with simple analog wiring, the 2006 Silverado radio receives a ‘wake-up’ command via the data wire. This complexity means aftermarket units require a specialized interface module to translate these digital signals into usable power.
3
Why is a wiring harness adapter important?
A wiring adapter is critical because it preserves the integrity of your truck’s original harness. It allows for ‘plug-and-play’ capability, ensures that features like Retained Accessory Power function correctly, and protects sensitive computer modules from accidental voltage spikes or improper grounding during the installation process.
4
What are the benefits of using a professional wiring harness?
Professional-grade harnesses provide reliable, color-coded connections that minimize installation errors. They offer insights into the factory system’s electrical load, ensuring your new stereo does not blow fuses or drain your battery, while also simplifying the removal process if you ever decide to reinstall the original factory radio.
5
How can I get started with my stereo installation?
Start by identifying your specific audio configuration, such as standard or Bose premium, to ensure you purchase the correct interface. Gather necessary installation details, disconnect the negative battery terminal, and perform a dry-run connection of your new harness to verify all components function correctly before finalizing your wiring.
6
Where is the accessory wire for my radio?
It doesn’t exist as a physical wire in the harness. You must use a data interface module to generate a simulated 12V accessory signal.

![2022 Ram 2500 Running Boards [2026]](https://truckguider.com/wp-content/uploads/2026/03/2022-ram-2500-running-boards-featured.webp)
![Dodge Ram 2500 Interior [2026]](https://truckguider.com/wp-content/uploads/2026/03/featured-583ae4d5-768x768.webp)