2007 Chevy Silverado Belt Diagram: 2026 Proper Routing

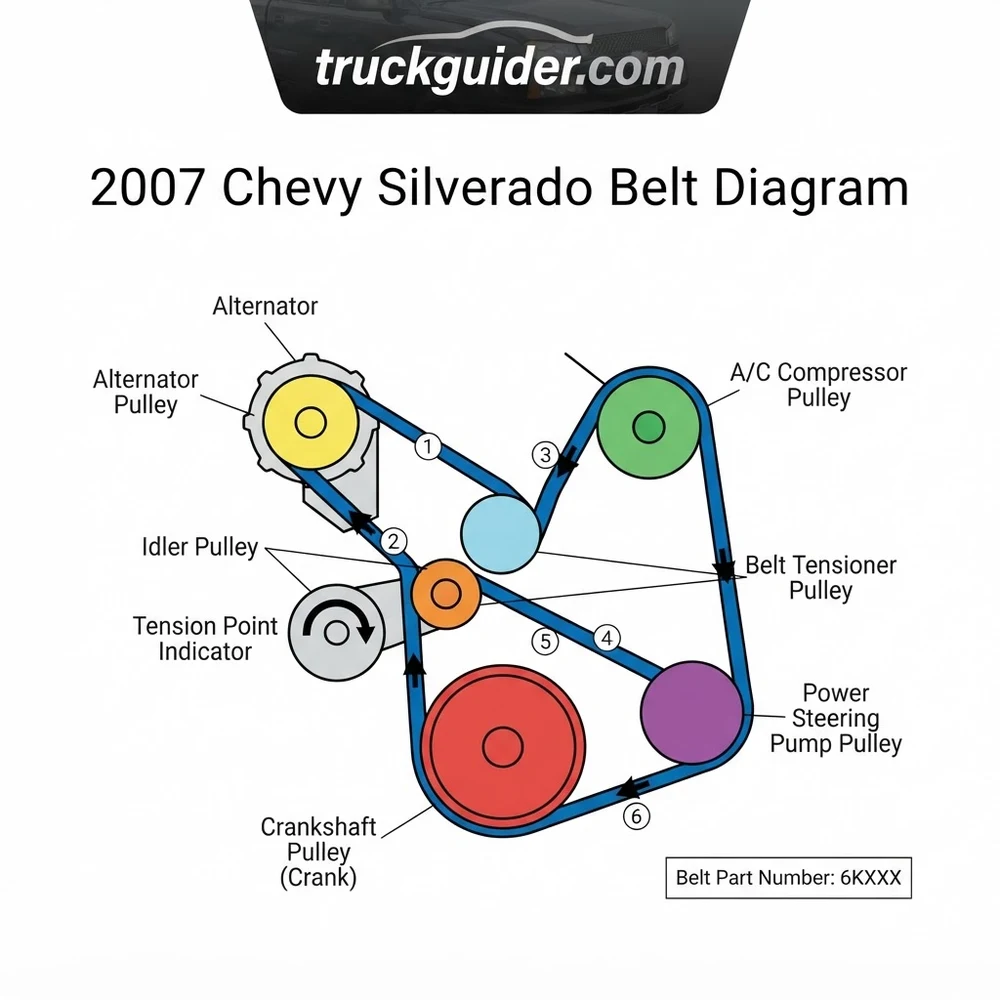
Route the serpentine belt ribbed-side down onto the crankshaft pulley, carry it up around the power steering pump, over the alternator, down beneath the smooth idler pulley, around the water pump, and finish by rotating the 15mm automatic belt tensioner clockwise to slip the belt over the tensioner pulley.
📌 Key Takeaways
- Main serpentine belt length differs between 145-amp (93.0-inch) and 160-amp (93.5-inch) factory alternators.
- The 2007 Silverado features a separate secondary 4-rib belt dedicated exclusively to the A/C compressor.
- Belt tensioner center bolt requires a 15mm socket rotated clockwise to relieve internal spring pressure.
- Worn idler pulley bearings are the primary cause of belt chirping and premature rib fraying.
- Belt replacement is DIY-friendly in under 30 minutes, but pulley alignment issues require professional diagnosis.
Accurate accessory drive maintenance on the 2007 Chevrolet Silverado requires a precise understanding of the vehicle’s dual-belt drive architecture. The 2007 model year serves as a transitional production phase for General Motors, encompassing both the legacy GMT800 platform (marketed as the “Classic”) and the redesigned GMT900 generation (“New Body Style”). Because these platforms utilize distinct accessory drive offsets, alternator amperage ratings, and air conditioning drive mechanisms, applying the correct 2007 chevy silverado belt diagram is critical to preventing belt slip, premature bearing failure, and severe engine overheating.
Schematic representation: 2007 Chevy Silverado (GMT900 / GMT800) Serpentine and A/C Drive Routing Path illustrating Crankshaft Balancer, Water Pump, Alternator, Power Steering, Idler Pulley, and Spring-Loaded Belt Tensioner.
2007 Chevy Silverado Belt Diagram by Engine and Platform


General Motors engineered two entirely separate vehicle architectures under the 2007 model designation. Correctly identifying whether your truck is a GMT800 Classic or a GMT900 New Body Style determines the physical belt routing path and the accessory drive mounting layout. The accessory drives on these platforms feature distinct pulley center distances and water pump casting designs that alter how the serpentine belt interfaces with each accessory.


GMT800 Classic vs. GMT900 New Body Style Belt Drive Differences



The 2007 Silverado Classic (GMT800) carries over the Gen III Vortec V8 architectures (such as the 4.8L LR4, 5.3L LM7/L59, and 6.0L LQ4). In contrast, the 2007 New Body Style (GMT900) introduces the Gen IV Vortec engine family (including the 4.8L LY2, 5.3L LY5/LMG/LC9, and 6.0L L76/LY6). The principal divergence in the pulley diagram between these platforms lies within the air conditioning compressor drive circuit:
- GMT800 Classic: Employs an independent, dedicated secondary drive utilizing a conventional spring-loaded mechanical belt tensioner mounted low on the lower passenger side of the engine block.
- GMT900 New Body Style: Eliminates the secondary mechanical tensioner entirely. It incorporates a direct-drive elastic “stretch belt” running directly between the crankshaft harmonic balancer and the A/C compressor.
Do not attempt to install an adjustable tensioner on a GMT900 Gen IV engine block. The engine casting lacks the drilled and tapped mounting boss utilized by the GMT800 platform, requiring the direct installation of an elastic stretch-fit OEM belt.
Vortec 4.8L (LY2) and 5.3L (LY5, LMG, LC9) Pulley Diagram Layouts
On the Gen IV 4.8L and 5.3L platforms, the primary serpentine belt operates every accessory except the air conditioning compressor. The layout positions the grooved crankshaft pulley at the bottom dead center of the drive assembly. Above it, the smooth water pump pulley sits centrally, driven by the smooth reverse side of the serpentine belt to maintain correct reverse-rotation cooling efficiency. The power steering pump is mounted low on the driver side, while the high-output alternator resides on the upper driver-side bracket. An upper idler pulley stabilizes belt flutter between the alternator and the dynamic belt tensioner, which is bolted to the front-passenger cylinder head face.
Vortec 6.0L (LY6, L76) Accessory Drive Configurations
The Vortec 6.0L LY6 and variable-valve-timing-equipped L76 V8 powerplants utilize an identical triangular geometry for the main accessories as the 5.3L platform, but often incorporate higher current demand accessories. When equipped with heavy-duty cooling packages or the optional 160-amp charging system, the physical alternator pulley diameter increases slightly, which alters the required effective belt size. Cross-referencing your truck’s RPO codes (found on the glove box placard) is essential before selecting replacement components during a comprehensive Silverado alternator replacement guide procedure.
OEM Belt Part Numbers and Belt Size Specifications


Selecting the correct drive belt demands exact matching of dimensional width, rib profile, and effective circumference. Gen IV Vortec engines utilize an ISO 9982 standard 6-rib PK profile for the primary serpentine circuit and a 4-rib PK profile for the secondary A/C circuit. The primary serpentine belt size varies based on the installed alternator capacity (RPO KG3 for 145-amp; RPO KW1 for 160-amp).


| Engine & RPO Option | Drive Circuit | OEM Belt Part Number | Aftermarket Part Number | Belt Size (Effective Length / Ribs) |
|---|---|---|---|---|
| 4.8L / 5.3L / 6.0L (145A Alternator) | Primary Serpentine | GM 12626222 (ACDelco 6K930) | Gates K060930 | 93.00 in (2362 mm) / 6-Rib |
| 4.8L / 5.3L / 6.0L (160A Alternator) | Primary Serpentine | GM 12637248 (ACDelco 6K935) | Gates K060935 | 93.50 in (2375 mm) / 6-Rib |
| GMT900 Gen IV V8 (All Displacements) | A/C Secondary (Stretch) | GM 12558509 (ACDelco 4K378) | Gates K040378SF | 37.80 in (960 mm) / 4-Rib Elastic |
| GMT800 Classic Gen III V8 | A/C Secondary (Tensioned) | GM 12576447 (ACDelco 4K376) | Gates K040376 | 37.62 in (956 mm) / 4-Rib Standard |
| 4.3L V6 (LU3) Work Truck | Single Serpentine | GM 12575881 (ACDelco 6K956) | Gates K060956 | 95.62 in (2429 mm) / 6-Rib |
Primary Serpentine Drive Belt Dimensions and Codes


The primary OEM belt utilizes continuous-filament polyester tensile cords embedded in an ethylene propylene diene monomer (EPDM) synthetic rubber matrix. Unlike older chloroprene belts that showed visible surface cracking, EPDM belts wear by losing rib depth material over extended operating cycles. Installing the 93.0-inch belt on a 160-amp charging system will induce premature radial loading on the alternator and water pump bearings. Conversely, installing the 93.5-inch belt on a 145-amp system shifts the belt tensioner past its calibrated take-up range, causing slippage under heavy electrical loads.
Secondary A/C Compressor Stretch Belt Specifications
The A/C drive on the 2007 GMT900 relies on an elastic polyamide tensile member. This construction permits temporary elongation during installation without yielding, maintaining dynamic tension through internal cord memory. The belt part number designation typically includes an “SF” suffix (indicating Stretch Fit) in commercial aftermarket listings. A conventional non-elastic 4-rib belt cannot be substituted under any circumstances; doing so will warp the compressor snout, cause instantaneous belt failure, or shear the harmonic balancer pulley lip during mounting.
Accessory Mounting Fastener Torque Specs: Serpentine Belt Tensioner Bolts: 37 lb-ft (50 Nm); Upper Idler Pulley Bolt: 37 lb-ft (50 Nm); Power Steering Pump Mounting Bolts: 18 lb-ft (25 Nm); Water Pump Casing Bolts: First pass 11 lb-ft (15 Nm), Final pass 22 lb-ft (30 Nm).
2007 Chevy Silverado Belt Diagram Routing Path Step-by-Step


Executing the complete belt replacement on a 2007 Silverado requires following the exact spatial relationship defined by the belt routing path. Because the secondary air conditioning belt sits rearward (closer to the timing cover) on the dual-sheave harmonic balancer, the primary serpentine belt must be completely demounted prior to servicing the A/C circuit.


Lower A/C Compressor Belt Installation Sequence
Access the lower front crossmember from beneath the vehicle and detach the plastic splash shield using a 10mm socket. On GMT900 platforms, install the secondary stretch belt using the following mechanical procedure:
- Position the rear grooves of the 4-rib stretch belt onto the lower grooved pulley of the air conditioning compressor located on the lower passenger side of the engine block.
- Feed the upper portion of the stretch belt loop over the rear 4-rib track of the crankshaft harmonic balancer.
- Affix a specialized stretch belt installation magnetic guide tool (such as Kent-Moore EN-48930 or Gates SFT001) onto the outer lip of the crankshaft balancer pulley at approximately the 2 o’clock position to anchor the belt.
- Seat a 24mm socket and a long-handle breaker bar onto the center crankshaft harmonic balancer bolt.
- Rotate the engine crankshaft clockwise in a continuous motion. The tool will wedge the stretch belt outward and guide its inner ribs over the balancer’s retention lip until it snaps fully into the matching internal grooves.
- Rotate the crankshaft an additional 360 degrees to verify that all four ribs are tracking perfectly within the pulley grooves and have not slipped off-center toward the oil pan.
Main Serpentine Belt Routing Path Execution
Once the rear A/C circuit is secured, proceed with the primary 6-rib drive installation from the top of the engine bay. Utilize an assistant or a secure under-hood latch retainer to facilitate routing.
- Pass the loop of the 6-rib serpentine belt down between the engine fan shroud and the front accessory brackets.
- Wrap the lowest loop of the belt around the outer 6-rib track of the crankshaft pulley / Harmonic balancer, ensuring the ribbed surface mates flush into the pulley lands.
- Route the driver side span upward and align the ribbed interior surface over the deeply grooved alternator pulley at the top-left quadrant of the engine.
- Route the downward span coming off the alternator down around the ribbed pulley of the power steering pump located at the lower driver side. Check alignment closely, referencing our GM power steering pump pulley alignment procedure if you notice any belt track walk.
- Direct the lower span coming off the crankshaft harmonic balancer up and over the top of the smooth water pump pulley. Ensure the flat, smooth back of the belt lies centered across the wide, ungrooved water pump surface.
- Direct the span passing between the alternator and power steering around the underside of the grooved or smooth upper idler pulley (depending on your specific bracket casting revision) positioned high on the accessory bracket.
- Form a final bight of the belt between the water pump and the dynamic belt tensioner.
- Mount a 15mm box-end wrench or designated low-profile serpentine belt tool / Breaker bar to the hex boss cast into the center of the automatic tensioner arm.
- Apply steady, clockwise torque to the tool to rotate the spring-loaded tensioner pulley arm downward and toward the engine centerline, collapsing the internal clock spring.
- Slide the remaining loose belt loop under the smooth roller face of the collapsed tensioner pulley, then release leverage slowly until the tensioner contacts the belt back and takes up operating slack.
Belt Tensioner Operation and Pulley Inspection Guidelines


The accessory drive relies on an internal damped torsional spring within the automatic belt tensioner to modulate dynamic belt oscillations. Over time, heat cycles degrade both the internal polymer damping pads and the sealed bearings in the dynamic and stationary pulleys.
Evaluate the tensioner indicator window cast into the base housing. The moving pointer cast on the pivoting arm must rest squarely within the graduated physical stop marks when the belt is fully tensioned. If the indicator exceeds the maximum travel mark, the belt has stretched beyond service limits or the internal spring has suffered catastrophic tension loss.
Relieving Automatic Belt Tensioner Spring Load



When applying release leverage using a 15mm socket, avoid rapid release cycles. Snapping the tensioner arm back under unconstrained spring pressure can crack the aluminum stop lugs on the housing or shatter the mounting ear. Always maintain complete control of the breaker bar until the belt loop is seated or entirely clear of the drive envelope.



Diagnosing Idler Pulley Bearing Wear and Runout
With the primary serpentine drive removed, inspect each non-driven component manually. Spin the idler pulley and the tensioner roller by hand. Any audible clicking, gritty grinding, or freewheeling spinning (which signifies washed-out grease) dictates immediate component replacement. The allowable axial and radial runout of the idler pulley must not exceed 0.030 inches (0.76 mm). Lateral bearing deflection under load misaligns the belt entrance angle, prompting chirp noises and accelerated rib wear. Clean all pulley faces with a wire brush and brake cleaner to eliminate packed road grime and petrified rubber glaze before installing the new belt.
Critical 2007 Chevy Silverado Belt Diagram Mistakes to Avoid
Subtle installation errors on the Vortec accessory platform lead directly to strand detachment, mechanical clatter, or roadside stranding. Review these common pitfalls before initiating work:
- Reversing Water Pump Pulley Rotation: Feeding the belt across the bottom of the water pump instead of over the top turns the impeller clockwise rather than counter-clockwise. This drastically drops coolant flow velocity through the radiator cores, triggering rapid thermal runaway and severe overheating under load, as discussed in our Gen IV Vortec cooling system overhaul documentation.
- Platform and Model Year Confusion: Attempting to force an A/C belt from a 2007 Classic onto a 2007 New Body Style. The Classic belt lacks the high-modulus elastomeric properties required for a stretch application and will instantly rupture or bind.
- Mating Smooth Belts to Grooved Profiles: Placing the grooved face of the serpentine belt against the smooth surface of the tensioner or water pump. The smooth face of the belt must contact smooth pulleys; the grooved face must only engage grooved pulleys.
- Neglecting Single-Rib Offset Misalignment: Allowing the belt to sit one tooth offset on either the crankshaft balancer or the alternator. Operating the engine with an offset belt cuts the outer stabilizing rib cleanly off within five operational miles.
2007 Chevy Silverado Belt Diagram Technical Inquiries
Does the 2007 Silverado 5.3L use a stretch belt for the A/C compressor?
Yes, if the truck is a “New Body Style” (GMT900) platform, it uses an elastic stretch belt without an adjustable or spring-loaded tensioner. If the truck is a 2007 “Classic” (GMT800) platform, it features a traditional spring-loaded tensioner assembly mounted beside the compressor on the passenger side.
How can you differentiate a 145-amp from a 160-amp alternator belt size?
Locate the Service Parts Identification sticker inside the passenger glovebox. The code KG3 denotes a 145-amp alternator (requiring a 93.0-inch belt), whereas code KW1 indicates a 160-amp heavy-duty alternator (requiring a 93.5-inch belt). Alternatively, measure the outside diameter of the alternator casing: the 145-amp measures roughly 135mm, while the 160-amp measures 145mm across.
What causes premature serpentine belt edge shredding on Gen IV Vortec engines?


Edge shredding is almost exclusively caused by a cocked or failing upper idler pulley bracket or an improperly seated power steering pump pulley. If the power steering pulley has been serviced without pressing it precisely flush to the pump shaft snout, the resultant 2-3mm axial offset will force the belt against the alternator pulley flange, shaving the front edge of the belt.
Can you reuse the A/C stretch belt after removing it for water pump maintenance?
General Motors engineering guidelines stipulate that elastic stretch belts are single-use components. The process of dismounting a stretch belt permanently deforms the inner elastomeric cords, creating micro-fractures in the tensile structure. Always cut the old stretch belt off with shears during maintenance and install a brand-new unit upon reassembly.
How does deck engagement and clutch cycling impact belt tension?
Auxiliary power take-off (PTO) units or commercial belt-driven air compressor installations rely on sudden electro-magnetic clutch cycling similar to heavy mower deck engagement. When these accessories cycle under full load, they produce an instantaneous torque spike along the accessory drive. This transient load momentarily collapses the spring-loaded belt tensioner arm, risking belt hop if the mechanical dampener within the tensioner assembly has lost its calibrated internal friction.
2007 Chevy Silverado Belt Diagram: Frequently Asked Questions
What is the part number for the 2007 chevy silverado belt diagram?
For 2007 Silverado V8 engines (4.8L, 5.3L, 6.0L), the primary belt part number is ACDelco 6K930 (GM 12626222) for 145-amp alternators, or ACDelco 6K935 for 160-amp alternators. The secondary A/C drive belt is ACDelco 4K378 or GM 12576447 depending on your specific compressor bracket setup.
How do I route the 2007 chevy silverado belt diagram correctly?
Start by looping the ribbed belt around the lower crankshaft pulley. Route it upward around the power steering pump, over the alternator, under the smooth idler pulley, and across the water pump pulley. Finally, rotate the spring-loaded belt tensioner clockwise and slide the belt over the tensioner pulley smoothly.
What size belt does 2007 chevy silverado belt diagram use?
Most 2007 Silverado 1500 trucks utilize a 6-rib serpentine belt measuring 93.0 inches (2,362 mm) for standard 145-amp charging systems, or 93.5 inches for high-output 160-amp systems. The lower air conditioning compressor uses an independent 4-rib belt measuring approximately 37.8 to 38.0 inches (960 mm) in outer circumference.
How do I adjust belt tension on 2007 chevy silverado belt diagram?
The 2007 Silverado uses an automatic mechanical tensioner that cannot be adjusted manually. To relieve or reset tension, attach a 15mm wrench to the tensioner pulley center bolt and rotate clockwise. When released, the calibrated internal coil spring automatically restores proper operating tension across the belt routing path.
What causes the 2007 chevy silverado belt diagram belt to slip?
Belt slip is typically triggered by a weakened internal tensioner spring, seized idler pulley bearings, oil or coolant contamination on pulley grooves, or an overstretched belt. Misaligned alternator or power steering pulleys will also force the belt out of alignment, causing persistent squealing, glaze, and severe slippage under load.
Can I replace the 2007 chevy silverado belt diagram belt myself?
Yes, replacing the belt is a straightforward 20-minute DIY task requiring only a 15mm wrench or serpentine belt tool. Referencing the under-hood pulley diagram ensures the correct routing path over all accessory drives, eliminating the risk of reverse water pump rotation or misaligned belt rib engagement.