2008 Dodge Avenger Fuse Diagram: Identification Guide
The 2008 Dodge Avenger fuse diagram identifies the Integrated Power Module under the hood near the battery and the interior panel on the driver-side dashboard. These diagrams label specific fuses for components like the fuel pump and headlights, helping owners quickly diagnose electrical failures without needing professional assistance or complex tools.
📌 Key Takeaways
- Identifies both the interior and engine compartment fuse box layouts
- Protects the ECU and sensitive electronics from high-voltage spikes
- Always match replacement fuses to the exact amperage listed in the diagram
- Use a multimeter to test fuses without removing them from the panel
- Check this diagram first when electronic components or lights fail
Finding yourself stranded with a car that won’t start or facing a sudden electrical failure in your cabin can be an incredibly frustrating experience. For owners of this specific mid-sized sedan, understanding the 2008 Dodge Avenger fuse diagram is the first and most critical step in performing a successful roadside or garage repair. Whether your power windows have stopped responding, your radio has gone silent, or you are facing a more serious “no-crank” situation, the fuse box is the nerve center that protects your vehicle’s sensitive electronics. This guide provides a comprehensive breakdown of the electrical protection system, helping you identify which fuse controls which component, how to interpret the layout of the Totally Integrated Power Module (TIPM), and the proper techniques for troubleshooting electrical faults without needing an expensive trip to the dealership.
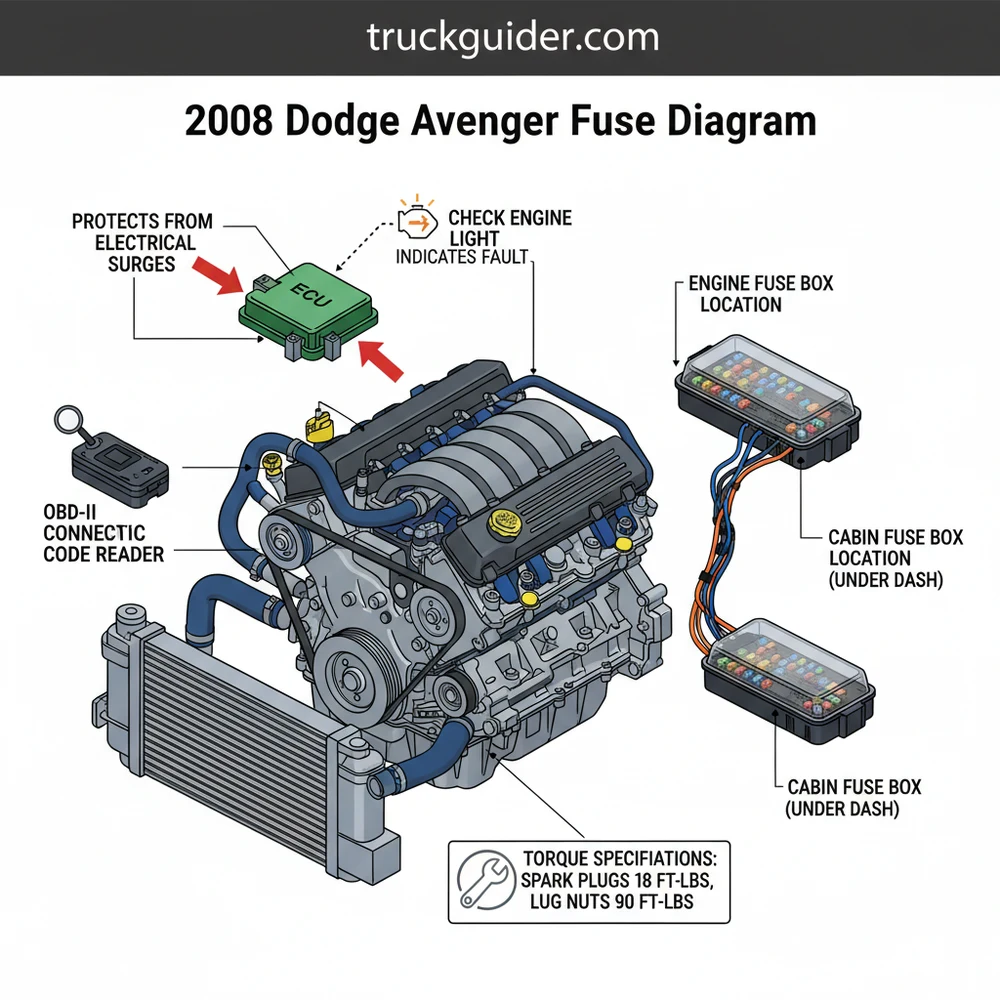
The 2008 Dodge Avenger utilizes a single primary fuse box known as the Totally Integrated Power Module (TIPM). Unlike older vehicles that had separate interior and under-hood panels, nearly all critical fuses and relays for this model are housed in one location in the engine compartment.
The 2008 Dodge Avenger fuse diagram is centered around the TIPM, which is located on the driver’s side of the engine bay, situated conveniently near the air filter housing. This module is not just a plastic box with wires; it is a sophisticated computer that manages power distribution across the entire vehicle. The diagram itself is usually embossed on the underside of the plastic cover, but over time, heat and engine grime can make these markings difficult to read. The layout consists of several rows of mini-fuses, J-case fuses (the larger, square ones), and various relays that handle high-current loads for components like the starter and the cooling fans.
The diagram is organized numerically, with “M” prefixes (e.g., M1, M2) typically representing the mini-fuses that protect smaller circuits like the instrument cluster or the ECU (Electronic Control Unit). Larger circuits, such as those governing the anti-lock brake system (ABS) or the blower motor, utilize high-amp J-case fuses. Understanding the color-coding is also essential: 10A fuses are red, 15A are blue, 20A are yellow, and 25A are clear or white. Using this 2008 Dodge Avenger fuse diagram allows you to bridge the gap between a hardware failure and a simple electrical interruption.
graph TD
    A[TIPM Box - Engine Bay] --> B[Mini Fuses M1-M37]
    A --> C[J-Case Fuses J1-J22]
    A --> D[Relays]

    B --> B1[M1: Center High Mount Stop Light - 15A]
    B --> B2[M6: Power Outlet/Cigar Lighter - 20A]
    B --> B3[M13: Instrument Cluster/ECU - 15A]
    B --> B4[M20: Interior Lighting - 15A]

    C --> C1[J1: Air Pump/Reactor - 40A]
    C --> C2[J4: Driver Door Node - 25A]
    C --> C3[J13: Blower Motor - 40A]
    C --> C4[J17: ABS Solenoid - 40A]

    D --> D1[Starter Relay]
    D --> D2[Fuel Pump Relay]
    D --> D3[Cooling Fan Relay]
If your OBD-II scanner cannot communicate with the vehicle’s computer, check fuse M13. This fuse often powers the diagnostic port, and a blown fuse here will prevent you from reading any diagnostic code during troubleshooting.
Reading and interpreting the 2008 Dodge Avenger fuse diagram requires a methodical approach. Follow these steps to ensure you identify the correct fuse and replace it safely:
1. Safety First and Preparation: Ensure the engine is completely off and the key is removed from the ignition. If you are working on high-amperage circuits, it is a best practice to disconnect the negative battery terminal to prevent accidental shorts. You will need a pair of needle-nose pliers or a dedicated fuse puller tool (often found clipped inside the fuse box cover).
2. Locate the TIPM: Open the hood and find the black rectangular box on the driver’s side. Release the plastic tabs on the sides of the cover and lift it straight up. Flip the cover over to see the printed diagram on the inside lid.
3. Identify the Symptom and Map the Fuse: If your check engine light is on and you suspect an electrical issue, or if a specific component like the horn isn’t working, find the corresponding label on the diagram. For example, the horn is typically linked to fuse M22.
4. Visual Inspection: Using your puller tool, gently extract the suspected fuse. Hold it up to a light source. A healthy fuse has a continuous U-shaped metal wire inside. A blown fuse will have a visible break in that wire, or sometimes a dark, charred smudge inside the plastic casing.
5. Continuity Testing: Sometimes a fuse can look fine but still be faulty. Use a digital multimeter set to the “Continuity” or “Ohms” setting. Touch the probes to the two small metal test points on top of the fuse. If the meter beeps or shows zero ohms, the fuse is good. If it shows “OL” (Open Loop), the fuse is blown.
6. Replacement with Correct Amperage: This is the most critical step. Always replace a blown fuse with one of the exact same amperage rating. Never “upgrade” a 10A fuse to a 20A fuse just because it keeps blowing; doing so can cause the wiring harness to overheat and potentially start a fire.
7. Verify the Repair: Once the new fuse is seated firmly, reconnect the battery and start the vehicle. Check if the component is now operational. If the fuse blows again immediately, you have a short circuit further down the line that requires deeper investigation.
8. Secure the Module: Once finished, snap the TIPM cover back into place firmly. This cover is essential for protecting the electronics from moisture, engine heat, and road debris, which can lead to corrosion.
Do not use a screwdriver or metal tool to pry out fuses while the battery is connected. You risk shorting out the entire TIPM, which is a very expensive component to replace on a 2008 Dodge Avenger.
When troubleshooting the 2008 Dodge Avenger, you may encounter several common issues that seem mechanical but are actually rooted in the TIPM or fuse system. One frequent problem is the “ghost in the machine” syndrome, where windshield wipers turn on by themselves or the horn starts honking randomly. This is often a sign of internal TIPM failure or a loose ground wire rather than a single blown fuse.
Another common issue involves the cooling fans. If you notice your temperature gauge rising and a lack of coolant flow cooling through the radiator, check the large J-case fuses for the radiator fans. If the fans aren’t getting power, the engine can overheat rapidly, potentially damaging the head gasket or even the timing chain guides if the heat becomes extreme. Furthermore, if you receive a diagnostic code related to the transmission or engine sensors, always check the ECU and TCM fuses before assuming a sensor has failed.
- ✓ Symptom: No power to OBD-II port. Solution: Check Fuse M13 (15 Amp).
- ✓ Symptom: Radio or Clock resets frequently. Solution: Check Fuse M10 (15 Amp) for loose seating.
- ✓ Symptom: Fuel pump not engaging. Solution: Inspect Fuel Pump Relay and Fuse M25 (20 Amp).
To keep your Dodge Avenger’s electrical system in top shape, periodic maintenance of the fuse area is recommended. Every time you check your oil or inspect your accessory belt, take ten seconds to ensure the TIPM cover is tight. Moisture is the enemy of the 2008 Dodge Avenger’s electrical system; if the seal on the fuse box fails, corrosion will begin to form on the underside of the fuses, leading to intermittent power loss and confusing check engine light warnings.
When performing battery maintenance, always pay attention to the torque spec of the terminal nuts. Loose battery terminals can cause voltage spikes that may blow sensitive fuses or damage the ECU. Ensure the terminals are tightened to approximately 50-70 inch-pounds (about 5-8 Nm). Additionally, keeping a small kit of spare fuses in your glovebox is an essential habit. Include a variety of mini-fuses (10A, 15A, 20A, 25A) and at least one of each major J-case fuse used in the Avenger.
In terms of component quality, always opt for high-quality, name-brand fuses (like Bussmann or Littelfuse). Cheap, unbranded fuses from discount bins may not blow at the rated amperage, which defeats their entire purpose and puts your vehicle’s wiring at risk. If you are dealing with a recurring blown fuse, it is worth using an OBD-II scanner to look for “pending” codes that might indicate an electrical component is drawing too much current before it completely fails.
While you are under the hood checking fuses, take a moment to inspect your accessory belt for cracks and listen for any rattling that might indicate a worn timing chain. A healthy electrical system is only useful if the mechanical components it controls are also in good repair.
Mastering the 2008 Dodge Avenger fuse diagram is an empowering skill for any car owner. It transforms a potentially scary “car won’t start” scenario into a simple five-minute fix. By knowing where the TIPM is located, how to identify blown fuses, and understanding the relationship between the fuses and major systems like the ECU and cooling system, you save time and money. Remember that while a fuse is a simple component, it is your car’s primary defense against catastrophic electrical failure. Treat your TIPM with care, use the correct replacement parts, and always use a systematic approach to troubleshooting. With this knowledge, you can keep your Dodge Avenger on the road and ensure its electrical components continue to function reliably for years to come.
Step-by-Step Guide to Understanding the 2008 Dodge Avenger Fuse Diagram: Identification Guide
Identify the electrical issue – Determine which component is failing to narrow down the specific circuit.
Locate the fuse box – Find the Integrated Power Module under the hood or the interior dash panel.
Understand the diagram – Match the numbered slot in the fuse box to the corresponding label on the diagram cover.
Apply the fuse puller – Carefully grasp the suspected fuse and pull it straight out of the socket.
Verify the fuse condition – Look for a broken metal filament inside the plastic or use a multimeter to check for continuity.
Complete the replacement – Insert a new fuse of the exact same amperage and ensure any mounting bolts meet the factory torque spec.
Frequently Asked Questions
Where is the 2008 Dodge Avenger fuse box located?
The primary fuse box, or Integrated Power Module, is located in the engine compartment on the driver’s side near the battery. A secondary interior fuse panel is situated on the left side of the dashboard. You must open the driver’s door and remove the side cover to access these cabin fuses.
What does the 2008 dodge avenger fuse diagram show?
The diagram illustrates the specific layout and assignment of every fuse and relay in the vehicle. It provides the amperage rating for each circuit, ensuring you don’t install a fuse that could damage the ECU or wiring. It maps fuses to components like the fuel pump, radio, and wipers.
How many fuses and connections does the Avenger have?
The Integrated Power Module contains roughly 40 to 50 fuses and relays that manage the vehicle’s electrical load. Each fuse features a two-prong connection that bridges the circuit. These connections link directly to the main wiring harness to distribute power to the OBD-II port, lighting, and engine control sensors.
What are the symptoms of a bad fuse in an Avenger?
Common symptoms include specific electronic components failing to operate, such as a dead radio or non-functional headlights. A blown fuse related to engine sensors may trigger a check engine light and store a diagnostic code. If a component has no power, the fuse is the first part to inspect.
Can I replace the fuses in my Avenger myself?
Yes, replacing a fuse is a simple DIY task that requires no mechanical experience. By following the 2008 dodge avenger fuse diagram, you can identify the correct fuse for the failing circuit. It is a quick fix that often saves a trip to the mechanic for minor electrical issues.
What tools do I need for fuse replacement?
You only need a plastic fuse puller, which is typically located inside the engine bay fuse box cover. A digital multimeter is helpful for testing fuse continuity. If a blown fuse caused a check engine light, an OBD-II scanner will be necessary to clear the resulting diagnostic code.


![How to Use Lucas Oil Stabilizer: Mixing Ratios & Tips [2026]](https://truckguider.com/wp-content/uploads/2026/03/how-to-use-lucas-oil-stabilizer-featured.webp)

![Dodge Plastic Control Arms: Expert Review [2026]](https://truckguider.com/wp-content/uploads/2026/03/dodge-plastic-control-arms-featured.webp)