2009 Toyota Tacoma 4.0 Serpentine Belt Diagram: 2026 Routing

On the 2009 Toyota Tacoma 4.0L V6 (1GR-FE), route the ribbed side over the crankshaft, A/C compressor, water pump, and alternator. The smooth backside contacts two idler pulleys and the automatic belt tensioner. Rotate the 14mm tensioner hex head counterclockwise to release spring tension and seat the belt on the alternator last.
📌 Key Takeaways
- The 1GR-FE 4.0L V6 uses a 7-rib serpentine belt with an effective length of approximately 83.5 inches (7PK2120).
- Belt tension is maintained by an automatic spring-loaded tensioner requiring a 14mm wrench turned counterclockwise.
- Idler pulley #1 and #2 ride exclusively on the smooth back side of the belt.
- Worn idler pulley bearings are the primary cause of engine squeal and belt misalignment on this platform.
- DIY replacement takes 30-45 minutes; seek professional help if tensioner arm damping fails or mounting bolts seize.
The single-overhead-cam and dual-overhead-cam variants of Toyota’s GR engine family rely on an engineered accessory drive system where a single serpentine belt coordinates several critical engine accessories. On the 2009 Toyota Tacoma equipped with the 4.0-liter V6 (1GR-FE), routing the serpentine belt correctly across the crankshaft, water pump, alternator, air conditioning compressor, power steering pump, and idler assembly is mandatory for maintaining proper operational speed, cooling efficiency, and electrical output. Misrouting by even a single pulley flange can result in reverse water pump rotation, belt derailment, or catastrophic mechanical failure under high-RPM load. This technical guide delivers the complete 2009 Toyota Tacoma 4.0 serpentine belt diagram, pulley architecture, belt specifications, and factory-correct replacement procedures for technicians and experienced service personnel.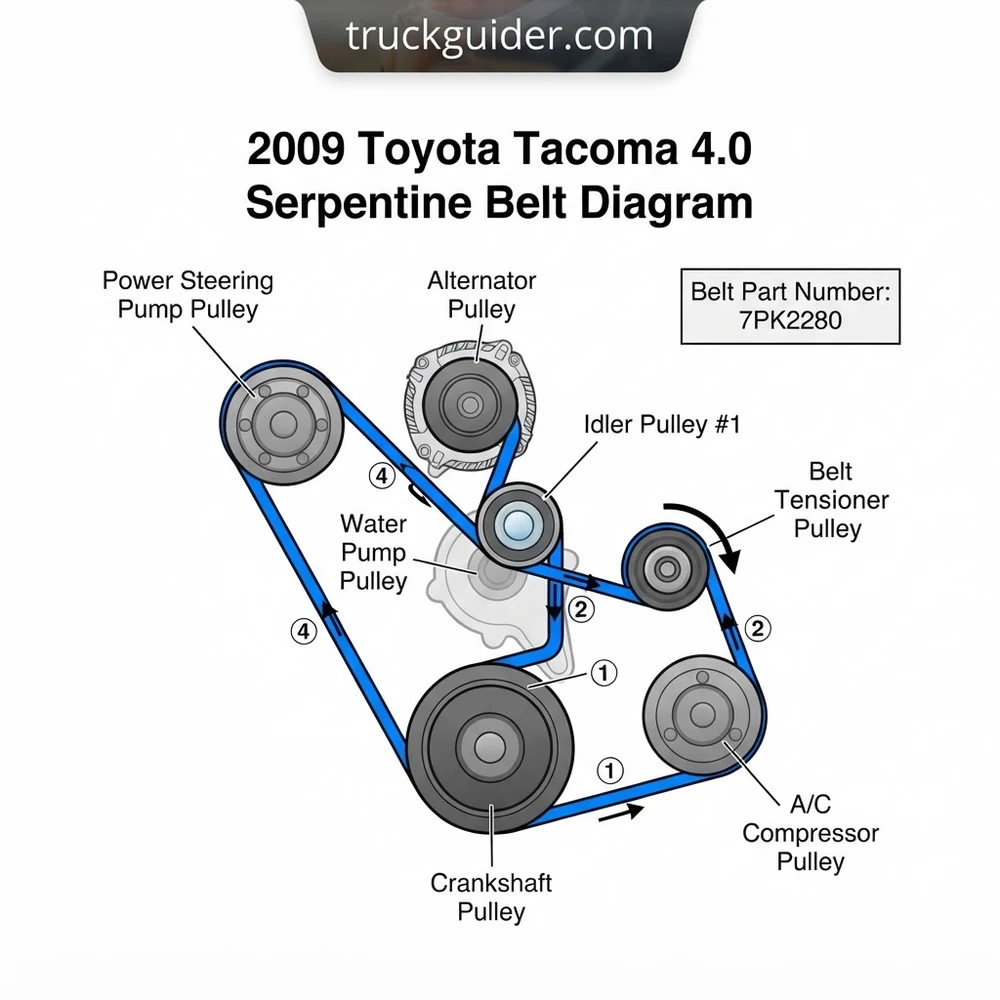
2009 Toyota Tacoma 4.0 Serpentine Belt Diagram Pulley Layout



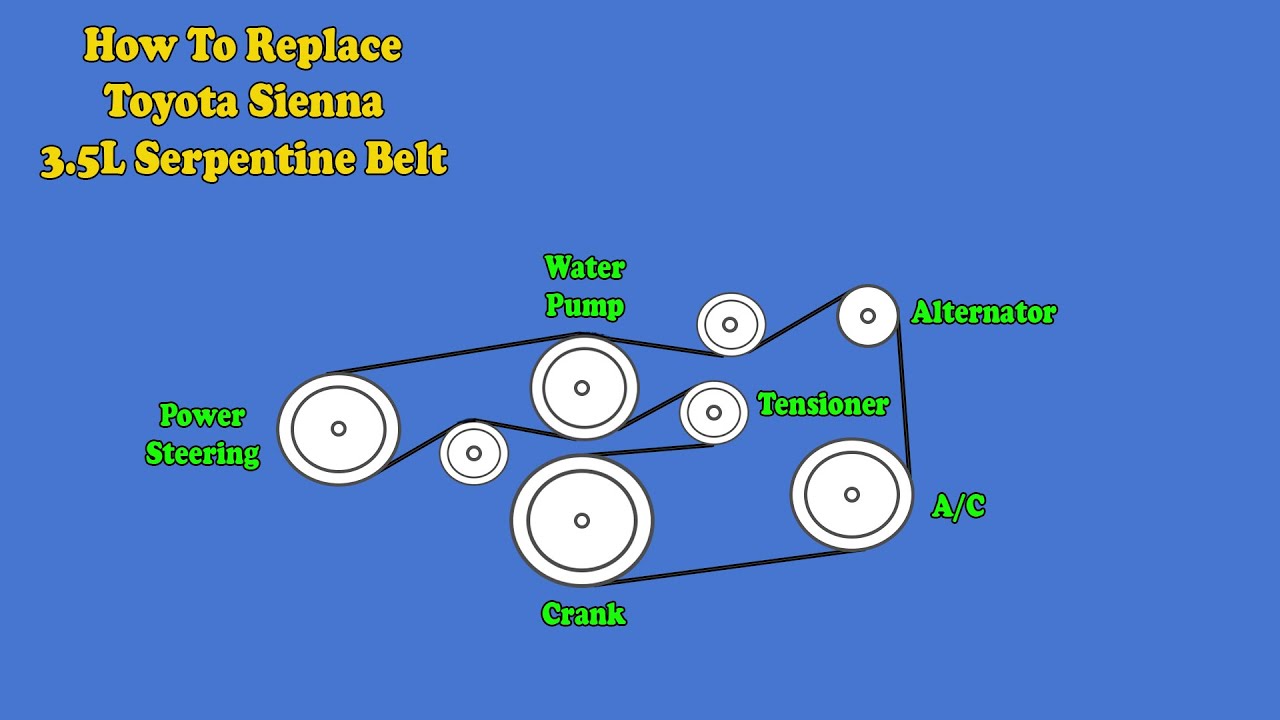
The 4.0L 1GR-FE V6 engine utilizes an eight-pulley accessory drive configuration driven off the main harmonic balancer. Understanding the dynamic layout and physical profile of each component on the front timing chain cover is critical for accurate installation. The serpentine system uses a double-sided operating principle: the ribbed inner surface of the belt drives grooved pulleys, while the flat outer EPDM backing drives smooth idler and tensioner pulleys.


At the bottom-center of the front engine assembly sits the crankshaft damper pulley. This grooved drive pulley is the rotational source for the entire system, turning clockwise when viewed from the front of the vehicle. Immediately above the crankshaft and positioned slightly offset toward the vehicle’s centerline is the water pump and mechanical fan clutch pulley. Unlike many domestic configurations where the water pump runs off the back of the belt, the 1GR-FE water pump features a grooved pulley driven directly by the ribbed side of the belt, ensuring positive traction to prevent cooling cavitation under heavy loads.
High on the driver side (engine right) sits the alternator pulley, which is deeply grooved and demands the highest wrap angle to prevent belt slip during high electrical current draw. Positioned below the alternator on the lower driver-side quadrant is the power steering pump pulley, also grooved. On the opposite lower passenger-side quadrant, you will find the air conditioning compressor pulley, which incorporates an electromagnetic clutch mechanism to manage compressor engagement.
Managing belt tracking, wrap angles, and vibration dampening are three un-grooved pulleys: two fixed idlers and one dynamic tensioner. Idler Pulley No. 1 is positioned at the top passenger side, directly guiding the belt between the water pump and the dynamic tensioner. Idler Pulley No. 2 is mounted near the upper driver side between the water pump and the alternator. The automatic belt tensioner assembly is mounted on the passenger-side mid-block section. The flat back of the serpentine belt rides smoothly across these non-grooved pulleys, directing the belt’s path so that grooved pulleys achieve the required radial engagement without interference from the timing cover architecture.
When reviewing the pulley diagram, observe that the belt loops over Idler No. 2 before dropping down around the alternator, then travels under the power steering pump. Confirming that the grooved side of the belt seats strictly into the corresponding grooved channels prevents premature rib shredding.
2009 Tacoma 4.0 Belt Part Number, Rib Count, and Size Specs


According to OEM factory specifications, the 2009 Toyota Tacoma 4.0L V6 requires a 7-rib serpentine belt (7PK profile). Installing an incorrect 6-rib belt or a belt with non-compliant effective length leads to premature tensioner bottoming, constant chirping, or loss of accessory drive engagement under load. Modern replacements use Ethylene Propylene Diene Monomer (EPDM) construction, which resists high-heat cracking far better than legacy neoprene compounds but requires visual depth measurement to detect rib thinning.


| Manufacturer / Brand | Part Number | Belt Size / Profile | Effective Length |
|---|---|---|---|
| Toyota OEM (Bando OEM) | 90916-A2001 / 90916-02571 | 7PK2120 | 83.46 in (2120 mm) |
| Gates FleetRunner Heavy-Duty | K070834HD | 7PK2119 | 83.42 in (2119 mm) |
| Continental Multi-V | 4070834 | 7PK2120 | 83.46 in (2120 mm) |
| Bando Rib-Ace | 7PK2120 | 7PK2120 | 83.46 in (2120 mm) |
| Dayco Poly-Rib | 5070835 | 7PK2121 | 83.50 in (2121 mm) |
The standard rib width for a 7PK belt is 0.140 inches (3.56 mm) per rib, providing a total belt width of 0.980 inches (24.9 mm). Variations beyond 0.25 inches (6.35 mm) in effective length can exceed the functional travel limit of the internal spring mechanism in the factory belt tensioner. When replacing a worn belt, cross-reference the installed part number against these dimensions, particularly if your truck has undergone an aftermarket high-output alternator upgrade or secondary accessory installation.
Factory Belt Tension Value: New belt installation target is 140–165 lbs (623–734 N) dynamic tension. Used belt operating threshold is 90–110 lbs (400–489 N). The automatic belt tensioner automatically adjusts this load, provided the belt effective length remains within 2119 mm to 2125 mm.
Automatic Belt Tensioner Mechanics and 1GR-FE Leverage Specs



The 2009 1GR-FE engine features a spring-loaded mechanical automatic belt tensioner positioned on the lower right-front engine timing cover. The tensioner incorporates a heavy internal torsion spring paired with a dampening chamber to absorb cyclic torsional vibration from the crankshaft. This prevents belt whip, harmonic resonance at high engine speeds, and bearing load spikes on accessories.
To relieve spring tension during belt removal or installation, locate the 14mm hex cast directly into the dynamic tensioner body arm above the pulley center. Manufacturer specs indicate that you must apply rotational force counter-clockwise (toward the driver side) using a dedicated serpentine belt tensioner tool or a long-handled 1/2-inch drive breaker bar fitted with a shallow 14mm socket. Standard ratchet handles rarely provide adequate leverage due to the high spring rate of the internal coil mechanism and close clearance with the mechanical radiator fan shroud.


Do not rotate the 14mm center bolt of the tensioner pulley itself to relieve belt tension. Applying counter-clockwise breaking torque directly to the pulley fastener risks unthreading or shearing the center retaining bolt. Always seat your socket securely on the raised cast hex lug on the tensioner swing arm.
The tensioner base features mechanical limit cast marks that serve as an integrated wear indicator. On the stationary mounting base attached to the engine block, three raised indicators represent the operating range. A single raised pointer on the rotating tensioner arm moves across this range as the belt stretches over its service life. With a new OEM belt installed, the indicator line must rest cleanly within the acceptable boundary window. If the indicator exceeds the maximum travel mark toward the relaxed stop, the belt has sustained significant elongation or the tensioner internal damping spring has suffered material fatigue, necessitating immediate replacement of the entire tensioner assembly.
When bolting a replacement tensioner to the engine block, technicians should verify that mounting torque is properly calibrated. Fasteners installed into the aluminum timing chain cover are vulnerable to thread stripping if over-torqued. Always refer to our accompanying 1GR-FE water pump replacement guide and timing cover service technical briefs for step-by-step structural fastener reconditioning procedures.
2009 Toyota Tacoma 4.0 Serpentine Belt Diagram Routing Steps



Replacing the drive belt on a 2009 Tacoma 4.0L does not require draining the cooling system or pulling the radiator. However, working around the fixed mechanical fan shroud requires a calculated, sequential method to thread the belt loop through the clearance gaps between the cooling fan blades and radiator shroud. Follow these numbered steps to route the belt accurately according to the 2009 Toyota Tacoma 4.0 serpentine belt diagram.
- Disconnect the Battery and Clear Access: Disconnect the negative battery terminal using a 10mm socket to eliminate any risk of accidental starter engagement. Remove the plastic engine beauty cover (two 10mm nuts) and set aside the air intake ducting if extra hand clearance between the top of the radiator shroud and engine front is desired.
- Relieve Tension and Slip Off the Old Belt: Place your 14mm socket and long-handled leverage tool onto the cast release lug of the automatic tensioner. Rotate the tool counter-clockwise firmly toward the driver side to compress the internal spring. While holding the tensioner in this fully released position, slip the serpentine belt off the smooth, readily accessible top Idler Pulley No. 1 or the water pump pulley. Slowly allow the tensioner arm to ease back to its resting stop.
- Feed the Belt Around the Fan Blades: Pull the slack of the old belt away from the front accessory pulleys. Maneuver the belt loop forward over each fan blade one at a time, turning the fan manually as you work the loop around the circumference until the old belt is completely clear of the fan clutch assembly.
- Position the New OEM Belt Over the Fan: Take your new 7PK2120 belt and reverse the extraction procedure. Thread the new belt loop between the fan blades and the fan shroud, indexing the fan around until the entire belt sits suspended between the engine block and the back of the fan clutch assembly.
- Route the Lower Engine Quadrants: Following the belt routing path, feed the bottom loop under the grooved crankshaft pulley. Route the right-hand strand around the grooved A/C compressor pulley on the lower passenger side. From the A/C compressor, route the flat back of the belt around the smooth pulley of the automatic tensioner, then up over Idler Pulley No. 1 (upper passenger side).
- Route the Upper and Driver-Side Accessories: Run the strand coming up from the crankshaft over the grooved water pump pulley. Direct the belt under Idler Pulley No. 2, over the top grooved alternator pulley, and wrap it downward around the grooved power steering pump pulley. Ensure the deep 7-rib profile aligns cleanly with the grooves of the alternator and power steering pulleys. Reference our diagnostic notes on Tacoma alternator diagnostic procedures if your vehicle exhibits voltage irregularities following belt work.
- Compress Tensioner and Finalize Placement: Double-check that the belt is firmly seated in all grooved pulleys (crankshaft, A/C, water pump, alternator, and power steering). The final point of placement will be the smooth Idler Pulley No. 1 or water pump pulley. Fit your 14mm tool onto the tensioner lug, exert counter-clockwise force to bottom out the tensioner stroke, and slide the flat back of the belt over the smooth idler. Release the tool smoothly to tension the system.
Before starting the engine, use a high-intensity inspection light to visually verify the belt’s rib engagement across every single pulley. A belt resting off-center by one rib on the crank or A/C compressor pulley will rip its outer edge off within seconds of ignition startup.



Inspecting 1GR-FE Idler Pulley Bearings and Belt Alignment
The 4.0-liter 1GR-FE engine runs two fixed smooth idler pulleys alongside the dynamic tensioner pulley. A frequent failure point on 2005–2015 Tacomas is dried-out internal grease within the sealed deep-groove ball bearings inside Idler No. 1 and Idler No. 2. When the internal bearing lubricant degrades under heat and engine bay dust, the steel ball bearings develop micro-pitting. This presents as a high-pitched dry chirping or metallic whining sound that closely mimics a slipping serpentine belt.
With the belt removed, conduct a hands-on mechanical inspection of each pulley assembly:
- Spin Testing: Spin each idler pulley and the tensioner pulley vigorously by hand. A healthy pulley spins with slight hydraulic resistance from fresh grease and produces virtually zero sound. If a pulley freewheels rapidly with an audible skateboard-wheel hiss or whirring noise, its internal bearing grease has evacuated, and bearing seizure is imminent.
- Deflection and Radial Play: Grasp each pulley firmly at the 12 o’clock and 6 o’clock positions and attempt to rock it axially along its mounting bolt axis. Any detectable wiggle, clicking, or play exceeding 0.005 inches (0.13 mm) indicates severe bearing race wear. Replace the assembly immediately.
- Surface Gouging and Glazing: Inspect the flat contact surfaces of the smooth idlers for baked-on rubber contamination, heavy rust scale, or grooving. Metal transfer from a previous shredded belt will cause tracking instability and belt squeal.
Fastener Torque Specs: Idler Pulley No. 1 retaining bolt: 39 ft-lbs (54 Nm). Idler Pulley No. 2 retaining bolt: 39 ft-lbs (54 Nm). Complete dynamic belt tensioner assembly mounting bolts: 32 ft-lbs (43 Nm). Always clean the threads and confirm dry torque ratings.
Pulley coplanar alignment is equally critical. If your truck has recently undergone power steering pump or alternator service, verify that the replacement accessory was pressed or bolted completely flat against its mounting brackets. A pulley misalignment of more than 1/3 of a degree (roughly 1/16-inch per foot of span) generates continuous lateral scuffing, generating chirps that cannot be cured by simply applying belt dressing or replacing the belt. To check for runout or offset, lay a precision straightedge across the machined front lip of the crankshaft pulley and project the line across the power steering and alternator pulley faces.
Finally, ensure adjacent systems—such as lines tied to the Tacoma secondary air injection system maintenance—remain secured away from the belt’s rotational clearance zone. Loose vacuum lines or wiring harnesses can migrate under engine vibration and contact the high-speed belt path.
2009 Toyota Tacoma 4.0 Serpentine Belt Diagram FAQ
What is the socket size needed to release the 2009 Tacoma belt tensioner?


Releasing the automatic belt tensioner on the 2009 Tacoma 4.0L V6 requires a 14mm shallow socket attached to a long-handled breaker bar or dedicated flat serpentine belt tool. Seat the socket firmly onto the raised cast hex boss positioned on the tensioner swing arm, not on the center pulley retaining bolt. Rotate the tool counter-clockwise toward the driver side to release drive tension.
How do I know if the noise is a bad belt or a failing idler pulley bearing?
To isolate belt noise from bearing noise on the 1GR-FE, mist a few drops of clean water onto the ribbed side of the belt while the engine idles. If the squeal vanishes instantly for several seconds before returning, the belt is glazed, dry, or misaligned. If the chirping, whining, or grinding noise remains unchanged or grows louder, the fault resides in the internal ball bearings of Idler Pulley No. 1, Idler No. 2, or the tensioner pulley.
Can I install a 2012 or newer 1GR-FE serpentine belt on a 2009 model?
No. In 2010 to 2012, Toyota updated the 1GR-FE with Dual VVT-i (variable valve timing on both intake and exhaust camshafts), modified the front timing cover, and updated the accessory mounting positions. The Dual VVT-i engines use a different belt length and routing path compared to the 2005–2009 single VVT-i configuration. Always order your belt specifically for the 2005–2009 model year range (7PK2120 profile).
Do I have to remove the radiator fan or shroud to change the serpentine belt?


No. You do not need to pull the cooling fan or remove the radiator shroud. There is sufficient clearance between the fan blade tips and the interior shroud ducting to pass the belt around the fan blades one by one. Turning the fan by hand as you work the loop around the circumference allows you to easily extract the old belt and position the new replacement.
What causes the serpentine belt to jump off the pulleys on the 4.0L Tacoma?
Belt derailment on the 1GR-FE is typically caused by a failing dynamic belt tensioner that has lost its internal spring dampening, allowing the belt to whip and jump teeth under sudden engine deceleration. Other frequent culprits include excessive axial play in the power steering pump shaft, a seized A/C compressor clutch bearing, or severe internal failure of the No. 1 or No. 2 idler bearings that cocks the pulley face out of parallel alignment with the crankshaft.
Step-by-Step Guide to Understanding the 2009 Toyota Tacoma 4.0 Serpentine Belt Diagram
Identify – Verify the replacement belt matches the 7PK2120 specification and review the under-hood routing decal.
Locate – Place a 14mm box-end wrench or serpentine tool onto the cast hex lug of the automatic tensioner.
Reference – Follow the pulley diagram to note smooth idler pulleys versus grooved accessory drive wheels.
Connect/Route – Rotate tensioner counterclockwise to slip off old belt, then route the new belt ending at alternator.
Verify – Ensure all ribs sit completely in pulley grooves before releasing tensioner back to its resting position.
Troubleshoot – Start engine to confirm smooth tracking; stop immediately if squealing occurs or belt walks off-center.