2012 Ram 2500 Leveling Kit Guide: Best Fits & Tire Sizes [2026]
To effectively level a 2012 Ram 2500, a 2.5-inch leveling kit is the industry standard for clearing 35-inch tires without significant rubbing. Most owners choose between heavy-duty steel spacers for value or progressive-rate coil springs for improved ride quality and axle articulation.
🎯 Key Takeaways
- Takeaway 1:A 2.5-inch lift is required to comfortably clear 35-inch tires.
- Takeaway 2:Steel spacers are more cost-effective than full replacement springs.
- Takeaway 3:4WD models require specific kits to account for the solid front axle.
- Takeaway 4:An adjustable track bar is recommended to keep the axle centered.
- Takeaway 5:Diesel models (6.7L Cummins) need heavy-duty springs due to engine weight.
To level your 2012 Ram 2500, you need a 2-inch to 2.5-inch kit to eliminate the factory nose-down rake and clear 35-inch tires. Because the 2012 model sits on a multi-link front suspension with a track bar—a design that changed in 2014—selecting a kit specifically engineered for the 2010-2013 heavy-duty frame is vital for maintaining steering alignment. A proper level does more than improve the look; it increases approach angles and allows for a beefier tire setup without the high cost of a full 6-inch lift.
Getting the right fitment depends on whether you value budget or ride quality. Most 2012 owners choose between simple coil spacers or full replacement progressive-rate springs. While spacers are the fastest way to get the height you want for under $150, upgrading the springs provides a significantly smoother ride over washboard roads and potholes. Regardless of the path you choose, staying within the 2-inch to 2.5-inch range ensures you do not overextend your factory control arms or create “death wobble” issues common with poorly planned front-end modifications.
Top Leveling Kit Options for 2012 Ram 2500 (Steel vs. Spring)
The 2012 Ram 2500 4WD utilizes a heavy-duty coil spring front suspension. When shopping for a kit, you will primarily encounter two styles: spacers that sit atop your factory springs and full replacement coils. For 2WD models, the kits typically involve a different spacer design to accommodate the independent front suspension, though the 4WD kits remain the most popular for off-road and towing applications.

Budget-Friendly Coil Spacers (Steel and Billet)
Coil spacers are the most cost-effective method to level your 2012 Ram. These puck-style spacers bolt onto the top of your factory coil bucket. Because you are reusing the stock springs, your ride quality remains exactly the same as it was from the factory. This is the ideal choice if you are satisfied with the current stiffness of your truck but want the extra clearance for larger rubber.
- Rough Country 2-Inch Leveling Kit (Steel): This is a top-rated budget pick. Constructed from heavy-duty 1/4-inch steel, it costs approximately $60 to $90. It is a “set it and forget it” solution that maintains factory geometry.
- ReadyLift 2.5-Inch Billet Aluminum Kit: If you want the maximum height before needing to replace control arms, this kit is excellent. Billet aluminum won’t corrode or “squeak” over time. Expect to pay between $150 and $200.
- Daystar Polyurethane Spacers: These offer a slight dampening effect and are the most affordable, often found for under $50. However, they can compress slightly over several years of heavy engine weight.
Performance Replacement Springs
If your 2012 Ram feels “harsh” over bumps, a spacer will not fix the problem. Instead, you should look at progressive-rate replacement springs. These kits replace your factory coils entirely. They are softer at the top of the stroke for daily driving but stiffen up when the suspension compresses deeply. While more expensive, they transform the handling of the heavy Cummins or Hemi front end.
- Carli Suspension 2.5-Inch Leveling Springs: Widely considered the gold standard for the 2012 Ram 2500. These springs are designed specifically for the weight of the 6.7L Cummins. They cost around $350 to $400 for the pair but offer unmatched ride quality.
- Thuren Fabrication Leveling Coils: These are custom-tuned to provide a “plush” feel. They are highly sought after by owners who take their trucks on forest roads or uneven job sites. Pricing is similar to Carli, usually around $360.
- Icon Vehicle Dynamics 2.5-Inch Dual Rate Springs: These provide a great balance between towing stability and unloaded comfort. They typically retail for $380.
2012 Ram 2500 Leveling Kit Made Easy: Your Essential Action Plan
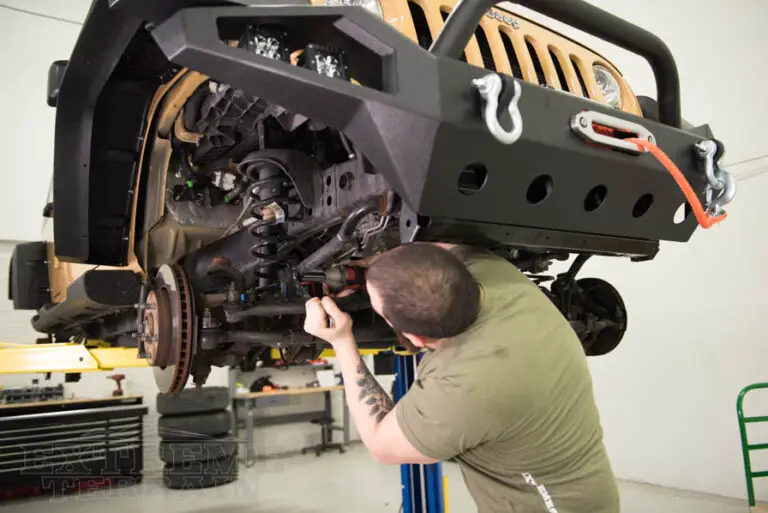
The 2012 Ram 2500 is a powerhouse of a truck, but from the factory, it often sits with a noticeable “rake,” where the front end is significantly lower than the rear. This design is intended to keep the truck level when hauling heavy loads, but for many owners, it compromises ground clearance and aesthetic appeal. Installing a leveling kit—typically consisting of steel or polyurethane spacers—raises the front end by 2 to 2.5 inches, allowing for larger tires and a more aggressive stance. This guide provides a detailed, mechanical walkthrough to ensure you perform this upgrade safely and effectively, maintaining your truck’s suspension integrity while achieving that perfect level look.
Step 1: Preparation and Tool Gathering
What you need: A high-capacity floor jack (3-ton minimum), two heavy-duty jack stands, wheel chocks, a full socket set (specifically 18mm, 21mm, and 24mm), a breaker bar, a torque wrench, and penetrating oil (like WD-40 or PB Blaster).
Instructions: Before you even touch a wrench, park your truck on a flat, level concrete surface. Engage the parking brake and place wheel chocks behind the rear tires to prevent any movement. Use a measuring tape to record the distance from the ground to the center of the wheel arch on both the front and rear; this gives you a baseline for your progress. Spray all major suspension bolts—specifically the lower shock bolts, sway bar end link nuts, and track bar bolts—with penetrating oil. Letting this soak for 20 minutes will save you immense frustration later, as these heavy-duty components are often seized by road grime and rust.
Pro Tip: Measure your “fender to hub” distance rather than “fender to ground” to account for any variations in tire pressure, giving you a more accurate reading of the lift achieved.
Step 2: Lifting and Securing the Chassis
What you need: Floor jack, jack stands, and a lug wrench or impact gun with a 7/8-inch or 22mm socket.
Instructions: Loosen the lug nuts on both front wheels while the truck is still on the ground, but do not remove them yet. Place the floor jack under the front differential or the reinforced section of the frame and lift the truck until the front tires are several inches off the ground. Position your jack stands securely under the frame rails, just behind the front wheel wells. Slowly lower the jack until the frame is resting firmly on the stands. Ensure the truck is stable by giving it a gentle shake. Once secure, remove the lug nuts and the front wheels entirely, placing them aside. This provides clear access to the coil springs and shock towers.
Pro Tip: Never rely solely on a hydraulic jack while working under a heavy vehicle like a Ram 2500; always use high-quality jack stands rated for the vehicle’s weight.
Step 3: Disconnecting the Sway Bar and Shocks
What you need: 18mm and 21mm sockets, a breaker bar, and a backup wrench.
Instructions: To allow the axle to drop low enough for the springs to come out, you must disconnect the sway bar end links and the shocks. Start by removing the nuts from the sway bar end links using an 18mm socket. You don’t need to remove the links entirely, just disconnect them from the sway bar. Next, move to the lower shock mounts. Use a 21mm socket and a breaker bar to remove the large bolt holding the bottom of the shock to the axle. If the shock is under tension, use your floor jack to slightly raise the axle until the bolt slides out easily. Repeat this process on both the driver and passenger sides to ensure the axle can move independently of the frame.
Pro Tip: If the sway bar links are spinning while you try to loosen the nut, use a pair of vice-grips on the flat part of the stud to hold it in place.
Step 4: Managing the Track Bar and Brake Lines
What you need: 24mm socket, zip ties or small bungee cords, and a flathead screwdriver.
Instructions: The track bar keeps the axle centered under the truck, but it will restrict downward movement during this install. Loosen (but do not necessarily remove) the frame-side track bar bolt using a 24mm socket. More importantly, look for the brake line brackets and ABS wire clips attached to the frame and axle. Use a screwdriver to gently pop the plastic clips out and unscrew any small 10mm or 13mm bolts holding brake line brackets. If you skip this, lowering the axle will put extreme tension on your rubber brake hoses, potentially tearing them or damaging the internal lining. Secure the lines loosely with zip ties so they have plenty of slack as the axle descends.
Pro Tip: Pay very close attention to the ABS sensor wires; they are thin and fragile compared to the heavy steel components around them.
Step 5: Lowering the Axle and Removing Coil Springs
What you need: Floor jack and a second person (optional but helpful).
Instructions: Position your floor jack under the center of the front axle to support its weight. Slowly lower the jack. As the axle drops, the tension on the coil springs will release. Continue lowering until the springs are loose enough to be pulled out by hand. Note the orientation of the spring—the “pigtail” or the end of the coil usually fits into a specific notch in the lower spring bucket. Pull the coil springs out of the truck and set them aside. Reach up into the upper spring tower and remove the factory rubber isolator. Most leveling kits are designed to sit between this rubber isolator and the steel frame, or the isolator may be integrated into the new spacer.
Pro Tip: If the axle doesn’t drop far enough, check for any overlooked brackets or wires. Never force the axle down if it feels hung up on something.
Step 6: Installing the Leveling Spacers
What you need: The leveling kit spacers, the factory rubber isolators, and possibly a hammer or mallet.
Instructions: Inspect your leveling spacers. Most 2012 Ram 2500 kits use a “puck” style spacer. Place the spacer into the upper spring mount. Many kits feature a pin or a specific shape that aligns with a hole in the frame’s spring bucket; ensure this is perfectly seated. If your kit requires you to reuse the factory rubber isolator, place it onto the bottom of the new spacer. The isolator acts as a vibration dampener, preventing metal-on-metal contact which would cause significant “clunking” or “squeaking” while driving. Ensure the spacer is flush against the frame so that the coil spring will sit straight once reinstalled.
Pro Tip: Applying a thin layer of marine-grade grease to the top and bottom of the spacer can help prevent future squeaks caused by friction between the metal and polyurethane components.
Step 7: Reseating the Springs and Raising the Axle
What you need: Floor jack and the original coil springs.
Instructions: Place the coil spring back into the lower axle bucket, making sure the end of the coil is clocked correctly in the notch. Align the top of the spring with the rubber isolator and leveling spacer. While holding the spring in place (or having a helper do it), slowly raise the floor jack. This will compress the spring back into the upper mount. Watch carefully to ensure the spring stays centered on the spacer as the axle rises. Continue lifting until the lower shock mount holes align with the holes on the axle. Reinsert the lower shock bolts and hand-tighten them. Do the same for the sway bar end links, ensuring the studs pass through the sway bar correctly.
Pro Tip: It is often easier to align the shocks if you do one side at a time, using the jack to tilt the axle slightly to match the shock’s angle.
Step 8: Final Torquing and Reassembly
What you need: Torque wrench, 21mm and 24mm sockets, and your wheel lug wrench.
Instructions: With the components back in place, it is time to tighten everything to factory specifications. Reattach the brake line brackets and ABS clips you removed earlier. Put the wheels back on and tighten the lug nuts in a star pattern. Lower the truck back onto the ground so the full weight of the vehicle is on the suspension. Now, torque the lower shock bolts to 100 ft-lbs, the sway bar end link nuts to 27 ft-lbs, and the track bar bolt to a massive 150-200 ft-lbs (check your specific kit’s manual for exact figures). Finally, torque your wheel lug nuts to 140 ft-lbs. Bouncing the front of the truck a few times helps settle the new components into their permanent positions.
Pro Tip: Always perform the final torque of suspension bushings (like the track bar) while the truck is on the ground to prevent “bushing bind,” which can lead to premature wear.
✅ Final Checklist
- Verify that the coil springs are properly seated in their lower axle notches.
- Ensure all brake line and ABS wire brackets are reattached and have sufficient slack at full turn.
- Check that all bolts (shocks, sway bar, track bar, and lugs) are torqued to the correct foot-pound specifications.
- Confirm that the steering wheel is relatively straight (it may require a minor adjustment at an alignment shop).
- Double-check that no tools or jacks were left under the chassis before the initial test drive.
Important Notes:
- Alignment is mandatory: Changing the front ride height alters the “toe” and “caster” of your steering geometry. Failure to get a professional alignment immediately will result in rapid tire wear and “Death Wobble.”
- Safety Warning: Coil springs hold a massive amount of stored energy. Never place your fingers between the coils or between the spring and the frame during installation.
- Estimated Time: 2 to 4 hours depending on mechanical experience and tool availability.
- Estimated Cost: $60 – $150 for the kit itself, plus the cost of a professional alignment ($80 – $120).
Tire and Wheel Fitment: Clearing 35-Inch Tires
The most common reason to level a 2012 Ram 2500 is to fit 35-inch tires. On a stock height truck, 35s will almost certainly rub the inner fender liner or the control arms during full-lock turns. A 2-inch to 2.5-inch level provides the vertical clearance needed, but your choice of wheel offset is the deciding factor in whether you will need to trim your truck.
Fitting 35s on Factory vs. Aftermarket Wheels
You can run 35-inch tires on your factory 17-inch or 18-inch wheels, but there is a catch. Because factory wheels have a high positive offset (usually around +43mm to +57mm), a wide 12.50-inch tire will likely rub against the factory control arms when you turn the steering wheel all the way to the left or right. Many owners tolerate this “light rub” for the sake of keeping the stock look, but it can be annoying during parking maneuvers.
- 35×12.50R17/18/20: The standard “big tire” look. On stock wheels, expect minor control arm contact. On aftermarket wheels with a +18mm to +25mm offset, these usually clear perfectly with a 2.5-inch level.
- 295/70R18: A slightly narrower alternative to the 12.50-inch wide tire. This size is roughly 34.3 inches tall and is much less likely to rub the control arms on factory wheels.
- 315/70R17: This is the equivalent of a 35-inch tire and was the factory size for H2 Hummer wheels, which are a popular budget swap for the 2012 Ram.
Offset and Backspacing Requirements
To avoid rubbing the control arms entirely, you need a wheel that pushes the tire outward. However, if you push the tire too far out (using a “negative” offset), you will begin to rub the back of the fender well and the plastic bumper valance. For a 2012 Ram 2500 with a leveling kit, the “sweet spot” for 9-inch wide wheels is an offset between +12mm and +25mm. If you choose a 0mm or negative offset wheel, be prepared to use a heat gun to reshape your plastic fender liners or do minor trimming on the pinch weld at the rear of the wheel well.
Always remember that adding larger tires and a leveling kit will change your speedometer reading. Since the 2012 model uses the computer to track wheel speed for ABS and transmission shift points, you may want to use a handheld programmer to update your tire size. This ensures your 68RFE or G56 transmission continues to shift at the optimal RPM ranges despite the larger rolling diameter.
Essential Components: Shocks, Track Bars, and Steering Geometry
When you level a 2012 Ram 2500, you are doing more than just moving the body away from the axle. Because these trucks utilize a solid front axle with a five-link suspension setup, changing the ride height alters the entire geometry of the front end. Ignoring the supporting components can lead to a “flighty” steering feel or the dreaded death wobble.
The Importance of Extended Shocks
One of the most common mistakes owners make is reusing factory shocks with a 2 or 2.5-inch spacer. At this height, the stock shocks are nearly fully extended at ride height, leaving almost no “down-travel.” This results in a harsh ride over potholes and can eventually damage the shock internal valving. To fix this, you have two main options:
- Shock Extension Brackets: These are budget-friendly steel brackets that move the mounting point of your factory shock, restoring its original travel range.
- Longer Aftermarket Shocks: Upgrading to a shock specifically valved for a 0-2.5 inch lift, such as the Bilstein 5100 series, significantly improves dampening and ride quality over the stock units.
Correcting Axle Shift with an Adjustable Track Bar
On the 2012 Ram 2500, the track bar is what centers the axle under the frame. Because the track bar moves in an arc, lifting the truck even two inches will pull the front axle roughly 1/2 to 3/4 of an inch toward the driver’s side. While the truck is still drivable, it can cause uneven tire wear and “dog-tracking.” Installing an adjustable heavy-duty track bar allows you to re-center the axle perfectly, ensuring your steering wheel stays straight and your geometry remains intact.
Budget vs. Premium: Pricing and Brand Comparison
Deciding how much to spend on your leveling kit depends largely on how you use your truck. Are you looking for a better stance for the street, or do you take your Ram 2500 off-road or into heavy work environments? The price gap between entry-level and high-end kits can be several hundred dollars, but the difference in performance is noticeable.
Entry-Level Spacer Kits ($50 – $200)
Budget kits typically consist of steel or polyurethane “pucks” that sit on top of your factory coil springs. These are excellent for owners who want the look of a leveled truck without changing the factory ride characteristics. Brands like Rough Country and Daystar dominate this space. These kits are effective and durable, but they do nothing to improve the actual suspension performance.
- Pros: Affordable, maintains factory spring rate, easy to return to stock.
- Cons: Does not improve ride quality; often requires separate purchase of shocks or brackets.
Premium Performance Systems ($600 – $1,200+)
If you find the factory 2012 Ram suspension too stiff or “crashy” over bumps, a premium kit is the way to go. Instead of spacers, these kits usually include replacement progressive-rate coil springs. Brands like Carli Suspension, Thuren Fabrication, and Icon Vehicle Dynamics design these kits to soften the initial hit while providing better control. These systems often come bundled with high-end shocks and corrected hardware.
- Pros: Significant improvement in ride comfort, better off-road articulation, and increased durability.
- Cons: Higher upfront cost and more complex component selection.
Conclusion
Leveling your 2012 Ram 2500 is one of the most impactful upgrades you can make, offering a more aggressive profile and the ability to clear 35-inch tires. Whether you choose a simple spacer for a budget-friendly aesthetic boost or a full progressive spring system for a smoother ride, the key is to account for your steering geometry and shock travel. Ensuring your axle is centered and your shocks aren’t bottoming out will keep your heavy-duty hauler driving like a dream.
Ready to transform your truck? Start by measuring your current ride height from the center of the wheel to the fender arch to determine exactly how much lift you need. Once you have your numbers, pick the kit that fits your budget and get ready to enjoy a whole new look on the road!
💬 Quick Questions & Answers
What is the biggest tire size for a 2012 Ram 2500 with a level?
You can comfortably run 35×12.50 tires, though minor trimming might be needed if using factory wheels with high offsets.
Do I need new shocks for a 2-inch leveling kit?
While not strictly required for spacers, longer shocks or shock extensions are highly recommended to prevent the suspension from topping out.
Will a leveling kit affect my towing capacity?
No, leveling the front does not change the rear spring rate or the truck’s rated payload and towing capacity.
What’s the difference between 4WD and 2WD kits for this year?
4WD models use coil spacers or springs for the solid axle, while 2WD models require specific spacers designed for independent front suspension.
How much does a 2012 Ram 2500 leveling kit cost?
Basic spacer kits range from $50–$150, while premium spring and shock packages typically cost between $400 and $900.
❓ Frequently Asked Questions
Is a 2-inch or 2.5-inch level better for my 2012 Ram 2500?
A 2-inch kit usually leaves a slight forward rake, which is ideal if you frequently tow. A 2.5-inch kit provides a perfectly level appearance and maximum clearance for 35-inch tires.
Do I need an adjustable track bar with a leveling kit?
When you lift the front of a solid-axle Ram, the factory track bar pulls the axle toward the driver’s side. An adjustable track bar is recommended for any level over 2 inches to keep the axle centered and prevent steering issues.
Can I install 37-inch tires with just a leveling kit?
While some owners fit 37s with significant trimming and specific wheel offsets, it is generally not recommended. Stick to 35-inch tires to ensure full suspension travel and steering lock without interference.
What brands make the best kits for the 2012 heavy-duty suspension?
Rough Country and ReadyLift offer reliable, budget-friendly spacer options. For those prioritizing ride quality, brands like Bilstein, Carli, and Thuren provide high-quality springs and tuned shocks.
Will a leveling kit make my ride stiffer?
Spacers maintain the factory spring rate, so the ride remains similar but may feel harsher over large bumps. Upgrading to progressive-rate leveling springs often results in a smoother ride than the factory setup.
Are there specific kits for the 6.7L Cummins vs. the 5.7L Hemi?
Yes, because the Cummins diesel engine is significantly heavier, most reputable spring kits have different rates for diesel vs. gas engines. Always verify engine compatibility to ensure the front reaches the advertised lift height.

![2003 Dodge Ram 1500 Rims: Fitment Guide & Best Wheels [2026]](https://truckguider.com/wp-content/uploads/2026/03/2003-dodge-ram-1500-rims-featured-768x403.webp)

![Dodge U110C Code: Lost Communication with Fuel Level Sensor [2026]](https://truckguider.com/wp-content/uploads/2026/03/u110c-code-dodge-featured.webp)