
2013 Toyota Tundra Serpentine Belt Diagram: Proper Routing (2026)

For the 2013 Toyota Tundra (4.6L/5.7L), the serpentine belt follows a specific serpentine path around the crankshaft, alternator, water pump, and AC compressor. Using a 14mm wrench on the belt tensioner bolt, rotate clockwise to release tension, slide the old belt off, and route the new belt per the pulley diagram.
📌 Key Takeaways
- The 5.7L V8 typically uses a 93-inch belt (e.g., Gates K070930 or OEM 90916-A2003).
- The belt tensioner features a 14mm hex nut cast into the housing for clockwise rotation.
- Always verify belt rib alignment with all pulleys before final tension release to prevent premature failure.
- A common failure point is the idler pulley bearing, which often emits a chirping noise before complete seizure.
- Seek professional help if the tensioner arm shows lateral movement or fails to apply sufficient pressure.
Maintaining the accessory drive system on a 2013 Toyota Tundra requires precise adherence to factory specifications. Whether you are operating the 4.6L 1UR-FE or the 5.7L 3UR-FE engine, the serpentine belt system is responsible for driving the alternator, power steering pump, water pump, and air conditioning compressor. A failure in this path results in immediate loss of charging voltage and cooling circulation, potentially leading to catastrophic thermal engine damage. Utilizing the correct 2013 Toyota Tundra serpentine belt diagram is essential for ensuring proper deck engagement across all pulleys and maintaining the integrity of the automatic belt tensioner assembly.
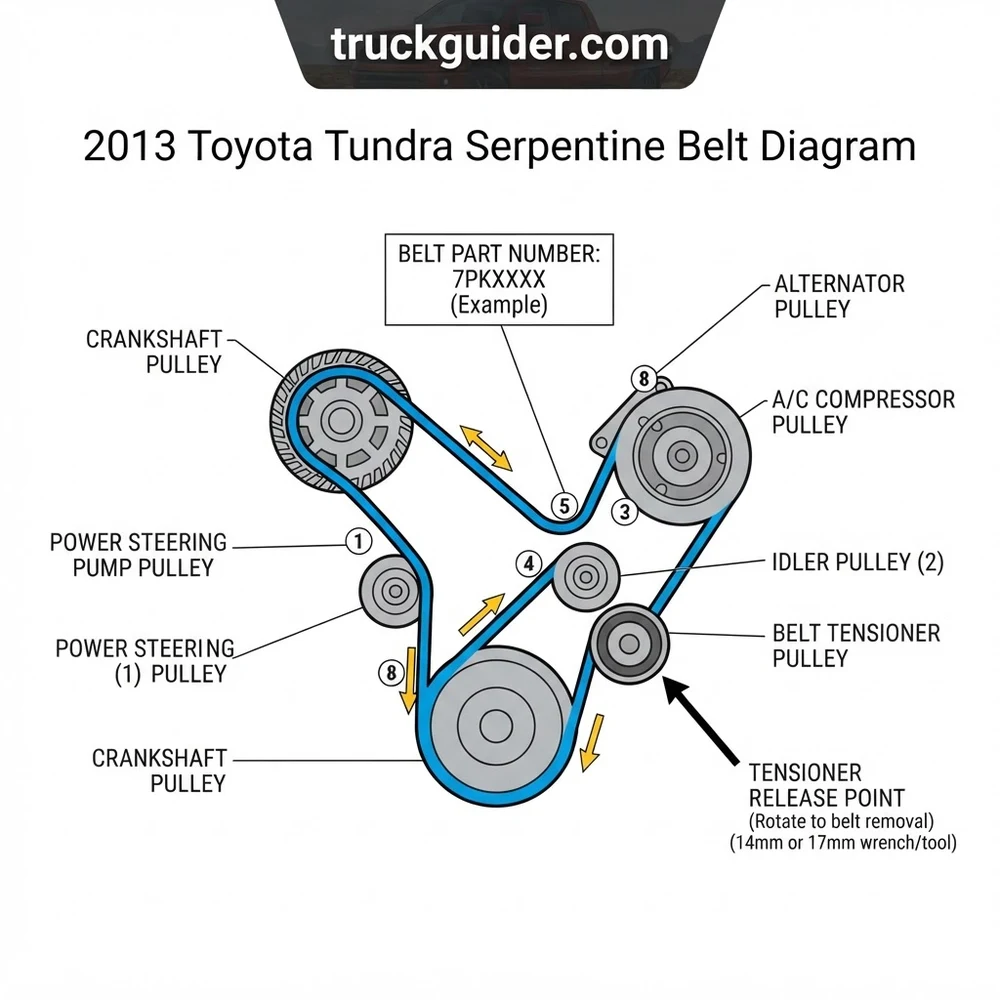
Understanding the 2013 Toyota Tundra Serpentine Belt Diagram and Routing
Recommended Best Deal Products


The serpentine belt routing path on the 2013 Toyota Tundra varies slightly depending on your specific engine configuration. Both the 4.6L and 5.7L V8 engines utilize a single, continuous belt to drive all engine accessories. The schematic illustrates a complex winding pattern that relies on the belt tensioner to maintain constant pressure. Understanding this geometry is critical; if the belt is routed incorrectly, you may experience “back-side” running of the pulley against the grooved side of the belt, which leads to immediate overheating and rapid degradation of the belt material.
Decoding the 4.6L and 5.7L Pulley Layouts

The 2013 Toyota Tundra serpentine belt diagram highlights specific anchor points that serve as the foundation for the system. The crankshaft pulley acts as the primary driver, sitting at the bottom of the stack. From here, the belt travels upward to the idler pulley, which is designed to redirect the belt toward the alternator. The automatic belt tensioner is strategically positioned to take up slack. On the 5.7L variant, the tensioner arm must be rotated significantly to release enough pressure for belt removal. You must ensure that the belt ribs are perfectly seated within the grooves of the alternator pulley to prevent slippage under high electrical loads.
Analyzing Belt Tensioner and Idler Pulley Roles
The idler pulley is a non-driven component meant to alter the belt routing path, ensuring sufficient contact area on the driven accessories. If the bearing within the idler pulley fails, it often creates a metallic “chirping” or grinding noise before the belt snaps. Similarly, the belt tensioner maintains specific tension requirements defined by the OEM. If the tensioner spring has weakened, the belt may slip under load, causing the battery warning light to flicker as the alternator RPM drops below the necessary threshold for optimal charging.
2013 Toyota Tundra Serpentine Belt Part Numbers and Specifications
Choosing the correct belt size and material is imperative for the longevity of the accessory drive system. OEM belts are typically composed of EPDM (Ethylene Propylene Diene Monomer), which provides superior heat resistance compared to traditional chloroprene rubber. Refer to the table below for quick reference regarding engine-specific part selection.
| Engine Displacement | OEM Belt Reference | Common Aftermarket Equivalent |
|---|---|---|
| 4.6L 1UR-FE V8 | 90916-02688 | Gates K070906 |
| 5.7L 3UR-FE V8 | 90916-02688 | Continental 4070905 |
| All Engines (Tensioner) | 16620-0S011 | Dayco 89362 |
Always cross-reference your specific VIN at the parts counter, as Toyota introduced minor running production changes to the 5.7L cooling fan assembly that can affect belt clearance.
How to Use the 2013 Toyota Tundra Serpentine Belt Diagram Step by Step
Recommended Best Deal Products



Replacing the accessory belt requires a systematic approach to ensure safety and correct belt alignment. Before starting, ensure the ignition is off and the battery negative terminal is disconnected to prevent accidental engagement of the cooling fans.
- Access the Tensioner: Locate the tensioner pulley on the front of the engine block. Using a 14mm serpentine belt tool or a long-handled socket wrench, prepare to apply clockwise torque to the tensioner bolt.
- Release Tension: Rotate the tensioner arm until the tension is fully released. With your other hand, slide the old belt off the nearest accessible pulley, such as the idler pulley or the alternator pulley.
- Remove the Old Belt: Carefully extract the belt from the engine compartment, paying close attention to the path identified in the 2013 Toyota Tundra serpentine belt diagram. Inspect the old belt for signs of cracking, rib separation, or localized glazing.
- Routing the New Belt: Following the routing path from the bottom up, place the new belt around the crankshaft pulley first. Use the diagram to thread the belt around the power steering pump, water pump, and finally the alternator.
- Final Seat: Once the belt is routed around all stationary pulleys, use your serpentine belt tool to rotate the tensioner again. Slide the belt onto the final pulley—typically the idler pulley—ensuring that every rib is perfectly centered within the pulley grooves.
- Verification: Release the tensioner slowly. Double-check that the belt is fully seated on all pulleys and not overlapping any edges. A misaligned belt can shred within minutes of operation.
Do not place your fingers between the belt and the pulley while rotating the tensioner. Use a high-quality serpentine belt tool to keep your hands at a safe distance from the pinch points.
Tensioner Pulley and Belt Maintenance Guidelines
The health of your accessory system is not solely dependent on the belt itself. The tensioner assembly and idler pulleys are wear items that often reach their service limit near the 100,000-mile mark. Ignoring these components can lead to a roadside failure regardless of the age of the belt.
Diagnostic Signs of Pulley Bearing Failure
If you hear a rhythmic “whirring” noise that changes pitch with engine RPM, this is often the sound of a failing idler pulley bearing. To verify, remove the belt and spin the idler and tensioner pulleys by hand. Any resistance, “crunchy” feeling, or excessive lateral movement (wobble) indicates that the pulley must be replaced. A frozen bearing will cause the belt to burn through the rubber casing in seconds, leading to a sudden loss of steering assist and electrical power.
Optimal Belt Tension and Deck Engagement
Modern EPDM belts do not require periodic tightening like older V-belt systems; the tensioner is designed to provide constant force. However, if you observe the tensioner arm vibrating excessively while the engine is idling, the internal spring mechanism has likely fatigued. Proper deck engagement refers to the amount of contact the belt maintains with each pulley. If the tensioner is worn, the belt may lose contact during rapid deceleration, causing a momentary voltage dip. Always inspect the alignment of the tensioner arm; it should remain parallel to the engine block under load. If the arm sits at an angle, the internal bushing is worn, and the entire assembly requires replacement.
Torque for the tensioner mounting bolt on 2013 5.7L engines is 44 ft-lbs (60 Nm). Ensure threads are clean before reinstallation to prevent casing stress.
2013 Toyota Tundra Serpentine Belt Diagram Questions Answered
Recommended Best Deal Products


Is it necessary to remove the radiator shroud to access the belt?
On most 2013 Tundra models, there is sufficient clearance between the cooling fan and the engine accessories to route the belt without removing the shroud. However, using a low-profile serpentine belt tool is required to work within the confined space. If you find the reach too restricted, removing the upper radiator cover and the intake ducting can provide significant extra working room.
What are the signs of incorrect belt routing?
If the belt is routed incorrectly, you will typically notice immediate symptoms upon startup. These include the belt “jumping” a groove on the alternator pulley, abnormal squealing, or the belt contacting its own back-side against a grooved pulley. If these symptoms occur, shut down the engine immediately to prevent the belt from overheating and snapping.
Can I reuse the old belt if it looks visually fine?
While an EPDM belt may look fine after 100,000 miles, the internal tension cords eventually lose their elasticity. Additionally, the ribs may suffer from “micro-cracking” that is not visible without bending the belt backward. For mission-critical vehicles like the Tundra, replacing the belt during any maintenance involving the tensioner is considered standard practice.
Does the 4.6L engine use a different belt than the 5.7L?
While the routing path is nearly identical, the physical length required may differ slightly based on the specific alternator amperage and cooling fan setup included in the towing package. Always verify the part number against your specific VIN to ensure the exact length, as an oversized belt will bottom out the tensioner, leading to insufficient clamping force.
For additional maintenance resources, please review our comprehensive guides on alternator testing procedures and engine cooling system maintenance to ensure your Tundra remains in peak operating condition.
Step-by-Step Guide to Understanding the 2013 Toyota Tundra Serpentine Belt Diagram
Identify – Verify your engine type (4.6L or 5.7L) and ensure you have the correct belt part number.
Locate – Find the 14mm hex bolt on the belt tensioner arm situated near the center of the engine front.
Reference – Consult the routing diagram on the radiator shroud or your manual to visualize the belt path.
Connect/Route – Apply clockwise pressure to the tensioner, slide the belt off, and thread the new belt through all pulleys according to the diagram.
Verify – Ensure every rib is perfectly seated in the pulley grooves and perform a final check of the belt tensioner alignment.
Troubleshoot – Start the engine and listen for squealing; if noise persists, check for debris or misaligned belt segments.

![2013 Ram 1500 Lug Pattern: Specs & Fitment Guide [2026]](https://truckguider.com/wp-content/uploads/2026/03/featured-f235e879-768x1024.webp)
![2013 Ram 1500 Oil Type [2026]](https://truckguider.com/wp-content/uploads/2026/03/featured-21030e95-768x768.webp)
![2013 Ram 1500 Transmission Guide: Complete Specs Guide [2026]](https://truckguider.com/wp-content/uploads/2026/03/2013-ram-1500-transmission-featured.webp)