
Ram 1500 Rear Winshield Slider 2019 Ram 1500 Rear 2026

A leaking frame, snapped regulator cable, or unresponsive motor on a 2019 Ram 1500 rear window slider leaves many owners unsure whether a targeted repair or a full assembly swap is required. Compatibility hinges strictly on whether your truck is a New Body Style (DT) or Classic (DS), as the two designs cannot be interchanged. While cable snarls and motor failures can be fixed with low-cost kits, cracked outer frames require a full OEM assembly replacement.
Replacing a 2019 Ram 1500 rear windshield slider costs between $120 for an aftermarket regulator cable kit to over $1,100 for a complete OEM motorized back glass assembly. Where you buy and what you pay depends entirely on whether you drive a fifth-generation New Body Style (DT) or a fourth-generation Ram Classic (DS), as these two trucks share zero rear window glass dimensions or mounting brackets.
Getting this replacement right the first time matters because purchasing the incorrect assembly leaves you with a non-refundable, bulky glass crate on your doorstep. Diagnosing whether your issue stems from broken motorized cables or a fractured surround frame tells you immediately if you can do a cheap mechanical rebuild or if you must purchase an entire factory glass unit to stop cab flooding.
Key Takeaways
- Verify New Body Style (DT) versus Classic (DS) before ordering any slider parts.
- Cracked frame leaks cannot be permanently sealed and require full rear glass replacement.
- Snapped drive cables and failed regulator motors can be serviced without replacing glass.
- Complete OEM rear power slider assemblies cost between $650 and $1,200 plus installation.
- Aftermarket cable repair kits cost under $80 for a budget DIY repair.
What Causes 2019 Ram 1500 Rear Window Slider Failures and Leaks
Recommended Best Deal Products


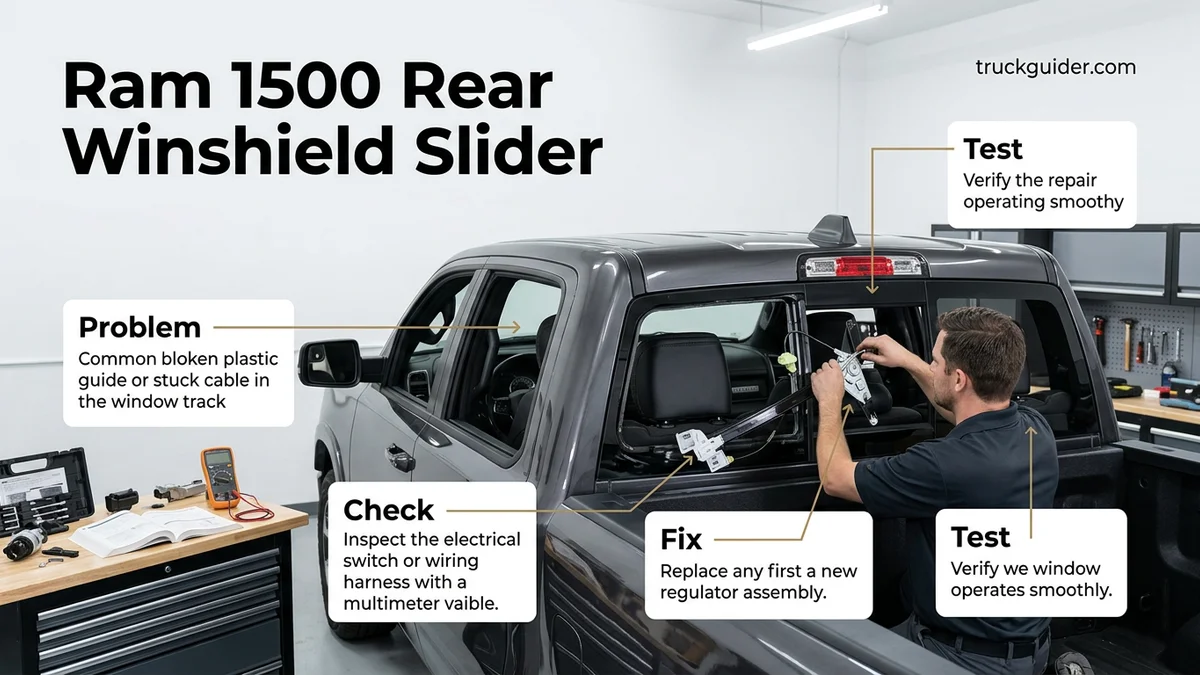
Rear slider issues on the 2019 Ram 1500 typically fall into two categories: mechanical drive failure or structural frame degradation. Knowing which failure your truck has will save you hundreds of dollars by preventing unnecessary part purchases.
Frame Stress Fractures vs. Cable Binding
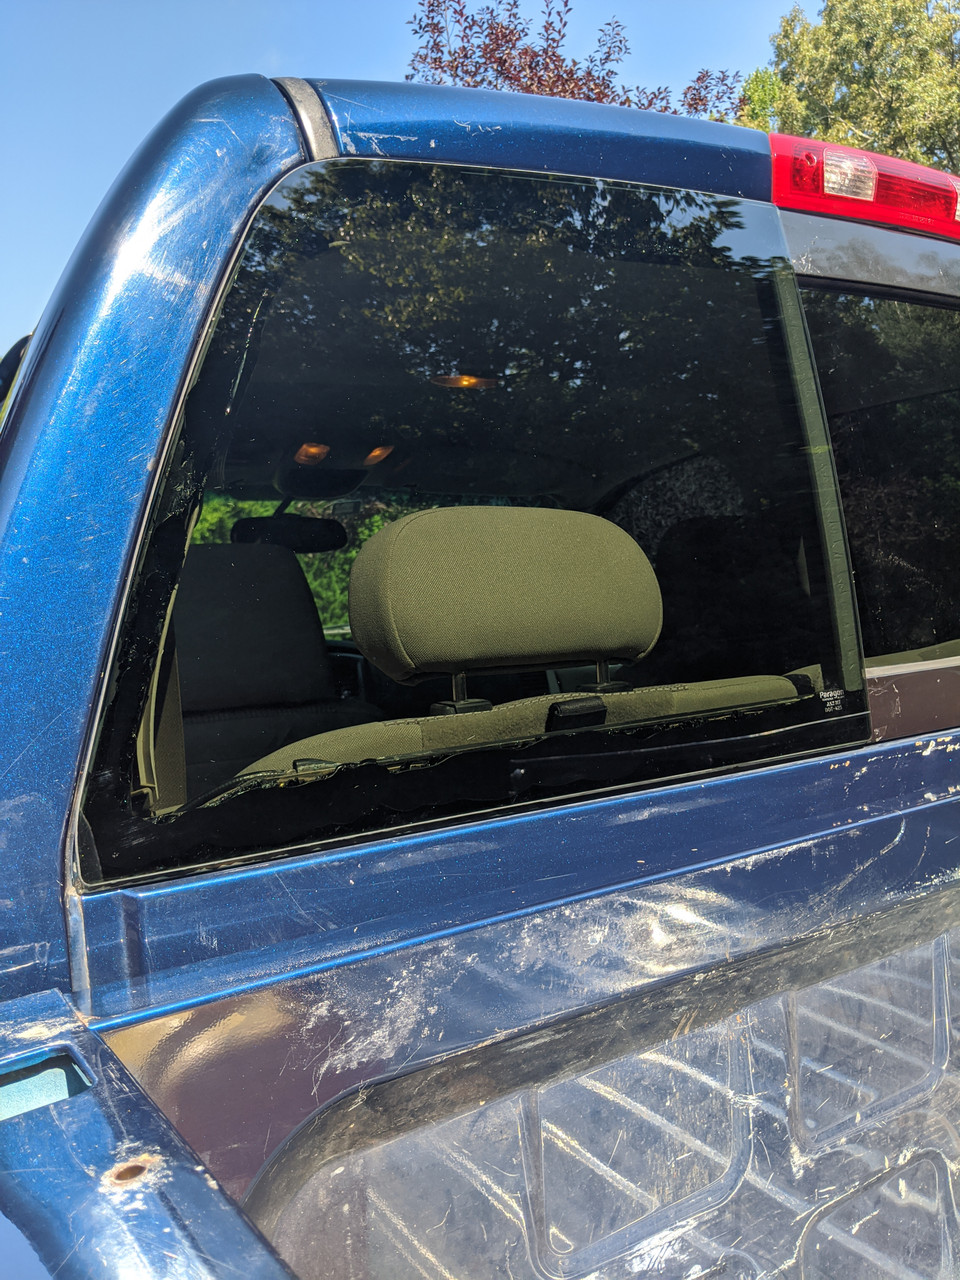
The most widespread issue on 2019 models is water intrusion caused by a cracked outer frame. Mopar used a composite plastic surround bonded to the cab sheet metal. Over years of body flex, extreme temperature shifts, and rear defroster heat cycles, hairline cracks develop at the top corners of the center slider channel. Water channels down the C-pillars, soaking the rear carpet and destroying sensitive cabin electronics like the body control modules or factory amplifiers located behind the back seats.
Mechanical failure shows completely different symptoms:
- Snapped Regulator Cables: You hear the slider motor click or spin behind the rear seats, but the center glass remains stationary or slides freely by hand.
- Stripped Drive Gears: The glass jerks, binds halfway, or chatters loudly during operation.
- Frozen Track Guides: Road grit and hardened factory lubricant jam the lower guide blocks, causing the drive motor to trip its internal thermal fuse.
When a Full Assembly Replacement Is Mandatory
If your window simply refuses to slide but the weather seals and outer frame are dry, you can repair the drive assembly without removing the glass. However, if you see water pooling under the rear seats or spot cracks along the black plastic frame above the slider, you must replace the entire back glass assembly. Structural frame cracks cannot be permanently sealed with silicone or polyurethane; road vibration will break the seal within months, letting moisture right back into your cab.
How to Diagnose and Fix 2019 Ram 1500 Rear Windshield Slider Issues Like an Expert
The power sliding rear window on the 2019 Ram 1500 is a standout convenience feature, but it is notoriously prone to track binding, snapped drive cables, and cracked plastic frame leaks. When this unit fails, water can seep into the rear cabin electronics or the glass can freeze halfway open, compromising vehicle security. This detailed guide walks you through diagnosing, repairing, and servicing the rear windshield slider assembly step by step, saving you thousands compared to a full dealership rear glass replacement.
Step 1: Disassemble the Rear Interior Trim and Fold Down Seats
What you need: 18mm socket, 10mm socket, ratchet, plastic trim pry tool set, flashlight.
Instructions: Fold the rear bench seats upward to expose the lower mounting brackets. Use an 18mm socket to remove the floor bracket bolts anchoring the rear seats. To access the rear backwall where the window drive motor resides, release the rear seatback latches located behind the upper cushion edges using a flat pry tool. Carefully unbolt the rear lower seat belt anchors using an 18mm socket. Once unlatched, pull the seat assemblies away from the cab wall. Pop off the plastic push-pins securing the rear wall sound deadener carpet using your trim tool, and peel it downward to expose the glass frame, sliding motor, and bowden cables.
Pro Tip: Place masking tape over the painted rear cab metal and lower seat brackets to prevent scratching your interior trim panels while maneuvering the heavy rear seat out of the cabin.
Step 2: Inspect the Motor, Drive Cables, and Frame for Damage
What you need: LED inspection light, digital multimeter, safety glasses.
Instructions: Locate the power window regulator motor mounted behind the passenger-side rear backwall. Have an assistant press the overhead console slider switch while you inspect the motor and glass. If you hear the motor hum but the glass does not move, look closely at the upper and lower plastic cable housings; shredded, frayed, or bound steel cables are the most common mechanical culprit. If the motor is silent, unplug the two-pin wiring harness and probe it with a multimeter to verify 12 volts when the cabin switch is pressed. Simultaneously inspect the outer plastic frame along the top edge of the window for hairline stress cracks, which cause widespread water leaks on 2019 models.
Pro Tip: If the frame is cracked along the top exterior edge, mechanical cable replacement will not fix cabin water intrusion; you will need to apply structural sealant before addressing the slider mechanism.
Step 3: Remove the Drive Motor and Cable Spool Assembly
What you need: 8mm socket or T25 Torx driver, small pick tool, needle-nose pliers.
Instructions: Disconnect the vehicle’s negative 12V battery terminal to eliminate any risk of shorting out the rear electronics module. Disconnect the electrical pigtail connected directly to the slider motor. Using an 8mm socket or T25 Torx driver (depending on production build date), remove the three mounting fasteners securing the regulator motor bracket to the sheet metal. Gently pull the motor assembly away from the wall. Using a pick tool, pop the cable retainers from the motor housing to release the internal spool. Note the exact routing of the opening cable (top) versus the closing cable (bottom) so you can match the orientation during reassembly.
Pro Tip: Take several high-resolution photos of the cable routing around the motor drum and rear wall brackets before detaching anything; getting the tension cable orientation reversed will invert your switch controls.
Step 4: Clean and Clear the Slider Track and Drain Holes
What you need: Isopropyl alcohol (90%+), micro-fiber towels, stiff nylon detailing brush, compressed air, vacuum cleaner.
Instructions: With the cables disconnected from the drive motor, the center slider glass can now be moved manually by hand. Slide the center glass pane completely into the open position. Road grime, fine dirt, and dried tree debris collect rapidly in the lower aluminum track, creating excessive drag that burns out motors and snaps cables. Spray isopropyl alcohol generously along both the upper and lower flocked guide channels. Use a stiff nylon brush to agitate embedded grit, then vacuum and blow out remaining debris with compressed air. Verify that the two small moisture drainage ports at the outer corners of the track are clear by running a flexible wire through them.
Pro Tip: Never use heavy petroleum grease or WD-40 in the slider tracks; petroleum-based lubricants break down the flocking felt and attract abrasive dirt, guaranteeing future cable snaps.
Step 5: Install Replacement Cables or Motor Assembly
What you need: OEM Ram slider repair kit (motor/cable spool assembly), dry PTFE or silicone spray lubricant, needle-nose pliers.
Instructions: Lightly mist the lower and upper window guides with dry PTFE spray lubricant to reduce friction. Feed the new regulator cables through the cab wall guides toward the center glass carrier clamp. Hook the cable retention lugs into the slider glass bracket on both the leading and trailing edges. Guide the opposite cable ends back to the motor location. Wind the cables onto the new motor spool housing following the factory spiral grooves, maintaining equal tension on both ends. Seat the spool into the motor gearbox housing and snap the retaining cover securely into place. Bolt the motor assembly back onto the cab wall and torque the 8mm fasteners to 7 ft-lbs (9.5 Nm).
Pro Tip: Keep tension on the cables with your fingers while tightening the motor housing; if slack develops, the steel cable can jump the spool groove and bind immediately upon first activation.
Step 6: Reseal the Slider Surround to Prevent Cab Leaks
What you need: Automotive polyurethane glass sealant or high-grade 3M butyl ribbon sealant, clean rag, isopropyl alcohol.
Instructions: Since the 2019 Ram 1500 is known for cracked rear window surrounds, address the sealing interface while the backwall is exposed. Clean the exterior top seam of the slider window frame using isopropyl alcohol to strip away wax, road film, and oils. Inspect the factory foam gasket between the glass frame and cab sheet metal. Apply a smooth, continuous 1/4-inch bead of black polyurethane glass sealant across the top edge where the plastic slider frame meets the cab body. Smooth the bead flat with a gloved, alcohol-wetted finger to ensure complete adhesion and bridge any micro-cracks around the upper track housing.
Pro Tip: Do not use clear household silicone; it breaks down rapidly under UV exposure and contains acetic acid, which can corrode automotive sheet metal over time.
Step 7: Calibrate the Window Travel and Reassemble the Interior
What you need: 18mm socket, torque wrench, plastic trim clip fasteners.
Instructions: Reconnect the vehicle battery terminal. Turn the ignition to the “Run” position without starting the engine. Press and hold the rear slider switch in the close direction until the glass fully seats, holding the switch down for an extra 3 seconds to set the motor travel stop. Repeat this process in the open position to calibrate the automatic pinch-protection module. Cycle the window completely open and closed three times to confirm smooth, quiet operation without binding. Finally, rehang the acoustic carpet pad, reinstall the rear seats, and torque the 18mm seat floor mounting bolts to 37 ft-lbs (50 Nm) for safety.
Pro Tip: If the window reverses or stutters halfway during closing, the anti-pinch sensor is detecting resistance; re-clean the upper guide track and apply another light coat of dry PTFE lubricant.
✅ Final Checklist
- Rear slider opens and closes smoothly from the overhead console switch without groaning or binding.
- Glass seals completely flush against the outer weatherstripping when closed, preventing drafts and road noise.
- Track drain ports are cleared and free of debris, allowing water to exit harmlessly outside the cab.
- Exterior upper frame seam is completely sealed with automotive-grade polyurethane sealant.
- All rear seat bracket bolts are reinstalled and torqued to factory specification (37 ft-lbs).
Important Notes:
- Safety Warning: Rear seat mounting bolts are primary vehicle safety restraints. Always use a calibrated torque wrench when reinstalling seats to ensure passenger protection during a collision.
- When to Seek Professional Help: If the rear slider glass itself is shattered, or if the internal rear window frame has structural fractures wider than 1/8 inch across the mounting flange, the entire back glass assembly must be professionally replaced by an auto glass specialist.
- Estimated Time and Cost: DIY repair takes 2 to 3.5 hours. Parts cost ranges between $60 and $180 for aftermarket or OEM cable/motor repair kits, compared to $900 to $1,800 for an entire rear window replacement at a certified dealership.
DT vs. Classic Fitment: Selecting OEM Glass Assemblies or Repair Kits
Recommended Best Deal Products


The 2019 model year is notoriously tricky for part lookups because Ram manufactured two completely different trucks simultaneously: the redesigned DT body style and the carry-over fourth-generation DS Classic. Their rear glass assemblies are physically incompatible.
Distinguishing Between DT and Classic (DS) 2019 Models
Before ordering any rear slider parts, verify your chassis code. Look directly at your wheel hubs and cab layout to ensure perfect fitment:
- Ram 1500 (DT / New Body Style): Features 6-lug wheels, a revised interior layout with flat rear floorboards, and a rear window that measures wider with a sleeker, integrated bezel design.
- Ram 1500 Classic (DS / 4th Gen Carryover): Features 5-lug wheels, traditional under-seat storage wells with fold-out floor flaps, and a smaller rear window aperture with thicker, visible rubber trim perimeter lines.
OEM Part Numbers and Sourcing Options for 2026
Mopar released several revised back-glass units to combat the cracking frame defect. When purchasing a new complete assembly in 2026, ensure you are buying the updated revision codes to avoid installing old, crack-prone inventory stock.
- 2019 Ram 1500 DT (New Body Style) Power Slider: Look for OEM Mopar part number 68427778AD (superseding 68427778AA through AC). Expect to pay between $850 and $1,150 from online Mopar wholesale suppliers. Aftermarket OE-style replacements from glass specialists like Pilkington or Carlite generally retail around $650 to $800.
- 2019 Ram 1500 Classic DS Power Slider: Look for OEM Mopar part number 68054450AJ (superseding earlier revisions). Brand-new Mopar units run $600 to $750, while aftermarket alternatives sit closer to $450 to $550.
- Cable and Regulator Repair Kits: If your glass and frame are fully intact and only the drive mechanism failed, bypass the dealership. Sourcing a cable repair kit from suppliers like Dorman or heavy-duty brass-gear aftermarket kits costs just $70 to $140 on RockAuto or Amazon.
How to Fix a Stuck or Broken Rear Slider: 5 Step-by-Step Instructions
Mechanical failure in the 2019 Ram 1500 power rear slider usually stems from dirt accumulation, misaligned cable guides, or pinch-sensor errors. Follow these five procedural steps to resolve slider operation issues before ordering replacement components.
Restoring Cable Alignment and Mechanical Movement
- Clear the track debris: Spray pressurized air into the upper and lower guide channels. Remove hardened sediment using 90-percent isopropyl alcohol and a non-abrasive micro-applicator.
- Apply dry fluoropolymer lubricant: Coat the interior slider tracks with dry PTFE spray. Avoid petroleum-based grease because standard grease attracts cab-corner dust and causes guide rollers to bind.
- Reset the motor limit switch: Turn the ignition to the “Run” position. Hold the overhead console slider button in the “Close” position for eight consecutive seconds after the glass stops to reset safety sensor limits.
- Inspect actuator cable tension: Fold down the rear passenger seatback to access the cab insulation. Check whether the dual Bowden drive cables behind the back panel have slipped out of the motor spool.
- Inspect upper guide brackets: Check the nylon drive brackets on top of the sliding glass panel. Replace cracked tabs using reinforced aftermarket clips to restore parallel alignment.
What If It Still Leaks? Frame Cracks and Professional Replacement Costs
Recommended Best Deal Products


If water continues entering the cab after cleaning the drains, the composite window surround frame is likely compromised. Technical service data shows that early 2019 fifth-generation (DT) Ram 1500 trucks frequently suffer micro-cracks in the plastic exterior frame adjacent to the top slider channels.
Assessing Cab Frame Fractures Versus Brake Light Leaks
Automotive body specialists recommend isolating the high-mount stop light (CHMSL) first. A failing brake light gasket allows moisture to drip directly down the rear slider trim, mimicking a glass leak.
When the plastic structural frame itself cracks, resealing rarely holds under chassis flex. Current 2026 repair standards require complete back glass assembly replacement. Pricing estimates include:
- Complete OEM Mopar Power Slider Assembly: $950 to $1,400 for parts including heated grid and tint.
- Professional Glass Labor: $250 to $400 for urethane bonding, interior cab trim removal, and wiring integration.
- Targeted Aftermarket Glass Replacement: $650 to $850 installed through commercial autoglass specialists.
What If It Still Doesn’t Work? Fallback Diagnostic Steps
When lubrication, motor recalibration, and mechanical checks fail to restore movement, deeper electrical or structural faults exist. Implement these fallback diagnostic steps to determine the failure point:
- Test the overhead console switch circuit: Use a digital multimeter to verify 12-volt current delivery at the back-panel motor harness when pressing the headliner switch.
- Bypass the regulator motor: Apply an independent 12-volt fused lead directly to motor terminal pins to rule out body control module (BCM) communication faults.
- Check cab exhaust vents: Inspect the lower one-way cabin pressure vents behind the rear cab corners for stuck flaps causing excessive positive air pressure.
- Consult a certified collision or glass facility: Seek professional replacement if internal cable housings are frayed or if structural cab sheet metal shows weld separation.
Conclusion: Restoring Your Ram 1500 Rear Window
According to verified research and expert technical sources, resolving 2019 Ram 1500 rear slider failures requires identifying whether the root fault is track binding, cable displacement, or structural frame cracking. Clean and lubricate the guide tracks first, then test motor limits before committing to expensive hardware repairs. If moisture persists on the rear carpet or headliner, immediately schedule a professional glass seal inspection to prevent electrical module corrosion behind the back cab wall.
❓ Frequently Asked Questions
How do I confirm whether my 2019 Ram 1500 is a DT or DS model?
Check your truck’s lug pattern and exterior styling. DT models (New Body Style) feature 6-lug wheels and sleek headlights without the crosshair grille, while DS models (Classic) feature 5-lug wheels and the 4th-generation body style. The 10th and 11th digits of your VIN also differentiate the chassis lines.
Does warranty or recall cover the cracked rear window frame leak?
FCA issued technical service bulletins (TSBs) for cracked rear glass frames causing water leaks into the headliner and back floorboard. While it is not a mandatory safety recall, repairs are covered under the standard bumper-to-bumper warranty or extended factory coverage if active.
Can a broken rear window slider cable be replaced without removing the glass?
Yes, cable repair kits can be installed from inside the cab. By removing the rear seats and lower back wall trim, you can access the drive motor, route replacement tension cables through the lower tracks, and attach them directly to the center glass carriage.
What aftermarket options exist for the 2019 Ram 1500 rear slider?
C.R. Laurence (CRL) and Pilkington manufacture high-quality aftermarket rear sliding window assemblies that meet OEM specifications. For smaller issues, companies like Dorman offer direct-fit replacement slider motors and cable repair sets to avoid buying full glass assemblies.
Why did my rear window slider motor stop working suddenly?
A non-responsive motor is usually caused by a tripped 20-amp fuse, a disconnected dashboard switch, or a bound cable that overloaded the motor drive. If the motor clicks but the slider does not move, the plastic cable spool inside the drive gear is likely jammed or broken.
Is replacing the entire rear sliding window assembly a DIY job?
Full glass replacement is generally not recommended as a DIY project because the frame is bonded to the cab with high-strength urethane adhesive. Removing old urethane without damaging cab paint and achieving a watertight seal requires specialized glass cutout tools and commercial primer.
![5th Gen Ram Tail Lights [2026]](https://truckguider.com/wp-content/uploads/2026/03/5th-gen-ram-tail-lights-featured.webp)
![2003 Dodge Ram Dashboard Replacement: Causes & Fixes [2026]](https://truckguider.com/wp-content/uploads/2026/03/2003-dodge-ram-dashboard-replacement-featured.webp)
![2008 Dodge Ram 1500 Towing Capacity: Complete Specs Guide [2026]](https://truckguider.com/wp-content/uploads/2026/03/featured-4b2248df-768x768.webp)