4th Gen Ram Headlights: Complete Diagram & Layout Guide
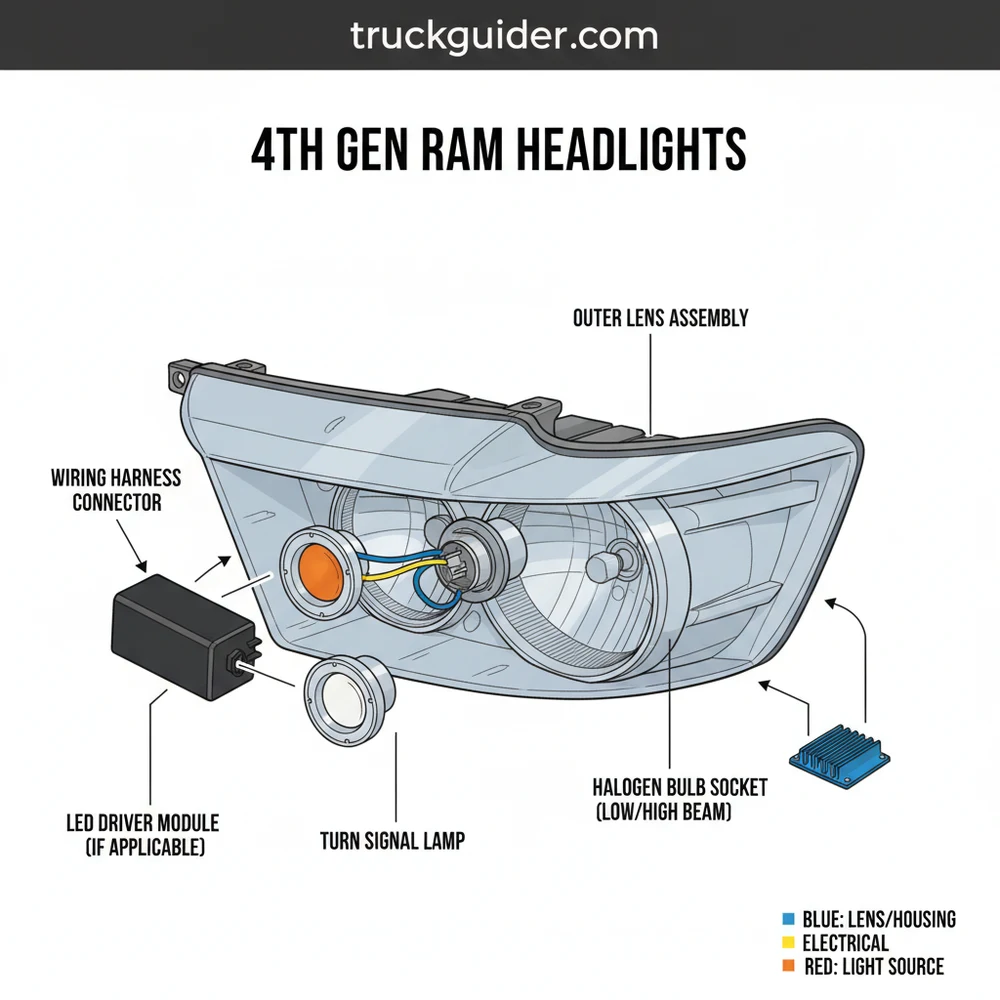
A 4th gen ram headlights diagram illustrates the complete assembly structure, including the projector or quad-lamp housing, bulbs, and electrical connectors. This system layout details how the high/low beams, turn signals, and parking lights integrate within the housing, providing a clear map for troubleshooting wiring or performing LED lighting upgrades.
📌 Key Takeaways
- Identifies the distinction between Quad and Projector style assemblies.
- Pinpoints the exact location of high beam, low beam, and signal bulbs.
- Highlights the critical sealing points to prevent moisture intrusion.
- Offers a clear map for upgrading to aftermarket lighting systems.
- Useful for both routine maintenance and complex electrical repairs.
When you are looking to upgrade or repair your vehicle, understanding the 4th gen ram headlights configuration is essential for a successful project. Whether you are dealing with a burnt-out bulb, a cracked housing, or a complete transition from halogen to LED or HID systems, having a clear roadmap of the components and wiring is the first step toward professional-grade results. This comprehensive guide provides a detailed overview of the assembly structure, offering a clear schematic of how these lights are integrated into your truck’s front-end system. By learning how to read the blueprint of your lighting layout, you can avoid common pitfalls like broken mounting tabs or electrical shorts, ensuring your vehicle remains safe and visible on the road.
The Anatomy of 4th Gen Ram Headlight Components
To effectively use a diagram for 4th gen ram headlights, you must first understand the physical structure and the individual components that make up the assembly. These trucks typically come with two primary styles of headlight housings: the Quad-beam style and the Projector-style. While they look different from the outside, their internal layout and mounting systems share a similar blueprint.
The primary component is the outer housing, a large, clear polycarbonate lens bonded to a durable ABS plastic backing. Inside this housing, you will find the reflector bowls. In a Quad-beam configuration, there are two distinct sections: one for the low beam and one for the high beam. In a Projector configuration, the low beam is housed within a glass spherical lens that focuses the light pattern, while the high beam remains in a traditional reflector bowl.
Beyond the lenses, the system includes the internal wiring loom, which terminates at a central connector on the back of the unit. This connector is the “brain” of the assembly’s electrical system. It manages the power distribution to the low beam, high beam, turn signals, and side marker lights. Understanding this configuration is vital because the pinouts vary depending on whether your truck was factory-equipped with projectors or quad-lamps.
The 4th Gen Ram uses a pulse-width modulation (PWM) system to manage power to the headlights. This means the truck sends rapid pulses of energy rather than a constant stream, which can cause flickering if you install aftermarket LEDs without the correct schematic-matched resistors.
Decoding the Headlight System Layout

A proper diagram or schematic of the headlight system shows more than just the bulbs; it illustrates the relationship between the housing and the vehicle’s chassis. The layout for these trucks is unique because the headlight is held in place by a three-point mounting configuration. Two 10mm bolts are located at the front, accessible only after removing the radiator shroud and the grille. The third mounting point is a hidden stud located at the rear of the housing, which is accessed through a plastic flap inside the wheel well.
When looking at a technical schematic of the 4th gen ram headlights, you will notice the following key elements:
- ✓ Primary Harness Connector: Usually a multi-pin plug (often 6-pin or 14-pin depending on trim).
- ✓ Vertical Adjustment Screw: A silver 7mm or Torx-head bolt used to aim the beam pattern.
- ✓ Retaining Slide: A white plastic locking mechanism found on the rear mounting stud.
- ✓ Turn Signal/Parking Light Socket: A twist-lock component generally located at the bottom outer corner.
The visual breakdown above identifies the spatial relationship between these parts. Notice the placement of the vent caps on the back of the assembly. These are crucial components designed to allow heat to escape while preventing moisture from entering. If your layout overview shows missing or damaged vent caps, you are likely to experience internal fogging or condensation.
Step-By-Step Guide to Reading and Implementing the Diagram

Interpreting a technical blueprint for your truck’s lighting can be intimidating, but following a structured approach makes the process manageable. This guide will walk you through the process of using your diagram to perform a complete assembly removal or inspection.
Step 1: Gather Your Tools and Prepare the Workspace
Before starting, consult your component list. You will need a 10mm socket for the main bolts, an 8mm socket for the wheel well liner, a long extension, and a non-marring trim tool. Ensure the vehicle is parked on a level surface with the engine off and the light switch in the “Off” position to prevent any electrical surges during the disconnection process.
Step 2: Accessing the Front Mounting Points
Open the hood and locate the plastic radiator shroud. According to the system overview, this shroud hides the upper grille bolts. Use your trim tool to pop the plastic rivets. Once the shroud is removed, unscrew the four 10mm bolts holding the top of the grille. Gently pull the grille forward and upward to release the bottom clips, exposing the two front-facing headlight bolts.
Do not force the grille. The lower clips are made of plastic and can snap in cold weather. Use a firm, steady pull rather than a jerking motion.
Step 3: Navigating the Hidden Mounting Stud
The most confusing part of the 4th gen ram headlights blueprint is the rear mounting stud. Locate the small access door inside the front wheel well. Reach through this opening to find a white plastic lever. According to the schematic, this lever must be pushed upward to unlock the rear of the headlight housing. This is often the step that frustrates DIYers who aren’t looking at a layout diagram.
Step 4: Extracting the Housing
With the front bolts removed and the rear slide unlocked, grasp the headlight housing from the edges. Pull it straight forward toward the front of the truck. If you feel resistance, double-check the rear locking slide. Once the unit is loose, do not pull it too far, as the wiring harness is still connected.
Step 5: Disconnecting the Electrical System
Refer to your wiring schematic to identify the locking tab on the main connector. Most 4th gen models feature a red sliding lock. Slide the red tab out, press the center release, and pull the connector away from the housing. This completely isolates the component from the truck’s electrical system.
Step 6: Understanding Bulb Placement and Replacement
If you are using the diagram to replace bulbs, look at the rear of the housing. The low beam is usually the top bulb, and the high beam is the bottom (on Quads). For Projectors, the main bulb is behind a large round dust cap. Twist the caps counter-clockwise to remove them, then turn the bulb 45 degrees to release it from the reflector.
Never touch the glass of a new halogen bulb with your bare fingers. The oils from your skin can create hot spots on the quartz glass, causing the bulb to shatter or burn out prematurely.
Common Issues and Troubleshooting with the Diagram
Even with a perfect blueprint, 4th gen ram headlights can present challenges. One of the most frequent problems is the “Bulb Out” warning on the dashboard even when the bulbs appear to be working. Using the electrical schematic, you can trace this back to the Totally Integrated Power Module (TIPM). If the resistance in the circuit doesn’t match the factory configuration exactly, the TIPM will cut power to that circuit as a safety measure.
Another common issue is condensation. If your layout shows the seals are intact but you still see water inside, check the “breather” patches. These are small Gore-Tex-like membranes that allow the unit to breathe. If they are painted over or clogged with mud, moisture becomes trapped.
If one headlight is dimmer than the other, the schematic suggests checking the ground wire. On these trucks, the ground points are located on the inner fender wells. Corrosion at these points can cause a significant drop in voltage, leading to poor lighting performance.
Tips and Best Practices for Maintenance
To keep your 4th gen ram headlights performing at their peak, regular maintenance is required. The polycarbonate lenses are susceptible to UV oxidation, which leads to the dreaded “yellowing” effect. Using a ceramic coating or a high-quality UV sealant once a year can keep your lenses crystal clear and preserve the integrity of the light beam.
When it comes to upgrades, quality matters. The 4th gen system is notoriously sensitive to “cheap” components. If you are replacing your factory housings with aftermarket options, ensure they are “Plug-and-Play” compatible with your specific configuration (Quad or Projector). Switching between styles usually requires a conversion harness to adapt the wiring layout.
- ✓ Use Dielectric Grease: Apply a small amount to the electrical pins to prevent moisture ingress and corrosion.
- ✓ Check Alignment: Every time you remove the housing, check your beam aim against a wall. The 4th Gen Ram sits high, and misaligned lights can blind oncoming traffic.
- ✓ Inspect the “Ball” Socket: The rear mounting stud pops into a plastic socket. If this socket is cracked, the headlight will vibrate while driving. Replace it if it feels loose.
In terms of cost-saving, doing the work yourself using a reliable schematic can save you hundreds of dollars in labor fees. Dealerships often charge 1.5 to 2 hours of labor just to replace a headlight assembly because of the need to remove the grille. With the right configuration knowledge, you can complete the entire process in under 45 minutes.
Conclusion
Mastering the 4th gen ram headlights system is a rewarding endeavor for any truck owner. By understanding the intricate layout of the mounting points, the specific pinouts of the wiring schematic, and the physical structure of the housing, you move from guesswork to precision. Whether you are performing a simple bulb swap or a complex full-assembly upgrade, the key is to respect the blueprint of the vehicle. Always ensure your connections are secure, your seals are tight, and your aim is true. With this comprehensive overview as your guide, you are well-equipped to maintain the safety and aesthetic appeal of your truck’s front-end lighting for years to come.
Step-by-Step Guide to Understanding the 4Th Gen Ram Headlights: Complete Diagram & Layout Guide
Identify the specific headlight style used in your configuration, such as Quad or Projector.
Locate the mounting bolts and electrical connectors on the rear of the headlight housing.
Understand how the wiring harness integrates with the vehicle’s main electrical system.
Connect the replacement bulbs or upgrade kits to the designated socket layout.
Verify that all lighting functions, including high beams and signals, operate correctly.
Complete the installation by securing the assembly and checking the beam alignment.
Frequently Asked Questions
Where is the headlight adjustment screw located?
The adjustment screw is typically found on the rear or top of the headlight housing. For most 4th Gen Ram headlights, you can access it through a dedicated hole in the radiator support frame. Turning this screw allows you to align the beam pattern vertically for better night visibility.
What does the 4th Gen Ram headlights diagram show?
This diagram illustrates the internal structure and external housing configuration of the lighting assembly. It details the specific layout of the bulbs, the wiring harness connection points, and the mounting brackets. It is essential for understanding how the lighting system integrates with the vehicle’s electrical grid.
How many bulbs do 4th Gen Ram headlights have?
Depending on whether you have the Quad or Projector style, the configuration varies. Quad setups typically feature two main bulbs (H11 and 9005) plus a turn signal, while Projectors use a different bulb type for the main beam. Both systems include side markers and parking light components.
What are the symptoms of a bad headlight assembly?
Common symptoms include flickering lights, moisture buildup inside the lens, or a completely non-functional beam. If only one bulb is out, the component itself may be blown. However, if multiple lights fail, check the wiring harness or the TIPM system for electrical distribution issues.
Can I upgrade these headlights to LEDs myself?
Yes, upgrading the 4th gen ram headlights to LEDs is a popular DIY project. You will need to ensure the LED bulbs are compatible with the Ram’s CAN bus system to avoid flickering or dashboard errors. The diagram helps you locate the correct access panels for installation.
What tools do I need for headlight removal?
To remove the assembly, you generally need a 10mm socket, a ratchet, and an extension. You may also need a trim removal tool to gently pop out the grille or plastic rivets. This allows you to access the hidden mounting bolts behind the assembly structure.


![Dodge Ram 2500 Interior [2026]](https://truckguider.com/wp-content/uploads/2026/03/featured-583ae4d5-768x768.webp)