Dodge Ram Serpentine Belt Diagram: Step-by-Step Instructions
A Dodge Ram serpentine belt diagram illustrates the path across the alternator, power steering pump, water pump, and A/C compressor. Locate the spring-loaded tensioner, rotate it to release tension, and follow the routing sequence shown. Ensure the belt ribs align with each pulley to maintain proper accessory drive and engine performance.
📌 Key Takeaways
- Visualizing the routing path prevents incorrect accessory rotation.
- The tensioner is the primary component for belt removal and installation.
- Ensure ribs are seated in pulleys to prevent belt shredding.
- Use a long-handled tool for leverage when releasing tension.
- Always check the diagram before removing the old belt.
Maintaining a heavy-duty vehicle like the 2011 Dodge Ram requires a solid understanding of its internal mechanics, and few components are as vital yet overlooked as the accessory belt system. When you are under the hood, having a clear and accurate 2011 Dodge Ram serpentine belt diagram is not just a convenience; it is a necessity for ensuring your truck remains operational. This single, continuous loop of reinforced rubber is responsible for powering multiple peripheral components, including the alternator, power steering pump, and air conditioning compressor. In this comprehensive guide, we will break down the routing patterns for the various engine configurations available for this model year, explain how to interpret the layout, and provide the technical insights needed to perform a successful replacement or inspection. By the end of this article, you will understand the critical relationship between the belt, the engine’s cooling system, and the onboard diagnostic computers that monitor your vehicle’s health.
The 2011 Dodge Ram utilized several different engines, including the 3.7L V6, 4.7L V8, 5.7L HEMI V8, and the 6.7L Cummins Diesel. While the basic principles of the serpentine belt remain the same, the specific routing path and pulley count vary significantly between these powerplants. Always verify your engine displacement before beginning work.
Understanding the 2011 Dodge Ram Serpentine Belt Diagram
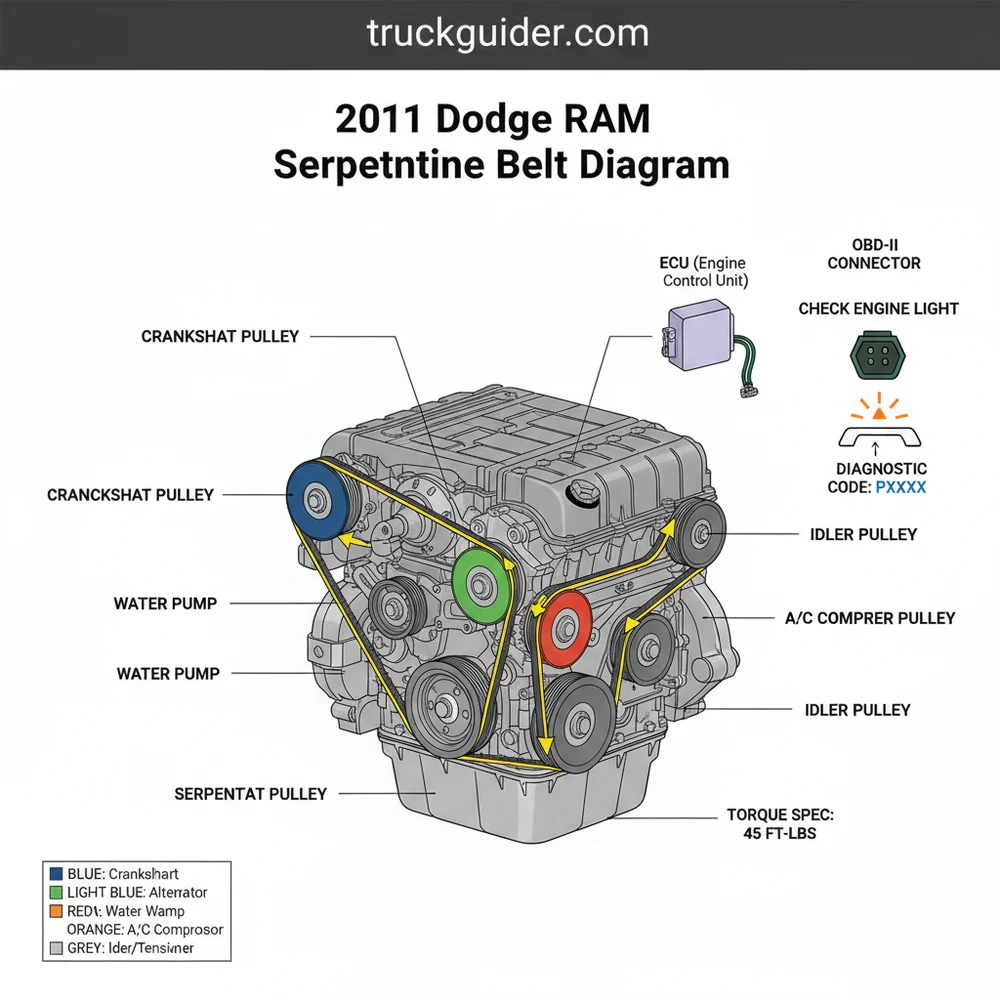
The 2011 Dodge Ram serpentine belt diagram acts as a roadmap for the “accessory belt” system. Unlike older vehicles that used multiple V-belts for different components, the serpentine system uses one long belt to drive everything. The diagram visually represents how the belt weaves through a series of pulleys. To read it effectively, you must identify two types of pulleys: “grooved” and “smooth.” Grooved pulleys interface with the ribbed side of the belt, while smooth pulleys (typically idlers or the backside of the tensioner) interface with the flat, smooth side of the belt.
In the 5.7L HEMI configuration, which is one of the most common for this year, the belt starts at the large crankshaft pulley at the bottom. It then travels upward to the water pump, over to the alternator (which generates electrical power for the ECU and charges the battery), and down through the power steering pump. The path also includes an A/C compressor and at least one idler pulley to maintain the proper wrap angle. The tensioner pulley is the most dynamic part of the diagram; it is spring-loaded and maintains constant pressure on the belt to prevent slipping. Understanding this flow is essential for ensuring that coolant flow remains consistent, as the water pump relies entirely on this belt to circulate fluid through the engine block and radiator.
[DIAGRAM_PLACEHOLDER: A detailed technical illustration showing the 2011 Dodge Ram 5.7L HEMI Serpentine Belt Routing. The diagram labels the Crankshaft, Alternator, Water Pump, Power Steering Pump, A/C Compressor, Idler Pulley, and the Tensioner. Arrows indicate the clockwise direction of belt travel, and color-coding distinguishes between grooved and smooth pulley interfaces.]
Variations exist for the 3.7L and 4.7L engines, which often place the alternator and tensioner in slightly different spatial orientations. The 6.7L Cummins Diesel is even more distinct, utilizing a much wider and thicker belt to handle the massive torque loads of the diesel engine. When looking at the diagram, always look for the “T” symbol, which represents the tensioner. This is your starting point for any removal or installation procedure, as it is the only component that can be moved to create slack in the system.
Step-by-Step Installation and Interpretation Guide
📤 Share
💾 Download
Interpreting a 2011 Dodge Ram serpentine belt diagram is the first step, but the physical application requires a methodical approach. Before you touch a single bolt, ensure the engine is completely cool. Working near the radiator and water pump involves high-temperature components that can cause severe burns.
Required Tools and Materials
- ✓ 3/8-inch or 1/2-inch drive long-handle ratchet or a dedicated serpentine belt tool
- ✓ Replacement serpentine belt (OEM quality recommended)
- ✓ Work light or flashlight
- ✓ Degreaser and a clean rag
The Installation Process
1. Locate the Diagram: Check the underside of your hood or the radiator shroud for a factory-printed 2011 Dodge Ram serpentine belt diagram. If it is missing or unreadable, refer to the digital placeholder provided in this article. Having this visual reference in front of you during the process is vital to prevent incorrect routing, which can spin the water pump in reverse and stop coolant flow.
2. Release the Tension: Locate the tensioner pulley. On most 2011 Ram models, the tensioner has a square hole for a ratchet drive or a hex nut. Using your long-handle tool, rotate the tensioner (usually clockwise for the HEMI) to compress the internal spring. This will create slack in the belt.
3. Remove the Old Belt: While holding the tensioner in the “open” position, slide the belt off the topmost smooth pulley (usually an idler). Once the belt is off one pulley, slowly release the tensioner and then fully unthread the belt from the remaining pulleys. Inspect the old belt for cracks, missing chunks (rib-jumping), or glazing.
4. Inspect the Pulleys: Before installing the new belt, spin each pulley by hand. They should spin smoothly without noise or “play.” If a pulley feels gritty or wobbles, the bearing is failing. This is also a good time to check the tensioner; if it doesn’t provide strong resistance or if the arm is misaligned, it must be replaced. Ensure the torque spec for a new tensioner bolt is followed (typically 30-40 ft-lbs depending on the specific engine).
5. Route the New Belt: Following the diagram exactly, begin threading the new belt. It is usually easiest to start at the bottom crankshaft pulley and work your way up. Leave the smooth idler pulley for last, as it is the easiest to slide the belt over once the tensioner is compressed.
6. Seating the Belt: Ensure the ribs of the belt are perfectly centered in the grooves of the pulleys. If the belt is even one “rib” off-center, it will shred within minutes of the engine starting. Use your flashlight to double-check the A/C compressor and power steering pump pulleys, as they are often tucked away and harder to see.
Never place your fingers between the belt and a pulley while the tensioner is under load. If the tool slips, the tensioner can snap back with enough force to cause serious injury.
Common Issues, Troubleshooting, and Diagnostic Codes
📤 Share
💾 Download
A failing serpentine belt system doesn’t just cause noise; it can trigger complex electrical and mechanical failures that engage the vehicle’s ECU (Engine Control Unit). When the belt slips or fails, the alternator stops providing a steady voltage. This can lead to a “Check Engine Light” or a “Battery” light on the dashboard. Using an OBD-II scanner is a great way to confirm if a belt issue is affecting the electronics.
Common OBD-II diagnostic codes associated with belt-driven component failure include P0562 (System Voltage Low) or codes related to engine overheating like P0128 (Coolant Thermostat/Coolant Temp). If the belt is slipping, the water pump doesn’t spin at the required RPM, causing the coolant flow to drop. The ECU monitors these temperatures through sensors, and if the temperature spikes too quickly, it may put the truck into “limp mode” to protect the engine from warping or head gasket failure.
Squealing is the most common symptom of a belt issue. If the squeal occurs only when you turn the steering wheel, the power steering pump is meeting resistance, or the belt is too loose. If it happens when you turn on the air conditioning, the A/C compressor clutch or the belt’s grip on that pulley is the culprit. Spraying a small amount of water on the ribbed side of the belt while the engine is running (carefully!) can help diagnose: if the noise stops momentarily, the belt is the issue. If it gets louder or doesn’t change, a pulley bearing is likely the source of the problem.
If you are experiencing a persistent check engine light and have replaced the belt, use an OBD-II tool to clear the codes. If the alternator was the issue, the voltage should now stay between 13.5V and 14.5V with the engine running.
The Relationship Between the Belt and the Timing Chain
It is important for DIY enthusiasts to distinguish between the serpentine belt and the timing chain. In the 2011 Dodge Ram, the serpentine belt is an external “accessory belt.” If it breaks, the engine stops running its accessories but does not suffer internal damage. The timing chain, however, is located inside the engine block behind the timing cover. It synchronizes the crankshaft and camshaft. While the serpentine belt needs replacement every 60,000 to 100,000 miles, the timing chain is designed to last the life of the engine, provided oil changes are performed regularly. If you hear a rattling sound from inside the front of the engine, that is likely the timing chain or its tensioner, not the serpentine belt. The serpentine belt diagram will not show the timing chain, as that requires significant engine teardown to access.
Maintenance Tips and Best Practices
To get the most out of your 2011 Dodge Ram serpentine belt, proactive maintenance is key. Modern belts are made of EPDM (Ethylene Propylene Diene Monomer), which does not crack as easily as older neoprene belts. Instead of cracking, EPDM belts lose material from the ribs, much like a tire loses tread. You can purchase a small plastic gauge to measure rib depth, or simply look for signs that the belt is “sinking” deeper into the pulley grooves than it should.
When replacing the belt, it is highly recommended to replace the tensioner and idler pulleys at the same time. These components have bearings that are rated for roughly the same lifespan as the belt itself. A fresh belt on a worn, vibrating tensioner will wear out prematurely. Additionally, always check for oil or coolant leaks. If the water pump is leaking coolant or the front crank seal is leaking oil, these fluids will degrade the rubber of the belt rapidly. Solving the leak is necessary before installing a new belt, or you will find yourself repeating the job within a few months.
For those looking to save money, purchasing a “kit” that includes the belt, tensioner, and idlers is often cheaper than buying them individually. Brands that offer OE (Original Equipment) specifications are preferred, as the 2011 Dodge Ram requires high tension to keep the heavy-duty alternator and A/C compressor running under load. Always ensure you follow the manufacturer’s torque spec for the tensioner mounting bolt to prevent it from snapping or backing out under engine vibration.
Conclusion: Mastering Your Ram’s Accessory Drive
Understanding the 2011 Dodge Ram serpentine belt diagram is a fundamental skill for any owner who wants to ensure their truck’s longevity and reliability. This simple loop of rubber is the lifeline for your engine’s most critical systems. By ensuring the belt is correctly routed to maintain proper coolant flow and electrical output, you prevent the ECU from triggering a check engine light and avoid being stranded on the side of the road. Whether you are troubleshooting a diagnostic code with an OBD-II scanner or performing a routine 100,000-mile service, the technical details provided here—from pulley identification to torque specs—will help you get the job done right. Keep your pulleys clean, your tensioner strong, and always keep a copy of the routing diagram in your glovebox for peace of mind during your next long haul.
Frequently Asked Questions
Where is the belt tensioner located?
The belt tensioner is typically located on the front of the engine, often positioned between the alternator and the crank pulley. On most Dodge Ram models, it features a spring-loaded arm. You can identify it by the square 3/8-inch or 1/2-inch drive opening used to rotate the arm and release belt tension.
What does a serpentine belt diagram show?
The diagram illustrates the precise path the belt must follow around various engine accessories like the alternator, water pump, and air conditioning compressor. It shows which pulleys are grooved and which are smooth, ensuring the belt is installed with the correct side facing each pulley for maximum grip.
How many pulleys are involved in the routing?
Depending on the specific Dodge Ram engine, the belt typically routes around 6 to 8 pulleys. This includes the crankshaft (the drive source), the alternator, power steering pump, A/C compressor, water pump, and idler or tensioner pulleys. Every engine configuration has a unique routing sequence that must be followed exactly.
What are the symptoms of a bad serpentine belt?
Common symptoms include chirping or squealing noises, visible cracks, or frayed edges. If the belt slips, the ECU might detect a drop in voltage or cooling efficiency, causing a check engine light. In such cases, use an OBD-II scanner to check for a diagnostic code related to the charging system.
Can I replace the belt myself?
Yes, replacing a serpentine belt is a straightforward DIY task that takes about 20-30 minutes. You need a way to release the tensioner and access to the routing diagram. Most Dodge Ram trucks have the diagram printed on a sticker under the hood, making the process much simpler for home mechanics.
What tools do I need for belt replacement?
You will need a serpentine belt tool or a long-handled ratchet to release the tensioner. A flashlight is helpful for inspecting pulleys. If you are also replacing pulleys or the tensioner, check your service manual for the specific torque spec for mounting bolts. An OBD-II tool helps clear any temporary codes.

![2016 Ram 1500 Oil Filter Guide: Part Numbers & Best Brands [2026]](https://truckguider.com/wp-content/uploads/2026/03/2016-ram-1500-oil-filter-featured.webp)


![Dodge 2500 Lug Pattern Specifications For Ram Heavy Duty [2026]](https://truckguider.com/wp-content/uploads/2026/03/featured-f475b848.webp)