Where Is The Blend Door Actuator Location, Diagrams, Diagnostics, and Repair Protocols 2026
The modern automotive climate control system represents a convergence of thermodynamics, fluid mechanics, and digital control systems. At the heart of this complex network lies the HVAC actuator—a small, electromechanical component responsible for the physical manipulation of airflow within the vehicle’s cabin. Specifically, the blend door actuator, which regulates air temperature by mixing thermal streams from the heater core and the evaporator, has become a notorious failure point in light-duty trucks and passenger vehicles.
This technical report provides an exhaustive analysis of blend door actuator systems across the four dominant North American truck platforms: the Ford F-150, Chevrolet Silverado/GMC Sierra, Ram 1500, and Toyota Tundra. Through deep semantic research and synthesis of technical service bulletins (TSBs), repair databases, and field reports, this document serves as a comprehensive reference for locating, diagnosing, and replacing these components.
It addresses the user’s primary search intent—spatial orientation via location diagrams—while extending into second-order insights regarding failure mechanics, calibration algorithms, and repair economics.
The analysis reveals a critical trend in automotive engineering: as dashboard designs have become more ergonomic and aesthetically integrated, the serviceability of HVAC components has degraded. Components once accessible via simple trim removal now often require substantial dashboard disassembly, particularly in the 2015+ Ford F-150 and 2019+ Ram 1500 platforms. This report delineates specific “workaround” procedures developed by the aftermarket community to mitigate these labor-intensive repairs.
TRUCKGUIDER DIAGNOSTICS
Blend Door Actuator: Location & Repair
Why is your dashboard ticking?
If you hear a rhythmic clicking noise coming from your dash, or if your truck is blowing hot air on the driver’s side and cold on the passenger’s side, you likely have a failed Blend Door Actuator.
These small electric motors control the flaps inside your HVAC housing. They determine temperature (Blend), airflow direction (Mode), and fresh air intake (Recirculation). When plastic gears inside strip, they lose calibration and “hunt” for position, causing the infamous click.
Common Failure Symptoms
Reported symptoms by F-150, Ram, and Silverado owners.
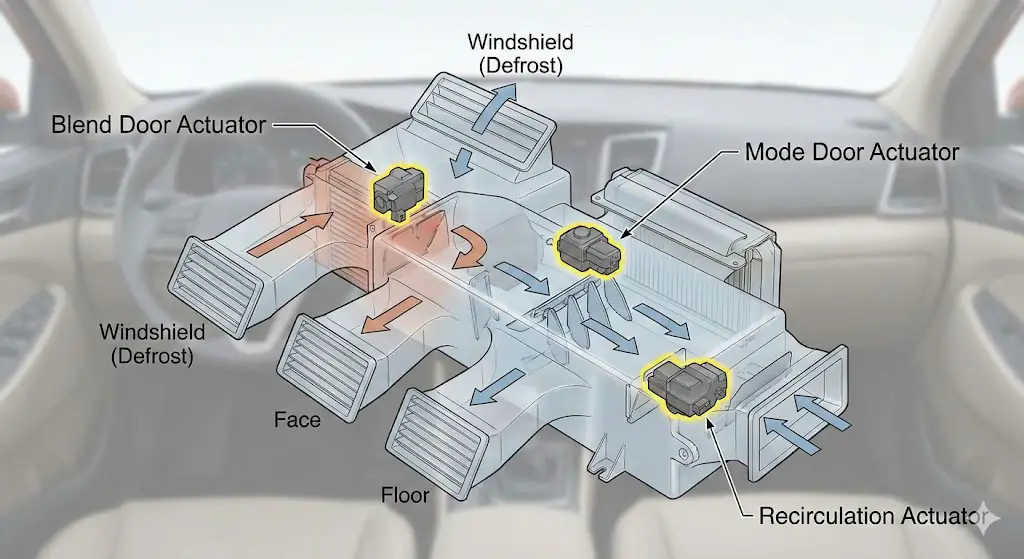
Dashboard X-Ray: Where is the Actuator?
The most confusing part of replacement is knowing which actuator is faulty. Modern trucks often have 3 or 4. Use this schematic to locate yours based on its function.
Repair Cost Comparison
Why DIY is popular: The part is cheap, but the labor is intensive.
The “Dash Pull” Factor
Why does a dealership quote $800+ for a $40 part? Accessibility.
While the Recirculation Actuator (behind the glovebox) can often be changed in 20 minutes, the Temperature Blend Door is frequently buried deep within the HVAC plenum. In many factory manuals (especially for the Ford F-150 and Ram 1500), the official procedure requires removing the entire dashboard.
- ⚠ OEM Parts: $35 – $80 (Recommended for longevity)
- ✓ Aftermarket: $15 – $30 (High failure rate)
Step-by-Step Diagnostic Logic
1. Identify the Trigger Observation
When does the noise/failure happen?
2. The “Touch Test” Action
Locate the suspected actuator housing under the dash. Place your finger on the black plastic box while changing settings. You will feel the vibration of the clicking gears distinctly in the failed unit.
3. Calibration Attempt Software Fix
Before replacing, try a reset. Disconnect the negative battery terminal for 15 minutes. Reconnect and turn key to “On” (do not start) for 30 seconds. The HVAC system will attempt to relearn door positions.
© 2026 TruckGuider Infographics
The Anatomy of Airflow: Theoretical Framework of HVAC Actuation
To accurately interpret location diagrams for blend door actuators, one must first understand the architectural logic of the HVAC distribution box (plenum). The plenum is not merely a box; it is a complex manifold designed to manage air velocity, temperature, and direction simultaneously.
The Shift to Drive-by-Wire HVAC
Historically, climate control was mechanical. A steel cable connected the dashboard slider directly to the blend door. The driver provided the torque to move the door. In modern "Drive-by-Wire" systems, the dashboard control is merely an input device sending a low-voltage signal (or digital data packet via CAN/LIN bus) to a Body Control Module (BCM) or a dedicated HVAC module. This module then commands an actuator to move the door.
This decoupling of control and execution allows for features like Dual-Zone Climate Control, where the driver and passenger can request different temperatures. However, it introduces a reliance on fragile plastic geartrains and potentiometers.
Component Taxonomy: Defining the Actuators
Confusion often arises because users refer to all HVAC motors as "blend door actuators." Technical accuracy requires distinguishing between three distinct functional types, as installing a mode actuator in a blend position will result in calibration failure.
| Actuator Type | Technical Designation | Functional Role | Failure Symptom Profile |
| Blend Door Actuator | Temperature Door Servo / Air Mix Damper | Controls the ratio of air passing through the heater core (hot) vs. the evaporator core (cold). | Temperature Asymmetry: Driver side hot / Passenger side cold (or vice versa). Inability to Change Temp: Stuck on Max Hot or Max Cold. |
| Mode Door Actuator | Distribution Servo / Defrost Actuator | Controls the routing of mixed air to specific vents (Windshield, Face, Floor). | Stuck Vents: Air blows only from Defrost (safety default) or Floor. Cannot switch to Face vents. |
| Recirculation Actuator | Air Inlet Servo / Fresh Air Damper | Selects the air source: External fresh air vs. Internal cabin air. | Auditory Distress: Loud tapping/clicking immediately upon startup. Fogging: Windows fog up due to stuck recirculation. Odors: Exhaust fumes enter cabin. |
The Physics of Failure: Why They "Click"
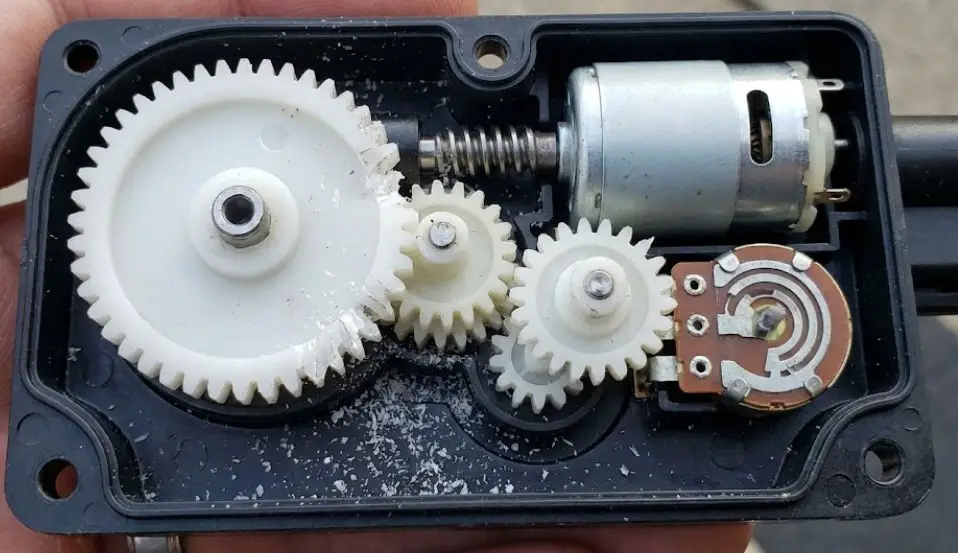
The pervasive symptom described in field reports as a "plastic machine gun" or "tapping noise" is a specific mechanical failure mode involving the internal reduction gears.
- Plastic Fatigue: The primary gear (often nylon) loses teeth due to thermal cycling and brittle fracture.
- Potentiometer Drift: The internal position sensor (resistive strip) develops "dead spots" due to contact scrubbing. The HVAC module loses track of the door's position.
- The "Hunting" Phenomenon: When the module cannot verify the door position, it attempts to "home" the actuator by driving it to the physical stop. If the gears are stripped, the motor spins the broken gear against the remaining teeth, creating the rapid clicking sound.
Ford F-150 Series: Deep Dive Analysis (2009–2020)
The Ford F-150 represents the highest volume of actuator failures in the research dataset, primarily due to the sheer number of units on the road and specific design vulnerabilities in the Motorcraft YH series actuators. The architecture shifts radically between the 12th and 13th generations.
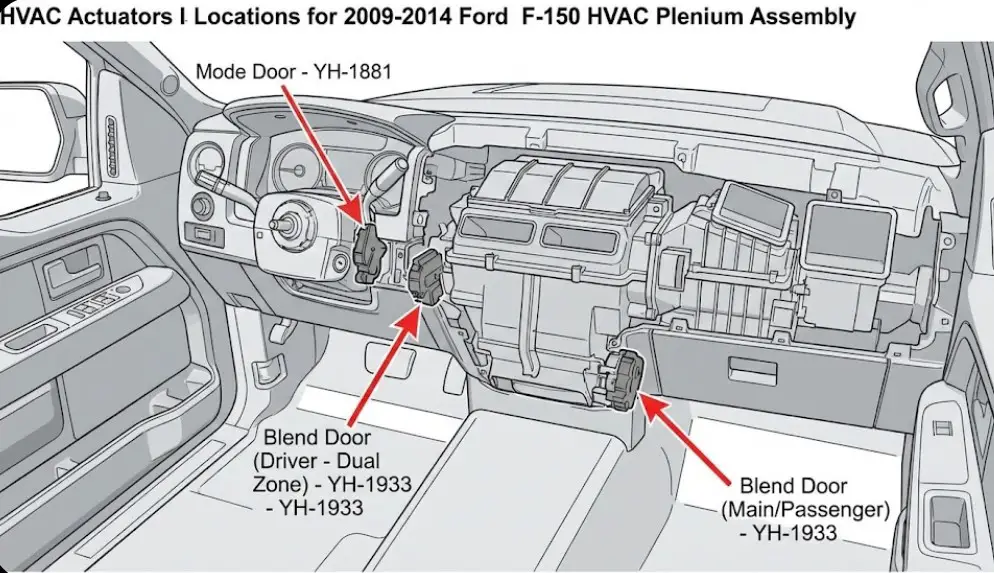
12th Generation F-150 (2009–2014): The "Accessible" Era
In the 2009–2014 platform, Ford utilized a centralized HVAC plenum layout. While tight, most actuators are serviceable without removing the dashboard.
Spatial Orientation and Component Mapping
Diagram A: 2009-2014 F-150 Actuator Locations
| Component | Ford Part # (Typical) | Location Description | Access Vector |
| Blend Door (Main/Passenger) | YH-1933 | Behind the center radio stack, mounted low on the plenum, slightly biased toward the passenger side. | Remove radio bezel and drop the glove box. |
| Blend Door (Driver - Dual Zone) | YH-1933 | Bottom of the HVAC plenum, directly above the transmission tunnel hump. | Driver's side footwell. Look up and to the right of the gas pedal. |
| Mode Door | YH-1881 | Driver's side of the plenum, located higher up than the blend door. | Driver's side footwell. Located directly above the gas pedal lever mechanism. |
| Recirculation Door | YH-1770 | Top of the blower motor housing, behind the glove box. | Drop the glove box completely. Located high up on the right. |
The "Dual Zone" Distinction
In Single Zone (Manual Climate) trucks, there is only one blend door actuator, located in the "Main/Passenger" position behind the radio. The bottom actuator on the driver's side is absent or inactive. In Dual Zone (Automatic Climate) trucks, the system splits. The actuator behind the radio becomes the Passenger Temp control, and the actuator on the floor becomes the Driver Temp control.
Diagnostic Insight: If a 2011 F-150 Lariat (Dual Zone) has heat on the passenger side but only cold air on the driver's side, the failure is the lower driver-side actuator (Floor location), not the one behind the radio.
Replacement Procedure: Mode Door (YH-1881)
The Mode Door is the most frequent failure causing air to be stuck on Defrost.
- Locate: Lie on the driver's floorboard. Look up past the brake pedal.
- Identify: You will see a black actuator with a circular cam gear.
- Removal: It is held by two 8mm (or T20 Torx depending on year) screws.
- Critical Step: The gear on the new actuator must align with the door spline. Do not force the door. Plug the new actuator in, turn the key to ON, and adjust the vent selector until the actuator gear rotates to match the door position.
13th Generation F-150 (2015–2020): The "Dashboard" Era
The 2015 redesign introduced a more compact, firewall-hugging HVAC unit. This improved cabin space but severely compromised serviceability for the Driver Side Blend Door.
The Driver Side Blend Door Nightmare
The location of the driver-side temperature actuator on the 2015+ F-150 is the subject of immense controversy in the repair community.
- Official Location: Bottom left of the HVAC box, sandwiched between the box and the firewall carpet, directly behind the center console metal framing.
- Official Procedure: Remove front seats, center console, steering column, and entire dashboard assembly. Labor Time: 8.5 Hours.
The "Cheater" Method (Field-Developed Protocol)
Research snippets indicate a high search volume for workaround methods. A detailed synthesis of these methods reveals a viable 2-hour repair protocol that avoids dash removal.
Protocol: 2015+ F-150 Driver Blend Door "No-Dash-Pull" Replacement
- Console Displacement: Instead of full removal, unbolt the center console and slide it rearward by 4-6 inches. This requires disconnecting the main harness connectors under the cupholders.
- Ductwork Manipulation: The lower footwell duct obstructs the actuator screws. Use a heat gun to soften the duct plastic and flex it out of the way, or cut a strategic access flap (which can be taped shut later).
- Tooling Requirement: A standard ratchet will not fit. You must use a 1/4" mini-ratchet bit driver or a finger ratchet to access the rear screw.
- Blind Operation: The rear screw is not visible. It must be located by touch. Magnetic sockets are mandatory to prevent dropping the screw into the carpet abyss.
TSB 23-2115: The Cam Failure
For 2015-2020 F-150s exhibiting "Lack of Heat," replacing the actuator may not suffice. Ford TSB 23-2115 (superseding 21-2199) identifies a mechanical binding issue with the temperature door cam itself.
- Root Cause: The cam profile creates excessive friction, causing the actuator to stall.
- Symptom: DTC B1081:07 (Left Temp Damper Mechanical Failure).
- Required Fix: The TSB requires removing the dashboard to replace the cam (Part FL3Z-19788-A) and lubricate the bearing surfaces. Replacing only the actuator will result in repeat failure within months.
Chevrolet Silverado / GMC Sierra Series: Deep Dive Analysis (2007–2018)
General Motors' approach to HVAC layout differs significantly from Ford's, utilizing a "stacked" vertical orientation in the GMT900 platform, transitioning to a more integrated horizontal layout in the K2XX platform.
GMT900 Platform (2007–2013)
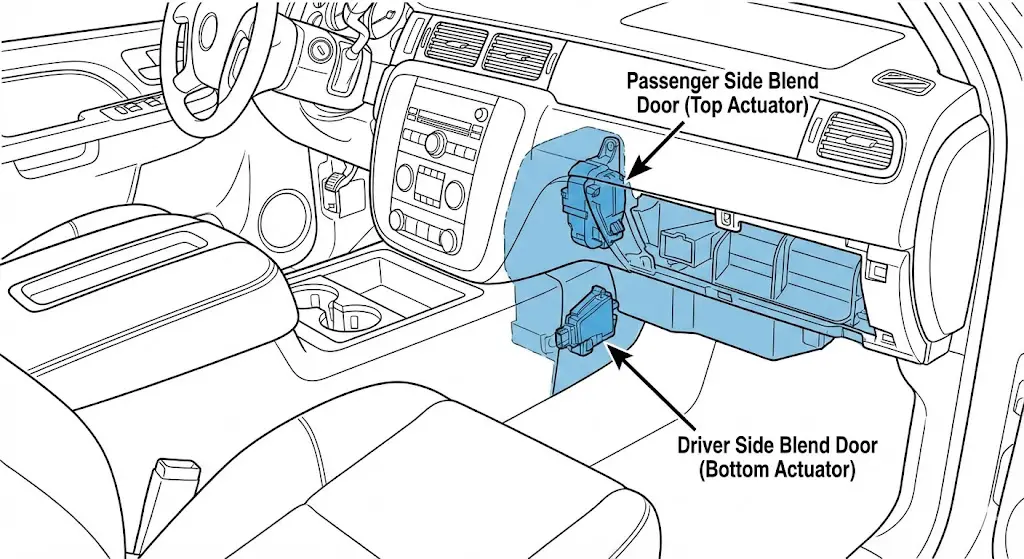
This generation is notorious for "Ghost" HVAC issues, where the actuators lose calibration after a battery disconnect.
Location Diagram Descriptions
- Driver Side Blend Door (The "Bottom" Actuator):
- Location: Unlike Ford, GM places the driver's blend actuator on the bottom of the HVAC case, accessible from the passenger side footwell. It is located near the transmission hump, very low down. A plastic cover (hush panel) must be removed.
- Passenger Side Blend Door (The "Top" Actuator):
- Location: Top of the HVAC case, accessible from the passenger side by removing the glove box. This controls the passenger temp in dual-zone, or main temp in single-zone.
- Mode Door:
- Location: Driver's side, high up near the knee bolster/gas pedal.
- Recirculation Door:
- Location: Top right, behind the glove box, near the A-pillar.
The Calibration Sensitivity
GM actuators are highly sensitive to voltage spikes. Snippet highlights a critical, non-negotiable recalibration procedure required after replacing any HVAC component or disconnecting the battery.
GM GMT900 Manual Calibration Protocol:
- Ignition OFF.
- Remove the HVAC fuse (located in the interior fuse block or underhood block, typically labeled HVAC or HVAC ECU).
- Wait 60 seconds to clear volatile memory.
- Reinstall fuse.
- Turn Ignition to RUN (Engine OFF).
- Do not touch any controls. The system will cycle all doors from stop to stop (approx. 40-60 seconds).
- Verify operation. Failure to do this can cause the new actuator to over-travel and break the internal door stop immediately.
K2XX Platform (2014–2018)
The 2014 redesign moved the components, causing confusion for owners upgrading from older trucks.
Component Mapping
- Driver Blend Door Actuator:
- Shift: Moved to the Driver's Side proper. It is now located behind the panel under the steering column (knee bolster) and the side trim of the center console.
- Access: Requires removing the lower trim panels. The actuator is mounted vertically.
- Passenger Blend Door Actuator:
- Location: Behind the glove box.
- Access: Straightforward glove box removal.
Diagnostic Insights
A common symptom in the K2XX platform is the AC blowing warm on the driver's side while the passenger side is cold. This is almost exclusively the driver-side actuator. However, verify refrigerant levels first; low freon can mimic this symptom in GM condensers due to the flow path of the refrigerant loop favoring the passenger side.
Ram 1500 Series: Deep Dive Analysis (2009–2024)
Ram trucks (formerly Dodge) present a unique set of challenges, specifically regarding the physical durability of the doors themselves, not just the actuators.
4th Generation Ram (2009–2018 / Classic)
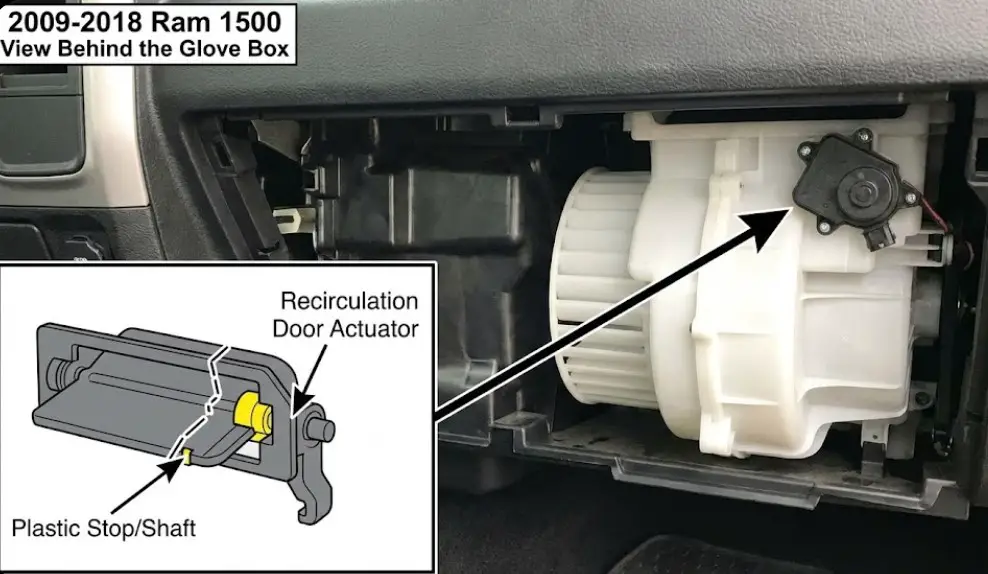
The Recirculation Door Epidemic
The most searched HVAC term for Ram owners is "clicking behind glovebox." This is overwhelmingly the Recirculation Door Actuator.
- Location: Behind the glove box. Once the glove box is dropped (squeeze tabs in), it is the actuator visible on the upper right of the white blower housing.
- Failure Mode: The plastic stop on the door itself often breaks, allowing the actuator to rotate 360 degrees. Or, the actuator gears strip.
- Implication: If the door shaft is broken, replacing the actuator will not fix the issue. The entire housing must be dropped, or a "hack" method involving cutting the housing grid is used to replace the door.
Blend Door Locations
- Single Zone: Behind the glove box, lower section.
- Dual Zone (Driver): Buried behind the center stack.
- Dual Zone (Passenger): Behind the glove box.
5th Generation Ram (2019+ DT)
The 5th Gen Ram ("New Body Style") represents a significant regression in serviceability for the driver-side blend door.
The "Dash-Out" Requirement
Research snippet and confirm that for the 2019+ Ram 1500 (DT), the Driver Side Blend Door Actuator is located on the left side of the HVAC box, physically obstructed by the aluminum dashboard carrier beam.
- Service Manual Procedure: Remove steering column, center console, and roll the entire dashboard assembly back.
- Field Reality: There is currently no widely accepted "cheater" method for this specific actuator on the 5th Gen that does not involve significant disassembly. Owners are reporting dealer quotes in the $1,200–$1,800 range.
- Contrast: The passenger side actuator remains accessible behind the glove box.
The "Heater Treater" Solution
Due to the prevalence of broken doors (not just actuators) in Ram trucks, an entire aftermarket industry (e.g., Blend Door USA, Heater Treater) has emerged producing CNC-machined aluminum replacement doors. For 4th Gen owners intending to keep their trucks long-term, replacing the plastic doors with metal versions during an actuator repair is a recommended preventative measure, despite the higher upfront cost.
Toyota Tundra Series: Deep Dive Analysis (2007–2021)
Toyota nomenclature differs from the domestics. "Actuators" are referred to as "Servos" (e.g., Air Mix Servo). The Tundra system is robust but complex in high-trim models (Platinum/Limited) due to the number of servos involved (up to 5).
Servo Location Mapping (2nd Gen & Refresh)
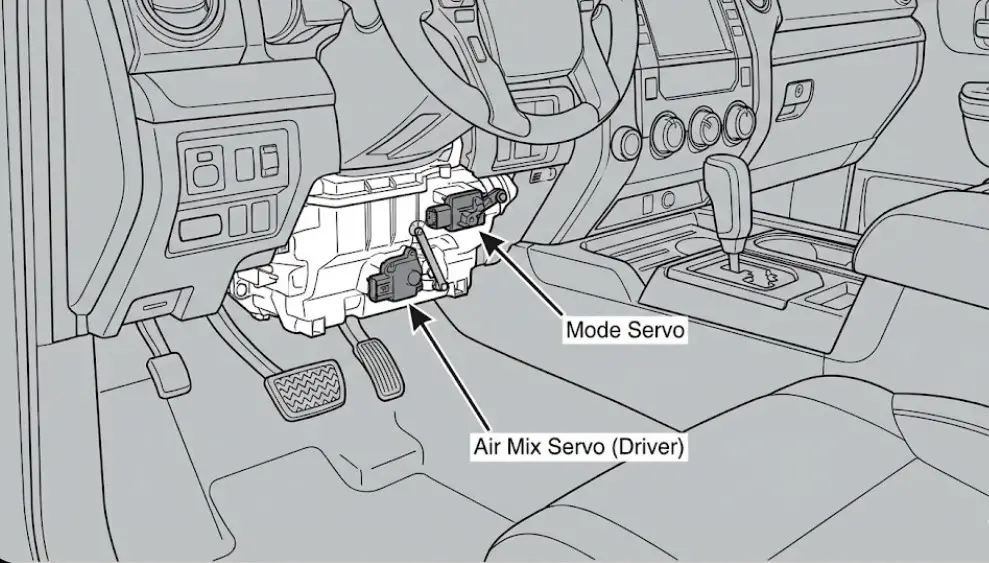
Diagram B: 2007-2021 Toyota Tundra Servo Layout
| Servo Name | Toyota Function | Location Description |
| Air Inlet Servo | Recirculation | Behind the glove box, upper right, directly attached to the blower motor assembly. |
| Air Mix Servo (Passenger) | Main Temp / Pass Temp | Passenger footwell, left side (near center console). Located on the lower portion of the white HVAC box. Visible without removing dash. |
| Air Mix Servo (Driver) | Driver Temp (Dual Zone) | Driver footwell, right side (near gas pedal). Located low on the HVAC box. |
| Mode Servo | Vent Selection | Driver footwell, located above the Driver Air Mix Servo. |
| Max Cool Servo | Bypass Damper | (Some Models) Located high on the plenum, controls bypass air for max A/C. |
The "Techstream" Barrier
Unlike Ford or GM trucks which can often self-calibrate, Toyota servos rely heavily on the LIN Bus communication protocol and precise initialization.
- Initialization Issue: If a servo is replaced and not initialized, the ECU may not recognize the full range of motion, leading to blinking A/C lights or limited travel.
- The Procedure:
- Scanner Method: Use Toyota Techstream software (or high-end Snap-On/Autel tools) to run the "Servo Motor Initialization" utility.
- Manual Method (Button Dance): Some models respond to holding AUTO + RECIRC while turning the ignition ON, waiting for the indicators to flash, then releasing. This forces a limit check.
Common Failure: The "Dying Mouse" Sound
Toyota servos often make a distinct "squeaking" or "chirping" sound (like a dying mouse) rather than the loud clicking of domestic trucks. This is caused by dirty contacts on the internal potentiometer grease.
- Repair vs. Replace: Detailed teardowns suggest that Toyota servos can often be repaired by opening the casing, cleaning the old dielectric grease off the resistive tracks, and re-greasing. This can save hundreds of dollars compared to buying a new OEM servo ($150-$250).
Diagnostic Protocols and Symptom Matrix
Accurate diagnosis is crucial to avoid "loading the parts cannon" (replacing parts randomly).
Symptom-to-Component Matrix
| Symptom | Probable Cause | Verification Test |
| Loud clicking/tapping on startup (stops after 30s) | Recirculation Actuator | Touch the actuator behind the glove box during startup. You will feel the click. |
| Clicking when changing Temp (Hot to Cold) | Blend Door Actuator (Driver or Pass) | Adjust temps independently. If clicking occurs only when moving Driver temp, it is the Driver actuator. |
| AC blows cold on Pass, Hot on Driver | Driver Blend Door Actuator (Dual Zone) | Critical Check: Verify coolant level and A/C refrigerant pressure first. Low Freon causes the same symptom. |
| Air blows only to Defrost/Floor (No Face) | Mode Door Actuator | Cycle through vent positions. Watch the Mode actuator arm (Driver side) for movement. |
| Temp stuck, Actuator motor spins but no change | Broken Blend Door (Internal) | Remove actuator. Manually rotate the door nub. If it spins freely with no resistance, the door is snapped internally. |
Advanced Diagnostics: B-Codes
Standard OBDII scanners check the Engine (P-Codes). To diagnose HVAC, a scanner capable of reading Body Control Module (BCM) codes is required.
- Common Codes:
- B1081: Left Temp Damper Motor (Ford).
- B0228: Recirculation Actuator (GM).
- B1443: Air Outlet Damper Control Servo (Toyota).
- Live Data: Using a scanner to read "Commanded Position" vs. "Actual Position" (Feedback) is the definitive test. If Commanded is 50% and Actual is 0% or 100%, the actuator is jammed or electrically dead.
Repair Economics: DIY vs. Professional
The financial disparity between DIY repair and professional service for blend door actuators is extreme due to the labor-intensive nature of dashboard work.
Cost Comparison Table (Estimated)
| Vehicle | Part Cost (OEM) | Part Cost (Aftermarket) | Shop Labor (Hours) | Shop Cost (Total Est.) | DIY Savings |
| Ford F-150 (2009-14) | $45 - $60 | $25 - $40 | 1.5 - 2.5 | $250 - $450 | ~$350 |
| Ford F-150 (2015-20) Driver | $50 - $70 | $30 - $45 | 6.0 - 8.5 | $900 - $1,300 | ~$1,100 |
| Chevy Silverado (GMT900) | $40 - $60 | $20 - $35 | 1.0 - 1.5 | $180 - $300 | ~$220 |
| Ram 1500 (2019+) Driver | $55 - $75 | $35 - $50 | 8.0 - 10.0 | $1,200 - $1,600 | ~$1,400 |
| Toyota Tundra (2014+) | $120 - $180 | $50 - $80 | 2.0 - 3.0 | $400 - $600 | ~$450 |
Part Quality Warning
Snippet analysis indicates a high failure rate for "lifetime warranty" aftermarket parts (e.g., Dorman) in this specific application. Given the labor difficulty (especially for the F-150 Driver side), OEM parts (Motorcraft/ACDelco) are strictly recommended. The risk of saving $20 on a part only to repeat an 8-hour labor job is a poor economic decision.
Conclusion
The location of the blend door actuator is not a static data point; it is a variable dependent on generation, trim level, and zone. For the truck owner facing this repair, the path forward involves three steps:
- Verify the Component: Use the auditory and symptom matrix to distinguish between Blend, Mode, and Recirculation faults.
- Consult the Generation-Specific Diagram: Do not rely on generic videos. A 2014 Silverado is structurally different from a 2013.
- Evaluate the "Cheater" Methods: For 2015+ F-150s, the workaround method described in Section 2.2.2 is a viable alternative to dashboard removal, provided the owner possesses the patience and dexterity required for blind screw removal.