2000 GMC Sierra Fuse Box Diagram: Pinpointed by Circuit Function

Finding the correct 2000 GMC Sierra fuse box diagram is the most effective way to troubleshoot electrical failures, from a dead cigarette lighter to malfunctioning interior lighting. Whether you are addressing a blown circuit or performing an electrical upgrade, having access to these specific layouts and amperage details is essential for vehicle maintenance.
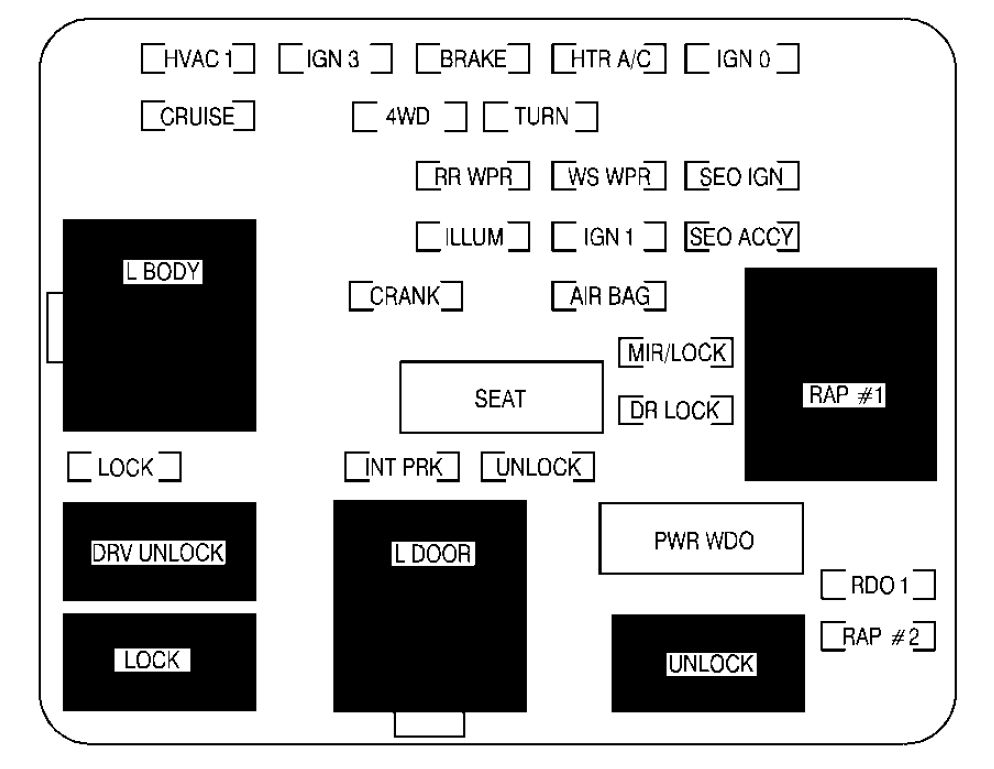
Reference Data for 2000 GMC Sierra Fuse Box Diagram
Recommended Best Deal Products


How to Read This Chart
The table above outlines the most common electrical circuits found in the 1999-2000 GMC Sierra platform. “Amp Rating” represents the maximum current flow a fuse can handle before triggering a safety break. Always cross-reference these findings with the physical label printed on the inside of your fuse block cover.
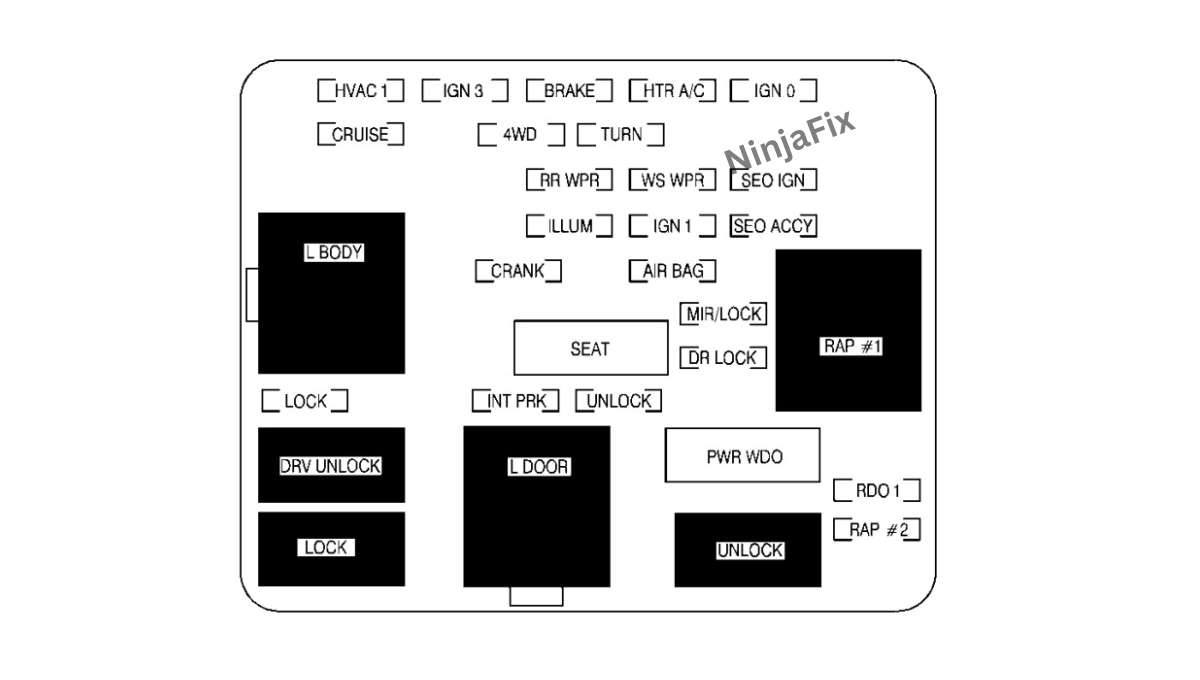
If your specific trim level includes high-output audio, towing electronics, or heated seating, some of these slots may be populated differently. If a slot is marked “Verify for Exact Configuration,” consult your specific owner’s manual or the factory-provided decal on the kick panel to ensure safety against short-circuiting.

Insights Into 2000 GMC Sierra Fuse Box Locations
The 2000 model year marks the early stage of the GMT800 platform for the GMC Sierra. You will primarily interact with the instrument panel fuse block, which is ingeniously hidden behind the driver-side dash cover. Unlike older models that required tools, this cover is designed to be removed by hand.
Understanding the location details is crucial before attempting any repairs. The primary fuse block is situated on the left side of the dashboard, accessible only when the driver-side door is fully open. Pull the edge of the panel to release the friction clips, revealing the grid of fuses and relays.
📋
How to Safely Inspect and Replace Fuses
Recommended Best Deal Products


Open the driver-side door and locate the removable panel on the side of the dashboard. Gently pry it off using your fingers or a plastic trim tool to avoid scuffing the interior.
Use a fuse puller (often found inside the engine bay fuse box) to extract the suspected fuse. Examine the metal filament inside; if it is broken or the plastic housing is scorched, the fuse has blown.
Always replace a blown fuse with one of the exact same amperage rating. Never use a higher amperage fuse, as this can cause permanent damage to your wiring harness.
Common Issues and Summary of Facts
Electrical gremlins are a common fact of life for vehicles nearing their second decade. For the 2000 GMC Sierra, a common point of frustration is the accessory socket losing power, which is almost always linked to the 20A fuse in the main panel. If you find multiple circuits failing at once, this is a summary indicator of a larger ground issue rather than individual fuse failure.
Keep in mind that while the interior fuse block handles most cabin-related systems, the engine bay fuse center controls major power distribution, including the fuel pump, starter relay, and cooling fans. If your cabin fuses test fine but components remain unresponsive, check the primary distribution center under the hood.
The 1999-2000 GMC Sierra generation (Mk1 GMT800) was the first to introduce the modern, standardized “mini-fuse” style, which significantly improved reliability and reduced the footprint of the interior fuse block compared to the older “maxi” or glass-tube style fuses.
🔎 How to Find Your Fuse Details
Recommended Best Deal Products


To verify the exact circuit layout for your specific 2000 GMC Sierra, follow these identification steps:
- Locate the VIN (Vehicle Identification Number) on the dashboard driver’s side corner.
- Check the owner’s manual for your specific engine size (4.8L, 5.3L, or 6.0L) as this sometimes dictates towing or heavy-duty electrical loads.
- Inspect the inside of the interior kick-panel cover; a printed schematic is usually attached to the back of the plastic plate, providing a direct map for your specific factory build.
What If It Still Doesn’t Work?
If you have replaced a blown fuse and the component still does not function, follow these diagnostic steps before assuming a larger wiring failure:
- Check the relay: Listen for a soft “click” when activating the component. If no click is heard, the relay may be stuck open or closed.
- Inspect the harness: Look for signs of frayed wiring near the door hinge or under the dashboard.
- Test the component directly: If it’s an accessory socket or light bulb, ensure the device itself hasn’t failed independently of the truck’s electrical system.
- Professional diagnosis: If the fuse blows immediately upon insertion, you likely have a “dead short” in the circuit that requires a professional electrical technician to trace.
Professional repair shops usually charge between $100 and $200 for electrical troubleshooting diagnostics depending on the complexity of the short. Attempting to bridge a circuit with a higher-rated fuse is a fire hazard and is strongly discouraged.
Conclusion: Keeping Your 2000 GMC Sierra Roadworthy
Maintaining the electrical health of your 2000 GMC Sierra starts with a clear understanding of the fuse box diagram and its associated components. By identifying the specific circuit responsible for your electrical concerns, you can save significant time and diagnostic costs. Based on research of the GMT800 platform, these systems remain robust, but they require periodic inspection of connections to prevent oxidation and moisture-related failures. Should you encounter persistent issues, refer back to these troubleshooting steps or consult a qualified mechanic to ensure your vehicle remains safe and operational for years to come.
Key Takeaways
-
✓
Locate the instrument panel fuse block by opening the driver-side door and removing the side dashboard cover. -
✓
The under-hood electrical center is housed in a black plastic box located on the driver’s side of the engine bay. -
✓
Always match replacement fuses by both physical size and specific amperage color-coding to prevent system damage. -
✓
Refer to the interior of the fuse cover for a printed legend that serves as a primary reference during troubleshooting. -
✓
Use a fuse puller tool rather than metal pliers to avoid accidental short-circuits during the removal process.
❓ Frequently Asked Questions
1
What is the 2000 GMC Sierra fuse box diagram?
The fuse box diagram is a technical layout that maps out the specific location and function of every circuit, relay, and fuse within your truck. It provides essential insights for identifying which component controls lights, fuel pumps, or audio systems, ensuring you perform electrical repairs with accuracy and safety.
2
How does the GMC Sierra fuse system work?
The system acts as a protective grid for your vehicle’s electronics. Each fuse is designed to melt or ‘blow’ if current levels exceed safe limits, preventing wire overheating or electrical fires. By reviewing the provided facts on circuit functions, you can isolate which subsystem is failing during an electrical outage.
3
Why is this fuse information important?
Having access to accurate fuse information is vital for DIY maintenance. Incorrect fuse placement can lead to short circuits, damaged controllers, or total system failure. These details allow you to troubleshoot symptoms logically, saving you expensive diagnostic time at a professional repair shop or dealership.
4
What are the benefits of checking my own fuses?
Checking your fuses independently offers the benefit of speed and cost savings. Many electrical gremlins, such as a dead radio or malfunctioning turn signals, are caused by simple, inexpensive fuse failures. Learning these steps empowers you to perform basic repairs without needing advanced mechanical equipment or service fees.
5
How can I get started with electrical troubleshooting?
Start by identifying the failed component and locating the corresponding fuse panel. Use a test light or multimeter to check for power on both sides of the fuse. Once you have confirmed the fuse is the culprit, replace it with the correct amperage rating as indicated in our provided reference data.
6
Where is the fuse box located on a 2000 GMC Sierra?
Interior on the driver side dash panel (accessible with the door open) and under the hood on the driver side near the firewall.