2014 Ram 1500 Headlight Bulb Size & LED Upgrades Guide 2026
The 2014 Ram 1500 represents a highly specific transitionary period in automotive electrical engineering. Situated right in the middle of the fourth-generation Ram production run, the 2014 model bridges the gap between traditional analog reflector lighting systems and the complex, module-driven projector optics that define modern trucks.
Navigating the forward lighting architecture of the 2014 Ram 1500 requires significantly more precision than older vehicles; owners must identify their truck’s specific trim package, the physical style of the headlight housing, the geometry of the lower bumper fog lights, and the sensitive parameters of the vehicle’s Totally Integrated Power Module (TIPM) or Power Distribution Center (PDC).
When a factory headlight fails, or when visibility demands an upgrade from the notoriously dim factory halogens, selecting the correct replacement is not a simple matter of pulling a bulb off a retail shelf. This comprehensive research report synthesizes electrical diagnostic protocols,
photometric data, OEM part catalogs, and regulatory compliance frameworks to deliver an authoritative, data-driven guide on 2014 Ram 1500 headlight bulb sizes, common electrical faults, and performance upgrade pathways.
Identifying the 2014 Ram 1500 Headlight Assembly Architecture
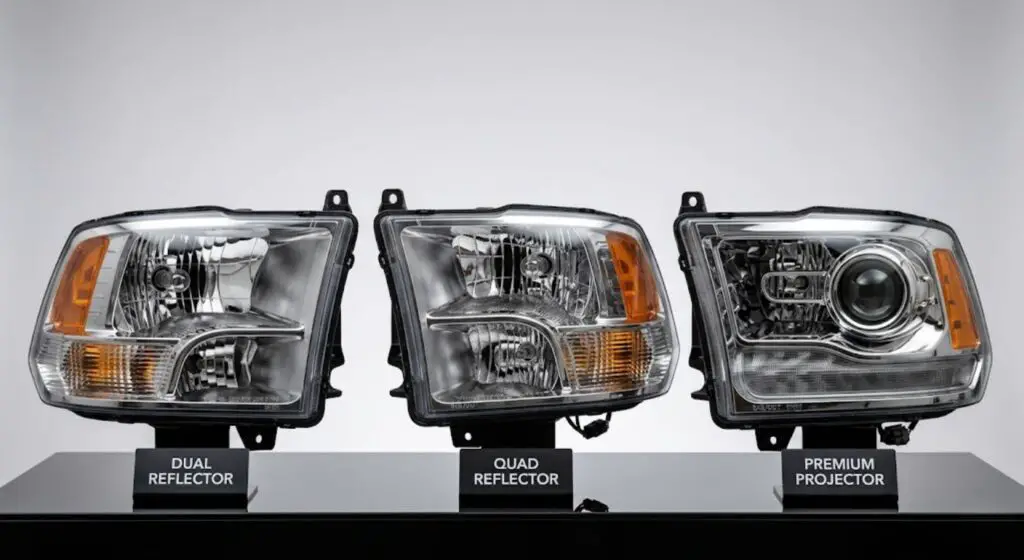
Automotive manufacturers rarely utilize a single headlight assembly across an entire model lineup due to the tiered nature of vehicle trim levels. The 2014 Ram 1500 is notably complex in this regard, having been manufactured with three completely distinct primary headlight housing styles: Dual, Quad, and Projector. Each of these assemblies dictates an entirely different bulb configuration, a different wiring harness, and a vastly different lighting output dynamic.
Relying solely on the vehicle’s trim level (such as Tradesman, SLT, Laramie, Express, or Sport) is an unreliable method for determining the headlight type, as dealership option packages frequently allowed lower trims to be upgraded with premium lighting at the time of purchase. Therefore, visual identification of the internal reflector optics is the only definitive method for determining the correct assembly.
Dual Reflector Headlights
The Dual headlight system serves as the baseline, entry-level configuration. It is most commonly found on fleet-oriented trims, work trucks, the base Tradesman, and entry-level SLT models. The visual marker for the Dual housing is its simplicity: the interior of the headlight features a single, large, clear reflector bowl that dominates the space.
Because there is only one primary optical cavity, the system relies on a single dual-filament halogen bulb to handle both the low beam and the high beam functions simultaneously. When the driver activates the high beams, a secondary filament within the same glass capsule is energized. The required replacement bulb size for the Dual housing is the H13, which is also cross-referenced as the 9008 bulb.
Quad Reflector Headlights
The Quad reflector system was designed to offer a moderate photometric improvement over the base Dual system by physically separating the high and low beam light sources. This setup is standard on mid-tier trims such as the Big Horn, Lone Star, and elevated SLT packages. To visually identify a Quad headlight, one must look at the layout of the chrome optics inside the lens.
The housing features two distinct, separate clear circular reflector bowls—typically arranged with the low beam in the upper position and the high beam situated below or slightly offset. If an observer checks the rear of the headlight assembly, they will find two separate bulb sockets and two distinct wiring plugs.
By separating the light sources, Ram engineers were able to optimize the reflector geometry for each specific task. The Low Beam requires an H11 bulb (interchangeable in some aftermarket catalogs with H8 or H9 bases), while the High Beam requires a 9005 (HB3) bulb.
Premium Projector Headlights
Standard on top-tier trims such as the Laramie, Laramie Longhorn, Limited, and the appearance-focused Sport model, the projector housing represents the pinnacle of factory halogen lighting for the 2014 model year. The defining visual characteristic of the projector housing is the low beam section, which features a distinct, thick glass spherical lens (often referred to as an “eye” or a “fish-eye” lens) rather than a bare bulb sitting in front of a chrome mirror.
This glass lens sharply focuses the low beam light and utilizes an internal physical metal cutoff shield to create a crisp, flat beam pattern that prevents glare from blinding oncoming drivers. The inner section of the housing retains a standard, traditional reflector bowl dedicated exclusively to the high beam. The assembly is completely sealed and is powered by a unique single large wiring harness plug that incorporates CANbus control directly into the housing. The Low Beam requires a 9012 (HIR2) bulb, while the High Beam utilizes a 9005 (HB3) bulb.
Complete 2014 Ram 1500 Bulb Size and Official Cross-Reference Guide
Beyond the primary forward lighting configurations, the 2014 Ram 1500 utilizes a highly diverse array of miniature bulbs to facilitate signal, safety, cargo, and interior illumination. Maintaining precise OEM specifications across these secondary lighting zones is essential for ensuring vehicle longevity, electrical compliance, and safety on the road. The following data presents the definitive bulb sizes required for the 2014 model year, including common cross-reference identification numbers used by aftermarket manufacturers.
Exhaustive Exterior and Interior Bulb Specifications
| Automotive Lighting Component | Official OEM Bulb Size | Common Cross-Reference / Alternate Sizes |
| Primary Low Beam (Dual Housing) | H13 | 9008 |
| Primary Low Beam (Quad Housing) | H11 | H8, H9 |
| Primary Low Beam (Projector Housing) | 9012 | HIR2 |
| Primary High Beam (Dual Housing) | H13 | 9008 |
| Primary High Beam (Quad & Projector) | 9005 | HB3 |
| Front Fog Lights (Horizontal Bumper) | 9145 | H10, 9140 |
| Front Fog Lights (Vertical Bumper) | 9006 | HB4 |
| Front Turn Signal / Front Parking | 3157 | 3156, 7443, 3057 |
| Rear Brake / Tail / Turn Signal | 3157 | 3156, 3057 |
| Reverse / Back-Up Light (Reflector) | T15 | 912, 921 |
| Reverse / Back-Up Light (Projector Trim) | 7443 | 7440 |
| Cargo / Third High-Mounted Brake Light | T15 | 912, 921 |
| Rear License Plate Illuminator | T10 | 194, 168 |
| Interior Dome / Map Reading Light | 211-2 | 578, 41mm Festoon |
| Glove Box Compartment Light | T10 | 194, 168 |
| Engine Compartment Under-Hood Light | 211-2 | 578, 561 |
The Fog Light Anomaly: Horizontal vs. Vertical Housings
The 2014 Ram 1500 introduces significant lighting complexity not just in the main headlights, but in the lower bumper styling. Depending on the exact trim, body package, and factory options, the vehicle features either horizontal or vertical fog light housings. Failing to identify the correct fog light geometry is one of the most common purchasing errors made by Ram owners, as the bulbs and the mounting brackets are entirely incompatible with one another.
The horizontal fog light configuration is typically found on standard steel bumpers featuring chrome or painted inserts, common on the SLT, Laramie, and Big Horn trims. These rectangular assemblies sit parallel to the ground and utilize a 9145 (also cross-referenced as H10) halogen bulb.
Conversely, the vertical fog light configuration is exclusively installed on the aerodynamic, monochromatic painted polyurethane bumpers found on the Sport and Express trims. These housings are oriented straight up and down, flanking the central air dam. The vertical assemblies require a 9006 (HB4) bulb.
Attempting to cross-install these bulbs will result in immediate base fitment failure; the plastic locking tabs and O-ring diameters on the 9145 and 9006 are structurally incompatible. Furthermore, owners looking to upgrade the entire fog light assembly to high-performance LED pods must ensure they purchase kits with the correct proprietary mounting brackets.
Companies like iJDMTOY and Vivid Racing manufacture custom metal mounting brackets specifically curved to adapt standard LED pods into either the horizontal or vertical openings without requiring destructive modification or drilling to the bumper.
Official Mopar OEM Part Numbers
For owners seeking exact factory replacements to maintain absolute original equipment fidelity and avoid any potential electrical anomalies, Mopar (the official parts and service division of Chrysler/Dodge) maintains a specific catalog of OEM inventory for the 2014 Ram 1500. Sourcing these specific part numbers guarantees a factory-correct beam pattern and exact wattage draw.
- OEM 9005 High Beam Halogen Bulb: Identified by Mopar Part Number L0009005 or L09005HL.
- OEM Horizontal Fog Light Assemblies: Identified by Mopar Part Number 68104820AF (Right Passenger Side) and 68104821AF (Left Driver Side).
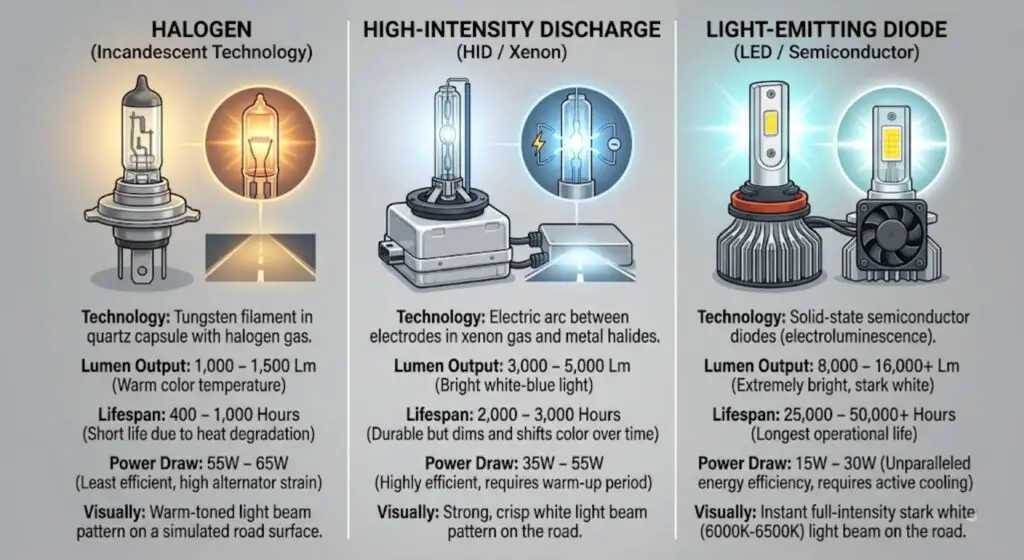
Photometric Science: Halogen vs. High-Intensity Discharge (HID) vs. LED
When an original equipment halogen bulb inevitably fails due to filament degradation, or when a driver determines that the factory lighting output is insufficient for safe nighttime navigation, they are faced with a critical decision.
The aftermarket offers replacement solutions in standard Halogen, High-Intensity Discharge (HID) xenons, or modern Light-Emitting Diode (LED) equivalents. Understanding the raw photometric data—specifically the lumen output, power draw, thermal dynamics, and lifespan—is critical to making an informed upgrade.
Standard Halogen Performance and Blackbody Radiation
Standard halogen bulbs operate on century-old incandescent technology. They function by passing a 12-volt electrical current through a fragile tungsten filament suspended within a small quartz capsule filled with pressurized halogen gas (such as iodine or bromine). As the filament encounters electrical resistance, it heats to thousands of degrees, emitting light through blackbody radiation.
While they are highly cost-effective to manufacture and inexpensive to replace (averaging $10 to $50 for a premium set), they are the least efficient lighting technology available in the modern automotive sector.
- Lumen Output: A standard 2014 Ram 1500 halogen bulb produces approximately 1,000 to 1,500 raw lumens.
- Lifespan: The intense heat degrades the tungsten over time, resulting in a relatively short operational lifespan of 400 to 1,000 hours of continuous use.
- Energy Consumption: Halogens draw a massive 55W to 65W of power, causing substantial strain on the vehicle’s alternator and electrical wiring harness.
High-Intensity Discharge (HID) and Xenon Gas Dynamics
HID systems completely abandon the fragile tungsten filament. Instead, they generate light using an electric arc passed between two tungsten electrodes housed inside a fused quartz tube filled with xenon gas and metal halide salts. This process is highly analogous to the mechanism of a lightning strike. HID systems are highly favored by automotive lighting purists who utilize the 2014 Ram 1500 projector housings, as the precisely focused glass optics pair exceptionally well with the spherical emission pattern of burning xenon gas.
- Lumen Output: A quality 35W HID system generates between 3,000 and 5,000 lumens, providing a massive upgrade in down-road visibility.
- Lifespan: HID capsules typically last 2,000 to 3,000 hours.
- Energy Consumption: Despite the massive increase in brightness, HIDs are highly efficient, drawing only 35W to 55W of steady-state power.
- Behavioral Traits: HID systems require an external ballast to ignite the arc, meaning they experience a brief 3-to-5 second warm-up period to reach their optimal color temperature. Crucially, when an HID capsule nears the end of its life, it does not fail instantly; instead, it slowly dims, shifts color toward a deep purple, or begins to strobe, giving the driver ample warning before a complete blackout.
Light-Emitting Diodes (LED) and Semiconductor Efficiency
LED technology represents the bleeding edge of automotive lighting, relying on solid-state semiconductor diodes to generate light through electroluminescence rather than extreme heat or gas ignition. The primary advantage of LEDs lies in their unparalleled electrical efficiency, extreme longevity, and resistance to the harsh vibrations experienced by a pickup truck.
- Lumen Output: Premium aftermarket LED sets utilize advanced CSP or LMP chips, generating a staggering 8,000 to 16,000+ total lumens per set.
- Lifespan: Because there is no filament to burn or gas to escape, high-quality LEDs boast an operational lifespan of 25,000 to over 50,000 hours, effectively outlasting the mechanical life of the truck.
- Energy Consumption: Highly efficient, drawing between 15W and 30W of power.
- Behavioral Traits: LEDs offer instantaneous full-intensity illumination with zero warm-up time. They emit a stark, daylight-simulating color temperature ranging from 6000K to 6500K, which dramatically enhances the reflective properties of road signs and lane markers. However, because LEDs generate intense localized heat at the diode base, they require sophisticated thermal management. Premium bulbs utilize aviation-grade 6063 aluminum heat sinks paired with high-speed 12,000 RPM turbo cooling fans to prevent thermal throttling.
| Lighting Technology | Average Lumen Output | Estimated Lifespan | Power Draw (Wattage) | Failure Mechanism |
| Standard Halogen | 1,000 – 1,500 Lm | 400 – 1,000 Hours | 55W – 65W | Abrupt filament snap |
| High-Intensity Discharge (HID) | 3,000 – 5,000 Lm | 2,000 – 3,000 Hours | 35W – 55W | Gradual dimming / Color shift |
| Light-Emitting Diode (LED) | 8,000 – 16,000+ Lm | 25,000 – 50,000+ Hours | 15W – 30W | Gradual diode degradation |
Overcoming the Totally Integrated Power Module (TIPM) and CANbus Challenges
Upgrading a 2014 Ram 1500 to highly efficient LED or HID technology frequently introduces a severe, frustrating technical complication: aggressive headlight flickering, rapid strobing, momentary drop-outs, or a complete protective shutdown of the lighting circuit. This phenomenon is not the result of faulty aftermarket bulbs, but rather is driven directly by the aggressive parameters of the vehicle’s underlying electrical architecture.
Understanding the Dodge/Chrysler TIPM Architecture
Dodge and Chrysler vehicles manufactured between 2006 and 2012 relied on a notoriously temperamental and high-failure rate component known as the Totally Integrated Power Module (TIPM). While Ram officially transitioned the nomenclature to a Power Distribution Center (PDC) for the 2013-2019 models, the underlying logic, behavior, and troubleshooting methods remain functionally identical, and mechanics universally continue to refer to the system as a TIPM.
The TIPM serves as the central nervous system for the truck’s entire electrical grid. Instead of relying on traditional, physical, replaceable fuses to protect the headlight circuits, the TIPM utilizes internal solid-state smart drivers, microprocessors, and integrated logic boards to monitor electrical current flowing to the headlights in real-time.
The critical issue arises from how the TIPM delivers power. It does not send a smooth, continuous stream of 12-volt Direct Current (DC) to the headlights. Instead, it utilizes Pulse Width Modulation (PWM), rapidly pulsing the voltage on and off hundreds of times per second to regulate power and extend the life of factory halogen bulbs. A traditional halogen filament retains intense heat, which naturally smooths out these rapid voltage pulses, resulting in steady, uninterrupted light.
However, when an LED bulb is installed, two major conflicts occur. First, the LED’s highly efficient 15W to 25W consumption falls drastically below the TIPM’s hardcoded expectation of a 55W load. The computer instantly interprets this low power draw as an anomaly—either a burned-out bulb or a dangerous short circuit. Secondly, because LED diodes react instantaneously to voltage changes without the thermal latency of a halogen filament,
the diodes literally turn on and off in sync with the TIPM’s PWM pulses, resulting in a highly visible, aggressive strobe effect. In response to these perceived anomalies, the TIPM initiates a safety protocol, severing the circuit entirely to prevent thermal damage, leaving the driver in the dark.
Diagnosing a deeper TIPM failure requires connecting an OBD2 scanner to read body control module faults. Common error codes associated with lighting circuit shutdowns include B17A5 (Halo Lamps Control Circuit Short to Ground) and B16FB (Front Right Fog Lamp Control Circuit Short to Battery or Open).
The Engineering Behind CANbus Decoders and Anti-Flicker Modules
To achieve functional, stable LED or HID integration on a 2014 Ram 1500, the electrical signal must be manipulated and conditioned to satisfy the strict parameters of the TIPM. This is achieved through the integration of CANbus decoders, resistor kits, or advanced anti-flicker modules.
Premium anti-flicker modules, such as those engineered by industry leaders like Diode Dynamics, are not simple “warning cancellers.” They utilize complex capacitive and resistive feedback loops built into a waterproof, shockproof, solid-state unit. These modules sit inline, acting as a bridge between the factory vehicle wiring harness and the new LED bulb or HID ballast.
The module performs two vital functions simultaneously. First, the internal capacitors actively absorb and smooth out the aggressive, choppy PWM signal sent by the TIPM, converting it into a clean, steady stream of DC power for the LED chips. Secondly, the internal resistors artificially replicate the high power consumption of a 55W halogen bulb, successfully tricking the vehicle’s computer into believing a factory bulb is still present and functioning normally.
When installing heavy-duty inline resistors, extreme caution must be exercised by the vehicle owner. The laws of thermodynamics dictate that the resistor must dissipate the excess bypassed voltage as severe thermal heat. Resistor modules can reach temperatures high enough to melt adjacent components; therefore, they must be mounted securely to a bare metal chassis component or the truck frame, safely away from plastic headlight housings, wiring looms, or combustible materials.
Legal Compliance and FMVSS 108: The Reality of LED Upgrades
The legality of aftermarket lighting upgrades is a highly contested and frequently misunderstood topic within automotive modification circles. In the United States, the manufacturing, testing, and implementation of all automotive lighting are strictly governed by the National Highway Traffic Safety Administration (NHTSA) under Federal Motor Vehicle Safety Standard (FMVSS) No. 108.
Interpreting NHTSA Regulations for Replaceable Light Sources
The regulatory framework of FMVSS-108 is decades old and was written specifically around the photometric characteristics and physical geometry of spherical, 360-degree light emitters—namely, traditional tungsten-halogen filaments and gas-discharge HID capsules. The optical physics of an automotive headlight reflector bowl are mathematically calculated based on the exact millimeter placement of a glowing filament.
LED chips, by their very nature, are flat, non-uniform surface emitters. Because the focal point and optical physics of an LED chip differ fundamentally from a cylindrical halogen filament, placing a bright LED bulb into a reflector bowl originally designed for halogen optics drastically alters the physical beam pattern. The reflector bowl cannot properly capture and focus the light, resulting in severe light scatter and intense glare projected upward into the eyes of oncoming drivers.
According to formal interpretations issued by NHTSA compliance engineers (such as those drafted in correspondence with LeRoy Angeles and Mark Baker of Soft Lights), not a single aftermarket LED replacement bulb has ever been officially certified, tested, or added to the NHTSA’s replaceable light source docket. Therefore, installing any aftermarket LED bulb into a factory halogen headlamp assembly mathematically renders the vehicle non-compliant with FMVSS 108 for on-road use.
The Myth of “DOT Approved” LED Drop-In Bulbs
The automotive aftermarket is flooded with products making dubious compliance claims. Marketing materials touting LED drop-in bulbs as “DOT Approved” or “SAE Compliant” are categorically misleading when referring to direct replacements for halogen bulbs. The Department of Transportation does not certify individual LED headlight bulbs; they only certify complete, sealed headlight assemblies (which include the housing, lens, internal reflector, and fixed light source) that have been tested as a unified optical system.
Only fully sealed, integral beam LED headlight assemblies manufactured to strict federal specifications, or factory-equipped Adaptive Driving Beams (ADB) which were recently legalized by NHTSA under the 2022 and 2024 final rule amendments, carry genuine legal certification. Adaptive Driving Beams utilize smart technology to automatically dim individual segments of the LED array to avoid blinding oncoming traffic while keeping the periphery of the road illuminated.
Consequently, all aftermarket LED drop-in replacement bulbs are legally designated strictly for off-road, agricultural, or show-car applications, though it is widely acknowledged that enforcement at the consumer level by local law enforcement remains notoriously sparse and inconsistent.
Evaluating Full Aftermarket Assemblies vs. Drop-In Bulbs
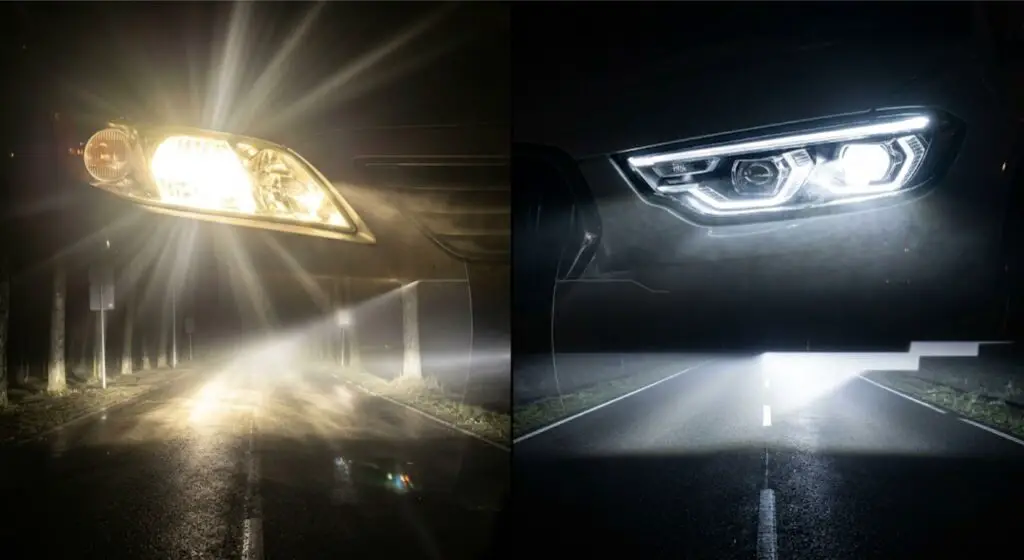
For 2014 Ram 1500 owners seeking a massive leap in lighting performance without violating FMVSS 108 regulations or blinding oncoming traffic, replacing the entire headlight assembly is the superior, albeit more expensive, solution. By replacing the factory Halogen Dual or Quad housings with a full aftermarket projector assembly, the optical physics are matched perfectly to the light source.
Comprehensive real-world testing and photometric analysis by independent outlets, such as the rigorous evaluations conducted by Headlight Revolution, reveal stark contrasts in performance among full assembly upgrades. In head-to-head testing measuring lux output, beam width, and cutoff sharpness, premium brands dominate the spectrum. The Morimoto XB Evo lineup achieved an exceptional overall rating of 7.30 out of 10, delivering a perfectly distributed beam pattern.
The AlphaRex Luxx HD series offered respectable mid-tier performance with a rating of 3.80, while the OEM factory halogen projectors scored a dismal 2.20, highlighting the severe limitations of the stock hardware. Budget assemblies, such as the GTR Carbide and Alpha Owl, scored at the very bottom with ratings of 1.00 and 0.80, proving that cheap aftermarket housings can actually perform worse than factory halogens.
Comprehensive Step-by-Step Installation Procedure for 2014 Ram 1500 Headlights

Changing a headlight bulb on the 2014 Ram 1500 is notably more complex and labor-intensive than on older generation pickup trucks. Engineers prioritized aerodynamic packaging, meaning owners can no longer simply reach behind the headlight to swap a bulb. The process requires partial disassembly of the truck’s front fascia and manipulation of hidden locking mechanisms. However, the procedure can be accomplished in a driveway with basic hand tools.
Required Tools:
- 10 mm socket, swivel, and ratchet extensions.
- 8 mm socket.
- Flathead screwdriver or dedicated plastic trim panel removal tool.
- Clean microfiber towels and latex/nitrile gloves.
Phase 1: Fascia and Grille Disassembly
- Safety Preparation: Ensure the vehicle engine is turned off, the keys are removed from the ignition, and the parking brake is firmly engaged. Open the hood by pulling the interior release latch.
- Radiator Cover Extraction: Locate the large, flat plastic radiator shroud covering the top of the grille assembly. Using the trim removal tool or a flathead screwdriver, carefully pry up and extract the six plastic push-rivets securing the shroud to the radiator support frame. Remove the shroud and set it aside.
- Grille Removal: With the shroud removed, use an 8 mm socket and ratchet to unscrew the four bolts securing the top edge of the chrome or painted grille assembly to the frame. Carefully tilt the top of the grille forward toward you, then pull it firmly and evenly away from the front of the truck to disengage the lower hidden friction clips. Remove the entire grille to expose the inner mounting bolts of the headlights.
- Headlight Bolt Extraction: Working on one side at a time, use a 10 mm socket (an extension is highly recommended) to remove the two primary bolts holding the inner side of the headlight housing to the vehicle frame.
Phase 2: Mastering the Wheel Well Access and Retaining Slide Lock
A unique, and highly frustrating, engineering feature of the 4th Generation Ram 1500 is a hidden sliding lock mechanism that secures the rear, outer edge of the headlight housing deep inside the fender.
5. Wheel Well Access: Move to the front wheel well of the side currently being worked on. Locate the small, pre-cut plastic access hatch in the fender liner, positioned near the front-top curvature of the tire. Use a trim tool to remove the single plastic push-pin securing this flap.
6. Unlocking the Retaining Tab: Reach an arm upward and forward through the open access hatch to locate a flat plastic retaining tab (frequently referred to by mechanics and owners as the “white sliding lock” due to its color on many models). Firmly push this retaining tab straight upward toward the sky. This action releases the clamping mechanism holding the rear ball-stud of the headlight housing.
7. Housing Extraction: Return to the front of the truck. Carefully pull the headlight housing straight forward, out of the fender cavity. Ensure the housing does not drag against the painted bumper.
8. Electrical Disconnection: Support the heavy housing and disconnect the primary electrical harnesses at the rear. This typically involves sliding back the red locking safety tabs, firmly depressing the release clips, and pulling the pods free from the sockets.
Phase 3: Bulb Extraction, Halogen Maintenance, and Reassembly
- Dust Cover Removal: Locate the large, circular, weather-sealed plastic dust cap on the rear of the headlight assembly. Twist the cap firmly counterclockwise to unscrew it, granting access to the internal bulb sockets.
- Bulb Swap: Disconnect the internal wire harness plugged directly into the back of the bulb base. Grasp the bulb base, twist it counterclockwise to unlock the tabs, and pull the old bulb straight out of the reflector bowl.
- Critical Halogen Glass Handling Warning: If the installation involves a new traditional halogen bulb rather than an LED upgrade, it is absolutely critical to wear clean latex gloves or hold the bulb using a paper towel. Under no circumstances should human skin touch the glass capsule of a halogen bulb.. The natural oils, salts, and microscopic grease from human skin transfer to the glass. Because halogen bulbs operate at extreme temperatures, these invisible oil deposits act as thermal insulators, creating localized hot spots on the glass surface. This uneven heating compromises the structural integrity of the quartz, inevitably leading to premature burnout or catastrophic, explosive shattering of the bulb inside the housing.
- Optically Clocking LED Upgrades: If installing an aftermarket LED bulb into a Projector housing, careful attention must be paid to the diode orientation. LED chips emit light bi-directionally, meaning they leave dark voids if misaligned. The bulb must be manually “clocked” (rotated within its adjustable locking collar) so that the LED chips face precisely 9 o’clock and 3 o’clock horizontally. If the chips face vertically at 12 and 6 o’clock, the projector bowl cannot harvest the light correctly, resulting in dangerous dead spots and shadows on the roadway.
- Final Reassembly: Insert the new bulb into the housing, twist clockwise to lock the tabs into place, reattach the internal wiring, and securely tighten the dust cover to prevent condensation and moisture ingress. Reverse the teardown steps to reinstall the housing into the fender, ensuring the rear ball-stud seats correctly before reaching into the wheel well to slide the white retaining tab back down into the locked position. Reconnect the main harnesses, bolt the housing down, snap the grille back into place, and secure the radiator shroud.
Questions and Answers
What is the exact difference between the 9012 and 9005 headlight bulb?
While visually nearly identical to the untrained eye, and frequently conflated by auto parts store counters, the 9005 (HB3) and 9012 (HIR2) bulbs are engineered for entirely different optical tasks. The 9005 is predominantly a high-beam bulb designed to output an intense, long-range, narrowly focused light pattern.
Conversely, the 9012 incorporates advanced Halogen Infrared Reflective (HIR) technology. The glass capsule of a 9012 bulb features a specialized spherical coating that reflects infrared heat back inward onto the tungsten filament, causing it to burn hotter and significantly brighter without increasing the 55W power draw.
This produces a massive, wide, and broad beam that is absolutely ideal for projector low-beam optics. Furthermore, their plastic locking bases are cut differently to prevent accidental swapping on the assembly line; a 9005 bulb cannot securely seat and lock into a 9012 housing without physically modifying and trimming the plastic locking tabs on the base of the bulb.
Why do aftermarket LED bulbs flicker on my 2014 Ram 1500?
The flickering is a direct result of the Ram 1500’s Totally Integrated Power Module (TIPM) attempting to manage a component it does not recognize. The TIPM sends power to the headlights using Pulse Width Modulation (PWM)—rapidly turning the electricity on and off. A traditional halogen filament stays glowing hot between these pulses, masking the interruption.
An LED reacts instantly, literally turning on and off with the PWM signal, creating a visible strobe effect. Furthermore, the low 15W-25W power draw of the LED triggers the TIPM’s safety protocols, making the truck believe the bulb is burned out or the circuit is shorted, prompting the computer to cut power entirely. Resolving this requires installing a CANbus anti-flicker decoder module.
Can I safely install LED bulbs into my factory Quad reflector housings?
Installing high-output LED drop-in bulbs into 2014 Ram 1500 Quad reflector housings is highly controversial within the lighting industry and is generally discouraged without stringent, professional beam adjustment. Unlike premium projector housings, which feature a physical metal cutoff shield to keep the intense light directed safely downward at the asphalt, traditional reflector housings spray light broadly in all directions to maximize visibility.
Placing a 10,000+ lumen LED into an unregulated Quad reflector housing creates severe, uncontrolled light scatter and intense glare that blinds oncoming traffic, creating a severe road hazard. Owners are strongly advised to utilize LEDs only in projector-style housings, or to replace the entire Quad housing with an aftermarket projector assembly.
How do I know if my Ram 1500 has a failing TIPM?
A failing TIPM presents a cascade of bizarre and seemingly unrelated electrical gremlins that extend far beyond simply a burned-out headlight. For the 2011 through 2014 generation of Ram trucks, symptoms of a dying TIPM/PDC include headlights turning on or off completely randomly, front and rear turn signals refusing to operate, the horn honking without driver input,
the windshield wipers activating independently, and most dangerously, the fuel pump either failing to prime (causing a crank-no-start condition) or running continuously after the truck is turned off, draining the battery overnight. If replacing bulbs and installing CANbus decoders fails to resolve lighting drop-outs, the TIPM module itself requires professional diagnosis and likely complete replacement.

![RAM 1500 Under Seat Storage: Best Fitment & Review Guide [2026]](https://truckguider.com/wp-content/uploads/2026/03/ram-1500-under-seat-storage-featured.webp)
![P018C Ram 1500: Fix & Reset Guide [2026]](https://truckguider.com/wp-content/uploads/2026/03/featured-fde55ade-768x768.webp)
![Ram Truck Running Boards [2026]](https://truckguider.com/wp-content/uploads/2026/03/featured-7beddc31-768x768.webp)
