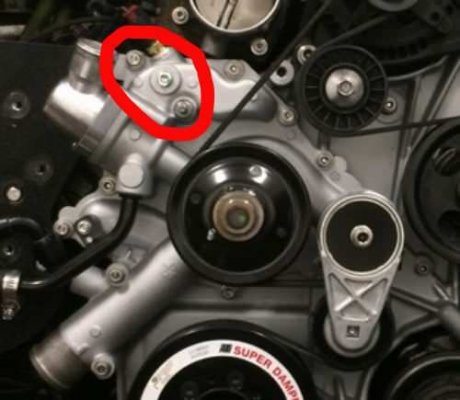
5.7 Hemi Water Pump Bolt Diagram
The 5.7 Hemi water pump bolt diagram is a crucial aspect of maintaining and replacing the water pump in your engine. By understanding the diagram and following a step-by-step guide,
You can ensure that the bolts are installed correctly and prevent potential engine damage from leaks. Regular maintenance and care of water pump bolts are also important to prevent issues and prolong the lifespan of your engine’s cooling system.
The 5.7 Hemi engine is a popular V8 engine produced by Chrysler since 2003. It is known for its powerful performance and fuel efficiency, making it a popular choice for many vehicles such as the Dodge Charger, Ram 1500, and Jeep Grand Cherokee.
Related Article: 5.7 Hemi water pump torque specs
The engine features hemispherical combustion chambers, which provide greater power and efficiency by allowing more air and fuel to enter the combustion chamber. The 5.7 Hemi engine is also designed with advanced technologies such as variable valve timing and cylinder deactivation to further improve its performance and fuel economy.
Overall, the 5.7 Hemi engine is a reliable and high-performance option for those in need of a powerful engine for their vehicle.
5.7 Hemi Water Pump Replacement
Importance of Water Pump in Engine Cooling System
As someone who owns or operates a vehicle, you may have heard the term “water pump” thrown around when discussing your engine’s cooling system. But what exactly is a water pump, and why is it so important? In this article, we’ll explore the key role that the water pump plays in keeping your engine cool and functioning properly.
What is a Water Pump?
Simply put, a water pump is a component of your engine’s cooling system that circulates coolant throughout the engine to regulate its temperature. Coolant, also known as antifreeze, is a mixture of water and chemicals that absorbs heat from the engine and transfers it to the radiator where it can be released into the atmosphere.
The water pump is responsible for moving the coolant through the engine and radiator, allowing it to absorb heat and keep the engine at a safe operating temperature. Without a functioning water pump, the engine would quickly overheat and suffer damage, leading to costly repairs or even engine failure.
How Does a Water Pump Work?
A typical water pump consists of a rotor, impeller, and bearings. The impeller is a fan-like blade that spins when the engine is running, creating a suction that draws coolant from the radiator and circulates it through the engine. The coolant is then returned to the radiator, where it releases heat and is cooled before being recirculated through the engine.
Importance of a Water Pump in Engine Cooling
The water pump is a critical component of the engine cooling system, and without it, the engine would quickly overheat and suffer damage. Overheating can cause a range of problems, from warped cylinder heads and blown head gaskets to complete engine failure.
Statistics show that cooling system failure is a leading cause of engine breakdowns, with water pump failure being one of the most common causes. Regular maintenance and care of your engine’s water pump can help prevent costly repairs and keep your engine running smoothly.
In summary, the water pump plays a crucial role in regulating the temperature of your engine and preventing overheating. Understanding the importance of the water pump and how it works can help you identify potential issues early on and prevent costly repairs down the line. Be sure to maintain your engine’s cooling system and regularly inspect your water pump to ensure that it’s functioning properly.
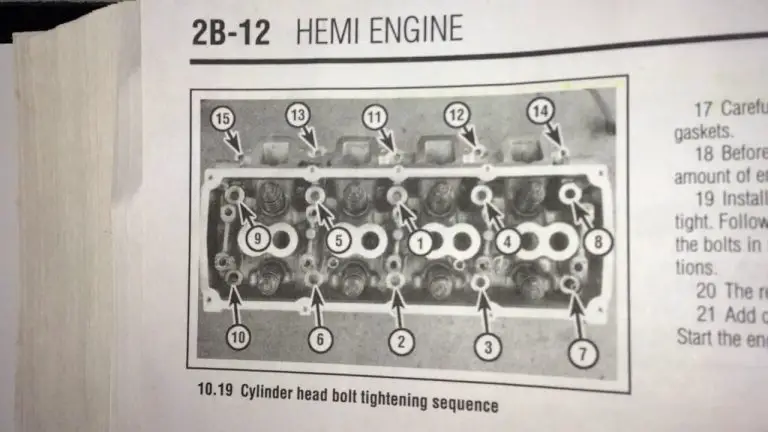
Understanding the Water Pump Bolt Diagram
If you’re someone who likes to work on their own vehicle, or if you’re a mechanic, you’ll know how important it is to understand the various components of an engine. The water pump is a crucial part of the engine’s cooling system, and understanding how it’s put together can help you diagnose and repair issues more effectively.
One important aspect of the water pump is the bolt diagram. In this article, we’ll explore what a water pump bolt diagram is and why it’s important to understand.
What is a Water Pump Bolt Diagram?
A water pump bolt diagram is a schematic that shows the location and size of each bolt used to secure the water pump to the engine. The diagram typically shows the number of bolts, their size, and their location on the water pump housing.
The bolt diagram is an important reference for anyone working on the engine, as it ensures that the water pump is installed correctly and securely. If the bolts aren’t tightened to the correct torque specification, the water pump can leak, leading to a loss of coolant and potential engine damage.
How to Read a Water Pump Bolt Diagram
Reading a water pump bolt diagram is relatively straightforward, but it’s important to pay close attention to the details. The diagram will typically show the location and size of each bolt, often using a numerical system to label them. The numerical system is typically used to indicate the order in which the bolts should be tightened when installing or removing the water pump.
The diagram may also show the torque specification for each bolt, which is important to ensure that the bolts are tightened to the correct level. It’s important to follow the torque specification closely, as over-tightening or under-tightening the bolts can cause issues with the water pump’s sealing and performance.
Understanding the water pump bolt diagram is an important part of working on an engine’s cooling system. By following the diagram closely and ensuring that each bolt is tightened to the correct torque specification, you can help prevent issues with the water pump and ensure that the engine stays cool and running smoothly.
So next time you’re working on your engine, take the time to reference the water pump bolt diagram to ensure that everything is installed correctly.
Step-by-Step Guide to Replacing Water Pump Bolts
Replacing the water pump bolts is an essential part of maintaining your engine’s cooling system. If you’re a DIYer, replacing the bolts can be a straightforward task if you have the right tools and know-how. In this step-by-step guide, we’ll take you through the process of replacing water pump bolts.
Tools You’ll Need
Before you get started, here are the tools you’ll need:
- Socket wrench set
- Torque wrench
- New water pump bolts
1: Remove the Old Bolts
The first step is to remove the old water pump bolts. Start by locating the bolts on the water pump housing. Refer to the water pump bolt diagram to identify the correct bolts and their torque specifications.
Using the socket wrench, loosen and remove each bolt carefully, making sure not to strip the threads or damage the bolt heads. It’s important to keep track of the order and position of each bolt, as they may be of different lengths.
2: Clean the Bolt Holes
Once you’ve removed the old bolts, take a moment to clean the bolt holes in the water pump housing. You can use a clean rag or a wire brush to remove any debris or rust that may be present.
3: Install the New Bolts
With the bolt holes cleaned, it’s time to install the new water pump bolts. Refer to the bolt diagram to identify the correct position and torque specification for each bolt.
Place each bolt in its correct position, and tighten them by hand before using the torque wrench to tighten them to the recommended specification. It’s important not to over-tighten the bolts, as this can damage the water pump housing or cause the bolts to snap.
4: Check for Leaks
Once you’ve installed the new bolts, it’s time to check for leaks. Start the engine and let it run for a few minutes, then check around the water pump housing for any signs of coolant leaks.
If you notice any leaks, stop the engine immediately and check the torque on the bolts. It’s possible that one or more bolts may not have been tightened correctly, causing a leak.
Replacing the water pump bolts is a simple task that can be done by anyone with the right tools and know-how. By following this step-by-step guide, you can ensure that your engine’s cooling system is operating correctly and that your water pump is secure and leak-free.
Remember to reference the water pump bolt diagram for the correct torque specifications and bolt positions, and always check for leaks after completing the job.
Common Issues and Troubleshooting Tips for Water Pump Bolts
While replacing water pump bolts is a relatively simple task, there are some common issues that can arise during and after the replacement process. Here are some troubleshooting tips for these issues:
1: Stripped Threads
If you encounter stripped threads while removing or installing water pump bolts, it’s important to address the issue before continuing. Stripped threads can cause the bolts to become loose, which can result in leaks or damage to the water pump housing.
To address stripped threads, you can use a thread repair kit or Helicoil to create new threads in the bolt hole. This will allow you to install the new bolt securely and avoid future issues.
2: Over-tightened Bolts
Over-tightening water pump bolts can cause damage to the water pump housing or cause the bolts to snap. It’s important to follow the recommended torque specifications and avoid using excessive force when tightening the bolts.
If you notice that a bolt has been over-tightened, you should remove it and inspect the threads for damage. If the threads are damaged, you may need to use a thread repair kit or helicoil to create new threads.
3: Coolant Leaks
If you notice coolant leaks around the water pump housing after replacing the bolts, it’s important to address the issue promptly. Coolant leaks can cause engine overheating and damage if left unaddressed.
To troubleshoot coolant leaks, start by checking the torque on each bolt to ensure that they are tightened to the recommended specification. If the bolts are tight, check the water pump gasket for damage or wear. A damaged gasket can cause coolant leaks and should be replaced.
4: Incorrect Bolt Positioning
If you install the water pump bolts in the incorrect positions, it can cause the bolts to become loose or damage the water pump housing. Always refer to the water pump bolt diagram to ensure that each bolt is installed in the correct position.
If you realize that you’ve installed a bolt in the wrong position, remove it and reinstall it in the correct position. Always double-check the positioning before tightening the bolts.
Replacing water pump bolts is an essential part of maintaining your engine’s cooling system. While issues can arise during and after the replacement process, they can be addressed with the right tools and know-how.
By following these troubleshooting tips, you can ensure that your water pump bolts are installed correctly and that your engine is running smoothly. Remember to always refer to the water pump bolt diagram and torque specifications, and to check for leaks after completing the replacement process.
Maintenance and Care Tips for Water Pump Bolts
Water pump bolts are an essential component of the engine cooling system, as they secure the water pump to the engine block and ensure proper circulation of coolant. To keep your engine running smoothly and avoid issues with the cooling system, it’s important to properly maintain and care for your water pump bolts. Here are some tips for doing so:
1: Check Torque Specifications
Water pump bolts need to be tightened to a specific torque specification to ensure proper function. It’s important to refer to the manufacturer’s specifications and use a torque wrench to tighten the bolts to the recommended torque. Avoid over-tightening the bolts, as this can cause damage to the water pump housing or bolts.
2: Inspect for Damage or Wear
Regular inspections of the water pump bolts can help identify any issues before they become major problems. Check for signs of damage or wear on the bolts, such as cracks, corrosion, or stripped threads. If you notice any issues, replace the bolts promptly to avoid potential issues with the cooling system.
3: Replace with Quality Parts
When replacing water pump bolts, it’s important to use high-quality parts to ensure proper function and longevity. Use bolts that are specifically designed for your engine and meet the manufacturer’s specifications. Using subpar or incompatible parts can cause issues with the cooling system and potentially damage the engine.
4: Address Leaks Promptly
If you notice coolant leaks around the water pump housing or bolts, it’s important to address the issue promptly to avoid damage to the engine. Check the torque on each bolt and inspect the gasket for damage or wear. If the gasket is damaged, replace it promptly to prevent further leaks.
5: Refer to the Water Pump Bolt Diagram
Always refer to the water pump bolt diagram when installing or replacing water pump bolts. This will ensure that each bolt is installed in the correct position and prevent issues with the cooling system.
Proper maintenance and care of water pump bolts are essential for the engine’s cooling system to function correctly. By following these tips, you can ensure that your water pump bolts are properly tightened, inspected, and replaced with quality parts as needed.
Remember to address any leaks promptly and refer to the water pump bolt diagram to ensure correct installation. With proper maintenance, your engine’s cooling system can function efficiently and effectively.
Credit: www.ramforum.com
Frequently Asked Questions
What is the function of the water pump in the 5.7 Hemi engine?
Why is it important to understand the water pump bolt diagram?
How often should water pump bolts be replaced?
How to Replace Water Pump
Conclusion
In conclusion, water pump bolts are a crucial component of the engine cooling system, and proper maintenance and care are necessary to keep your engine running smoothly. Checking torque specifications, inspecting for damage, using quality parts, addressing leaks promptly, and referring to the water pump bolt diagram can all help ensure that your engine’s cooling system functions correctly.
By following these tips, you can avoid major issues with the cooling system and prolong the lifespan of your engine. Remember to prioritize regular maintenance and care of your water pump bolts to keep your engine running at its best.
Read Also:
- 5.7 Hemi Water Pump Bolt Torque Specs
- 5.7 Hemi Spark Plug Torque Specs
- 5.7 Hemi Spark Plug Gap
- 5.7 Hemi Rocker Arm Torque Specs
- 5.7 Hemi Knock Sensor Location
- 5.7 Hemi Exhaust Manifold Bolt Torque Sequence
- 5.7 Hemi Cylinder 5 Misfire
- 5.7 Hemi Cylinder 3 Misfire
- 6.4 Hemi Drive Belt Diagram