Dodge Dakota Fuse Box Diagram: Identification Guide
The 2005 Dodge Dakota fuse box, or Integrated Power Module, is located in the engine compartment on the driver’s side near the battery. It contains the mini-fuses and relays that protect vital systems like the ECU and lighting. Consulting this diagram ensures you replace the correct circuit protection components quickly.
📌 Key Takeaways
- Identifies the location of the Integrated Power Module (IPM)
- Crucial for identifying fuses for the ECU and fuel system
- Always disconnect the battery before replacing high-amp fuses
- Cross-reference the diagram with the lid’s legend for accuracy
- Use this diagram when experiencing total loss of specific electrical functions
Locating a reliable 2005 dodge dakota fuse box diagram is the first critical step in diagnosing electrical failures that can leave you stranded or without essential vehicle functions. Whether you are dealing with a radio that has gone silent, headlights that refuse to ignite, or a more serious issue involving the engine control unit, the fuse box is the nerve center of your truck’s electrical system. This guide provides a detailed breakdown of both the interior and exterior fuse panels, helping you identify every circuit, understand the amperage requirements, and troubleshoot common electrical gremlins that affect this specific generation of the Dodge Dakota.
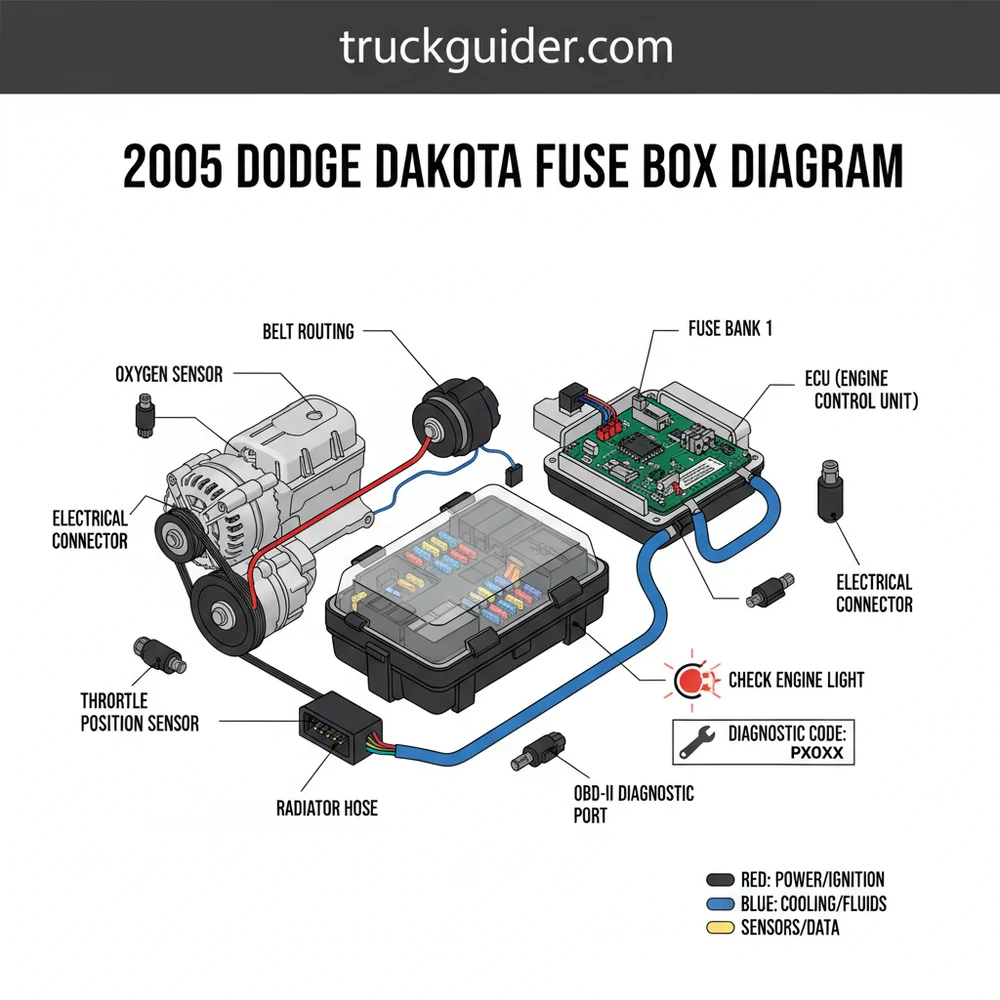
The 2005 Dodge Dakota utilizes a sophisticated electrical distribution system divided into two primary locations: the Integrated Power Module (IPM) located under the hood and the interior fuse panel located inside the cabin. The IPM, often referred to as the Power Distribution Center, is the heart of the vehicle’s high-current management. It houses heavy-duty fuses and relays that control the starter, cooling fans, and the ECU. Visually, the IPM is a large black plastic box situated on the driver’s side of the engine compartment, usually near the battery. When you open the lid, you will find a printed legend on the underside, but age and heat often make these labels difficult to read, which is why a dedicated 2005 dodge dakota fuse box diagram is indispensable.
Inside the cabin, the secondary fuse panel is tucked away behind a removable panel on the side of the dashboard, accessible only when the driver’s door is open. This panel manages lower-amperage components such as the instrument cluster, interior lighting, and the OBD-II diagnostic port. The diagram for this interior panel is focused on driver comfort and cabin electronics. Understanding the visual layout is key; the fuses are typically color-coded by amperage: red for 10A, light blue for 15A, yellow for 20A, and green for 30A. Relays are larger, square components that act as electromagnetic switches for high-load devices like the fuel pump or the blower motor.
The Integrated Power Module (IPM) in the 2005 Dodge Dakota is known to be sensitive to moisture. If you experience multiple unrelated electrical failures, such as windshield wipers turning on by themselves or the truck failing to start despite a good battery, the IPM itself may have internal corrosion.
Interpreting a fuse diagram and applying it to your vehicle requires a systematic approach. Follow these steps to safely identify and replace a blown fuse in your truck:
1. Prepare the Vehicle: Park your Dodge Dakota on a level surface and turn off the ignition. Ensure all lights and accessories are switched off to prevent any sudden electrical surges when you pull or replace a fuse. If you are working under the hood, allow the engine to cool, as you will be working near the radiator where coolant flow has recently been at high temperatures.
2. Locate the Appropriate Panel: Depending on what is malfunctioning, decide which box to open. If the issue is external (headlights, trailer tow, horn), go to the IPM under the hood. If the issue is internal (dome lights, power windows, radio), start with the interior panel.
3. Consult the Diagram: Match the physical layout of the fuses in the box to the 2005 dodge dakota fuse box diagram. Each slot is numbered. For example, Fuse 14 in the IPM might control the fuel pump relay, while Fuse 22 in the cabin might be for the cigarette lighter.
4. Use the Proper Tools: Never use pliers or screwdrivers to pry a fuse out, as this can damage the plastic housing or short out the circuit. Use the white fuse puller tool usually located inside the IPM cover or a pair of plastic tweezers designed for automotive fuses.
5. Inspect the Fuse: Once removed, look at the metal filament inside the plastic casing. If the wire is broken or if the plastic looks charred, the fuse is blown. However, sometimes a fuse can look fine but still be faulty. In these cases, use a multimeter to check for continuity.
6. Verify the Amperage: This is the most critical step. Replace the blown fuse with one of the exact same amperage. If the diagram calls for a 15A fuse, do not use a 20A fuse simply because it is available. Using a higher-amperage fuse can lead to melted wires or even a vehicle fire because the fuse will not blow before the wire reaches a dangerous temperature.
7. Test the Circuit: Replace the cover, start the vehicle, and check if the component is now functioning. If you are checking the engine system, you might need to use an OBD-II scanner to clear any stored diagnostic codes that were triggered by the power loss.
8. Torque and Secure: While you are in the engine bay, it is a good practice to ensure the battery terminals are tight. A loose ground or positive lead can mimic the symptoms of a blown fuse. Ensure the battery terminal torque spec is met (usually around 10-12 lb-ft) to maintain a steady flow of current.
Never bypass a fuse using a piece of wire or aluminum foil. Fuses are safety devices designed to be the weakest link in a circuit. Bypassing them removes that protection and can cause catastrophic damage to the ECU or the main wiring harness.
When troubleshooting electrical issues in a 2005 Dodge Dakota, the fuse is often just the messenger. If a fuse blows repeatedly, there is a short circuit or an overloaded component further down the line. For instance, if the fuse for the accessory belt-driven AC compressor clutch keeps blowing, the clutch itself may be seizing. Similarly, if you see a check engine light and your OBD-II scanner returns a code related to the oxygen sensors, check the heater circuit fuse before replacing the sensors themselves.
Common issues often involve the “No Bus” error on the instrument cluster. This usually indicates that the ECU (Engine Control Unit) is not communicating with the rest of the vehicle. Before assuming the ECU is dead, verify the fuses that provide power to the PCM (Powertrain Control Module). If these fuses are intact, the issue might be a corroded pin in the bottom of the IPM. Another frequent problem is the trailer tow circuit. Because these wires are exposed to the elements at the rear of the truck, they often short out, blowing the dedicated tow fuses in the IPM. If your blinkers work on the truck but not on the trailer, the 2005 dodge dakota fuse box diagram will point you directly to the auxiliary trailer relays.
- ✓ Check for “ghost” draws that drain the battery overnight by testing fuses for parasitic load.
- ✓ Look for signs of water entry in the cabin fuse panel, which can occur if the sunroof drains are clogged.
- ✓ Inspect the underside of the IPM for “green crusties” (corrosion) which are common in salt-belt states.
To maintain your Dodge Dakota’s electrical health, keep a kit of spare fuses of various sizes (Mini, ATO, and J-Case) in your glove box. It is also wise to keep a small tube of dielectric grease. When replacing a fuse or relay, applying a tiny amount of this grease to the terminals can prevent moisture from causing oxidation, which is especially helpful for the under-hood IPM.
Beyond the fuse box, remember that the electrical system relies on mechanical health. For example, a worn accessory belt can slip, causing the alternator to undercharge the battery, which in turn leads to erratic electronic behavior and false diagnostic codes. While the timing chain is a mechanical component, its sensors (Crankshaft and Camshaft positions) are powered through the fuse box. If your truck won’t start and you’ve confirmed fuel flow, check the fuse that powers these sensors.
If you are experiencing strange shifting patterns in the transmission, don’t immediately assume the worst. The Transmission Control Module (TCM) is powered by a specific fuse in the IPM. A blown fuse or a loose relay here can put the truck into “limp mode,” where it stays in second gear to protect itself.
Lastly, always ensure the coolant flow is unobstructed and the engine is not overheating when you are diagnosing electrical issues near the radiator. High heat can make wire insulation brittle, leading to intermittent shorts that are difficult to track down. By using a comprehensive 2005 dodge dakota fuse box diagram as your roadmap, you can systematically eliminate variables, save money on unnecessary parts, and keep your truck on the road. Whether it is a simple fix like a blown radio fuse or a complex diagnosis involving the ECU and OBD-II systems, having the right information is the most valuable tool in your garage. Regular maintenance and a quick check of your electrical connections can prevent a minor fuse issue from turning into a major breakdown.
Step-by-Step Guide to Understanding the Dodge Dakota Fuse Box Diagram: Identification Guide
Identify the fuse box location under the hood on the driver’s side.
Locate the specific circuit on the diagram corresponding to your electrical issue.
Understand the required amperage rating to ensure you use the correct replacement fuse.
Apply a fuse puller tool to gently remove the suspected blown fuse from its slot.
Verify that the internal metal strip of the fuse is broken before inserting a new one.
Complete the process by snapping the lid shut and testing the vehicle for functionality.
Frequently Asked Questions
Where is the fuse box located?
The primary 2005 Dodge Dakota fuse box, known as the Integrated Power Module, is located under the hood. You will find it on the driver’s side engine compartment, positioned between the battery and the fender. A secondary interior fuse panel is located behind a cover on the left side of the dashboard.
What does this fuse box diagram show?
This diagram illustrates the precise layout of mini-fuses, cartridge fuses, and relays within the IPM. It maps each component to its specific electrical circuit, such as the OBD-II port, headlights, or radio. It helps you find the correct fuse rating to prevent damage to sensitive electronic control modules and wiring.
How many connections does the fuse box have?
The Integrated Power Module features one main positive battery cable connection and several multi-pin harness connectors on the bottom. These connectors route power to the ECU, interior cabin, and lighting systems. Ensure all harness plugs are securely seated to maintain consistent electrical contact across all circuits in the vehicle.
What are the symptoms of a bad fuse box?
Symptoms of a failing IPM include a persistent check engine light, erratic lighting behavior, or a vehicle that will not start. You may also encounter a specific diagnostic code related to power distribution. Often, visible signs like melting plastic or corrosion on the underside connectors indicate the module requires replacement.
Can I replace the fuse box myself?
Yes, replacing the IPM is a straightforward DIY task. It involves disconnecting the battery, unbolting the power lead, and releasing the mounting clips. You must carefully disconnect the large harness plugs from the bottom. It is a plug-and-play component that does not typically require complex software programming for basic functionality.
What tools do I need for this task?
To service the fuse box, you need a basic socket set to remove the battery cables and the main power lead. A pair of needle-nose pliers or a fuse puller is essential for removing mini-fuses. If you are replacing the entire module, ensure you follow the manufacturer torque spec for the main power terminal nut.

![Dodge Key Fob Battery Replacement: Easy DIY Guide [2026]](https://truckguider.com/wp-content/uploads/2026/03/dodge-key-fob-battery-replacement-featured.webp)

![Key Fob Shell Replacement [2026]](https://truckguider.com/wp-content/uploads/2026/03/featured-2e4d28c1-768x768.webp)