Dodge Dakota Fuse Box Diagram: Quick Identification Guide
The 2003 Dodge Dakota fuse box locations include the Power Distribution Center in the engine compartment near the battery and the junction block on the driver’s side dashboard end-cap. These panels house fuses for the ECU, fuel pump, and lighting, which are essential for diagnosing electrical failures or starting issues.
📌 Key Takeaways
- Identifies circuit protection for critical engine and interior systems
- The ECU and fuel pump relays are the most vital components to locate
- Always disconnect the battery before servicing high-amperage fuses
- Cross-reference the diagram with the lid legend for layout accuracy
- Use this diagram when diagnosing a check engine light or dead electrical circuit
When you are troubleshooting an electrical issue in your pickup, having a clear and accurate 2003 dodge dakota fuse box diagram is the most important tool in your arsenal. Whether your radio has suddenly gone silent, your headlights are flickering, or you are dealing with a more complex engine management issue, the fuse box is the first place you should look. Electrical systems in modern-classic trucks like the 2003 Dakota are the backbone of vehicle operation, linking everything from the ignition system to the interior lighting. By understanding how to read these diagrams and locate the specific circuit protectors, you can save hundreds of dollars in diagnostic fees at a mechanic. In this guide, we will explore the dual-location setup of the Dakota’s electrical protection system, identify every fuse and relay, and provide you with the technical knowledge needed to resolve electrical faults efficiently.
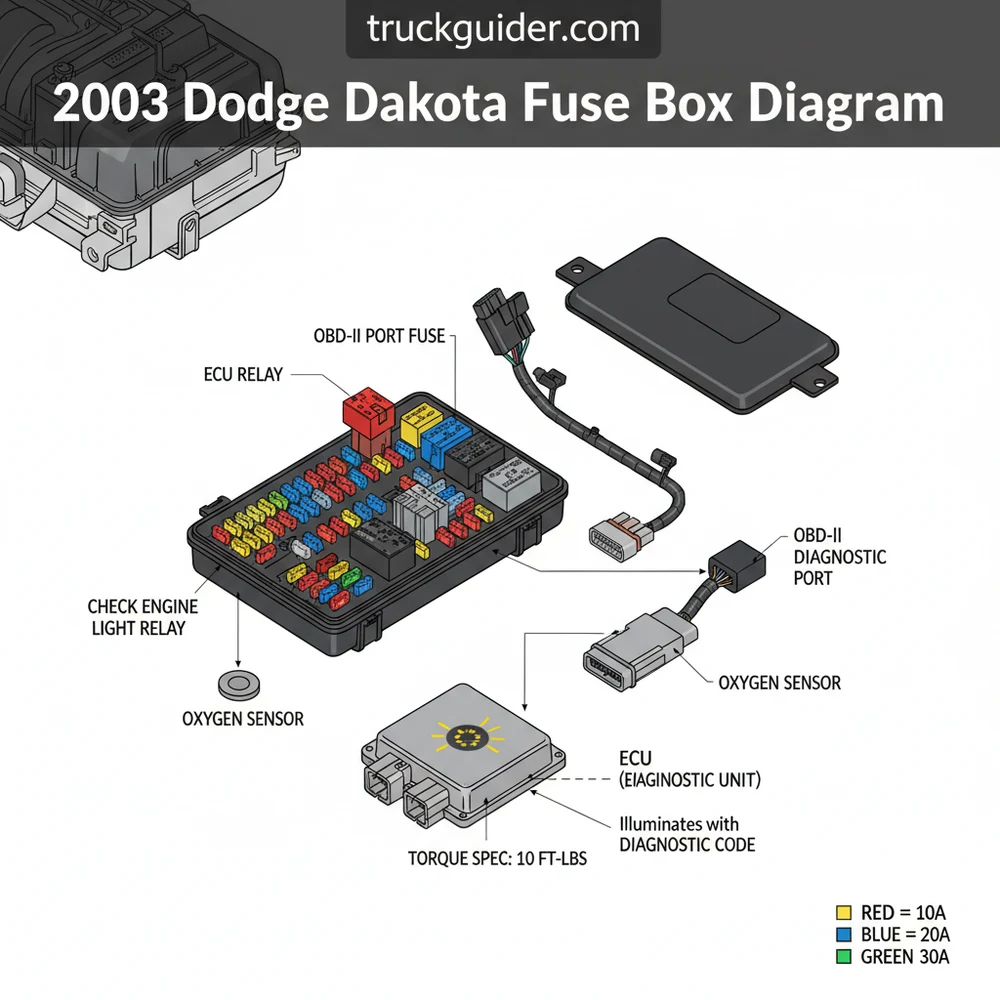
The 2003 Dodge Dakota utilizes two primary fuse centers: the Power Distribution Center (PDC) located under the hood and the Junction Block (JB) located inside the cabin on the driver’s side of the dashboard. Always check both locations when troubleshooting.
Understanding the 2003 Dodge Dakota Fuse Box Locations
The 2003 Dodge Dakota architecture splits its electrical management into two distinct regions. This design helps isolate high-amperage engine components from lower-amperage interior accessories. The Power Distribution Center, or PDC, is situated in the engine compartment, typically mounted on the driver’s side inner fender near the battery. This box houses the large “Maxi” fuses and the high-current relays that manage the starter, the fuel pump, and the radiator fan. Because these components deal with high heat and high vibration, the PDC is ruggedized with a weather-sealed cover.
Inside the cabin, you will find the Junction Block. This is hidden behind a plastic panel on the end of the dashboard, accessible only when the driver’s side door is open. The Junction Block focuses on “user-facing” electronics. This includes the power windows, the instrument cluster, the overhead console, and the OBD-II diagnostic port. If you are trying to pull a diagnostic code because your check engine light is on and your scanner won’t power up, the culprit is almost always a blown fuse in this interior panel.
The diagrams for these boxes are usually printed on the underside of their respective covers. However, after two decades of service, these labels often become faded, brittle, or completely unreadable. A digital or printed 2003 dodge dakota fuse box diagram serves as a permanent reference that accounts for the different engine configurations, whether you have the 2.5L I4, the 3.9L V6, or the 4.7L V8 engine.
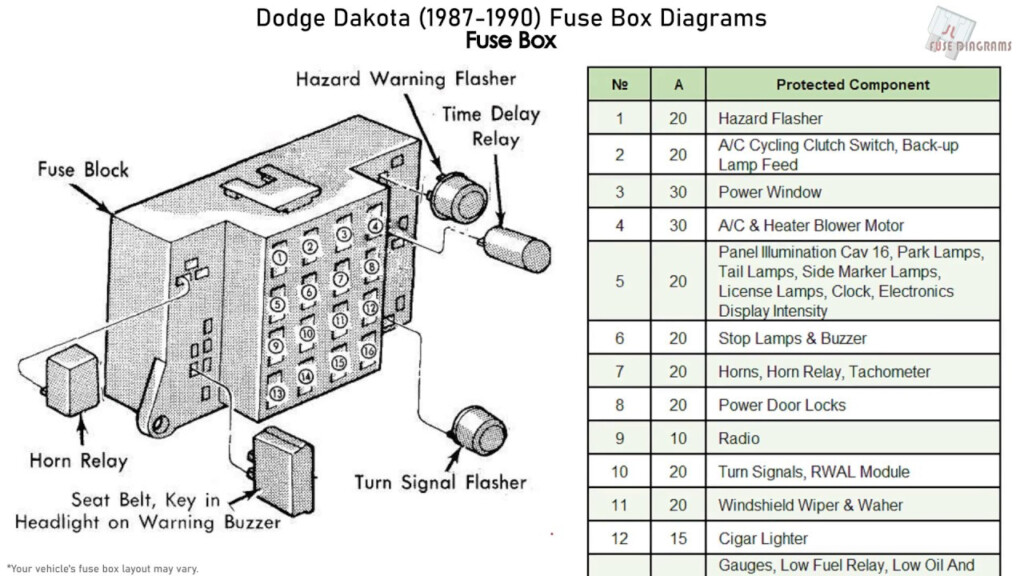
Detailed Breakdown: The Power Distribution Center (PDC)
The PDC is the “heavy lifter” of the truck’s electrical system. It contains the fuses that protect the ECU (Engine Control Unit) and the relays that control vital mechanical functions.
- ✓ Fuse A (50A): Main battery feed for the ignition switch.
- ✓ Fuse D (40A): High-speed cooling fan. This is critical for maintaining proper coolant flow and preventing overheating.
- ✓ Fuse F (30A): Protects the ECU and the fuel pump relay. If this blows, the truck will crank but never start.
- ✓ Relay 1: Fuel Pump Relay. Managed by the ECU to prime the system.
- ✓ Relay 5: Auto Shut Down (ASD) Relay. This is a safety feature that cuts power to the ignition coils if the ECU detects a stall.
In addition to fuses, the PDC is where you will find the interface for the accessory belt-driven components that are electronically triggered, such as the A/C compressor clutch. If your A/C isn’t blowing cold, check the A/C clutch relay and its corresponding 10A or 15A fuse here before assuming you have a refrigerant leak.
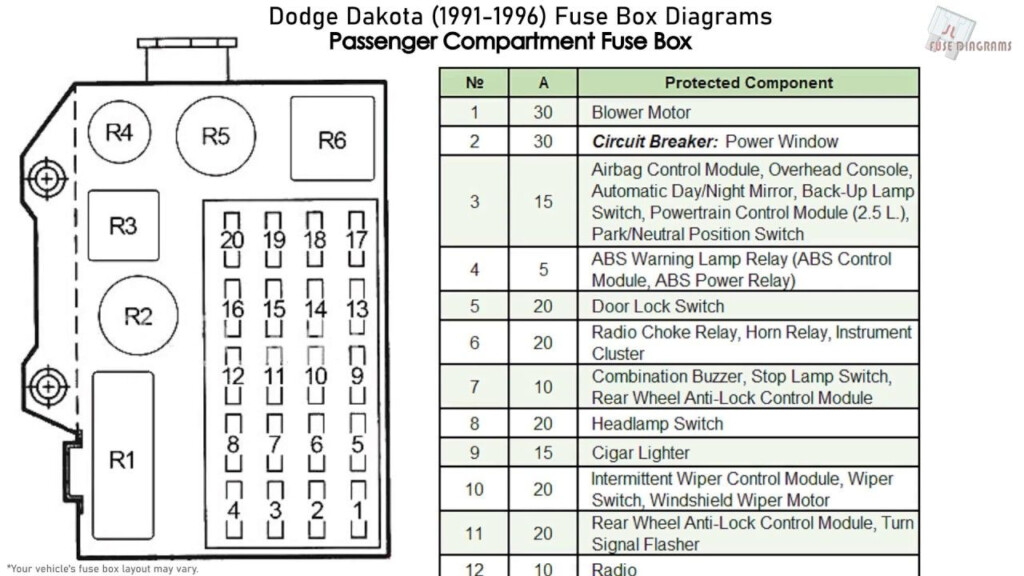
Detailed Breakdown: The Interior Junction Block
The interior panel handles the delicate electronics. While a blown fuse here rarely strands you on the side of the road, it can make for a very uncomfortable or illegal drive (such as having no turn signals).
- ✓ Fuse 1 (15A): Audio system and radio.
- ✓ Fuse 5 (10A): Airbag system (SRS). If this fuse is blown, your airbags will not deploy in an accident.
- ✓ Fuse 13 (20A): This powers the OBD-II data link connector and the cigarette lighter. If your diagnostic tool cannot read a diagnostic code, check this fuse first.
- ✓ Fuse 22 (10A): Instrument cluster and gauges.
Step-by-Step Guide to Using the Fuse Box Diagram
Interpreting a 2003 dodge dakota fuse box diagram and applying it to a repair requires a systematic approach. Follow these steps to ensure you identify the problem without causing further damage to the sensitive ECU or wiring harness.
Before pulling any fuses, turn the ignition to the “OFF” position. Pulling fuses with the key in “ON” or “ACC” can cause voltage spikes that may trigger a false check engine light or disrupt the ECU’s adaptive learning memory.
Step 1: Identify the Symptom
Determine exactly what is not working. If the entire truck is dead, start at the PDC. If only the wipers are dead, start at the interior Junction Block. Knowing the symptom allows you to narrow down your search on the diagram.
Step 2: Access the Fuse Panel
For the interior panel, pull the finger-access notch on the side of the dash. For the PDC under the hood, unlatch the plastic clips on the side of the box. Ensure the area around the PDC is clean so no debris falls into the open electrical terminals.
Step 3: Match the Diagram to Reality
Hold your 2003 dodge dakota fuse box diagram in the same orientation as the physical box. Look for the “keying” features, such as empty slots or larger relays, to make sure you are looking at the fuse numbers in the correct order.
Step 4: Inspect the Fuse
Use a plastic fuse puller tool (usually found inside the PDC cover) to remove the suspected fuse. Hold it up to the light. If the metal bridge inside the translucent plastic is broken or if there is a dark burn mark, the fuse is blown.
Step 5: Test with a Multimeter
Sometimes a fuse can look fine but still be “open.” Set your multimeter to the Continuity or Ohms setting. Touch the probes to the two small metal test points on top of the fuse. If the meter beeps, the fuse is good. If there is no continuity, it is bad.
Step 6: Replace with the Correct Amperage
This is the most critical step. Fuses are color-coded by amperage:
- Red: 10A
- Blue: 15A
- Yellow: 20A
- Clear/White: 25A
- Green: 30A
Never replace a 10A fuse with a 20A fuse. Doing so can cause the wiring to melt or catch fire before the fuse has a chance to blow.
Step 7: Verify the Fix
Turn the ignition on and test the component. If the fuse blows again immediately, you have a “short to ground” in that circuit, and further wiring inspection is required.
Do not use a screwdriver or metal pliers to pull fuses. Metal tools can bridge the gap between two live terminals, causing a massive short circuit that could fry the ECU or damage the battery. Use only insulated plastic pullers.
Common Issues & Troubleshooting
A common complaint for the 2003 Dakota involves the “no-bus” error on the odometer or a check engine light that appears after a battery jump-start. These issues are often rooted in the fuse box. If the ECU doesn’t receive steady power due to a loose or corroded fuse in the PDC, the communication bus across the truck’s computers will fail.
Another frequent problem is the failure of the OBD-II port. Since the OBD-II port shares a circuit with the cigarette lighter, metallic debris (like a coin) falling into the lighter socket will blow the fuse. This prevents you from being able to pull a diagnostic code, making it seem like the truck has a much more serious computer failure than it actually does.
If you find that your truck is running hot, don’t immediately assume the timing chain has jumped or that the water pump has failed. Check the cooling fan relay in the PDC. The 4.7L Dakota engines, in particular, rely heavily on the electric fan to maintain coolant flow through the radiator when the truck is idling. A $10 relay is much cheaper than a head gasket repair.
Tips & Best Practices for Electrical Maintenance
To keep your 2003 Dodge Dakota running reliably, treat the fuse box as a maintenance item, not just something to check when things go wrong.
1. Clean the Terminals: Over time, the terminals in the under-hood PDC can oxidize. This increases resistance, which generates heat. Every few years, use a dedicated electrical contact cleaner to spray the terminals.
2. Check the Ground Wires: The fuse box is only as good as its ground. Ensure the main ground strap from the battery to the frame and the smaller ground wires near the ECU are tight. When re-securing these, follow a generic torque spec of about 10-12 lb-ft for small bolts to ensure they don’t vibrate loose.
3. Inspect Wiring near Moving Parts: Electrical shorts often occur where the wiring harness passes near the accessory belt or the steering column. If you keep blowing the same fuse, look for frayed insulation in these areas.
4. Quality Components: When replacing relays, try to use OEM-spec components. Cheap, generic relays can have inconsistent internal timing, which can lead to “arcing” and eventually melt the plastic housing of your fuse box.
5. Keep Spares: Always keep a small variety pack of “ATM” (mini) and “MAXI” fuses in your glove box along with a printout of the 2003 dodge dakota fuse box diagram. Electrical failures never happen at a convenient time.
Conclusion
Mastering the 2003 dodge dakota fuse box diagram is a vital skill for any truck owner. It transforms a confusing mess of wires into an organized, logical system that you can manage yourself. By knowing where the Power Distribution Center and Junction Block are located, understanding the specific roles of the ECU and fuel pump fuses, and following safe replacement procedures, you ensure your Dakota remains dependable for years to come. Remember that a fuse is a safety device; if it blows, it has done its job of protecting your truck’s expensive electronic heart. By using the diagnostic code system via the OBD-II port and maintaining the health of your cooling and ignition circuits, you can tackle almost any electrical challenge with confidence. Keep your diagrams handy, your fuses fresh, and your connections clean to get the most out of your 2003 Dodge Dakota.
Frequently Asked Questions
Where is the fuse box located?
The interior fuse panel is located on the left side of the dashboard, accessible only when the driver’s door is open. The exterior Power Distribution Center (PDC) is located under the hood, situated directly next to the battery on the driver’s side of the engine compartment.
What does the fuse box diagram show?
The diagram provides a visual map of every fuse and relay location within the vehicle. It specifies the amperage rating, the color-coded fuse type, and the specific electrical circuit it protects, such as the ECU, headlights, radio, or the OBD-II diagnostic port system.
How many pins do the relays have?
Most relays in the 2003 Dakota use a standard four or five-pin configuration. These pins allow the ECU to trigger high-current components like the fuel pump or cooling fan. The OBD-II circuit often shares a 15-amp fuse with the cigarette lighter or auxiliary power outlets.
What are the symptoms of a bad fuse?
A blown fuse typically results in a sudden loss of power to a specific component, such as a check engine light appearing, non-functional wipers, or a no-start condition. Visual inspection will reveal a broken metal filament inside the transparent plastic housing of the blade-style fuse.
Can I replace the fuses myself?
Yes, replacing a fuse is a simple DIY task using a plastic puller tool. However, if a fuse blows immediately after replacement, it indicates a short circuit. In such cases, you should use a scanner to pull a diagnostic code before attempting further electrical repairs.
What tools do I need for fuse maintenance?
Basic maintenance requires a plastic fuse puller and a digital multimeter to test for continuity. If you are replacing the entire Power Distribution Center, you may need a socket set to ensure mounting bolts are tightened to the manufacturer’s recommended torque spec to prevent vibration damage.


![What Does The Tow Haul Button Do? Mechanical Functions [2026]](https://truckguider.com/wp-content/uploads/2026/03/featured-1e821ab7-768x432.webp)