Dodge Journey 3.6 Serpentine Belt Diagram: Step-by-Step
The 2012 Dodge Journey 3.6 serpentine belt diagram illustrates the path around the crankshaft, alternator, water pump, and tensioner. To replace it, rotate the tensioner counter-clockwise to release pressure, slide the belt off, and follow the routing map to install a new one, ensuring all ribs align perfectly in the pulleys.
📌 Key Takeaways
- Visual guide for correct belt routing across the Pentastar 3.6L engine
- The automatic belt tensioner is the most critical component to locate
- Always disconnect the battery and ensure the engine is cool before starting
- Use a long-handled serpentine belt tool for better leverage in tight spaces
- Consult this diagram during replacement or if checking for belt slippage
The 2012 Dodge Journey equipped with the 3.6L Pentastar V6 engine is a marvel of modern engineering, but maintaining its intricate systems requires a clear understanding of its mechanical layout. One of the most critical maintenance tasks you will face is replacing or inspecting the accessory belt. Navigating the engine bay can be daunting without a reliable 2012 dodge journey 3.6 serpentine belt diagram to guide your hands. This diagram acts as a roadmap, ensuring that the belt wraps correctly around the alternator, power steering pump, water pump, and air conditioning compressor. Having the correct diagram is the difference between a successful twenty-minute repair and a frustrating afternoon of trial and error. In this comprehensive guide, we will explore every facet of the serpentine system, from pulley identification to technical troubleshooting, ensuring your vehicle stays on the road and performs at its peak.
The 3.6L V6 engine in the 2012 Dodge Journey uses a single serpentine belt to drive all external accessories. Unlike the internal timing chain, which is lubricated by engine oil and hidden behind a metal cover, the serpentine belt is an external component that requires periodic replacement every 60,000 to 100,000 miles.
Understanding the Serpentine Belt Layout
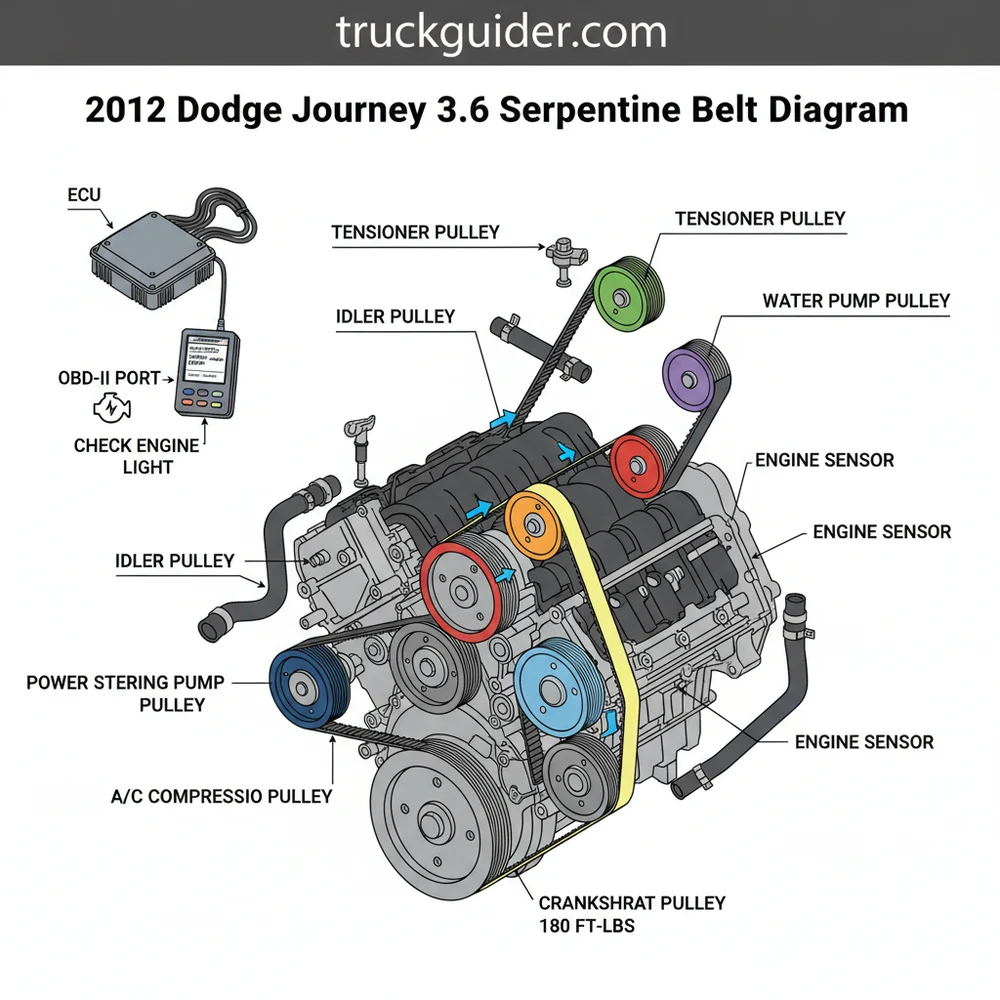
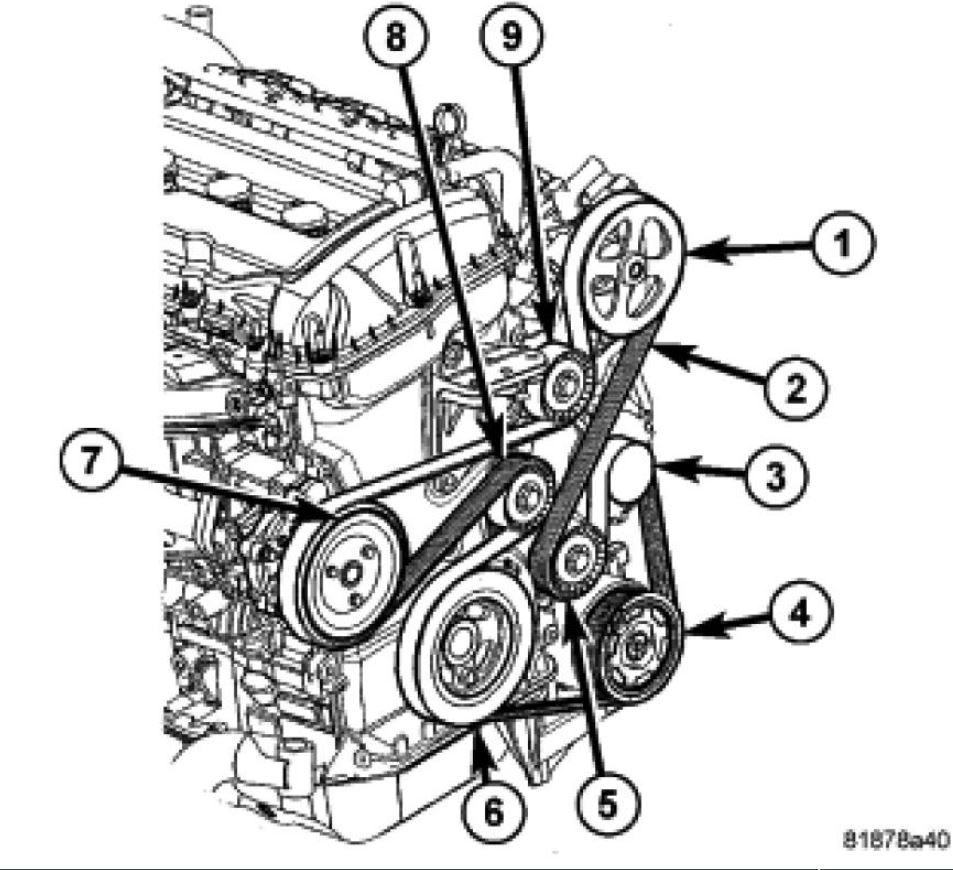
The serpentine belt system on the 2012 Dodge Journey 3.6L is a complex loop that interacts with seven distinct points of contact. To read the diagram effectively, you must first identify each component by its position and function. At the heart of the system is the Crankshaft Pulley, located at the bottom of the engine block. This is the “drive” pulley that provides the mechanical energy for all other components. As the crankshaft turns, it pulls the belt, which in turn spins the accessory pulleys.
Following the belt’s path, you will notice it interacts with both “ribbed” and “smooth” pulleys. The inner side of the serpentine belt features several V-shaped grooves (ribs) that lock into the grooves on the alternator, A/C compressor, and power steering pump. The flat, smooth back of the belt is typically used to drive the water pump or to run over idler pulleys.
The most critical component for any DIY mechanic is the Automatic Tensioner. On the 3.6L Pentastar engine, the tensioner is located on the passenger side of the engine block, roughly in the middle of the belt’s path. It features a heavy-duty internal spring that maintains constant pressure on the belt to prevent slipping. When you look at the diagram, the tensioner is the pulley you must manually rotate using a long-handled wrench to create the slack needed for removal or installation.
The 2012 model is unique because it still utilizes a hydraulic power steering pump, unlike later iterations of the Journey that transitioned to electric power steering. This means the belt routing is slightly more crowded than on newer models. The alternator is positioned at the top of the engine for better cooling, while the air conditioning compressor is tucked lower toward the front of the vehicle.
[DIAGRAM_PLACEHOLDER: A technical illustration showing the 7-pulley routing: 1. Alternator (Top), 2. Idler Pulley (Upper Middle), 3. Power Steering Pump (Right), 4. Water Pump (Center), 5. A/C Compressor (Lower Right), 6. Crankshaft (Bottom), 7. Tensioner (Lower Left)]
Step-by-Step Installation and Interpretation
Reading the 2012 dodge journey 3.6 serpentine belt diagram is only half the battle; applying that knowledge requires a systematic approach. Before you begin, ensure the engine is completely cool to the touch. You will be working in close proximity to the radiator and engine block, where heat can linger for hours.
Before removing the old belt, use your smartphone to take several clear photos of the routing from different angles. Even with a diagram, seeing exactly how the belt sits on your specific engine can be an invaluable reference during reassembly.
Tools and Materials Needed
- ✓ 1/2-inch or 3/8-inch drive long-handled ratchet or a dedicated serpentine belt tool.
- ✓ Replacement EPDM (Ethylene Propylene Diene Monomer) accessory belt.
- ✓ Flashlight or shop light for visibility in the deep engine bay.
- ✓ 10mm and 13mm sockets for removing the plastic splash guards.
The Installation Process
1. Access the Engine Bay: Open the hood and secure it. On the 2012 Dodge Journey, the belt is located on the passenger side (right side) of the engine compartment. To get better leverage, many mechanics find it helpful to remove the front passenger wheel and the plastic interior wheel well splash guard. This provides a direct line of sight to the crankshaft and tensioner.
2. Locate the Tensioner: Find the automatic tensioner pulley. It will have a hexagonal bolt head in the center of the pulley wheel. On the 3.6L V6, you typically turn this bolt clockwise (toward the front of the car) to compress the internal spring and release the tension on the belt.
3. Remove the Old Belt: While holding the tensioner in the compressed position, carefully slide the belt off the uppermost pulley (the alternator). Once the belt is off the alternator, you can slowly release the tensioner and remove the belt from the remaining pulleys.
4. Inspect the Pulleys: With the belt removed, spin each pulley by hand. They should spin smoothly without any grinding noises or wobbling. Check for dried coolant residue around the water pump pulley, as this indicates a leak that could affect coolant flow. If a pulley feels “gritty,” it is time to replace that specific component.
5. Route the New Belt: Using your 2012 dodge journey 3.6 serpentine belt diagram, begin looping the new belt starting from the bottom. Wrap it around the crankshaft first, then the A/C compressor and power steering pump. Leave the alternator for last, as its position at the top makes it the easiest “final step.”
6. Final Tensioning: Double-check that the belt’s ribs are perfectly seated in the pulley grooves. If the belt is even half a rib off, it will shred immediately upon startup. Compress the tensioner one last time, slide the belt over the alternator pulley, and slowly let the tensioner return to its resting position.
Never place your fingers between the belt and the pulley while the tensioner is under load. If the wrench slips, the tensioner can snap back with enough force to cause serious injury.
Common Issues and Troubleshooting
📤 Share
💾 Download
A failing serpentine belt system can manifest in several ways, often triggering warning signs that your vehicle’s computer system will detect. If the belt slips or breaks, the alternator will stop charging the battery. This often causes the ECU (Engine Control Unit) to detect a voltage drop, which will immediately illuminate the battery light on your dashboard and potentially trigger a check engine light.
Using an OBD-II scanner, you might find a diagnostic code such as P0622 (Generator Field Control Circuit) or P0117 if the water pump stops spinning and the engine begins to overheat. The loss of coolant flow is the most dangerous consequence of a belt failure, as the 3.6L Pentastar engine can suffer head gasket damage within minutes of overheating.
Common symptoms of a belt issue include a high-pitched squealing noise, especially during cold starts or when turning the steering wheel to its full extent. This usually indicates a stretched belt or a failing tensioner. If you notice a “chirping” sound, it may be an alignment issue with the accessory belt or a bearing failure in one of the idler pulleys.
Tips and Best Practices for Maintenance
To ensure longevity, always opt for a high-quality EPDM belt. Older neoprene belts were prone to cracking, but modern EPDM belts are designed to wear down slowly like a tire tread. This means you won’t always see cracks; instead, you must use a belt depth gauge to check if the grooves have become too deep.
When performing repairs, always adhere to the proper torque spec for any bolts you loosened. For the 2012 Dodge Journey, the bolt holding the tensioner assembly to the engine block typically requires 30 to 40 ft-lbs of torque. Over-tightening can strip the aluminum threads of the engine block, while under-tightening can lead to the assembly vibrating loose.
While you are working on the serpentine belt, take a moment to inspect the area for oil leaks. Oil is the enemy of rubber; a leaking valve cover gasket that drips oil onto the accessory belt will cause the rubber to soften and fail prematurely.
Regularly checking your belt is a low-cost way to avoid high-cost repairs. If you are already approaching 100,000 miles, it is often wise to replace the tensioner and idler pulleys at the same time as the belt. These components have bearings that share the same lifespan as the belt, and replacing them as a “kit” prevents you from having to perform the labor twice.
Conclusion
Mastering the 2012 dodge journey 3.6 serpentine belt diagram is a fundamental skill for any owner looking to maintain their vehicle’s reliability. By understanding the routing of the accessory belt and the critical role of each pulley—from the alternator to the water pump—you can prevent unexpected breakdowns and costly professional repairs. Remember to integrate modern diagnostic tools like an OBD-II scanner if you suspect electrical issues related to the belt, and always prioritize safety by using the right tools for the tensioner. With a bit of patience and the right information, keeping your Pentastar V6 running smoothly is a task well within your reach. Whether you are troubleshooting a check engine light or simply performing routine maintenance, a clear diagram and a systematic approach are your best allies in the garage.
Frequently Asked Questions
Where is the serpentine belt tensioner located?
The belt tensioner on the 3.6L Dodge Journey is located on the front passenger side of the engine block, positioned between the alternator and the crankshaft pulley. Identifying this spring-loaded component is crucial because you must rotate it to release tension whenever you are removing or installing a new belt.
What does the serpentine belt diagram show?
This diagram illustrates the precise routing path of the drive belt across all engine accessories. It details how the belt wraps around the alternator, air conditioning compressor, water pump, and power steering pump, ensuring the ribbed side and flat side of the belt meet the correct pulleys for operation.
What is the torque spec for the tensioner bolt?
The mounting bolt for the automatic tensioner typically requires a torque spec of approximately 40 Nm or 30 ft-lbs. While you do not need to torque the pulley while swapping a belt, ensuring the entire tensioner assembly is securely fastened to the engine block prevents vibrations and premature wear.
What are the symptoms of a bad serpentine belt?
Symptoms include chirping or squealing noises, visible cracks, or fraying. A snapped belt may trigger a check engine light or a battery warning. If the belt fails, the ECU may detect overheating via a diagnostic code, requiring an OBD-II scanner to clear the system once the repair is finished.
Can I replace the serpentine belt myself?
Yes, replacing a serpentine belt is a manageable DIY task for most Journey owners. You will need a routing diagram to ensure proper installation. While the process is straightforward, the engine bay is quite tight, so patience is required to properly seat the belt ribs into each pulley’s grooves.
What tools do I need for this task?
You primarily need a 3/8-inch or 1/2-inch drive long-handle ratchet or a dedicated serpentine belt tool. A socket set may be necessary to remove the wheel well splash shield for better access. Having an OBD-II scanner is also helpful if a belt failure previously triggered specific engine error codes.


![4.7 Dodge Engine Problems [2026]](https://truckguider.com/wp-content/uploads/2026/03/featured-47220cb4-768x403.webp)