How to Replace Headlight Bulbs: The Ultimate Guide for Ford, Chevy, and Ram Owners (2024/25/26 Edition)
In the complex ecosystem of automotive safety, few systems are as fundamental yet frequently undervalued as the forward lighting array. For the operator of a light-duty truck—specifically the pervasive platforms of the Ford F-Series, Chevrolet Silverado, and Ram 1500—headlights serve a dual imperative: they are the primary instrument of environmental perception during nocturnal operations and the definitive signal of the vehicle’s presence to the external world.
The act of replacing a headlight bulb is often perceived as a trivial maintenance task, a quick errand to be resolved in the parking lot of an auto parts store. However, a deeper analysis reveals that this procedure sits at the intersection of electrical engineering, optical physics, regulatory compliance, and mechanical serviceability.
The degradation of a headlight bulb is rarely a binary event. While a sudden filament fracture results in immediate failure, the vast majority of halogen bulbs undergo a gradual process of lumen depreciation. Over a lifespan of approximately 1,000 hours, a tungsten filament can lose up to 20% of its luminosity due to the evaporation of tungsten molecules and the subsequent darkening of the quartz capsule.
For a truck traveling at 65 miles per hour, covering nearly 100 feet per second, a 20% reduction in throw distance does not merely represent a dimming of the road; it mathematically equates to a reduction in reaction time that can determine the outcome of an obstacle avoidance maneuver.
This comprehensive report serves as the definitive technical resource for the truck owner confronting the inevitable failure of a lighting component. We will transcend the rudimentary “twist and pull” instructions found in basic owner’s manuals. Instead, we will explore the intricate physics of automotive lighting technologies, navigate the convoluted legal landscape of LED retrofits under NHTSA regulations, and dissect the increasingly complex mechanical procedures required to service modern trucks.
From the “trap door” access panels of the Ram 1500 to the grille-removal mandates of the Chevrolet Silverado, we will provide expert-level granularity on every step of the process. Furthermore, we will address the digital age of automotive lighting, where Pulse Width Modulation (PWM) and CANbus protocols turn simple bulb swaps into electronic troubleshooting sessions.
Can You See The Road?
A complete data-driven guide to replacing your headlight bulbs. Save money, improve visibility, and stay safe on the road.
💸 The Economics of DIY
Why get your hands dirty? The markup on parts and labor at a dealership or mechanic shop is significant. Replacing a bulb yourself is one of the highest ROI (Return on Investment) maintenance tasks you can perform on your truck or car.
Estimated averages based on 2024 national service rates.
💡 Halogen vs. LED vs. HID
Not all lumens are created equal. While Halogens are standard and cheap, LEDs offer superior longevity. HIDs provide intense brightness but can be complex to install. Choose the right balance for your driving needs.
Normalized scores (0-10) for comparison purposes.
The Toolkit
You don’t need a full garage. 90% of headlight replacements require zero specialized tools.
The Replacement Workflow
Follow these steps carefully to ensure a watertight seal and proper alignment.
Access
Pop the hood. Locate the backside of the headlight housing. Remove dust covers if present.
Disconnect
Unclip the wiring harness. Press the locking tab down and pull the connector firmly back.
Swap
Twist the old bulb counter-clockwise to remove. Insert the new bulb and twist clockwise to lock.
Test
Reconnect the wire harness. Turn on your car lights to verify the bulb works before closing the hood.
⚠️ Failure Points
We analyzed mechanic reports on failed DIY attempts. One specific error accounts for nearly half of all premature bulb failures.
The “Grease” Factor
Oil from your fingers creates a hot spot on the glass, causing the bulb to shatter or burn out instantly.
Expert Tips for Longevity
Replace in Pairs
Bulbs have similar lifespans. If one dies, the other is likely days away from failure. Save time by doing both at once.
Use Dielectric Grease
A small dab of grease on the connector prevents corrosion and keeps moisture out of the electrical contacts.
Check Your Seals
Ensure the rubber dust cover is seated perfectly. Moisture inside the housing causes fogging and oxidation.
Aim Your Lights
After replacing, park facing a wall to ensure your beams are level. Misaligned lights blind oncoming traffic.
© 2026 TruckGuider Infographics
The Physics and Chemistry of Automotive Lighting Technologies
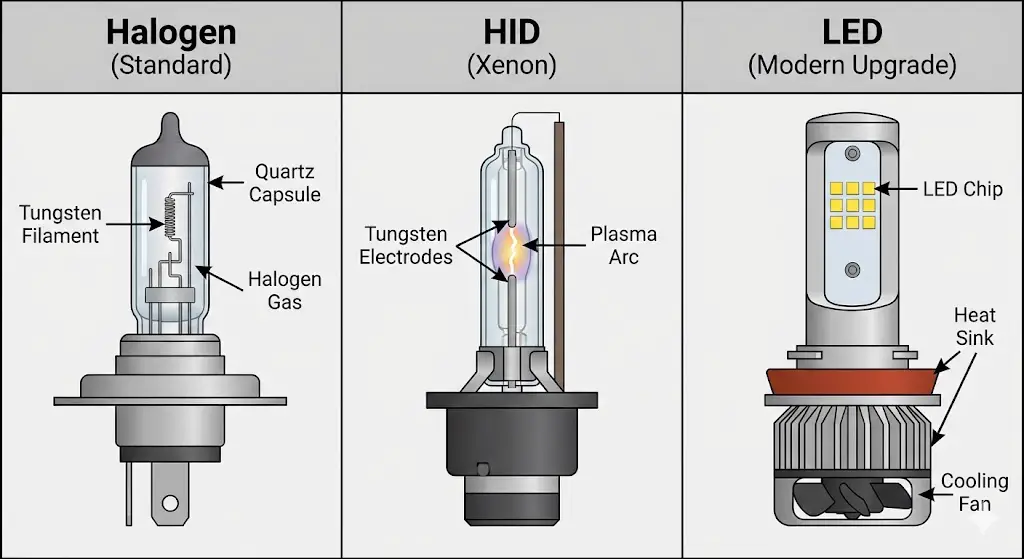
To execute a replacement or an upgrade with professional competence, one must first possess a nuanced understanding of the light source itself. The automotive industry has transitioned through several distinct epochs of lighting technology, each defined by unique physical principles, performance envelopes, and failure modes. Currently, three dominant technologies coexist in the truck market: Halogen, High-Intensity Discharge (HID), and Light Emitting Diode (LED).
The Halogen Standard: Incandescence Refined
The halogen bulb has stood as the ubiquitous standard for OEM (Original Equipment Manufacturer) truck lighting for over three decades. It is a refinement of the incandescent technology that dates back to the dawn of electric lighting.
The Tungsten-Halogen Cycle
In a standard incandescent bulb, current flows through a tungsten filament, heating it to incandescence—the emission of light caused by high temperature. However, tungsten evaporates at these temperatures, eventually thinning the filament until it snaps. The evaporated tungsten also deposits on the cooler glass wall, darkening the bulb.
The halogen bulb solves this through chemistry. The quartz glass capsule is filled with an inert gas mixed with a small amount of a halogen element, typically iodine or bromine. When tungsten evaporates, it chemically reacts with the halogen vapor to form a tungsten halide. As this halide circulates back toward the hot filament, the intense heat decomposes it, redepositing the tungsten back onto the filament and releasing the halogen gas to repeat the cycle.
This "regenerative cycle" allows the filament to operate at higher temperatures (increasing efficacy and color temperature) and extends the lifespan significantly compared to standard bulbs.
Performance Characteristics
Despite this clever chemistry, halogen bulbs are inherently inefficient. They typically convert only about 3-5% of the electrical energy into visible light, with the vast majority dissipated as infrared radiation (heat).
- Luminous Flux: A standard H11 halogen bulb produces between 1,000 and 1,500 lumens.
- Color Temperature: They emit a warm, yellowish-white light around 3,200 Kelvin. While often considered "dated" compared to modern LEDs, this lower color temperature is actually superior for penetrating fog and rain due to reduced Rayleigh scattering.
- Lifespan: The operational life is typically 400 to 1,000 hours. In the context of a heavy-duty truck, this lifespan can be truncated by high-vibration environments (e.g., off-road driving or towing), which physically stress the hot filament.
High-Intensity Discharge (HID): The Plasma Arc
HID, or Xenon lighting, represents a quantum leap in efficiency and output, utilizing the principle of electric discharge rather than thermal incandescence.
The Arc Mechanism An HID bulb contains no filament. Instead, it features two tungsten electrodes housed within a quartz tube filled with xenon gas and metal halide salts. To produce light, an external electronic ballast generates a high-voltage pulse—often exceeding 20,000 volts—to ionize the xenon gas and establish an electrical arc between the electrodes. Once the arc is established, the voltage drops, and the metal salts vaporize, creating a high-intensity plasma that emits light.
Operational Nuances HID systems are complex. They require a warmup period of several seconds to reach full brightness and color stability. They are also significantly brighter, producing 3,000 to 5,000 lumens, which necessitates precise optical control (projector lenses) to prevent blinding oncoming traffic. The failure mode of an HID is rarely sudden; they undergo "colorshift," turning pink or purple as the chemical composition of the salts changes over thousands of hours of use.
Light Emitting Diode (LED): Electroluminescence
The current frontier of automotive lighting is the LED, a solid-state semiconductor device that generates light through electroluminescence.
Semiconductor Physics When a forward voltage is applied to the p-n junction of a diode, electrons recombine with electron holes, releasing energy in the form of photons. The color of the light is determined by the energy band gap of the semiconductor material. White automotive LEDs typically use a blue indium gallium nitride (InGaN) diode coated with a phosphor layer (typically yttrium aluminum garnet) that converts a portion of the blue light into yellow, resulting in a broad-spectrum white light.
Thermal and Optical Challenges While the light emission itself is cool (no infrared radiation in the beam), the driver electronics and the diode junction generate significant conductive heat. If this heat is not dissipated, the LED will suffer permanent degradation or immediate failure. This is why high-performance LED headlight bulbs feature prominent heat sinks or active cooling fans at their base. Optically, LEDs present a challenge for retrofitting. A halogen reflector focuses light from a cylindrical filament. An LED is a flat, directional surface source. If the LED chips are not positioned to mimic the exact geometry of the original filament, the resulting beam pattern will be scattered, creating glare and failing to illuminate the road downfield.
Comparative Technology Matrix
The following table provides a high-level comparison of these technologies as they apply to the truck market in 2025.
| Feature | Halogen (Standard) | HID (Xenon) | LED (Modern Upgrade) |
| Light Generation | Thermal Incandescence | Plasma Arc Discharge | Solid-State Electroluminescence |
| Luminous Output | 1,000 – 1,500 lm | 3,000 – 5,000 lm | 8,000 – 12,000 lm (Pair) |
| Efficacy (lm/W) | ~15-20 lm/W | ~80-90 lm/W | ~100-150 lm/W |
| Typical Lifespan | 400 – 1,000 Hours | 2,000 – 3,000 Hours | 25,000 – 50,000+ Hours |
| Power Consumption | High (55W – 65W) | Medium (35W) | Low (15W – 25W) |
| Color Temperature | ~3200K (Warm White) | 4300K – 6000K | 5500K – 6500K (Crisp White) |
| Instant On? | Yes | No (Warm-up required) | Yes (Nanosecond response) |
| Vibration Resistance | Low (Filament fragility) | Medium | High (Solid state) |
| Cost Profile | Low ($20–$50/pair) | High ($150+) | Moderate to High ($40–$200) |
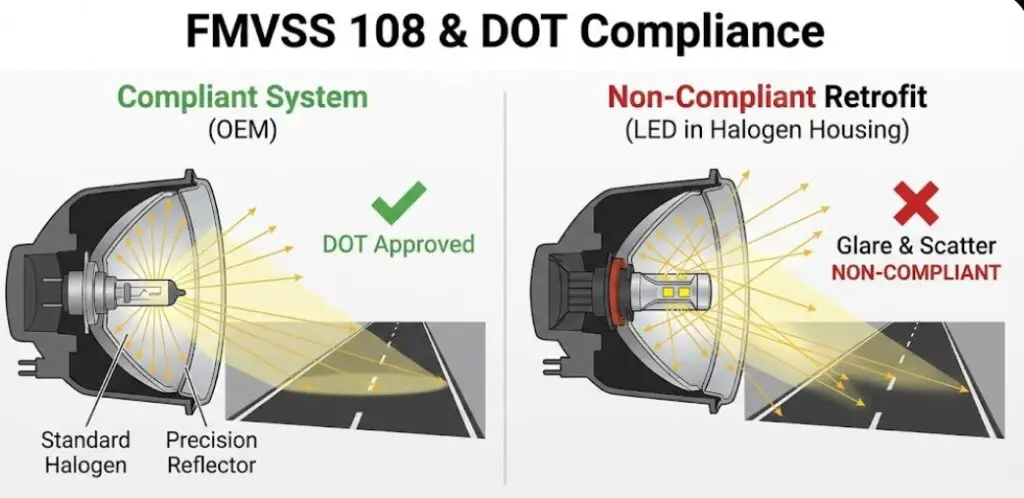
The Regulatory Framework: FMVSS 108 and DOT Compliance
Before an owner unbolts a single component, it is legally and ethically necessary to understand the regulations governing vehicle lighting. In the United States, the "Wild West" of aftermarket lighting is actually strictly regulated, though enforcement is often misunderstood.
Federal Motor Vehicle Safety Standard (FMVSS) No. 108
The supreme law of the land regarding automotive lighting is FMVSS No. 108, administered by the National Highway Traffic Safety Administration (NHTSA). This extensive document dictates the photometric requirements, durability, and physical dimensions of all lighting equipment on vehicles sold in the US.
The System Approach
Crucially, FMVSS 108 certifies the entire optical system as a single unit. The headlight housing (reflector/lens) and the light source (bulb) are tested together. The reflector's geometry is mathematically calculated to capture the light emitted from a filament in a very specific location and project it onto the road in a precise pattern.
- The Compliance Gap: When a consumer installs an aftermarket LED bulb into a halogen housing, they have altered the optical system. Since the housing was never tested or certified with that specific LED light source, the resulting assembly is technically non-compliant with FMVSS 108.
The "Make Inoperative" Prohibition
The NHTSA generally does not regulate the end-user (the vehicle owner). Instead, regulations target manufacturers, importers, and professional service providers. 49 U.S.C. § 30122 contains the "Make Inoperative" provision, which prohibits manufacturers, distributors, dealers, and motor vehicle repair businesses from knowingly making inoperative any part of a device or element of design installed in compliance with a safety standard.
- Implication for Shops: A professional mechanic or dealership is legally prohibited from installing a non-compliant LED bulb into a halogen housing, as this would take the vehicle out of compliance with FMVSS 108.
- Implication for Owners: While federal law may not explicitly penalize the individual owner for the act of installation, operating a vehicle with non-compliant lighting on public roads brings state laws into effect.
State Laws and Inspection Criteria
While NHTSA sets the equipment standards, state governments regulate the operation of vehicles. Most states have vehicle codes that mirror federal standards or explicitly ban certain modifications.
- Glare and Scatter: A poorly designed LED bulb in a reflector housing often sprays light above the "cutoff" line. This glare blinds oncoming drivers. Police officers can cite drivers for "dazzling" lights or improper equipment.
- Color Restrictions: FMVSS 108 and virtually all state codes mandate that headlights must be white.
- Blue/Purple (>6500K): Often seen in cheap HIDs or LEDs, these are generally illegal and attract law enforcement attention. They also reduce visibility, as the human eye is less sensitive to blue light at night, and blue light scatters more in moisture (glare).
- Yellow (<3000K): While permitted for fog lights, deep yellow is often restricted for primary low beams, though "selective yellow" has historical precedence.
The Verdict on Retrofits
Is it illegal? Technically, yes, for on-road use. NHTSA has stated in interpretation letters that "not a single aftermarket LED bulb has ever been approved" for use in halogen housings because the physical differences makes compliance with the stringent photometry of FMVSS 108 nearly impossible. The Compliant Path: The only fully legal way to upgrade a truck's lighting to LED is to replace the entire headlight assembly with a new unit that is sealed and certified as a complete LED system (e.g., swapping a halogen assembly for a DOT-marked aftermarket LED assembly).
Bulb Identification and Nomenclature
The automotive industry utilizes a standardized alphanumeric coding system for light bulbs. However, these codes can be confusing, with different regions (Europe vs. US) using different standards that sometimes overlap.
The H-Series and 9000-Series
Trucks typically utilize one of two main naming conventions:
- H-Series (European ECE origin): H1, H3, H4, H7, H11, H13.
- 9000-Series (US SAE origin): 9003, 9004, 9005, 9006, 9007, 9008.
Cross-Compatibility and Synonyms
Often, bulbs are identical but carry different names depending on the market or minor wattage differences.
- H11 vs. H8 vs. H9: These share the same base geometry but differ in wattage. H11 is the standard low beam (55W). H9 is a high-output version (65W) often used in high beams. H8 is a lower wattage (35W) version for fog lights. While they can sometimes mechanically fit into each other's slots, swapping them can melt wiring (H9 in H8 slot) or reduce output (H8 in H11 slot).
- 9005 (HB3): Standard high beam bulb.
- H13 (9008): A dual-filament bulb common in Ford trucks (2004-2014). It handles both high and low beams in a single glass capsule.
Filament Orientation
The physical orientation of the filament is critical.
- Axial Filament: The filament runs parallel to the bulb's length (e.g., 9005, 9006, H13).
- Transverse Filament: The filament runs perpendicular to the bulb's length (e.g., H7, 9004). When upgrading to LEDs, the LED chips must match this orientation. An LED bulb designed for a transverse application will perform terribly in an axial reflector, creating dark spots and glare.
Diagnostic Protocols: Is it Actually the Bulb?
Before purchasing parts or dismantling the front end of a truck, a proper diagnostic procedure ensures that the bulb is indeed the culprit. A "dead" headlight can be caused by a fuse, relay, wiring fault, or corrosion.
The Swap Test
The simplest diagnostic method requires no tools.
- Remove the non-functioning bulb.
- Remove the functioning bulb from the opposite side.
- Install the "good" bulb into the "bad" side.
- Result A: If the good bulb lights up, the original bulb is dead. Action: Replace bulbs.
- Result B: If the good bulb does not light up, the issue is upstream in the vehicle's electrical system (fuse, relay, wiring). Action: Investigate power supply.
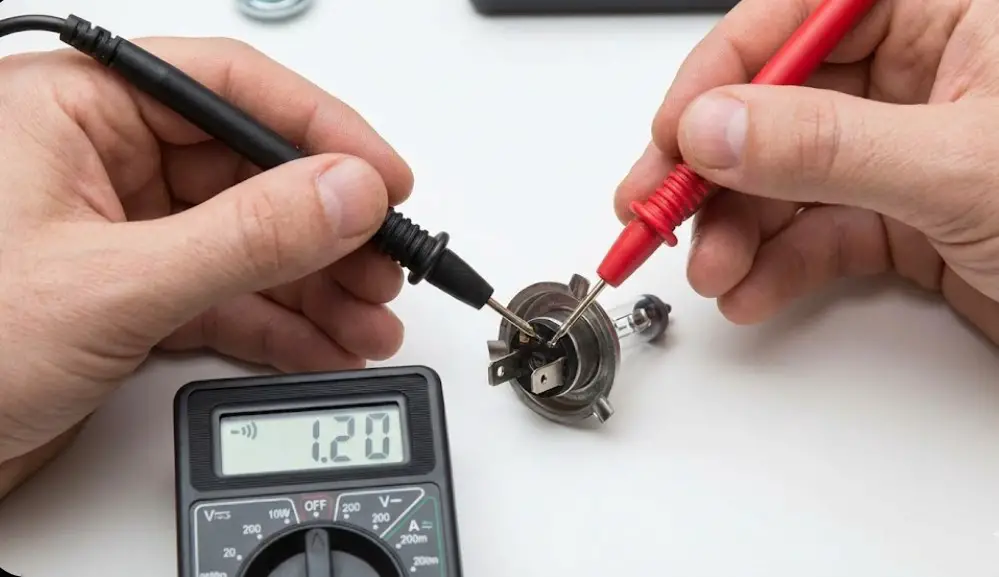
Multimeter Testing
For a more professional diagnosis, use a digital multimeter.
- Check for Power: Set the meter to DC Volts (20V scale). Unplug the connector. Turn the headlight switch ON. Probe the terminals in the connector. You should see approximately 12V-14V.
- No Voltage? Check the fuse box. Truck manuals list specific fuses for Left and Right Low Beams (e.g., F-150 often separates them).
- Check for Ground: Switch the meter to Continuity (beep mode). Probe the ground wire terminal (usually black) in the connector and touch the other probe to the chassis/battery negative. A beep indicates a good ground.
- No Beep? The ground wire is corroded or broken.
- Check the Bulb (Continuity): Remove the suspected bad bulb. Set meter to Resistance (Ohms). Touch probes to the bulb's pins.
- Reading: Low resistance (0.5 - 2.0 Ohms) means the filament is intact.
- Reading: "OL" (Open Loop) or infinite resistance means the filament is broken.
Connector Inspection
Heat and moisture are enemies of electrical connections. Inspect the plastic connector plug.
- Melting: High-resistance connections generate heat. If the plastic looks warped or brown, the connector needs to be replaced (pigtail splice) along with the bulb.
- Corrosion: Green or white powder on the terminals indicates oxidation. Clean with electrical contact cleaner and apply dielectric grease.
Preparation and Safety Protocols
Approaching a headlight replacement with a cavalier attitude can lead to injury or costly damage.
The "No-Touch" Mandate
This is the cardinal rule of headlight maintenance: Never touch the glass of a halogen or HID bulb with bare skin.
- The Science: Human skin secretes sebum (oils) and salts. When transferred to the quartz glass, these contaminants create a thermal barrier. When the bulb heats up (halogens exceed 500°C), this localized contamination causes uneven thermal expansion. This creates a stress riser in the glass, leading to bubbling, cracking, or catastrophic shattering.
- Recovery: If you accidentally touch the glass, do not discard the bulb. Immediately clean it thoroughly with isopropyl alcohol and a lint-free cloth (microfiber or kimwipe) before installation.
Electrical Isolation
While a simple bulb swap is often done "hot" by amateurs, best practice dictates safety.
- Ignition Off: Ensure the vehicle is off and the headlight switch is in the OFF or AUTO position.
- Battery Negative: For procedures involving the removal of the entire assembly or HID ballasts, disconnect the negative battery terminal. This prevents accidental short circuits if a live wire touches the chassis.
Tool Selection
While many bulbs are "tool-less," modern trucks often require disassembly.
- Trim Removal Tools: Plastic pry bars prevent scratching the paint or snapping brittle grille clips.
- Socket Set: A 10mm socket is the universal key for American trucks. An extension bar is often needed to reach recessed bolts.
- Torx Drivers: Ram and GM often use T20 or T25 screws for adjuster assemblies or wheel well liners.
- PPE: Nitrile gloves (for grip and glass protection) and safety glasses (to prevent debris from falling into eyes when working in wheel wells).
Detailed Replacement Guide: Ford F-Series (F-150)
The Ford F-150 is the best-selling vehicle in North America, and its headlight design has evolved significantly through its generations. We will cover the three most common generations on the road today.
Generation 12 (2009–2014)
This generation is beloved by mechanics for its serviceability. The design philosophy prioritized easy access.
Bulb Specs:
- Headlight: H13 (9008) - Dual Filament (High/Low).
- Fog Light: 9140 or H10.
The Procedure:
- Hood Access: Open the hood. Locate the top of the headlight assembly.
- Fastener Removal: There are three 10mm bolts. Two are clearly visible on top. The third is located on the inboard side, often behind a rubber mud flap that must be pulled back.
- Clip Release: Once bolts are removed, the only thing holding the assembly is a tension clip at the rear outer corner (near the fender).
- Extraction: Pull the entire headlight assembly straight forward (away from the truck). Do not pull outward or upward, or you risk snapping the plastic alignment pins.
- Bulb Swap: With the assembly loose, locate the bulb connector. Depress the locking tab and unplug the harness. Rotate the bulb 1/4 turn counter-clockwise to unlock and remove.
- Reassembly: Insert new H13 bulb (wearing gloves). Lock it in. Reconnect harness. Align the assembly pins with the fender slots and push firmly until the rear clip snaps. Reinstall the three 10mm bolts.
Generation 13 (2015–2020)
With the switch to the aluminum body in 2015, Ford significantly complicated the headlight replacement process. The headlight assembly is now "trapped" by surrounding bodywork.
Bulb Specs:
- Low Beam: H11.
- High Beam: 9005.
The "Official" Method (Grille Removal): Ford's service manual dictates removing the plastic trim piece above the bumper and the entire grille to access the lower headlight bolts. This is labor-intensive and risks breaking expensive painted trim clips.
The "Wheel Well" Method (The Mechanic's Shortcut):
This method is preferred for simple bulb swaps as it avoids bodywork disassembly.
- Steering: Turn the steering wheel fully away from the side you are working on (e.g., turn right to access the left headlight) to create space in the wheel well.
- Liner Release: Locate the screws (usually 5.5mm or 7mm) and push-pins holding the front half of the felt/plastic fender liner. Remove them.
- Access: Peel the fender liner back and secure it (a bungee cord helps). You now have access to the rear of the headlight housing from behind.
- Blind Operation: You will likely be working by feel. Locate the large rubber dust cap. Pull it off.
- Extraction: Reach inside, feel the bulb base. Twist counter-clockwise to unlock. Pull the bulb out slightly to access the wire connector. Unplug and remove.
- Install: Connect the new bulb first. Insert it into the housing, feeling for the alignment tabs. Twist clockwise to lock.
- Crucial Step: Reinstall the rubber dust cap firmly. If this is loose, the wheel well sprays water directly into the headlight, ruining it.
Generation 14 (2021+)
This generation introduced a divergence in technology.
- Lower Trims (XL/XLT): Still use halogen bulbs (H11/9005). The replacement procedure is similar to the Gen 13 "Wheel Well" method, though space is tighter.
- Higher Trims (Lariat/Platinum/Limited): Use factory integrated LED modules. These are sealed units. There are no replaceable bulbs. If a headlight fails (uncommon, but possible due to electronics failure), the solution is replacing the entire headlight assembly, a part that can cost between $1,000 and $1,600 per side.
Detailed Replacement Guide: Chevrolet Silverado 1500
General Motors has a reputation for difficult headlight packaging, often requiring component removal that baffles the uninitiated.
The GMT900 Platform (2007–2013)
Bulb Specs:
- Low Beam: H11.
- High Beam: 9005.
The Engine Bay Obstacle Course:
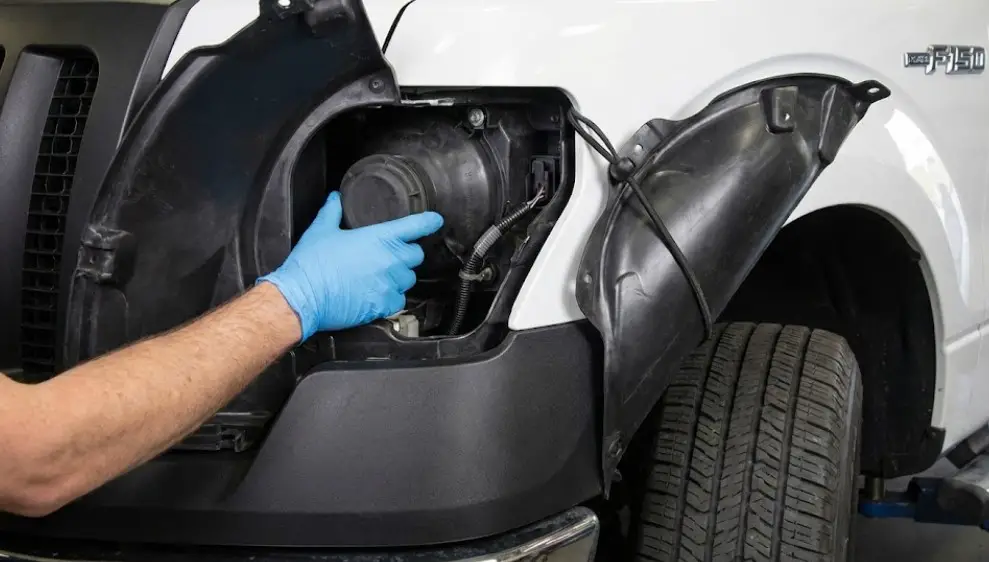
Unlike Ford, you typically don't remove the headlight housing on these models unless changing the housing itself. You work from under the hood.
- Driver Side: The space behind the headlight is crowded by the windshield washer fluid reservoir and the battery.
- Pro Tip: While it is possible for those with small hands to squeeze in, it is often faster to remove the battery clamp and slide the battery back or remove it entirely to gain clear access.
- Passenger Side: The air filter box blocks access.
- Disconnect the MAF sensor plug.
- Loosen the hose clamp connecting the air tube to the engine.
- Rock the air box firmly to unseat it from its rubber grommets and lift it out.
- You now have acres of space to access the H11 and 9005 bulbs.
The K2XX Platform (2014–2015 & 2016–2018 Refresh)
GM redesigned the front end, making the headlights deeper and harder to reach from the engine bay.
Bulb Specs:
- 2014-2015: H11 (Low) / 9005 (High).
- 2016-2018: H11 or D5S (HID) depending on trim.
The Procedure:
Access from behind the engine is nearly impossible due to structural supports.
- Method A (Wheel Well): similar to the Ford Gen 13. Remove the T15 Torx screws holding the liner. Peel back to access the dust covers.
- Method B (Grille Loosening):
- Remove the radiator shroud (12 push clips).
- Remove the four 10mm bolts securing the top of the grille.
- You do not need to fully remove the grille. You can pull the top corners of the grille forward gently to reveal the headlight bolts.
- Unbolt the headlight and slide it forward. This is high-risk for cracking the grille if done aggressively.
Detailed Replacement Guide: Ram 1500
Ram (formerly Dodge Ram) trucks feature one of the most unique and debated access features in the industry: the wheel well "trap door."
Gen 4 (DS) - 2009–2018 & Ram "Classic"
Bulb Specs:
- Quad Headlamps (Lower Trims): H11 (Low) / 9005 (High).
- Dual Headlamps (Base Trims): H13 (High/Low).
- Projector Headlamps (Laramie/Longhorn): 9005 (Low) / 9005 (High) - Uses a shutter for high beam.
The Trap Door Method:
Ram engineers anticipated the difficulty of grille removal and molded a specific access hatch into the plastic fender liner.
- Locate: Turn wheels inward. Look at the plastic liner in the forward wheel well. You will see a distinct rectangular panel or oval tab.
- Open: Unclip the tab and fold the panel back.
- Reach: Through this small window, you can reach the rear of the headlight.
- Action: Twist off the dust cap (can be very tight). Reach in to find the bulb.
- Critique: This method is controversial. The hole is small, sharp, and you are working blind. For large hands, this is a painful process.
The Grille Removal Method (Preferred by Mechanics):
Despite seeming more work, removing the headlight is often faster and allows for better visibility.
- Radiator Cover: Remove the plastic cover under the hood (6 clips).
- Grille Bolts: Remove the four 10mm bolts atop the grille.
- Grille Pull: Pull the grille straight forward to release the lower snap clips. Set grille aside.
- Headlight Bolts: Remove the two 10mm bolts on the front of the headlight.
- The Rear Clip: There is a white push-clip at the rear of the light (accessible from the wheel well trap door). Push this clip UP to release the headlight (or pull the headlight firmly if the clip is compliant).
Gen 5 (DT) - 2019+
The new body style Ram 1500 continues the trend of complexity.
- Halogen Trims: Follow the wheel well access procedure, which is slightly larger and more accessible than the DS generation.
- LED Trims: Like Ford, these are sealed units. Failure requires assembly replacement.
The RAM CANbus Warning: Ram trucks are notoriously sensitive to bulb changes. Even swapping a halogen for a different brand of halogen can sometimes trigger a "Lamp Out" light if the resistance varies slightly. Upgrading to LED on a 2015+ Ram almost always requires a high-quality CANbus decoder (see Section 11).
The LED Retrofit Guide: Technical Challenges
Replacing a halogen bulb with an LED (Light Emitting Diode) is the most popular upgrade for truck owners seeking better visibility. However, simply plugging in an LED often leads to flickering, error codes, or poor light patterns.
The CANbus and BCM Challenge
Modern trucks use a Body Control Module (BCM) to monitor the electrical integrity of lighting circuits.
- Resistance Monitoring: A 55W halogen bulb draws about 4.5 Amps. An LED bulb might draw only 1.5 Amps (20W). The BCM detects this massive drop in current, assumes the bulb filament is broken, and cuts power to the circuit or flashes a dashboard warning.
- Pulse Width Modulation (PWM): Many trucks (especially Ram and late-model F-150s) use PWM to feed power to the headlights. They pulse the voltage on and off rapidly (100Hz typically) to serve as Daytime Running Lights (DRL) at a lower voltage or to extend bulb life.
- Result: Halogens react slowly, smoothing this pulse. LEDs react instantly, turning on and off 100 times a second. To the human eye or a camera, this looks like a strobe light or severe flicker.
The Solution: Decoders and Anti-Flicker Modules
To run LEDs on a modern truck, you generally need an inline adapter known as a CANbus Decoder or Anti-Flicker Harness.
- Resistors: These add electrical load (dummy load) to the circuit to mimic the 55W draw of a halogen, tricking the BCM into thinking a standard bulb is present.
- Capacitors: These store electricity during the "on" phase of the PWM pulse and release it during the "off" phase, smoothing out the voltage supply to the LED and eliminating the flicker.
- Recommendation: Always buy LEDs that come with an external driver/decoder module, or purchase a specific "CANbus Ready" kit for Ram/Ford vehicles.
Thermal Management
LEDs hate heat. While they don't radiate heat forward, the electronics get very hot.
- Fan Cooling: Active fans allow for high brightness but can fail if clogged with dust or mud.
- Passive Heatsinks: Braided copper ribbons or aluminum fins are more reliable (no moving parts) but often harder to fit inside the tight dust caps of F-150 or Silverado housings.
- Fitment Alert: Ensure the heatsink fits inside the housing so you can reinstall the dust cap. If you leave the cap off to fit the LED, moisture will destroy the headlight.
Headlight Aiming and Calibration

A brighter bulb is useless if it points at the sky (blinding others) or the ground (limiting range). Aiming is a crucial post-installation step.
The Geometry of Alignment
Headlights are designed to have a "cutoff"—a sharp line where the light intensity drops off to prevent glare. This cutoff must be angled slightly downward.
- The Standard: The typical drop is 2.1 to 3.0 inches over 25 feet (roughly 0.7 - 1.0% gradient).
The 25-Foot Wall Method
This is the industry-standard DIY calibration method.
- Preparation: Find a level surface with a vertical wall. Park the truck 25 feet away from the wall (measure from the headlight lens to the wall).
- Load: Ensure the truck has a full tank of gas and, ideally, a person in the driver's seat (to account for suspension sag).
- Center Marking: Pull up to the wall (within 3 feet). Mark the geometric center of each headlight on the wall with tape.
- The Measurement: Back up to the 25-foot mark. Turn on low beams.
- The Target: The top edge of the beam pattern (the cutoff step) should fall 2 inches below the tape mark you made.
- Adjustment: Open the hood. Locate the vertical adjustment screw (usually a hex bolt or a toothed wheel driven by a Phillips screwdriver).
- Turn Clockwise/Counter-Clockwise: Observe the beam on the wall. Lower or raise it until it meets the 2-inch drop target.
- Lateral Adjustment: Most modern trucks do not have horizontal adjustment screws; they are fixed from the factory. If the beam is way off horizontally, the housing may be seated incorrectly.
Headlight Restoration and Lens Care
Often, an owner believes they need brighter bulbs when, in fact, they need clearer lenses.
Polycarbonate Degradation
Modern headlight lenses are made of polycarbonate plastic, which is impact-resistant but susceptible to Ultraviolet (UV) radiation.
- Oxidation: Over time, UV rays break down the outer layer of the plastic, causing it to turn yellow and cloudy (haze).
- Light Loss: A severely oxidized lens can block up to 80% of the light output. Installing a 200% brighter LED behind a cloudy lens will result in a scattered, ineffective beam.
Restoration Chemistry
Before replacing bulbs, assess the lens clarity.
- Sanding: Remove the dead plastic layer using wet sandpaper (graduating from 800 to 3000 grit).
- Polishing: Use a compound to clarify the plastic.
- Sealing: Crucial Step. You must apply a new UV-resistant clear coat or ceramic coating. Without this sealant, the freshly sanded plastic will yellow again within months.
Economic Analysis: Cost of Visibility
Understanding the financial landscape of lighting maintenance helps owners make informed decisions.
Cost Breakdown Analysis
- DIY Halogen Swap:
- Parts: $25 - $60 (Performance Halogens like Sylvania SilverStar).
- Labor: $0.
- Total: $25 - $60.
- DIY LED Upgrade:
- Parts: $50 - $150 (Quality LED kit with CANbus).
- Labor: $0.
- Total: $50 - $150.
- Professional Shop Replacement:
- Parts: $40 - $80 (Shop markup).
- Labor: 0.5 - 1.0 Hours ($100 - $150/hr).
- Total: $140 - $230.
- Dealership Assembly Replacement (Integrated LED):
- Parts: $1,000 - $1,500 (OEM Housing).
- Labor: 1.5 - 3.0 Hours (Bumper removal often required).
- Total: $1,500 - $2,500.
Value Proposition
While LEDs have a higher entry price ($100 vs $30), their lifespan makes them economically superior over the ownership of the truck.
- Halogen: 5 sets over 10 years @ $40/set = $200 + time/labor.
- LED: 1 set over 10 years @ $100 = $100.
- Conclusion: High-quality LEDs offer a 50% cost reduction over a decade, provided they don't fail prematurely due to cheap electronics.
Conclusion
The process of replacing a headlight bulb on a modern truck has evolved from a simple mechanical task to a multi-disciplinary engagement with optical physics and digital electronics. For the owners of Ford F-150s, Chevy Silverados, and Ram 1500s, the path to better visibility is paved with specific challenges—from the cramped engine bays of the GMT900 to the sensitive CANbus networks of the DT Ram.
However, the reward for navigating this complexity is substantial. Whether restoring the factory baseline with high-quality halogens or stepping into the modern era with a properly aimed, DOT-compliant LED assembly, the result is the same: increased safety, reduced reaction times, and the confidence to command the road, regardless of the hour or the weather. By adhering to the protocols outlined in this report—respecting the "no-touch" rule, verifying alignment, and utilizing proper electronic decoders—truck owners can ensure their lighting systems function not just as parts, but as precise instruments of safety.
Data Tables and Visual References
Table 1: Bulb Application Chart by Model Generation
| Make & Model | Generation / Years | Low Beam | High Beam | Fog Light | Notes |
| Ford F-150 | 2004 - 2014 | H13 (9008) | H13 (9008) | 9140/H10 | Dual Filament |
| Ford F-150 | 2015 - 2020 | H11 | 9005 | 9140 | Wheel well access preferred |
| Ford F-150 | 2021 - Present | H11 / LED | 9005 / LED | H10 | Sealed LED on high trims |
| Chevy Silverado | 2007 - 2015 | H11 | 9005 | 5202 | Battery removal helpful |
| Chevy Silverado | 2016 - 2018 | H11 / D5S | 9005 / D5S | 5202 | Tight grille clearance |
| Ram 1500 | 2009 - 2012 | H13 (Dual) | H13 (Dual) | 9145 | Basic Quad Headlight |
| Ram 1500 | 2013 - 2018 | H11 (Proj) | 9005 (Proj) | 9006 | Projector uses shutter |
| Ram 1500 | 2019 - Present | H11 / LED | 9005 / LED | H11 | Trap door access |
Table 2: Troubleshooting Matrix
| Symptom | Probable Cause | Diagnostic Action | Solution |
| One light out | Burned filament | Swap bulbs L/R | Replace bulb |
| Both lights out | Fuse or Relay | Check fuse box | Replace fuse; check short |
| LED Flickering | PWM Pulse / CANbus | None (visual) | Install Anti-Flicker Decoder |
| "Bulb Out" Dash Light | Low Resistance (LED) | None (visual) | Install Load Resistor |
| Dim / Yellow Light | Corrosion or Old Bulb | Voltage Drop Test | Clean ground / Replace bulb |
| Moisture in Lens | Cap Seal Failure | Visual Inspection | Dry out; reseal dust cap |

![5.7 Hemi Exhaust Manifold Upgrade [2026]](https://truckguider.com/wp-content/uploads/2026/03/featured-5f91c218-768x768.webp)
![Best 2017 Ram 1500 Crew Cab Running Boards: Top Fit Guide [2026]](https://truckguider.com/wp-content/uploads/2026/03/2017-ram-1500-crew-cab-running-boards-featured.webp)

![3.6 Pentastar Oil Type & Capacity Guide (2011: Specs & Fitment Guide [2026]](https://truckguider.com/wp-content/uploads/2026/03/3-6-pentastar-oil-type-featured.webp)