Ram Promaster 1500 Battery Location: How To Access And Replace Your Battery
If you are standing in front of your Ram ProMaster 1500 with the hood popped, looking for the battery, you might be surprised to find an empty engine bay. Most vehicle owners expect the battery to be easily accessible near the engine, but the ProMaster’s unique design hides it beneath the interior cabin floor, leading to confusion during jump-starts or replacements. In this guide, we will pinpoint the exact location of your primary and auxiliary batteries, provide step-by-step access instructions, and detail the specific technical requirements for your next replacement to ensure your vehicle remains a reliable asset for your business or lifestyle.
Locating the Ram ProMaster 1500 Primary Battery Under the Driver’s Floor
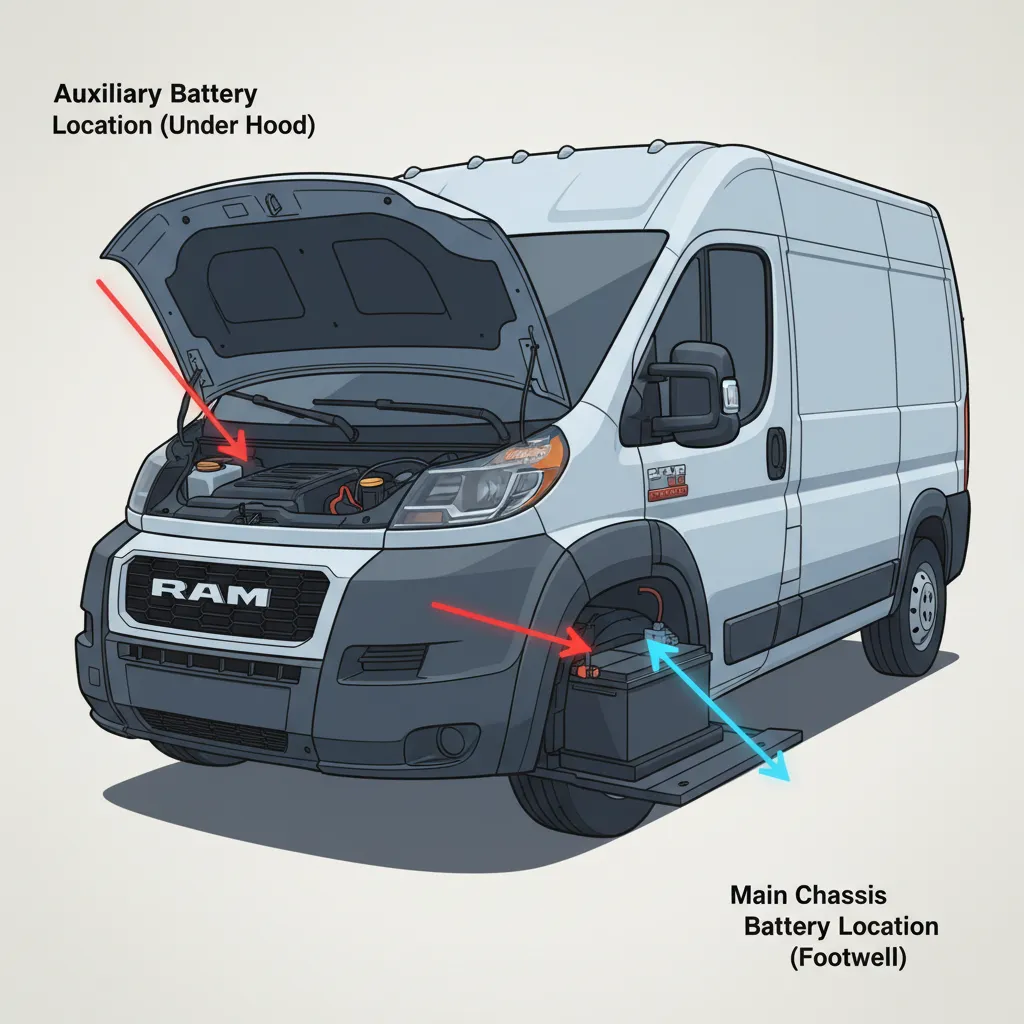
The Ram ProMaster 1500 is built on a “Euro-style” platform, sharing much of its DNA with the Fiat Ducato. This architectural heritage dictates several unique design choices, the most notable of which is the battery placement. Instead of the traditional under-hood mounting found in domestic pickup trucks, the ProMaster’s primary battery is tucked away in a dedicated compartment beneath the driver’s side floor, just forward of the seat base. To find it, you must look for a rectangular plastic or carpeted panel located directly in the footwell area.
This design is not merely a quirk; it is a calculated engineering decision. By placing the battery inside the cabin and under the floor, RAM engineers have effectively lowered the vehicle’s center of gravity. Furthermore, this placement shields the battery from the extreme temperature fluctuations and vibrational stress inherent in an engine bay. Research and thermal stability studies indicate that an interior battery location can extend battery life by up to 20% compared to high-heat engine bay environments. For the trusted local tradesperson or fleet operator, this translates to fewer roadside failures and reduced long-term maintenance costs.
Owners in colder climates, such as those in the northern community, benefit significantly from this setup. Because the battery is housed within the insulated cabin, it remains slightly warmer than it would if exposed to the biting winter air under the hood. This warmth helps maintain the battery’s chemical reactivity, ensuring more reliable starts on freezing mornings. When you enter the van, you will notice a distinct panel near the door sill. This is the gateway to your power source, which serves as the primary hub for all starting functions and standard electrical electronics.
Don’t confuse the battery location with the jump-start posts. If you only need to jump-start the vehicle, look under the hood for the red plastic cap (positive) and a nearby grounding stud (negative). Only access the floor compartment for testing or replacement.

Step-by-Step Instructions to Access the ProMaster Battery Compartment
Accessing the battery in a ProMaster 1500 requires a bit more effort than a standard vehicle, but with the right tools and a systematic approach, it is a straightforward task. Before you begin, ensure the vehicle is in park and the ignition is completely off. You will need a T25 Torx driver (standard on most late-model units) or a Phillips head screwdriver for older configurations, along with a 10mm socket for the terminals.
📋
Accessing the Battery
Remove any aftermarket floor mats or carpets. If your van has a rubberized flooring system, you may need a trim removal tool to gently pry the edge near the driver’s door sill to reveal the fasteners.
Locate the 6-8 T25 Torx screws securing the floor panel. Be careful not to strip these, as they are often seated in plastic anchors. Set the screws aside in a magnetic tray so they aren’t lost in the accessible crevices of the cabin.
Lift the panel straight up. You will now see the battery housed in a plastic tub. You will also notice a heavy-duty hold-down strap. Before proceeding with any electrical work, always refer to the battery replacement guidelines for safety.
Once the panel is removed, the battery terminals and the main fuse block are visible. It is essential to maintain organization; a common pitfall for the community of ProMaster owners is losing the specific fasteners, which requires a trip to the dealer. When reassembling, ensure the panel sits flush to maintain the weather seal of the cabin. Professional mechanics recommend tightening the Torx screws to a torque specification of 4-6 Nm to prevent cracking the plastic housing while ensuring a vibration-free fit.
Understanding Battery Specifications: Group Size 48 (H6) vs. Group Size 94R
Choosing the right replacement battery is critical for the ProMaster 1500’s sophisticated electrical system. Depending on the model year and specific trim, your van will likely require either a Group Size 48 (H6) or a Group Size 94R battery. These sizes are standardized by the Battery Council International (BCI), but they offer different performance profiles that must match your vehicle’s needs. For convenient shopping, you can check your VIN at a local service center or consult the official guide for your specific vehicle.
By The Numbers
CCA (Group 48/H6)
CCA (Group 94R)
Average Lifespan
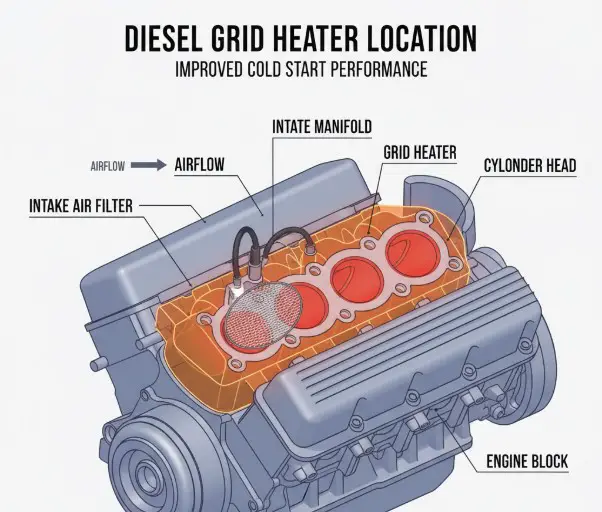
The Group Size 48 (H6) is the standard for many base configurations, providing reliable starting power for daily delivery routes. However, vehicles equipped with the 3.0L EcoDiesel engine or those with high-amperage alternators often utilize the Group Size 94R. The 94R is physically longer and offers a higher Cold Cranking Amp (CCA) rating, which is essential for overcoming the high compression of a diesel engine or powering complex interior upfits. When selecting a new unit, many nearby retailers offer both traditional flooded lead-acid and AGM (Absorbent Glass Mat) options. I highly recommend AGM for ProMaster owners; they are more vibration-resistant and handle deep discharges better, which is vital if your van spends long hours idling or serving as a mobile office.
Identifying Secondary and Auxiliary Battery Locations for Van Conversions
The Ram ProMaster 1500 is a favorite among the camper van conversion community and fleet managers who require additional power for liftgates or heavy-duty lighting. In these instances, you may find an auxiliary battery. Unlike the primary starting battery, the auxiliary battery is often located under the passenger seat or integrated within the engine compartment on specific factory-prep packages. If your van was ordered with the “Auxiliary Battery Prep” option, the factory provides a available wiring harness and an isolator system to ensure you don’t drain the starting battery while using interior accessories.
Camper Van Setup
Aftermarket “house” batteries are often placed in the rear cargo area, but the factory auxiliary location under the passenger seat is a prime spot for a 100Ah Lithium upgrade.
Split Charging
Factory dual-battery systems use an isolator. This prevents the primary battery from being drained while the vehicle is parked, protecting your ability to start the engine.
Maintaining a dual-battery system requires extra vigilance. If you notice your interior LEDs flickering or the liftgate moving slowly, the auxiliary battery may be reaching the end of its 3-5 year lifespan. When disconnecting a dual-battery system, always disconnect the negative terminals of both batteries before performing any service. This prevents a “back-feed” situation where a live circuit from the secondary battery could cause an electrical surge or spark while you are working on the primary unit.
Safety Precautions and Professional Maintenance Tips
Working on the ProMaster electrical system requires strict adherence to safety protocols. The most critical rule in automotive electronics is the “Negative First” rule. When removing a battery, always disconnect the negative (black) terminal first. When installing, connect the negative terminal last. This practice prevents accidental short circuits; if your wrench touches the metal frame while loosening the positive terminal first, it will create a massive spark and potentially damage the vehicle’s ECU or cause a battery explosion.
Because the battery is located inside the cabin, it must be properly vented. Ensure the small plastic vent tube is securely attached to the side of the battery and routed through the floor grommet to allow hydrogen gas to escape safely outside the vehicle.
For long-term reliability, I recommend inspecting the terminals every six months for corrosion. If you see white or blue powdery buildup, clean it with a wire brush and a mixture of baking soda and water. Afterward, apply a thin coat of terminal protector spray. Additionally, since the ProMaster is a modern, computer-controlled vehicle, consider using a memory saver device when swapping batteries. This small tool plugs into the OBD-II port and provides a low-voltage power supply to maintain your radio presets and engine idling parameters while the main battery is disconnected. For the most accurate torque and part numbers, always refer to Ram specs to ensure your maintenance meets factory standards.
✅ Pros of Floor Mounting
- Lower center of gravity for better handling
- Protection from engine heat (up to 20% longer life)
- Easier access in tight garage spaces
- Terminals stay cleaner without road grime
❌ Cons of Floor Mounting
- Requires tools to access even for testing
- Potential for cabin noise if panel is loose
- Hydrogen venting requires a specific tube
- Spills can damage interior flooring
Finally, remember that lead-acid batteries are 99% recyclable, making them one of the most sustainable consumer products in the United States. When you finish your replacement, take your old core to a recycling center nearby. Many local auto parts stores will even give you a “core credit” on your purchase, saving you money while protecting the environment for the local community you serve.
Summary and Conclusion
Locating and maintaining the battery in your Ram ProMaster 1500 doesn’t have to be a mystery. By understanding that the primary battery is located under the driver’s side floor panel, you can avoid the frustration of searching under the hood during a maintenance cycle. Remember that standard replacements typically require a Group Size 48 (H6) or 94R battery, and always use the designated jump-start posts in the engine compartment for daily emergencies rather than accessing the floor battery. Taking these small steps will ensure your van stays on the road and performs at its peak. Check your battery’s manufacture date today; if it is over four years old, visit a service center nearby to ensure your ProMaster stays reliable for the local community you serve.
Frequently Asked Questions
How do I jump-start a Ram ProMaster 1500 if the battery is under the floor?
You do not need to access the floor battery to jump-start the vehicle. RAM provides remote battery terminals under the hood. Look for a red plastic cap (positive) and a dedicated metallic post on the fender or engine block (negative). This allows for safe jump-starting without removing the interior floor panels.
What tools are required to remove the battery floor panel?
To access the battery, you typically need a T25 Torx driver or a standard Phillips screwdriver to remove the screws holding the plastic floor cover. Once inside, a 10mm socket or wrench is required to loosen the terminal clamps, and a 13mm socket with an extension is usually needed for the battery hold-down bracket.
Is there a second battery in my Ram ProMaster 1500?
Some ProMasters, especially those used for fleet work or camper conversions, may have an auxiliary battery. This is usually located under the passenger seat or in a specific compartment in the engine bay. If you have an auxiliary battery, it is used to power accessories while the engine is off, preserving the main battery for starting.
Why did RAM put the battery under the floor instead of the engine bay?
Placing the battery under the floor helps with weight distribution and lowers the vehicle’s center of gravity. Furthermore, it protects the battery from the extreme heat cycles of the engine compartment, which is a leading cause of premature battery failure. It also frees up space in the engine bay for easier maintenance of other components.
How do I know if my ProMaster needs a Group 48 or Group 94R battery?
The easiest way is to check the label on your existing battery or consult your owner’s manual. Generally, the 1500 gas models use the H6 (Group 48), while diesel models or those with high-electrical-load packages require the larger 94R. Nearby auto parts stores can also verify this using your vehicle’s VIN.


![Blend Door Actuator Location: Where to Find & Access It [2026]](https://truckguider.com/wp-content/uploads/2026/03/blend-door-actuator-location-featured-768x403.webp)