Toyota Tacoma Rear Drum Brake Diagram: 2026 Component Breakdown

The Toyota Tacoma rear drum brake system relies on a self-adjusting cable, return springs, and a wheel cylinder. To inspect, verify the wheel cylinder seals are intact and check the automatic adjuster star wheel. Ensure the primary shoe is facing the front and the secondary shoe faces the rear for correct actuation.
📌 Key Takeaways
- Primary brake shoes must be installed at the front, while secondary shoes (with the parking brake lever) attach to the rear.
- The automatic adjuster assembly must be lubricated with high-temperature brake grease during every service interval.
- Wheel cylinder bolts should be torqued to 12 ft-lbs to prevent hydraulic fluid leaks in the brake assembly.
- The most common failure point is a seized star wheel adjuster, which prevents the system from maintaining proper clearance.
- If you encounter uneven pedal feel or hydraulic leakage, seek professional brake technician support immediately for safety.
For the professional technician or advanced DIY enthusiast, mastering the Toyota Tacoma rear drum brake assembly is essential for vehicle safety and performance. Unlike modern disc systems, the Toyota drum setup relies on a complex network of springs, self-adjusting levers, and hydraulic components that require precise configuration to function correctly. This guide utilizes the Toyota Tacoma rear drum brake diagram as a technical roadmap to navigate the internal geometry of the hub. Whether you are addressing uneven braking, a stuck parking brake, or general wear, understanding the interaction between the wheel cylinder and the shoe hardware is mandatory. Improper assembly can lead to premature lining wear, overheating, or total brake failure, making the provided technical documentation your most vital resource.


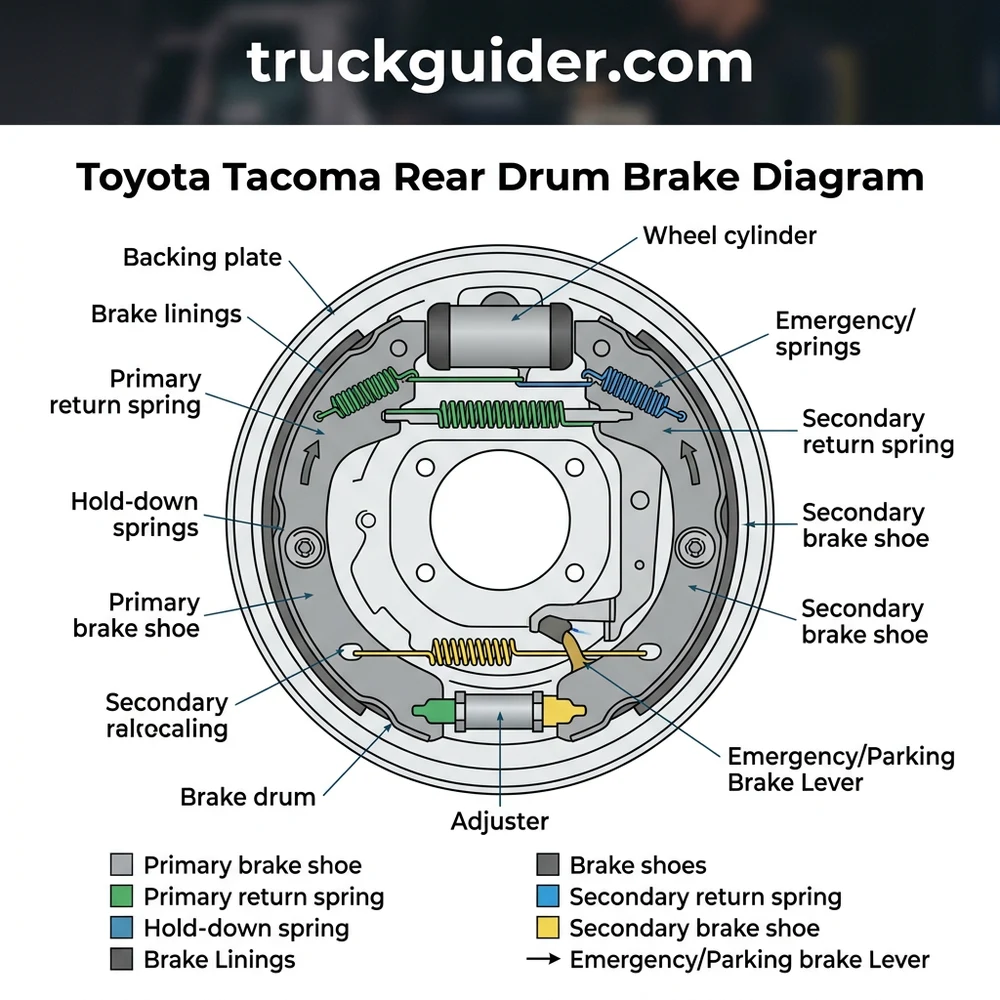
Toyota Tacoma Rear Drum Brake Diagram: Every Component Labeled
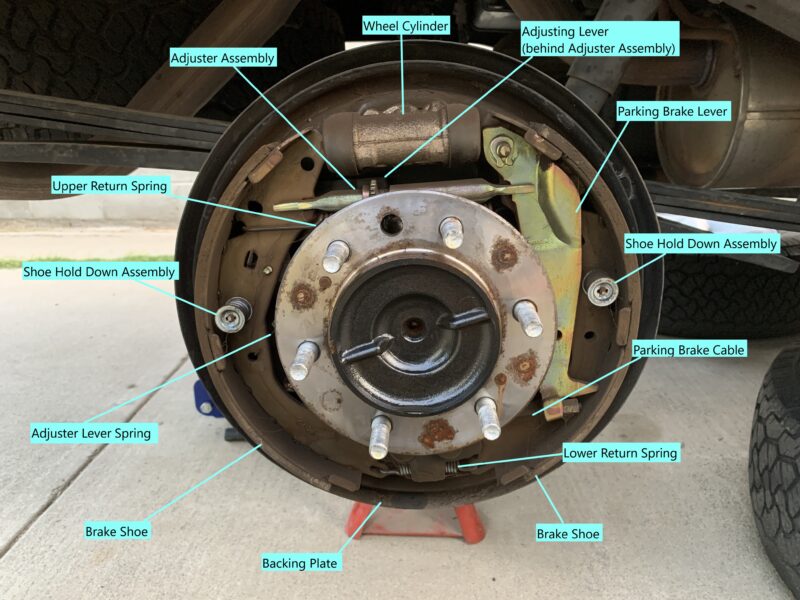
The rear drum brake system in the Tacoma is a classic leading/trailing shoe design. Accurate identification of these parts via the Toyota Tacoma rear drum brake diagram prevents common installation errors, such as swapping the primary and secondary shoes or misaligning the star wheel adjuster. When inspecting these components, it is critical to observe the orientation of each spring; a single reversed spring can compromise the entire self-adjusting mechanism.
| Part Name | Function | Technical Note |
|---|---|---|
| Brake Shoe | Creates friction against the drum inner wall | Always replace in sets (axle-wide) |
| Wheel Cylinder | Converts hydraulic pressure to mechanical force | Check for leaks under dust boots |
| Self-Adjuster Cable | Cycles the star wheel during braking | Ensure tension is maintained |
| Brake Drum | Provides the friction surface and housing | Observe max diameter markings |
The primary shoe (the shoe with the shorter lining) typically faces the front of the vehicle, while the secondary shoe faces the rear. The self-adjuster cable attaches to the actuator lever, which rotates the star wheel gear during reverse braking maneuvers. If your brake pedal feels “low” or “spongy,” the diagram often points to a seized star wheel or an overly stretched cable. Always clean the internal housing of brake dust using a HEPA-rated vacuum system, as these materials may contain legacy contaminants. While working on the braking system, technicians should also verify that the HVAC air handler and evaporator housing are clear of debris, as these systems share engine bay service corridors. A clean workspace ensures that the brake fluid, which is hygroscopic, does not become contaminated during the wheel cylinder replacement process.
How to Read the Toyota Tacoma Rear Drum Brake Diagram Step by Step

Utilizing the Toyota Tacoma rear drum brake diagram requires a systematic approach to disassembly and reassembly. Begin by stabilizing the vehicle on jack stands and removing the rear wheel assembly. Once the drum is removed, use the diagram as a visual reference for the order of operations.
1. Initial Inspection and Fluid Management: Before touching the hardware, inspect the rear axle assembly for signs of gear oil leakage, which can contaminate the shoes. Verify that the master cylinder fluid level is appropriate, and use a flare-nut wrench to avoid rounding the brake line fittings when servicing the wheel cylinder.
2. Spring Removal: Start by using a brake spring tool to remove the two heavy-duty hold-down springs. Refer to the Toyota Tacoma rear drum brake diagram to verify the tension requirements.
3. Hardware Extraction: Disengage the parking brake cable from the rear lever. Note that the cable tensioner often requires significant force; avoid using excessive heat or impact tools, which can warp the backing plate.
4. Cylinder and Line Service: Remove the wheel cylinder mounting bolts. If the piston seals are compromised, replace the entire cylinder rather than rebuilding it to ensure long-term reliability.
5. Reassembly with Calibration: As you reassemble, lubricate the contact points on the backing plate with high-temperature brake grease. Use the star wheel adjuster to set the initial clearance. The drum should slide over the shoes with a light “drag” sensation.
6. Final Adjustment: Perform several reverse braking sequences to allow the self-adjuster lever to set the final shoe-to-drum gap. If the HVAC system’s blower motor or cabin filter access is located near the firewall, take care not to disrupt the wiring harness when routing new lines.
When replacing the brake shoes, ensure you verify that the condenser and compressor are functioning within normal operational temperatures, as heat soak from the transmission tunnel can affect the surrounding brake components during heavy towing cycles.
Common Toyota Tacoma Rear Drum Brake Diagram Problems and Fixes
Even with regular maintenance, specific components within the Tacoma drum system are prone to failure. Using the Toyota Tacoma rear drum brake diagram, you can pinpoint the origin of common malfunctions before replacing functional parts.


Frozen Wheel Cylinder Pistons: If the vehicle pulls to one side during braking, the diagram will help you isolate a stuck wheel cylinder. This occurs when the internal rubber seals degrade, causing the piston to seize in the retracted position.
Seized Star Wheel Adjuster: If your parking brake handle pulls up too high, the star wheel is likely rusted solid. Use a wire brush to clean the threads and apply a thin layer of copper-based anti-seize.
Glazed Shoe Lining: Excessive heat from downhill driving can glaze the brake shoe lining, rendering them ineffective. If the linings look glassy, they must be replaced regardless of thickness.
LSPV (Load Sensing Proportioning Valve) Misalignment: On specific Tacoma models, the LSPV regulates pressure based on payload. If the linkage is bent or disconnected, the rear brakes will not receive sufficient pressure, leading to poor braking performance.
* Brake Master Cylinder Degradation: In some cases, the issue is not in the drum itself but in the master cylinder failing to push the required volume of refrigerant-like hydraulic fluid. Ensure that air is bled thoroughly from the lines after opening the hydraulic circuit.
Never use compressed air to blow out brake dust. Always use a wet wiping method or a specialized vacuum to prevent the inhalation of potentially hazardous particulates. Verify the integrity of the heat exchanger and return ducting nearby if you are performing heavy repairs that involve grinding or welding near the frame rails.
Toyota Tacoma Brake System Specifications and Service Limits
Precision is the hallmark of a professional brake job. Referencing the Toyota Tacoma rear drum brake diagram alongside these manufacturer specifications will ensure your repairs meet safety standards. Always use an inside micrometer to check for drum “out-of-round” conditions and ensure your replacement parts are matched to the specific model year and payload capacity of the vehicle.
| Measurement Point | Standard Value | Service Limit |
|---|---|---|
| Brake Shoe Lining | 4.0 mm | 1.0 mm |
| Brake Drum Diameter | 295.0 mm | 297.0 mm |
| Drum Out-of-Round | 0.05 mm | 0.10 mm |
Always torque your lug nuts to the manufacturer’s specified 83 ft-lbs (113 Nm) after servicing the rear drums. Incorrect torque settings can cause rotor or drum warping and wheel stud fatigue.
Toyota Tacoma Rear Drum Brake Diagram Questions Answered
How can I tell if the primary and secondary shoes are installed correctly?
The primary shoe has a shorter lining and is designed for the front position. The secondary shoe has a longer lining and goes to the rear. The Toyota Tacoma rear drum brake diagram clearly labels the position of the actuator lever, which attaches only to the secondary shoe. If you find the parking brake linkage does not reach, you have likely swapped the shoes.
What if my brake drum does not slide off the hub during removal?
This usually occurs when the shoe adjustment is too tight or a ridge has formed on the inner edge of the drum. Use a brake tool to retract the star wheel adjuster through the access hole in the backing plate. If it remains stuck, gently tap the outer edge of the drum with a rubber mallet while rotating it to break the corrosion seal.



Does the refrigerant level in the AC system affect brake performance?
No, the HVAC system and the brake hydraulic system are entirely separate. However, if you are performing a comprehensive vehicle service, ensure that the compressor and condenser are checked for debris, as a failure in these cooling systems can increase ambient temperatures in the engine bay, which may indirectly influence brake fluid viscosity over time.
How frequently should I check the brake shoe thickness?
According to standard maintenance schedules, you should inspect the rear drums every 15,000 to 20,000 miles. If you frequently drive in dusty conditions or haul heavy loads, shorten this interval. Always ensure that the return ducting for the rear axle is clear, as proper ventilation prevents brake dust build-up.
Can I upgrade my Tacoma from drums to discs?
While conversion kits exist, they are major modifications that can interfere with the load-sensing proportioning valve and parking brake cable routing. Always refer to a comprehensive Toyota Tacoma rear drum brake diagram before considering such a modification, as it changes the hydraulic pressure dynamics significantly and may void safety certifications.
Step-by-Step Guide to Understanding the Toyota Tacoma Rear Drum Brake Diagram
Identify – Remove the drum and identify the primary vs secondary shoe locations.
Locate – Locate the wheel cylinder at the top and the adjuster star wheel at the base.
Reference – Use the diagram to map the tension spring routing to prevent binding.




Connect/Route – Route the parking brake cable through the secondary shoe lever assembly.
Verify – Torque the hold-down pins and verify the self-adjuster clicks when activated.
Troubleshoot – Test the brake pedal feel; if soft, check for air in the line or evaporator obstruction.