Silverado 1500 Diagram Chevy Rear Drum Brake Assembly: Visualized

The Silverado 1500 diagram chevy rear drum brake assembly is essential for performing safe maintenance on older generation or specific heavy-duty work truck configurations. Understanding this mechanical layout prevents improper hardware installation, which is critical for maintaining consistent stopping power and correct parking brake tension. This overview provides the technical breakdown of components and the necessary steps to service your braking system.

How to Read This Chart
This reference table identifies the critical functional components found in standard Silverado rear drum systems. The “Component” column lists parts usually identified in a Silverado 1500 diagram chevy rear drum brake assembly. “Function” indicates the role, such as hydraulic activation or gap calibration. The “Status” column confirms the part’s requirement in an assembly, while the “Note” provides context for inspection during maintenance. Please verify against your specific vehicle owner’s manual, as heavy-duty configurations or specific model years may utilize slightly different hardware profiles or adjuster styles.


Detailed Silverado 1500 Diagram Chevy Rear Drum Brake Assembly Insights
Recommended Best Deal Products


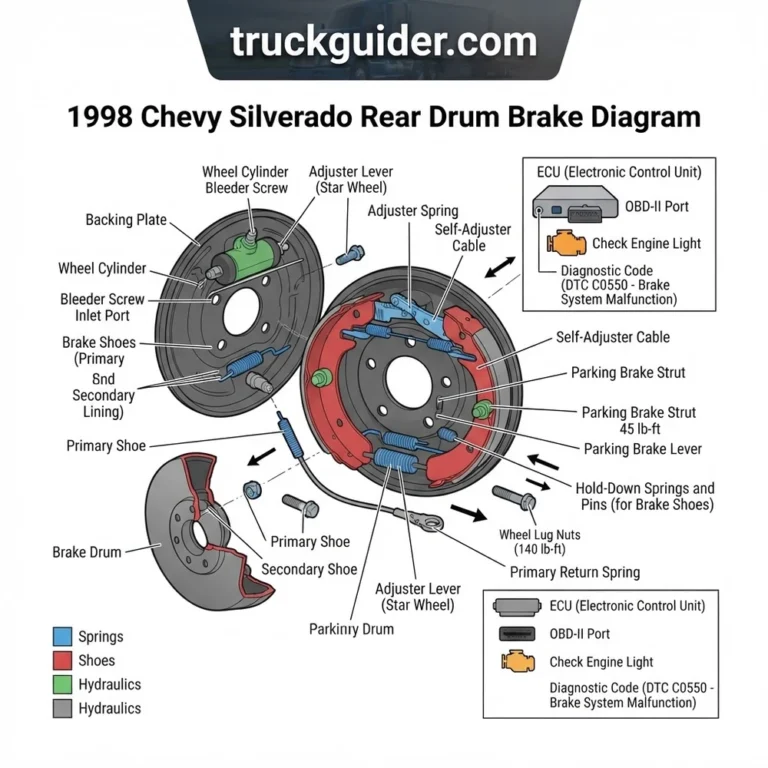
Understanding the internal layout of your rear braking system provides essential information for DIY repairs. The assembly is composed of a backing plate, two brake shoes, a wheel cylinder, return springs, and an automatic adjuster mechanism. The primary shoe is typically shorter than the secondary shoe; installing these in reverse can lead to poor braking performance and premature drum wear.

The adjuster mechanism, often consisting of a cable and star wheel, ensures that as the brake shoes wear down, the clearance between the drum and the lining remains within factory specifications. In many older Silverado models, this is a manual or semi-automatic system that requires verification during every brake job to ensure the “self-adjuster” is actually responding to parking brake usage.
📋
How to Read the Silverado 1500 Diagram Chevy Rear Drum Brake Assembly
Always identify the shorter shoe as the primary (front-facing) and the longer shoe as the secondary (rear-facing). Using the correct diagram ensures you don’t swap these, as the secondary shoe provides the majority of the stopping force in this design.

Verify the tension of the return springs using the diagram. If a spring is loose or incorrectly hooked into the backing plate, the shoe will drag against the drum, causing overheating and potential brake fade under load.
The adjuster cable must be routed precisely through the guide on the backing plate. Misalignment here is a common fact of failed auto-adjusters, often leading to a “low” or “mushy” brake pedal feel after a full service.
Common Silverado 1500 Diagram Chevy Rear Drum Brake Assembly Problems and Fixes
Recommended Best Deal Products

Drivers often notice a grinding noise or a pulsation in the pedal, which serves as a major symptom of worn-out drum components. Another frequent issue is the “stuck” adjuster wheel. Over time, road salt and brake dust combine to corrode the threads of the star wheel, preventing the system from compensating for pad wear.
If you encounter a parking brake that does not hold the vehicle on an incline, the issue likely resides in the parking brake lever linkage. This linkage resides behind the rear shoes. If the cable is stretched or the lever is seized, you will need to manually manipulate the assembly to regain proper tension. Always consult your specific model’s diagram when troubleshooting these linkages.
✨ Key Benefits of Proper Maintenance
Consistent Stopping
Properly adjusted drums ensure the rear of the vehicle provides its share of braking force, preventing the front discs from overheating prematurely.

Audible — Listen Free for 30 Days
One free credit a month and thousands of titles included.
Listen Free for 30 DaysParking Stability
A fully functional drum assembly guarantees that your emergency brake will hold the vehicle securely on steep gradients, a necessity for a truck.
Drum brakes are inherently self-energizing; when the wheel cylinder pushes the top of the shoes out, the rotation of the drum helps pull the primary shoe into the drum surface, providing increased braking force compared to discs in specific low-speed scenarios.
🔎 How to Find Your Specific Brake Configuration
Recommended Best Deal Products


To verify the exact Silverado 1500 diagram chevy rear drum brake assembly needed for your truck, locate the RPO (Regular Production Option) code sticker. This is typically found inside the glove box or on the driver’s side door jamb.
Look for codes such as “J41” or “J55,” which define the braking system installed at the factory. Once you have these codes, cross-reference them with your VIN (Vehicle Identification Number) at a local dealer or via an authorized service portal to ensure you are looking at the correct diagram for your specific truck’s rear-end configuration.
What If the Assembly Still Doesn’t Function Properly?
If you have followed the Silverado 1500 diagram chevy rear drum brake assembly instructions but still experience issues, check the following:
- Ensure the parking brake cable isn’t seized within its housing, which prevents proper release.
- Check for air in the hydraulic lines; if the wheel cylinder was replaced, the system must be bled at the rear wheels.
- Verify the drum itself; if it is out-of-round or scored beyond machining limits, no amount of adjustment will result in a smooth pedal.
If you suspect the master cylinder or ABS module is failing, professional diagnostics are recommended. Costs for professional drum brake service typically range from $250 to $500 depending on the parts required, such as new drums or wheel cylinders.
Conclusion
Maintaining the rear brakes on your truck is a manageable task when you rely on accurate technical resources. By using a validated Silverado 1500 diagram chevy rear drum brake assembly, you can ensure each spring, shoe, and adjuster is positioned correctly for maximum safety. Based on current service insights, always prioritize the cleanliness of the backing plate and the correct orientation of the shoes. For your next steps, gather the required RPO codes from your vehicle’s sticker to ensure you source the exact compatible replacement parts for your specific build year.
Key Takeaways
-
✓
Locate the star wheel adjuster at the bottom of the assembly to ensure even brake shoe tension. -
✓
Verify the orientation of the primary and secondary brake shoes, as the secondary shoe features more friction material. -
✓
Inspect the wheel cylinder boots for signs of hydraulic fluid leakage, which indicates failing internal seals. -
✓
Identify all return spring attachment points before removing the assembly to prevent hardware tension issues. -
✓
Use the brake diagram to confirm that the parking brake lever is correctly seated in the rear shoe slot.
❓ Frequently Asked Questions
1
What is a Silverado 1500 rear drum brake assembly?
This assembly is a drum-style braking system used on older or heavy-duty Silverado models. It uses an internal cylinder to push two brake shoes against the rotating drum, creating friction to stop the truck. It includes springs, a star-wheel adjuster, and a backing plate to manage these moving parts.
Audible Premium Plus — Annual Membership
12 audiobook credits up front, plus the full Audible catalogue.
See Annual Plans
2
How does the drum brake system work?
When you press the brake pedal, hydraulic fluid enters the wheel cylinder, forcing the pistons outward. This pushes the brake shoes against the inner surface of the brake drum. The resulting friction slows the rotation of the wheels. The return springs pull the shoes back once pressure is released.
3
Why is a correct assembly diagram important?
A detailed diagram provides the necessary info on spring placement and hardware orientation. Because these systems are under high tension, installing a spring backward or in the wrong hole can cause the brakes to lock, drag, or fail to engage, posing a serious safety risk to your vehicle.
4
What are the benefits of maintaining drum brakes?
Proper maintenance ensures consistent stopping power and longevity of the brake components. Keeping the assembly cleaned and adjusted prevents the buildup of brake dust and heat, which minimizes noise and vibration while helping the truck pass safety inspections and providing reliable performance for heavy hauling tasks.
5
How can I get started with brake repairs?
Start by identifying your specific Silverado model year, as brake configurations can vary. Acquire a reliable diagram for your specific trim, gather the necessary brake spring tools, and ensure you have a clean workspace. Always work on one side at a time so you can refer to the intact assembly.