1998 Chevy Silverado Rear Drum Brake Diagram: Installation Setup 2026

The 1998 Chevy Silverado rear drum brake assembly consists of a primary shoe, secondary shoe, automatic adjuster cable, lever, and hold-down springs. Key torque specs include 150 ft-lbs for axle nuts and 85 ft-lbs for lug nuts. Always verify that your wheel cylinder is free of hydraulic fluid leaks before reassembly.
📌 Key Takeaways
- Wheel cylinders must be inspected for leaks; if dry, they are typically functional, but leaking indicates a rebuild or replacement is required.
- The secondary brake shoe is identified by the longer friction material; it must always be installed toward the rear of the vehicle.
- Always adhere to the specific torque spec of 85 ft-lbs for wheel lug nuts to prevent brake drum distortion and uneven wear.
- The most common failure point is the automatic adjuster star wheel seizing due to rust or brake dust accumulation, causing a low pedal feel.
- If a diagnostic code or check engine light appears alongside poor braking, inspect the ABS sensors, as the ECU monitors wheel speed via these components.
Maintaining the braking efficiency of a heavy-duty workhorse requires absolute precision, especially regarding the 1998 Chevy Silverado rear drum brake assembly. While modern vehicles often utilize four-wheel disc configurations managed by complex ECU-driven stability control, the K1500 and C1500 series from the late 90s rely on a robust, mechanical drum-in-hat or standard drum setup. When your dashboard displays a warning indicator, it is rarely related to an OBD-II diagnostic code associated with the engine management system; rather, it indicates a hydraulic pressure loss or a physical switch activation. Mastering the 1998 Chevy Silverado rear drum brake diagram ensures your service procedures meet OEM standards, preventing premature fade and maintaining pedal feel under heavy load.

Prime for Young Adults — 6 Months Free
Students and 18–24s get six months of Prime free, then half price.
Start 6 Months Free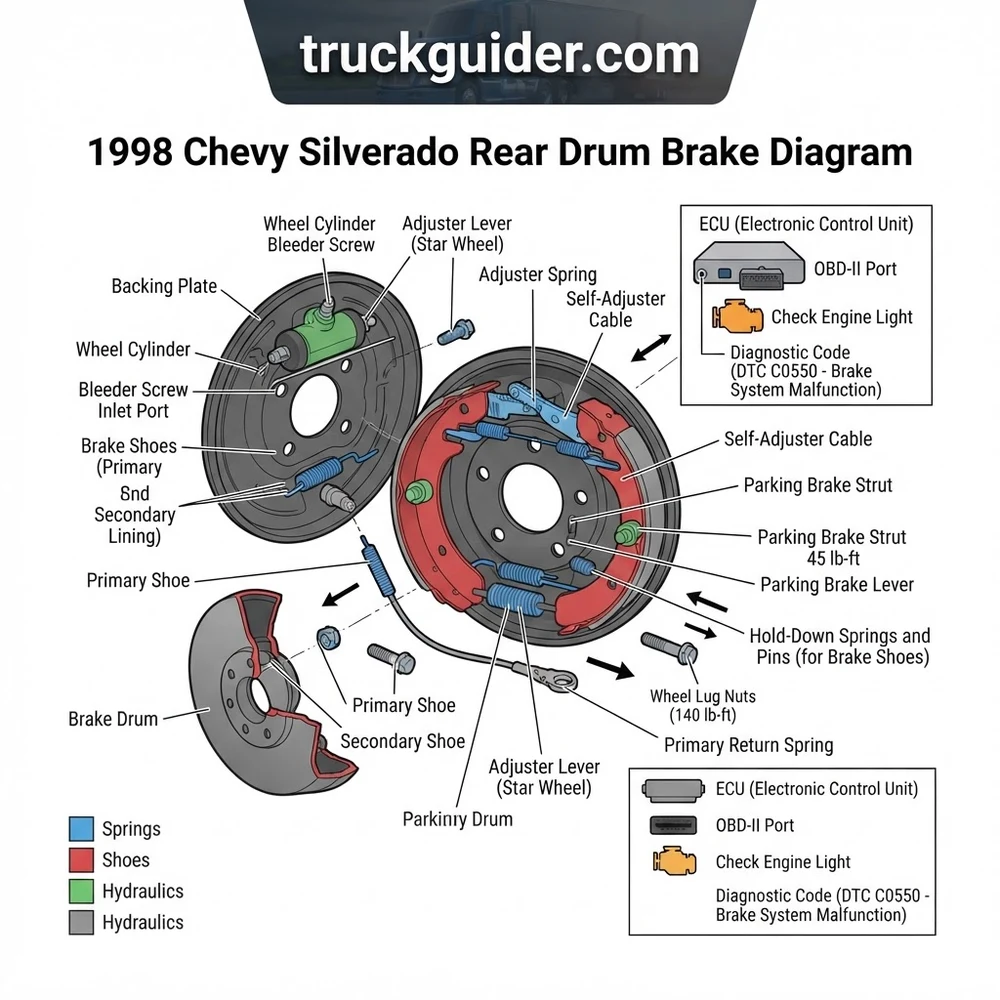
1998 Chevy Silverado Rear Drum Brake Diagram: Component Identification
Recommended Best Deal Products


Before initiating any service, you must identify each component to ensure correct orientation. The 1998 Chevy Silverado rear drum brake diagram depicts a duo-servo design, where the movement of the primary shoe assists the secondary shoe to increase braking force. Incorrect assembly of the self-adjuster components often leads to a spongy pedal or a complete lack of rear braking performance. Use the following table to verify your parts inventory against the diagram before reassembly.
| Component | Function | Technical Note |
|---|---|---|
| Primary/Secondary Shoes | Friction material engagement | Primary shoe lining is shorter. |
| Wheel Cylinder | Hydraulic pressure expansion | Check for weeping fluid seals. |
| Star Wheel Adjuster | Maintains clearance | Apply high-temp anti-seize. |
| Return Springs | Retracts shoes after pedal release | Use specialized brake pliers. |
| Backing Plate | Structural mounting base | Ensure mounting bolts are tight. |
The wheel cylinder is a critical hydraulic link. If you note low fluid levels in the master cylinder reservoir, do not assume an external leak; check the back of the drum backing plate for signs of hydraulic fluid bypass. Unlike modern systems that report sensor failure through an OBD-II diagnostic code, this braking system relies on the driver to detect physical symptoms. If you are also addressing engine performance, remember that an illuminated check engine light is unrelated to the mechanical drum system, though engine vacuum issues can indirectly affect the brake booster’s ability to assist the pedal. Always verify the condition of the hardware shown in the diagram; rusted or seized springs will prevent the shoes from retracting, causing excessive heat buildup and potential drum warpage. The star wheel assembly must move freely; if the threads are corroded, replace the entire adjuster kit to ensure the automatic adjustment function continues to operate correctly as the brake linings wear down over thousands of miles.
Common 1998 Chevy Silverado Rear Drum Brake Diagram Symptoms

Identifying component failure in your 1998 Chevy Silverado rear drum brake assembly requires a methodical approach. When the system deviates from factory behavior, specific symptoms often point to a single failure point within the diagram. For instance, a low or sinking brake pedal is almost always a sign of a leaking wheel cylinder or a failed master cylinder, rather than an issue with the brake shoes themselves. If the pedal feel is firm but the truck pulls to one side during braking, it suggests that one side is seizing or the self-adjuster on the opposite side has failed to take up the necessary slack.
Do not confuse brake system hydraulic issues with internal engine performance problems. A fluctuating oil pressure gauge or an engine-related diagnostic code does not influence the mechanical integrity of your drum brakes.
Another common symptom is a “chattering” or vibrating sensation during moderate braking. This is typically caused by an out-of-round drum or uneven lining wear. Inspect the drum for “hot spots”—discolored, hardened patches of metal—which indicate the drum has reached excessive temperatures. If you observe these, the drum must be machined or replaced. Furthermore, if the parking brake lever feels loose or requires excessive travel, the issue lies with the parking brake cable or the secondary shoe lever actuator shown in the diagram. When the cable stretches or the actuator seizes, the mechanical leverage needed to spread the shoes is lost, rendering the parking brake ineffective. While modern trucks utilize complex electronic parking brakes, the 1998 model relies entirely on physical cable tension. Always check the routing of these cables; if they are kinked or frayed, they will create resistance, leading to the shoes dragging against the drum while driving. This causes premature heat buildup and significantly reduces fuel efficiency by creating constant rolling resistance.
How to Use the 1998 Chevy Silverado Rear Drum Brake Diagram for Service
Recommended Best Deal Products


Following the 1998 Chevy Silverado rear drum brake diagram during assembly prevents common errors like improper spring orientation or inverted star wheel adjusters. To begin, secure the vehicle on jack stands and remove the rear wheels. Use a high-quality penetrant on the brake drum screws if they have become seized. Once the drum is removed, clean the backing plate thoroughly with non-chlorinated brake cleaner. It is imperative to wear proper respiratory protection, as legacy brake dust may contain hazardous materials. Refer to your diagram to identify the primary and secondary shoes; the primary shoe (the one facing the front of the vehicle) typically has a shorter lining, while the secondary shoe faces the rear and includes the parking brake lever attachment point.
Wheel bearing nut torque: 12 lb-ft while rotating the wheel, then back off and tighten to 15-20 lb-in to ensure proper seating.
Step-by-step disassembly should follow the diagram’s logic to ensure the smaller hardware pieces, such as the hold-down springs and pins, are not lost. Use a brake spring tool to remove the large return springs; note the position of the adjuster lever and cable guide. The cable guide must sit precisely in the slot on the shoe web; failure to do so will deactivate the automatic adjuster. When installing the new shoes, apply a light coat of high-temperature brake grease to the six small contact pads on the backing plate. These pads are where the shoe webs slide, and they are critical for smooth operation. Excessive grease will contaminate the linings, while a lack of grease will cause the brakes to hang up and overheat.
Before installing the drum, use a brake shoe gauge to set the preliminary clearance of the star wheel. The drum should slide over the shoes with a very slight drag. If you find yourself adjusting the star wheel through the backing plate slot once the drum is on, remember that the adjuster is self-locking; do not force it. Ensure that the coolant flow and oil pressure systems are not being neglected during this maintenance window, as older vehicles often require a comprehensive fluid service simultaneously. While performing the brake job, keep the brake fluid reservoir cap closed to prevent moisture contamination. Once the drums are reinstalled, perform a series of forward and backward stops at low speeds to allow the automatic adjuster to perform its initial setup. Finally, verify the parking brake tension; the lever should reach full lock within 5 to 7 clicks. If the system fails to hold, re-examine the cable tensioner under the chassis near the transmission crossmember before assuming an internal mechanical failure.

Audible — Listen Free for 30 Days
One free credit a month and thousands of titles included.
Listen Free for 30 Days1998 Chevy Silverado Rear Drum Brake Diagram Questions Answered
How do I know if my wheel cylinder is leaking?
Inspect the rubber boots at both ends of the wheel cylinder. If you peel back the dust boot and find brake fluid pooling inside, the cylinder seals have failed. A failing wheel cylinder often results in a soft pedal and may cause the vehicle to pull to the side with the functional brake during application.
Can I re-use the old return springs when replacing brake shoes?
It is strongly recommended to replace the hardware kit (springs, pins, and hold-downs) every time you perform a brake service. Over time, heat cycles cause the metal to lose its tension, which leads to weak retraction and uneven wear patterns on the new shoes.
Does the 1998 Chevy Silverado require a computer reset after brake work?
No. The 1998 Chevy Silverado rear drum brake system is entirely mechanical and hydraulic. There is no ECU interaction or diagnostic code triggered by basic brake component replacement. The brake warning light on the dash is triggered by a pressure differential switch in the master cylinder or the parking brake handle sensor.
What is the importance of the star wheel adjuster?
The star wheel adjuster compensates for the lining thickness reduction that occurs as you use the brakes. If the adjuster is seized or installed upside down, the system cannot maintain the correct clearance between the shoe and the drum, resulting in an increasingly long pedal travel over time.
Why does my truck pull during braking despite new shoes?
If the shoes are new, check for uneven lubrication on the backing plate contact points. Additionally, ensure the drum surface is not glazed or scored. A mismatched or improperly adjusted star wheel on one side of the axle will also cause an unequal braking force, leading to a pull toward the more aggressive brake.
For further assistance with related systems, consult our separate guides on timing chain replacement procedures and advanced OBD-II diagnostic troubleshooting for the Vortec 5.7L engine series.
Step-by-Step Guide to Understanding the 1998 Chevy Silverado Rear Drum Brake Diagram
Recommended Best Deal Products


Identify – Inspect the brake drum and internal components for excessive wear, heat scoring, or fluid leaks from the wheel cylinder.
Locate – Position your vehicle on jack stands and remove the wheel and brake drum to expose the shoe assembly as shown in the diagram.
Audible Premium Plus — Annual Membership
12 audiobook credits up front, plus the full Audible catalogue.
See Annual PlansReference – Use the diagram to map the position of the primary and secondary springs before removing any hardware.
Connect/Route – Install the new shoes and seat the parking brake cable into the lever, ensuring all springs are hooked to their designated anchors.
Verify – Torque all mounting hardware and wheel lugs to 85 ft-lbs, then cycle the parking brake to engage the automatic adjuster mechanism.
Troubleshoot – If a check engine light or ABS code persists, perform an OBD-II scan to determine if the issue is mechanical or electronic sensor-related.