1998 Chevy Silverado Door Latch Assembly Diagram: Repair Guide 2026

The 1998 Chevy Silverado door latch assembly consists of the rotary claw, external handle actuator rod, lock cylinder rod, and internal cable release. Located within the door shell, the system relies on a spring-loaded latch mechanism connected to the exterior handle via a threaded adjustment rod and internal plastic clips.
📌 Key Takeaways
- The primary latch uses a three-bolt M8 x 1.25 hex-head mounting configuration.
- Plastic rod clips are the most frequent point of failure and often break during removal.
- Ensure the locking rod is set to a 0mm gap to prevent inadvertent lock-out.
- Lubrication with white lithium grease is critical for the rotary claw spring mechanism.
- If the actuator solenoid fails, replace the complete integrated latch assembly.
The GMT400 platform remains a staple in the automotive landscape, but the age of these vehicles necessitates a thorough understanding of their mechanical systems. If you are struggling with a door that refuses to latch or an interior handle that feels disconnected, analyzing a 1998 Chevy Silverado door latch assembly diagram is the essential first step toward restoration. This mechanical system relies on a complex network of tension rods, plastic retaining clips, and a spring-loaded latch housing that often succumbs to wear, rust, or debris over decades of heavy-duty operation. By identifying the interplay between the interior handle, the exterior lock cylinder, and the primary latch mechanism, you can avoid unnecessary part replacement and address the specific point of failure in your truck’s door architecture.
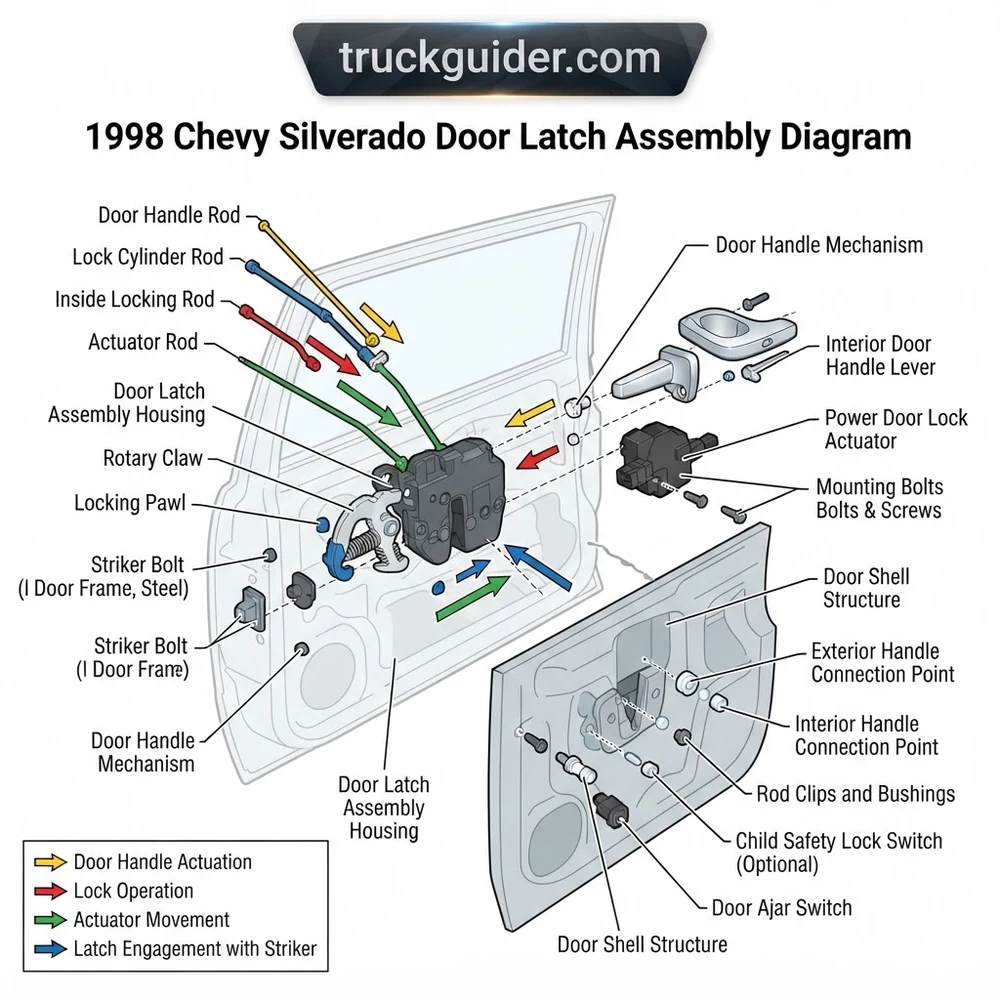
1998 Chevy Silverado Door Latch Assembly Diagram: Component Layout
Recommended Best Deal Products


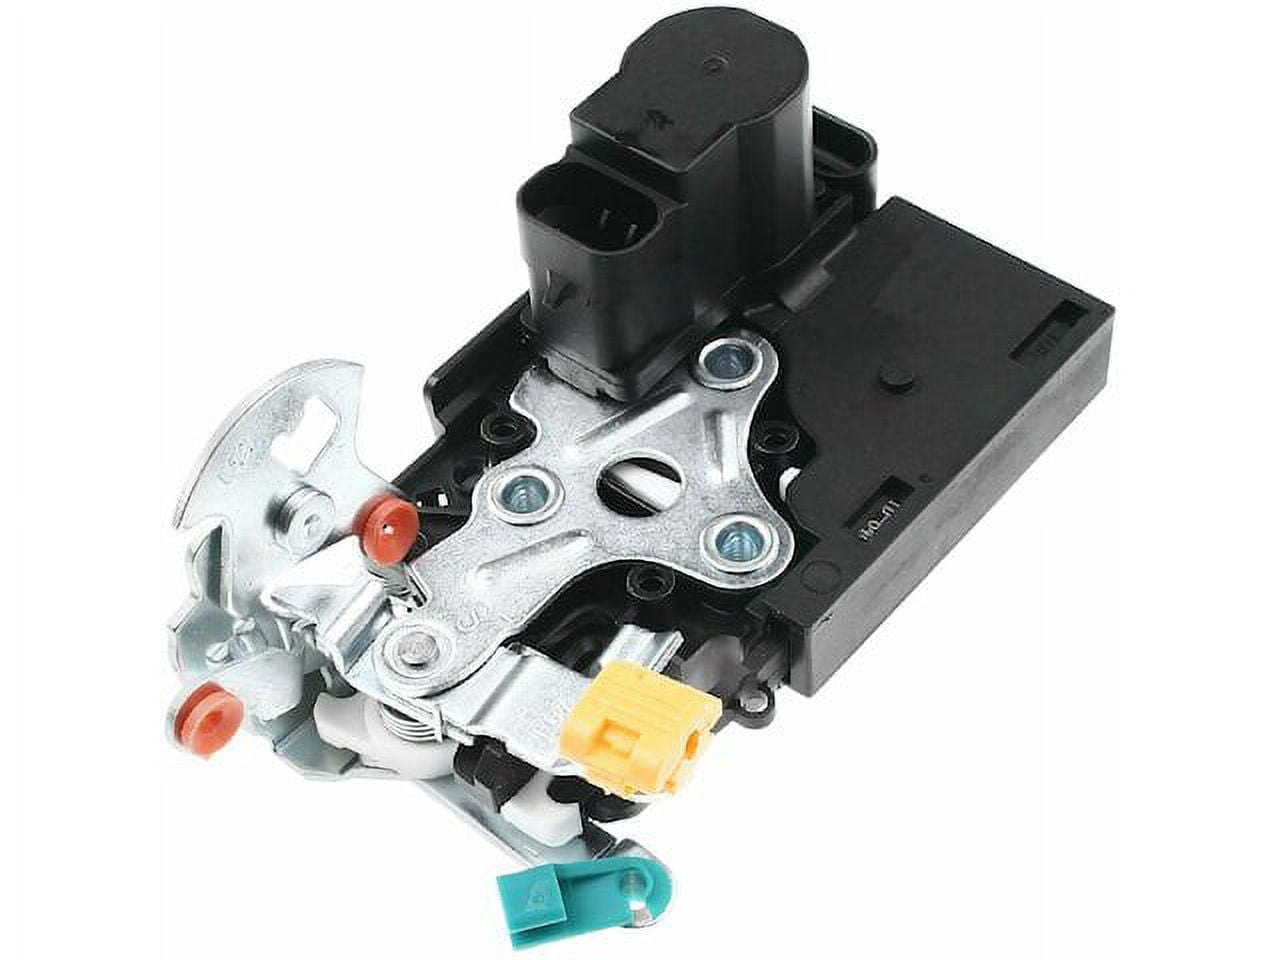
Understanding the internal configuration of the GMT400 door shell requires a breakdown of how the mechanical force of your hand translates into the release of the primary latch. The system is modular, but the components are interdependent; a single failed clip or a stretched rod can render the entire assembly inoperable. The following table identifies the critical parts found within the assembly, as typically referenced in OEM service schematics.
| Component | Function | Failure Symptom |
|---|---|---|
| Latch Mechanism | Spring-loaded jaw securing the striker bolt. | Door fails to close or pops open. |
| Interior Handle | Mechanical lever creating tension on release rod. | Handle feels loose or “dead.” |
| Primary Release Rod | Transmits motion from handle to latch pawl. | Handle pulls, but door does not open. |
| Linkage Clips | Nylon fasteners securing rods to levers. | Rods rattle or detach completely. |
| Lock Actuator | Electronic solenoid controlling lock position. | No “click” sound, manual lock only. |
The primary structural layout is anchored by the door inner steel panel. The latch assembly itself is fastened via three T30 or T40 Torx bolts located on the rear vertical edge of the door shell. These bolts bear the brunt of the door’s weight when closed against the striker. Inside the panel, the linkage rods—specifically the handle-to-latch rod and the lock-to-actuator rod—are held in place by small, high-density nylon clips. These clips are the most common point of failure in the 1998 system. Over time, heat cycles cause the nylon to become brittle and snap, leaving the rods loose within their mounting holes.
Furthermore, the geometry of the rod configuration is precise. If you attempt to bend or “adjust” these rods to compensate for wear, you often induce binding in the handle return spring. The schematic layout dictates that the interior handle must rotate a specific degree to move the latch pawl precisely 5mm to trigger the release. Any deviation in this movement path, caused by bent rods or worn hinge pins, will result in an intermittent latching issue. When reviewing the blueprint of this system, pay close attention to the orientation of the spring return. The return spring at the handle is often separate from the internal spring within the latch housing itself; both must be functional for the handle to return to the flush position after being pulled.
When replacing the latch assembly, always verify the orientation of the weather seal gasket behind the latch housing. If this seal is damaged or missing, water will ingress into the mechanism, leading to internal corrosion of the spring-loaded pawl and eventual lock-out.
Repairing the 1998 Chevy Silverado Door Latch Assembly System

Repairing the door system requires a methodical approach, specifically because the interior door panel of the GMT400 is held by pressure-fit clips that are prone to breakage. Before you attempt to remove the latch, ensure you have the proper trim removal tools and a set of quality Torx drivers.
1. Panel Removal and Preparation: Begin by removing the interior door handle trim bezel and the lock/window switch assembly. Once the switches are disconnected, remove the perimeter screws securing the door panel. Use a plastic pry tool to release the perimeter friction clips. Lift the panel upward to clear the window weatherstripping rail. Note the speaker wiring—disconnect it carefully to avoid harness damage.
2. Accessing the Linkage: With the panel removed, you will see the moisture barrier. Carefully peel this back; do not tear it, as it acts as a critical sound and water dampener. Locate the interior handle release rod and the lock control rod. These are secured to the door latch assembly via nylon snap-in clips. Use a small flat-head screwdriver to gently pry the clip off the rod, being extremely careful not to snap the brittle plastic.
3. Removing the Latch Housing: Access the exterior Torx bolts on the rear edge of the door. Support the latch assembly from the inside to ensure it does not fall into the bottom of the door cavity once the bolts are removed. Once detached, guide the latch assembly out through the access hole in the inner door panel. You will likely need to manipulate the exterior handle rod to free the unit completely.
4. Bench Inspection and Replacement: Compare your removed assembly to the 1998 Chevy Silverado door latch assembly diagram. Inspect the internal springs for fatigue and check the nylon bushings for excessive play. If you are replacing the actuator, note that it is often riveted or clipped directly to the latch frame; ensure the replacement actuator matches your specific cab configuration (standard vs. extended cab doors often feature different rod lengths).
5. Reinstallation and Testing: Reinstall the assembly by reversing the removal steps. Before closing the door, manually trigger the latch with a screwdriver to ensure the mechanism locks and releases smoothly. Apply a high-quality white lithium grease to all pivot points and the latch claw.
Never close the door while the interior panel is removed and the latch is being tested. If the latch fails to release, you will have no mechanical way to open the door from the inside, forcing a destructive entry into your door skin.
Troubleshooting 1998 Chevy Silverado Door Latch Assembly Issues
Recommended Best Deal Products


If your door is failing to operate, perform a systematic diagnostic process before ordering parts. Often, the issue is not the latch itself, but an external factor affecting the assembly geometry.
Striker Bolt Alignment: Inspect the striker bolt on the door pillar. If the bolt is grooved or worn deep into the metal, the latch claw cannot catch properly, leading to a door that pops open during vehicle vibration. A simple adjustment of the striker bolt height using a T40 Torx bit can often solve “loose” door symptoms.
Linkage Rod Tension: Observe the rods while pulling the handle. If you see the rod bowing or flexing without engaging the latch, the rod is either bent or the linkage clip has slipped. If the handle feels completely “mushy,” the spring at the handle return point has likely snapped.
Actuator Electrical Continuity: If the power locks are unresponsive, check for voltage at the actuator connector. Using a multimeter, verify you have 12V DC during the “lock” and “unlock” signal pulses. If voltage is present but the actuator is silent, the solenoid internal winding is likely open-circuit.
Latch Pawl Seizure: Over time, the internal lubricants turn into a thick, gummy sludge that prevents the pawl from snapping back into the “locked” position. Spraying a penetrating solvent like PB Blaster into the latch mechanism (while the door is open) can often revive a seized assembly. Follow this with a dry silicone lubricant once the mechanism is freed.
* Exterior Handle Linkage: Sometimes the exterior handle’s thumb-lever adjustment is the culprit. If the handle has excessive free-play, it may not be pulling the rod high enough to clear the safety catch. Check the plastic adjustment nut on the threaded end of the rod.
For the 1998 GMT400 series, the door striker torque specification is approximately 25 lb-ft. Ensure that any replacement Torx fasteners are grade 8 or equivalent to withstand the cyclic load of the door movement.
1998 Chevy Silverado Door Latch Assembly Diagram Questions Answered
Is the door latch assembly for the driver side compatible with the passenger side?
No. The latch assemblies for the GMT400 platform are side-specific due to the orientation of the exterior handle linkage and the location of the lock cylinder actuator. Attempting to force an incorrect side unit will prevent the rods from aligning with the handle levers.
Do I need to remove the window glass to replace the latch assembly?
In most cases, you do not need to remove the window glass. However, you must ensure the window is in the fully “up” position to provide maximum clearance within the door cavity. If you have an extended cab model, accessing the rear-access door latch may require slightly more disassembly of the upper door hinge area.
What is the most common cause of the door latch sticking in cold weather?
The most common cause is moisture entrapment within the latch housing combined with old grease. As temperatures drop, the moisture freezes within the pawl mechanism, preventing it from pivoting. A thorough cleaning of the assembly and the application of a low-temperature-rated synthetic lubricant are recommended for vehicles operating in cold climates.
Can the nylon clips be bought separately from the latch?
Yes. While many parts stores will try to sell you the entire latch assembly, the plastic linkage clips are available as a “door linkage retainer kit.” This is significantly cheaper and is often all that is required to fix a loose linkage rod. Always check your rod diameter, as there are two common sizes used on the 1998 models.
Should I lubricate the latch with WD-40?
Do not use standard WD-40 as a permanent lubricant. It is a water displacer and solvent, not a long-term lubricant. It will wash away existing grease and leave the mechanism unprotected once it evaporates. Use a dedicated white lithium grease or a specialized dry silicone spray intended for heavy-duty automotive hardware.
Step-by-Step Guide to Understanding the 1998 Chevy Silverado Door Latch Assembly Diagram
Recommended Best Deal Products


Identify – Verify the latch component part number against the diagram to ensure system compatibility.
Locate – Remove the interior door panel to expose the latch assembly structure within the inner door frame.
Reference – Use the diagram to map the rod routing and verify the placement of all retaining clips.
Connect/Route – Secure the rods to the latch claw and perform a dry-run check of the handle movement.
Verify – Cycle the lock cylinder and handle multiple times to ensure the assembly operates smoothly without binding.
Troubleshoot – If the door fails to latch, adjust the rod threaded ends per the diagram’s specified configuration.