2017 Ram 1500 Headlight Bulb Replacement, Upgrades, and Diagnostic Solutions Guide in 2026
The 2017 Ram 1500 occupies a unique transitionary space in the fourth-generation platform’s lifecycle, featuring an intricate and highly variable automotive lighting architecture.
Depending on the exact trim configuration—ranging from the base Tradesman to the premium Laramie, Longhorn, and Rebel packages—Fiat Chrysler Automobiles (FCA) equipped the vehicle with one of three entirely distinct headlamp assemblies. Because of this structural fragmentation, there is no single, universal headlight bulb size for the 2017 Ram 1500.
The electrical systems managing these lights are heavily monitored by the vehicle’s Body Control Module (BCM) via the Controller Area Network bus (CANbus). This digital oversight makes the 2017 model notoriously hostile to aftermarket lighting modifications, frequently resulting in severe LED flickering, dashboard warning codes, or total circuit lockouts.
Beyond digital hurdles, the factory physical wiring harness is plagued by a well-documented thermal flaw that causes the electrical connectors to melt, creating dangerous shorts and disabling the forward illumination.
This exhaustive report synthesizes factory specifications, independent photometric testing, and advanced diagnostic protocols to provide an authoritative resource for identifying, upgrading, and repairing the 2017 Ram 1500 headlight ecosystem.
Decoding the Ram 1500 Headlight Housing Architecture
The foundational step in resolving any lighting concern on the 2017 Ram 1500 is accurately identifying the installed headlamp assembly. Purchasing a replacement bulb based solely on the vehicle’s year and make will invariably lead to fitment errors if the specific housing geometry is not verified. FCA utilized three primary architectures, each dictating a unique bulb ecosystem and electrical connector layout.
The Dual Beam (Reflector Style) assembly represents the entry-level configuration. It is characterized by a single, large parabolic reflector bowl. This system relies on a dual-filament bulb to manage both low and high-beam functions; when the driver engages the high beams, the vehicle mechanically switches power to a secondary, higher-wattage filament within the same glass envelope.
The Quad Beam (Reflector Style) is the most prevalent configuration, commonly found on the Express, SLT, and Big Horn trims. It is visually identifiable by two distinct, clear circular reflector bowls housed within the single headlamp casing. This design separates the lighting duties, utilizing one dedicated bulb for the low beam and an entirely separate bulb for the high beam.
The Projector Headlight assembly represents the premium tier, factory-installed on higher-end trims such as the Sport, Laramie, Limited, and Rebel. Instead of a wide, scattered reflector bowl, this housing features a convex glass sphere—the projector lens—that tightly focuses the light output into a precise, sharp beam pattern with a strict upper cut-off line. These housings utilize specific single-filament bulbs and often incorporate unique factory wiring harnesses equipped with integrated CANbus parameters.
Comprehensive 2017 Ram 1500 Bulb Size Matrix
The structural variations across the trim levels necessitate a precise understanding of the corresponding bulb part numbers. It is critical to note a mid-generation manufacturing shift: while 2013 to 2015 Ram 1500s equipped with projector housings utilized the 9012 (HIR2) bulb for the low beam,
FCA transitioned the 2016 through 2018 models to utilize the 9005 (HB3) bulb for both the high and low beams within the projector housings. Referencing outdated sizing charts will result in the purchase of an incompatible 9012 bulb.
| Lighting Position | Dual Reflector Housing | Quad Reflector Housing | Projector Housing (2016-2018) |
| Low Beam Headlight | H13 (9008) | H11 | 9005 (HB3) |
| High Beam Headlight | H13 (9008) | 9005 (HB3) | 9005 (HB3) |
| Fog Light (Horizontal) | 9005 / 9145 (H10) | 9005 / 9145 (H10) | 9005 / 9145 (H10) |
| Fog Light (Vertical) | 9006 (HB4) | 9006 (HB4) | 9006 (HB4) |
| Front Turn Signal | 3157 / 3157NA | 3157 / 3157NA | 3157 / 3157NA |
| Side Marker Light | 3157 | 3157 | 3157 |
Auxiliary and Rear Lighting Specifications
Maintaining optimal visibility extends to the rear and interior environments of the vehicle. The Ram 1500 utilizes a highly standardized set of bulbs for these auxiliary functions, minimizing the complexity seen in the forward lighting. The reverse lights, cargo bed illumination, and center high-mount stop lights (CHMSL) uniformly rely on the 921 bulb size.
The primary brake and tail light functions are managed by the versatile 3157 dual-filament bulb. Within the cabin, interior illumination heavily utilizes the 194 bulb for map and glove box lighting, while the larger 578 (interchangeable with 212-2) bulb powers the central dome overhead light.
The Ram CANbus Dilemma: Rectifying LED Flicker and Bulb Rejection
A primary objective for many Ram 1500 owners is replacing the dim factory halogen bulbs with high-intensity light-emitting diodes (LEDs). However, the electrical architecture of the 2017 Ram 1500 actively resists this modification due to the strict voltage and current monitoring executed by the CANbus system.
Factory halogen bulbs operate via a physical filament that draws a high, predictable electrical load—typically 55 watts for a standard low beam. The BCM continuously monitors this circuit resistance to verify that the bulb is functioning. Modern LED technology is immensely efficient, often drawing between 15 and 30 watts to produce vastly superior light output.
When an LED is installed, the BCM registers the drastically reduced power consumption as an anomaly, assuming the circuit has been severed or the halogen filament has failed.
In response, the vehicle’s diagnostic software will trigger a persistent “Bulb Out” error on the instrument cluster. More problematically, the BCM employs Pulse Width Modulation (PWM), rapidly sending fragmented bursts of electricity to the headlight circuit to test for a connection.
Halogen bulbs are too slow to react to these micro-pulses, remaining steadily lit. LEDs, however, react instantly, resulting in a rapid, highly distracting strobe or flickering effect. In extreme cases, the BCM will completely sever power to the circuit to prevent perceived electrical damage.
Physical Remediation: Load Equalizing Resistors
The traditional aftermarket solution to CANbus rejection involves installing physical load equalizers, commonly referred to as resistors. These ceramic or aluminum blocks are spliced in parallel into the headlight wiring harness between the factory plug and the new LED bulb.
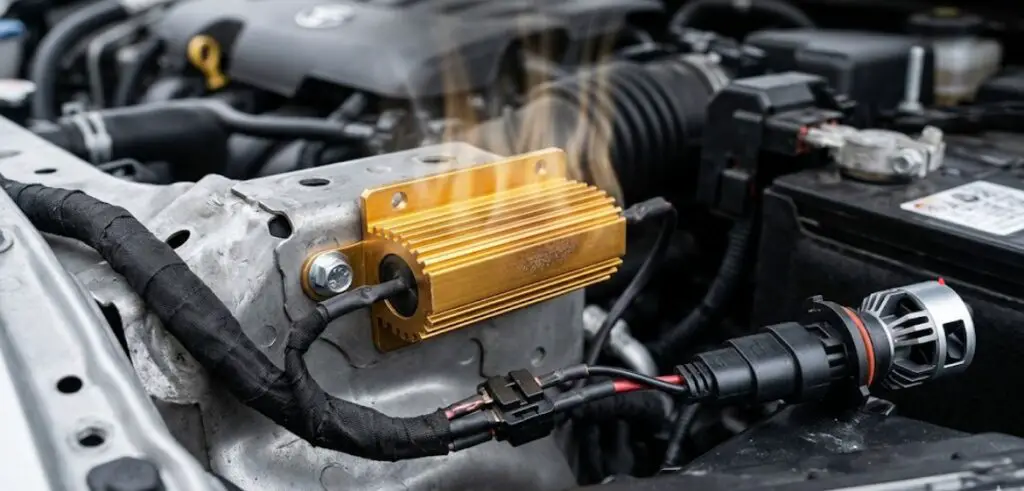
The resistor artificially consumes the “missing” electrical wattage and dissipates it as thermal energy, effectively tricking the BCM into believing a factory 55-watt halogen bulb is still operating.
While this resolves the flickering, resistors introduce immense localized heat into the engine bay—often reaching temperatures capable of melting nearby plastics—and must be securely mounted to a bare metal chassis component.
Digital Remediation: AlfaOBD Programming
A vastly superior, diagnostic-level solution exists that bypasses the need for hazardous physical resistors. Through the use of a diagnostic application known as AlfaOBD, owners can directly interface with the Ram’s BCM software. When paired with a compatible Bluetooth OBD-II scanner (such as the OBDLink MX+), the application provides access to the “Active Diagnostic” module.
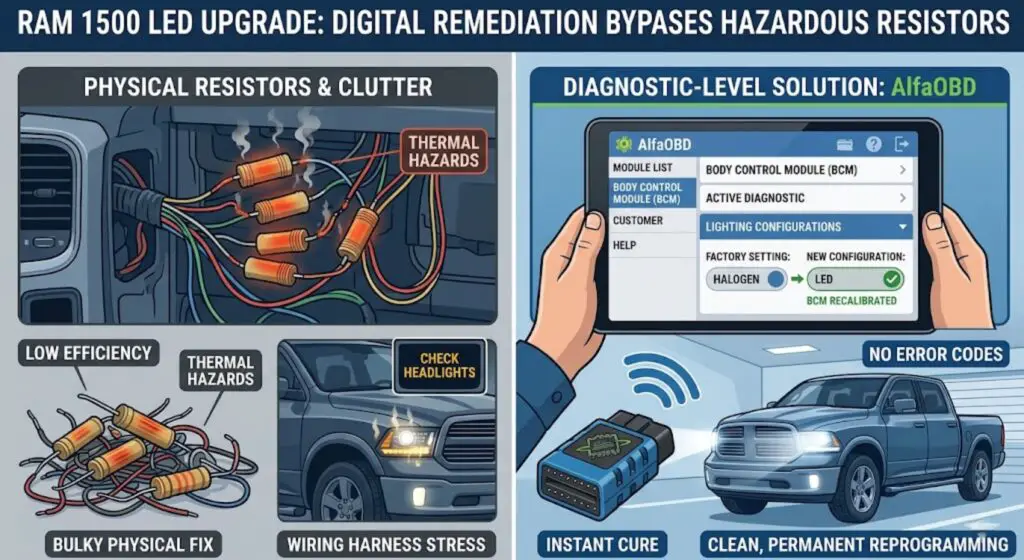
Within this digital interface, the vehicle’s inherent body parameters can be permanently reprogrammed. By navigating to the lighting configurations, the BCM can be instructed to switch from the factory “Halogen” setting to the “LED” configuration.
This software adjustment recalibrates the expected voltage thresholds, allowing the BCM to accept the low power draw of the LEDs natively. This instantly cures all flickering and dashboard error codes without introducing physical clutter or thermal hazards into the wiring harness.
Addressing the Melted Headlight Wiring Harness Flaw
Perhaps the most severe and dangerous vulnerability within the 2009-2018 Ram 1500 generation is the degradation of the factory headlight jumper wiring harness. Owners frequently encounter a scenario where a headlight ceases functioning, but inserting a brand-new bulb yields no result.
Further physical inspection of the housing reveals that the plastic electrical connector attaching to the rear of the bulb has severely discolored, cracked, or melted into a charred, deformed mass.
This catastrophic failure is a byproduct of high electrical resistance and thermal overload. The factory assembly utilized an 18-gauge wire that is marginally undersized for the prolonged thermal and electrical demands of the 55-watt and 65-watt halogen bulbs used across the Ram platform.
As the vehicle ages and the connector faces thousands of heating and cooling cycles, the metal terminals begin to oxidize and loosen. This microscopic separation creates immense electrical resistance, which physics dictates must be converted into localized heat.
Once this process begins, it cascades quickly, melting the plastic housing and presenting a severe fire hazard and the potential for broader engine bay electrical failure.
Industry protocol strictly dictates that a melted socket must never be ignored, reused, or cheaply spliced. Fortunately, a complete, expensive headlamp assembly replacement is unnecessary. FCA released an official Mopar replacement jumper wiring harness to rectify this specific thermal defect.
| Wiring Harness Specifications | Part Details |
| Official Mopar Part Number | 68193062AB |
| Superseded Part Number | 68193062AA |
| Aftermarket Equivalent | Dorman 926-384 |
| Platform Compatibility | 2009-2018 Ram 1500, 2500, 3500; 2019-2024 Classic |
Executing this repair requires a 10mm socket, needle-nose pliers, and a small flathead screwdriver to disengage the factory clips. Replacing the high-resistance factory harness permanently rectifies the thermal overload vulnerability.
Transitioning the vehicle to a high-quality LED bulb immediately after replacing the harness extends the lifespan of the new connector indefinitely, as the LED’s significantly lower electrical draw eliminates the thermal stress placed on the wiring.
Advanced LED Upgrade – Photometric Performance
For operators aiming to maximize the 2017 Ram 1500’s forward visibility, the aftermarket presents a vast array of LED replacements. However, selecting a bulb is a delicate balance of lumen output, thermal management, color temperature, and housing compatibility. High-tier bulbs utilize active cooling solutions (turbo fans) or advanced thermal separation technology to pull heat away from the diodes, preventing premature failure.
| Brand & Model | Tested Brightness (Lumens/Set) | Color Temperature | Cooling Architecture | Estimated Cost |
| Lasfit LS Plus | 13,000 LM | 6000K | Dual Heat Pipe + Turbo Fan | $129.00 |
| GTR Lighting Ultra 3 | 9,400 LM | 5750K | Aviation Aluminum + Active Fan | $259.00 |
| Morimoto 2Stroke 4.0 | 5,200 LM | 5500K-5800K | Passive Aluminum Heatsink | $240.00 |
| Diode Dynamics SL2 Pro | 3,600 LM | 5600K | Thermal Separation + Fan | $219.00 |
Photometric Dynamics in Ram Housings
The optical behavior of an LED changes drastically depending on whether it is fired into a Quad Reflector or a Projector housing. Independent photometric testing indicates that the GTR Lighting Ultra 3, boasting high sustained intensity and a 5750K crisp white output,
provides a measurable advantage in forward lux (usable light throw) when installed in the Ram’s large reflector applications. The raw power of the Ultra 3 successfully overcomes the optical scatter inherent in large reflector bowls.
Conversely, the Morimoto 2Stroke 4.0 prioritizes strict beam refinement over raw lumen output. Its optical precision makes it highly desirable for the Ram’s Projector housings, where exact diode focal points are required to maintain a sharp, clean cutoff line that prevents blinding oncoming drivers.
Furthermore, color temperature plays a critical role in human visual contrast and inclement weather performance. Original Equipment Manufacturer (OEM) LEDs on modern luxury vehicles are strictly engineered to sit between 5000K and 5500K, offering pure white light that maximizes contrast against dark asphalt without blue degradation.
Premium aftermarket options like the GTR Ultra 3 and Diode Dynamics SL2 Pro target the 5600K-5750K range, optimizing visual acuity while actively avoiding the illegal and visually fatiguing 6500K+ blue spectrums common in inexpensive, non-compliant imported bulbs.
Step-by-Step Headlight Assembly Removal Protocol
Accessing the headlight bulbs on a 2017 Ram 1500 is notably more complex than on older truck platforms. The front fascia relies on tightly overlapping aerodynamic tolerances, necessitating the partial removal of the primary front grille and the manipulation of the inner wheel well splash liners to fully extract the headlight assembly.
The extraction protocol begins under the hood. The top radiator support is shielded by a plastic aerodynamic cover secured by six plastic push-rivets. These rivets must be carefully extracted using a specialized trim tool to prevent fracturing the plastic. Beneath this shield, the superior edge of the main grille assembly is anchored by four 8mm bolts.
Once unbolted, the grille requires a firm, localized outward pull to disengage its lower friction retaining clips, allowing it to be completely removed from the fascia.
The secondary anchor point for the headlight assembly is hidden behind the vehicle’s fender. Operating inside the front wheel well, a single push-pin must be removed to fold back the inner splash liner. Reaching deep into this dark cavity reveals a specialized white plastic locking lever mechanism. This lever must be pushed upward vertically to release the rear mechanical grip on the headlight pod.
Returning to the front of the vehicle, the headlight assembly is now held only by two 10mm bolts. One bolt is easily accessible at the top, while the second is recessed deeply at the bottom edge, necessitating a long socket extension. With the hardware removed, the entire headlight housing can be pulled forward.
The primary power harnesses must be decoupled by depressing the red safety locking tabs and pulling firmly on the pods. Removing the rear circular dust cover grants final access to the bulb. When installing the new halogen or LED bulb, absolute care must be taken to never touch the glass capsule or LED diodes with bare skin, as biological oils will create microscopic thermal hot spots that severely degrade the bulb’s lifespan.
Geometric Precision: The 25-Foot Aiming Standard
A frequent, highly dangerous consequence of upgrading to LED bulbs or modifying the suspension geometry of a Ram 1500 is misaligned headlight trajectory. Misaligned high-output LEDs, particularly when installed in Quad reflector housings, will aggressively blind oncoming traffic and dramatically reduce the driver’s own effective visibility distance. Re-aiming the headlights is a strict geometric process governed by Department of Transportation (DOT) testing standards.
The universal alignment baseline utilized by inspection stations is known as the 25-Foot Rule. The vehicle must be positioned on a perfectly flat surface exactly 25 feet away from a blank, non-gloss white aiming wall or garage door. The tires must be inflated to factory specifications, and the vehicle must be unloaded of any heavy cargo that would artificially squat the rear suspension and elevate the front beam.
The vehicle is pulled flush against the wall to mark the exact horizontal and vertical center of the light beam using masking tape, establishing the baseline X and Y axis. The truck is then reversed in a perfectly straight line until the front face of the headlamps is precisely 25 feet from the wall. The physical aiming adjustment screws on the 2017 Ram 1500 headlight housings are accessed from above the engine bay via a long T20 Torx driver or a 7mm socket.
At a distance of 25 feet, the distinct cut-off line (the brightest top edge of the low beam pattern) must drop to prevent glare. Automotive industry standards dictate that the peak of the beam should rest between 2 to 4 inches below the original horizontal center height mark established on the wall.
It is also standard practice to adjust the driver’s side headlight fractionally lower than the passenger side to further protect oncoming traffic in the opposing lane. If the physical adjustment screw reaches its mechanical limit before achieving the required downward angle, the seating of the headlight assembly against the fender or the precise locking of the LED bulb within the socket collar must be re-evaluated.
Navigating the Body Control Module (BCM) Lockout
Occasionally, even after replacing a blown bulb, installing a new wiring harness, or establishing an LED CANbus bypass, a headlight will stubbornly refuse to ignite. This is a symptom of a protective software lockout within the BCM.
The BCM functions as the central nervous system for the Ram’s chassis and exterior electrical components. When the BCM detects a sustained, critical fault in a lighting circuit—such as a dead short caused by a melted connector—it will digitally isolate and disable that specific circuit to prevent widespread electrical fires. Replacing the physical hardware will not restore power until the BCM is cleared of the deep-level error state.
Executing a hard reset of the BCM requires purging the vehicle’s capacitive memory reserves. The standard diagnostic protocol involves turning off the ignition, ensuring all doors are closed, and removing the negative battery cable followed by the positive cable.
Touching the two removed battery cables together (while keeping them far away from the actual battery terminals) instantly discharges the latent energy stored in the BCM’s internal capacitors, clearing the volatile memory and erasing the temporary lockouts.
Alternatively, locating the specific BCM communication fuses within the Total Integrated Power Module (TIPM) under the hood and pulling them for 60 seconds can force a module reboot. If the lights fail to actuate post-reset, an advanced OBD-II scan tool must be deployed to manually clear the persistent body-level diagnostic trouble codes (DTCs).
Questions (In-Depth FAQ)
What is the difference between 9012 and 9005 in Ram projector headlights?
FCA altered the internal geometry of the premium Projector headlight housings mid-generation. Ram 1500 models manufactured from 2013 to 2015 require the 9012 (HIR2) bulb for the low beam. For the 2016 to 2018 model years, including the 2017 model, the factory specification was changed to the more common 9005 (HB3) bulb.
Can I put LED bulbs in my factory reflector housings?
Yes, but strict caution is required. While LEDs physically fit into the Dual and Quad reflector housings, installing inexpensive LEDs without proper focal point engineering will cause severe light scatter, blinding oncoming traffic. Only high-tier LEDs engineered specifically to mimic the halogen filament placement (such as the GTR Ultra 3) should be utilized in reflector bowls to maintain a safe, downward-angled beam pattern.
Why does my new Ram 1500 headlight bulb still not turn on?
If a brand-new bulb fails to illuminate, the primary suspect is a melted 18-gauge factory wiring harness connector, which physically breaks the electrical circuit. If the wiring is pristine, the Body Control Module (BCM) has likely placed a software lock on the circuit due to a prior fault code, requiring a capacitive battery discharge or an OBD-II code clearing to restore power.
How much does it cost to replace a 2017 Ram 1500 headlight bulb?
If utilizing a dealership or independent repair facility, the average cost for a 2017 Ram 1500 headlight bulb replacement ranges between $187 and $233. This breaks down to approximately $90 for premium OEM halogen parts and $98 to $143 for labor, as the complex extraction of the grille and headlight assembly requires significantly more billable time than a standard vehicle. Executing the replacement personally reduces the cost to merely the price of the bare bulb (typically $20 to $40 for halogen, or $100+ for premium LED sets).

![Ram Truck Running Boards [2026]](https://truckguider.com/wp-content/uploads/2026/03/featured-7beddc31-768x768.webp)
![Ram Trx Top Speed Without Limiter [2026]](https://truckguider.com/wp-content/uploads/2026/03/featured-cb0fbb5b-768x432.webp)
![RAM 1500 Power Running Boards [2026]](https://truckguider.com/wp-content/uploads/2026/03/ram-1500-power-running-boards-featured.webp)