6.7 Cummins Oil Pressure Sensor Location: A Detailed Identification And Replacement Guide
Maintaining the health of a 6.7 Cummins engine requires vigilant monitoring of vital fluids, but few things are more alarming than seeing your oil pressure gauge drop to zero while hauling a heavy load. This sudden loss of indicated pressure often triggers an immediate sense of dread for diesel owners, as oil is the lifeblood of the high-torque B-series engine. However, before assuming a catastrophic internal failure, it is essential to investigate the most common culprit: the oil pressure sensor. This small electronic component is a frequent failure point that can lead to unnecessary panic or, conversely, mask a genuine mechanical catastrophe if not addressed promptly. In this guide, we will pinpoint the exact 6.7 Cummins oil pressure sensor location, outline the symptoms of failure, and provide a technical walkthrough for replacement to get your truck back on the road.
Pinpointing the 6.7 Cummins Oil Pressure Sensor Location on Your Engine
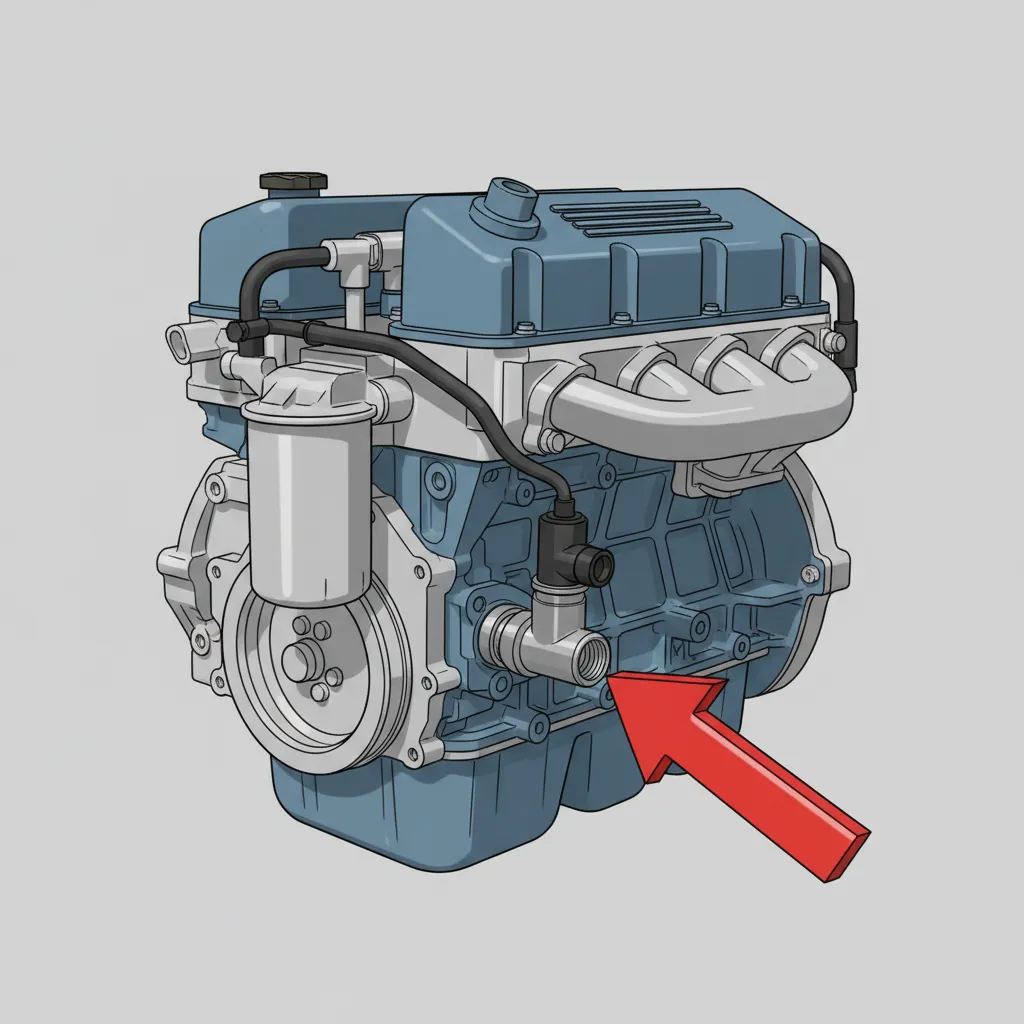
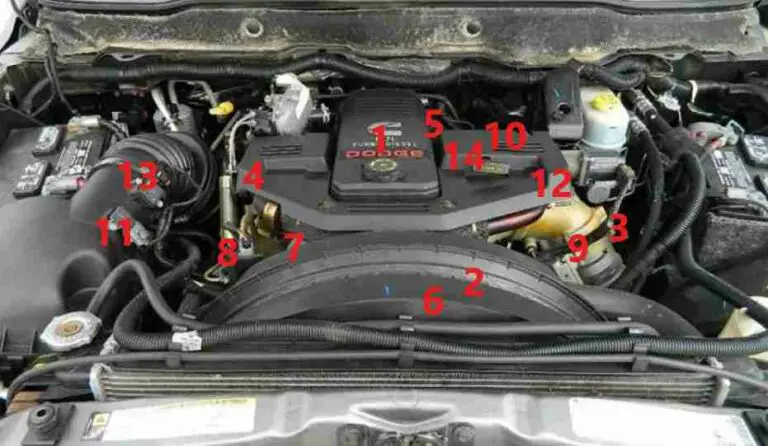
For many owners, the first challenge is simply finding the unit. The primary oil pressure sensor is situated on the driver’s side of the engine block, typically tucked behind the Electronic Control Module (ECM) and nearby the oil filter housing. On the official guide for B-series architecture, the sensor is positioned to tap directly into the main oil gallery to provide the most accurate real-time data to the vehicle’s computer. On most RAM 2500 and 3500 models, you can find the sensor mounted into the block just above the oil pan rail, though its visibility is often obscured by the complex web of wiring harnesses and fuel lines serving the high-pressure common rail system.
Model Year Variations
While the general location has remained within a 6-inch radius across three major engine refreshes, the surrounding topography changes significantly. For 2007.5–2012 models, the sensor is often more accessible from the top of the engine bay if you remove the intake horn. However, 2013+ models equipped with more complex emissions equipment and revised cooling paths often have much tighter clearances. In these newer trucks, reaching the sensor from the top is nearly impossible without significant disassembly.
To identify the part, look for a three-wire connector plugged into a brass or stainless steel hex-head component threaded into the block. The sensor usually features a 1-1/16 inch (27mm) hex size. It is critical to distinguish between the sensor and the switch; some early 6.7 configurations or industrial variants utilized a simple ‘on/off’ switch (which only triggers a light when pressure is dangerously low), while most RAM applications use a variable transducer to communicate actual PSI fluctuations to the ECM. For example, a 2010 RAM 2500 may show the sensor tucked behind the fuel filter housing, whereas a 2019 RAM 3500 moves some of the available clearance further back toward the firewall, making the wheel-well approach the only convenient option.
Identifying Symptoms of a Failing 6.7 Cummins Oil Pressure Sensor
Diagnosing a faulty sensor correctly is the difference between a $60 repair and an unnecessary $3,000 engine tear-down. The most common symptom is the “Check Gauges” chime on the instrument cluster, followed by the oil pressure needle dropping to zero at idle. This often happens once the engine reaches operating temperature, as the sensor’s internal resistance changes with heat. Within the RAM community, owners frequently report erratic gauge behavior where the pressure fluctuates rapidly between 20 and 80 PSI despite consistent engine RPMs.
Before assuming the sensor is the only issue, listen for audible “ticking” or “clattering” from the top end of the engine. If the engine remains quiet despite a ‘0 PSI’ reading, it likely points to a sensor fault. If the engine is noisy, shut it off immediately; you may have a failed oil pump or a spun bearing.
False low-pressure warnings can also trigger a “limp mode” in some model years. The ECM monitors the sensor signal voltage, which typically ranges from 0.5V at 0 PSI to 4.5V at maximum pressure. If the sensor’s internal diaphragm ruptures, oil can leak through the electrical connector body—a physical sign of failure that is unmistakable. Research indicates that sensor failure is one of the top five electrical issues for Cummins engines with over 150,000 miles, making it a “when, not if” repair for high-mileage drivers.
By The Numbers
Average Replacement Cost
DIY Minutes to Complete
Required Socket Size
Step-by-Step Guide for Oil Pressure Sensor Replacement
Replacing the sensor is a manageable DIY task for most owners. While you could pay a trusted local mechanic to handle it, following these steps will save you significant labor costs. The average DIY replacement time is 45-90 minutes depending on the specific vehicle trim and your familiarity with the engine bay.
📋
Step-by-Step Guide
Park on level ground and disconnect the negative battery cables. Since you will be working nearby the ECM and main wiring harness, preventing electrical shorts is paramount.
Jack up the driver’s side and remove the front wheel. Removing the inner fender liner provides the most direct and accessible path to the side of the engine block where the sensor resides.
Use a 1-1/16 inch deep oil pressure socket. Unclip the weather-pack connector, unscrew the old unit, and quickly thread the new sensor in by hand to minimize oil loss. Torque to 15-18 ft-lbs.
A specialized oil pressure rail socket is superior to a standard deep socket because it features a thinner wall and a shape designed to grip the hex without putting pressure on the plastic electrical connector body. If space is tight, use a long extension and a swivel joint to reach the sensor without removing the intake horn.
Parts Procurement and Professional Service Options
When it comes to electronic sensors on a Cummins, the “buy once, cry once” philosophy applies. There is a significant difference between high-quality Ram specs for OEM components and cheap aftermarket alternatives. The 6.7 Cummins ECM is notoriously sensitive to voltage resistance. Using a genuine Cummins or Mopar sensor ensures the voltage calibration matches the ECM profile perfectly. Aftermarket sensors frequently provide “jumpy” readings or fail again within months.
Cost Analysis and Availability
OEM Mopar sensors typically retail for $55–$90, while a professional diesel shop will usually bill a minimum of one hour of labor. According to RepairPal data, the average total cost ranges from $80 to $160. Most local auto parts stores keep these sensors in stock because they are such a high-failure item in the heavy-duty trucking community. However, always use your VIN to verify the part number; sensors changed between the early CM2150 and the later CM2350 controllers. Common part numbers include 4921511 or 4326849, but these are not always interchangeable.
✅ Why Go OEM?
- Exact ECM voltage calibration
- Superior internal seal durability
- Precision-machined threads
- Plug-and-play weather-pack fit
❌ Aftermarket Risks
- Inaccurate pressure readings
- Short lifespan (heat sensitivity)
- Risk of internal oil leaks
- Potential to trigger “Limp Mode”
If you replace the sensor and the erratic readings persist, the issue likely lies in the wiring harness. The harness serving the sensor can become frayed where it rubs against the engine block or the fuel lines. In this case, visiting a trusted local diesel specialist is the best course of action to perform a pin-out test on the ECM connector.
Conclusion
The 6.7 Cummins oil pressure sensor is a critical but often temperamental component. Located on the driver’s side block nearby the ECM and filter housing, it is the primary source of data for your dashboard’s vital signs. While faulty sensors frequently cause erratic gauge readings or “check gauges” lights without accompanying mechanical noise, they must be addressed to ensure you have a reliable warning system for actual oil loss. Replacement is a manageable DIY task requiring a 1-1/16 inch deep socket and about an hour of your time. If your oil pressure readings remain inconsistent after sensor replacement, contact a local diesel specialist to perform a mechanical pressure test immediately to protect your engine’s longevity.
Frequently Asked Questions
Can I drive my 6.7 Cummins with a bad oil pressure sensor?
While a bad sensor won’t physically damage the engine, it is risky. Without a functioning sensor, you cannot distinguish between a simple electrical glitch and a catastrophic loss of oil pressure. If the engine sounds normal and the oil level is full, you can typically drive to a nearby repair facility, but you should verify the pressure with a mechanical gauge as soon as possible.
What size socket do I need for the 6.7 Cummins oil pressure sensor?
You will need a 1-1/16 inch (27mm) deep-well socket. Many manufacturers produce a specialized ‘oil pressure switch socket’ that features a thinner wall and a specific depth to accommodate the plastic electrical connector without cracking it during the removal or installation process. Using a standard 12-point socket is discouraged as it may round the brass hex.
Does the 6.7 Cummins have an oil pressure switch or a sensor?
Technically, many 6.7 Cummins engines use a ‘switch’ that communicates with the ECM, which then ‘targets’ a specific pressure on your dashboard gauge based on engine load and temperature. This is why the gauge often stays in a fixed position. However, some heavy-duty or chassis cab versions utilize a true pressure transducer that provides real-time variable data to the community of gauges.
Will a faulty oil pressure sensor throw a code?
Yes, a failing sensor typically triggers Diagnostic Trouble Codes (DTCs) such as P0521 (Oil Pressure Sensor Range/Performance) or P0524 (Engine Oil Pressure Too Low). If the sensor fails completely, you might see P0522 or P0523, indicating low or high voltage at the sensor circuit. Scanning for these codes is a great way to confirm the sensor is the culprit.
Is it easier to reach the sensor from the top or bottom of the engine?
For most 6.7 Cummins owners, the easiest access point is through the driver’s side wheel well. By removing the plastic inner fender liner, you gain a straight line of sight to the block area behind the ECM. Reaching from the top is possible but requires removing the intake air horn and several wiring harness brackets, making it a much more labor-intensive available route.