Ram 1500 Exhaust Manifold Fix: 5.7L Hemi Bolts & Torques

A sharp, rhythmic ticking noise under the hood of a cold Ram 1500 almost always points to a failed exhaust manifold. On the popular 5.7L Hemi engine, mismatched thermal expansion rates between factory cast-iron manifolds and aluminum cylinder heads cause the iron to warp under severe heat cycles. This warping exerts immense shearing force on the rear mounting studs, snapping them flush with the head and blowing out the exhaust gasket.
While the cold-start tick often quiets down as engine heat temporarily expands the metal, ignoring the issue risks exhaust fumes entering the cabin, skewed oxygen sensor readings, and cylinder head surface erosion. Below, examine the mechanical causes behind this recurring defect, clear diagnostic criteria, safe extraction techniques for broken studs, and durable replacement strategies with proper installation specs.

Prime for Young Adults — 6 Months Free
Students and 18–24s get six months of Prime free, then half price.
Start 6 Months Free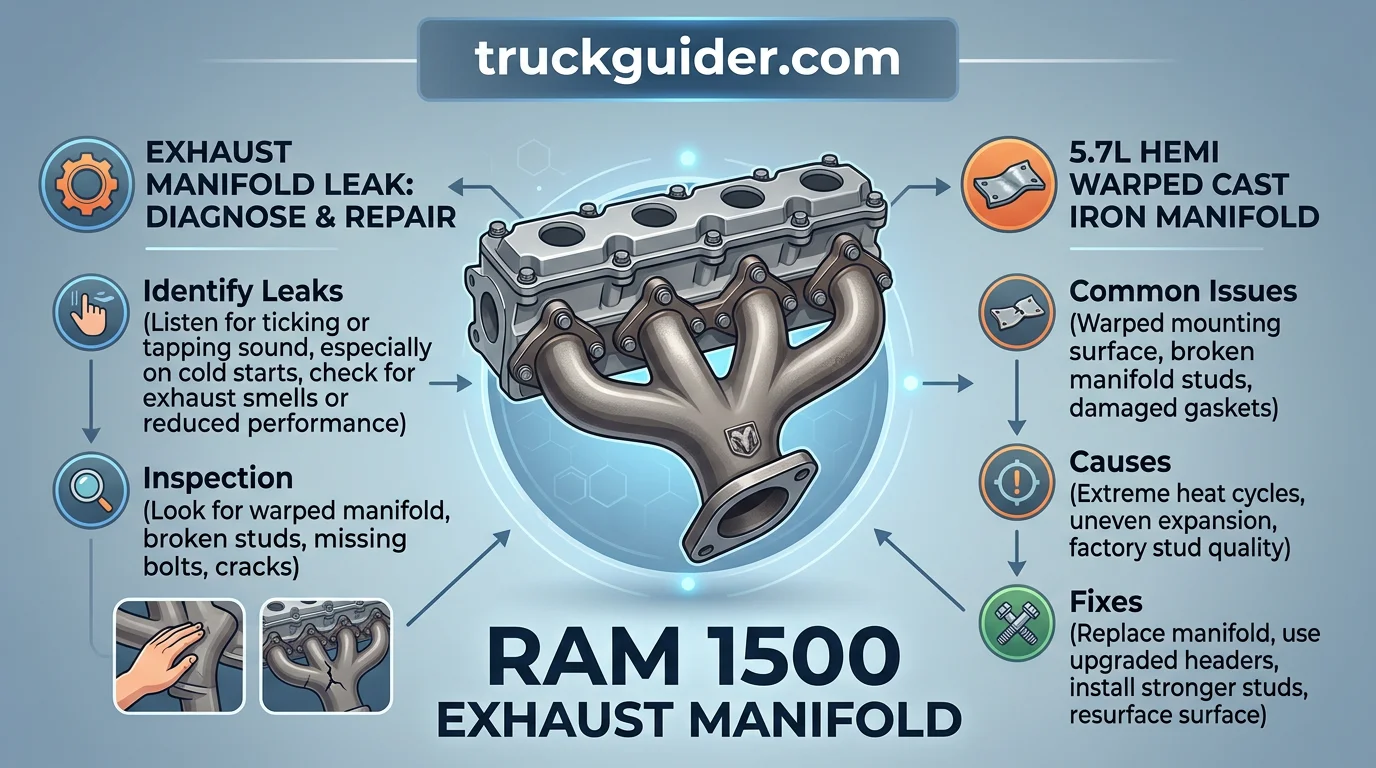
Ram 1500 Exhaust Manifold Anatomy and Core Operating Details
Recommended Best Deal Products


On the 5.7L Hemi V8, the exhaust manifold serves as the critical junction between the engine block and the exhaust system. The assembly bridges the four cylinder exhaust ports on each engine bank directly to the downstream catalytic converter and Y-pipe assembly.

Key Components of the Factory Manifold Assembly
The factory setup relies on a thick, contoured cast iron main body engineered to channel high-velocity exhaust pulses. Because cast iron offers high density, it dampens engine bay noise while managing extreme thermal loads across the cylinder bank.

Sealing the manifold to the engine is a multi-layer steel (MLS) exhaust gasket. This gasket cushions the physical mating surface between the cast iron runner flanges and the softer aluminum cylinder head ports, preventing high-pressure gas blowouts.
A stamped outer heat shield bolts directly over the top of the casting. This shield deflects radiant energy away from nearby components, including wire harnesses, fuel lines, the steering shaft, and the vehicle’s brake lines.
The entire assembly is secured to the aluminum head using dedicated steel mounting studs and bolts. These threaded fasteners pass through the manifold runners and heat shield, clamping the MLS gasket tight against the block.
Operating Temperatures and Exhaust Flow Paths
Under normal driving conditions, OEM exhaust manifolds face severe cyclical heating environments. Operating temperatures typically range between 800°F and 1,400°F, fluctuating rapidly depending on engine speed, throttle position, and external load.
During heavy operation, such as highway towing, spent exhaust gases exit the four cylinder head ports at roughly 1,200°F. These gases blast straight into the individual runners before converging inside the manifold’s central collector flange.
From the collector, the high-temperature stream discharges directly into the downpipe and catalytic converter. Managing these rapid temperature swings requires high structural stability across all four port junctions.

Audible — Listen Free for 30 Days
One free credit a month and thousands of titles included.
Listen Free for 30 DaysWhy the 5.7 Hemi Warps Manifolds and Shears Mounting Bolts
Thermal Expansion Mismatch: Cast Iron vs. Aluminum
The primary failure mechanism is differential thermal expansion between the cast iron manifold and the aluminum cylinder head. Aluminum expands and contracts at roughly twice the rate of cast iron during normal engine operating cycles.
As the engine cycles through heating and cooling, the rigid iron manifold tries to contract at a different rate than the head, bending the fasteners. This mismatch generates severe lateral shear stress against the mounting hardware instead of simple vertical clamping tension.
Over thousands of heat cycles, this continuous mechanical tug-of-war permanently warps the thick cast iron casting. The warped manifold curls upward at the ends, applying continuous, uneven leverage against the bolts.
The rear cylinder 7 and 8 bolt locations absorb up to 3/16 inch of cyclical thermal expansion scrub, shearing grade-8 equivalent factory studs over time.
Why Rear Cylinders 7 and 8 Suffer the Most Stress
Thermal movement is cumulative across the total length of the engine block. While front fasteners experience minimal movement, rear manifold bolts (especially near cylinders 7 and 8) bear the highest shear stress and break most frequently.
Rear exhaust bolts near cylinders 7 (driver side) and 8 (passenger side) experience the greatest accumulated displacement and snap first. These trailing positions absorb the compound expansion of the entire runner assembly as the metal pushes rearward.
Tucked close to the truck firewall, these rear cylinders also suffer from reduced airflow and retain elevated heat during heavy towing. This concentrated thermal cycling accelerates work hardening in the steel fasteners until they fatigue and snap.
Recognizing Ram 1500 Exhaust Manifold Leak Symptoms and Carbon
Recommended Best Deal Products


Identifying a compromised manifold early prevents further cylinder head erosion and poor engine performance. Physical wear manifests through predictable audio cues, telltale surface deposits, and computerized sensor adjustments.
Audible Premium Plus — Annual Membership
12 audiobook credits up front, plus the full Audible catalogue.
See Annual PlansAcoustic Hallmarks of a Cold Exhaust Leak
A cold-start ticking sound that diminishes or disappears as the engine warms up is the hallmark symptom of a warped Ram 1500 manifold leak. This sharp, rhythmic tapping syncs directly with engine RPM.
A loud ticking on cold morning startups that fades after 2 to 5 minutes of idling indicates a manifold leak that seals as parts expand. Thermal expansion temporarily closes the gap between the cast iron and aluminum head.
Visual Inspections: Soot Trails and Missing Fasteners
Physical evidence of exhaust gas escaping past the gasket appears as distinct carbon deposits. Inspect the cylinder 7 port with an inspection mirror to spot black powdery carbon soot tracing across the silver cylinder head flange.
Look for black soot deposits (carbon tracking) around cylinder head ports and broken bolt heads lying on the skid plate or frame rail. Sheared studs often drop directly beneath the rear cylinders due to extreme heat cycling.
Upstream Sensor Corruption and Fuel Trim Drops
The gap created by a warped flange does more than release exhaust pulses. The alternating high- and low-pressure waves pull fresh air directly into the exhaust tract through the opening.
Exhaust leaks upstream of the front O2 sensors can draw in outside air, causing false lean readings and rich fuel trims. Ambient oxygen fools the sensor into detecting an unburned fuel condition.
Because exhaust leaks upstream of upstream oxygen sensors draw ambient air into the exhaust stream, triggering false lean codes and increased fuel consumption, the engine computer compensates by dumping excess fuel into the cylinders.
Manifold Leak vs. Lifter Tick: Diagnostic Facts to Tell Them Apart
Temperature-Dependent Acoustic Behavior
Distinguishing between an exterior exhaust leak and catastrophic valvetrain failure prevents unnecessary and expensive engine teardowns. Many 5.7 Hemi owners panic after mistaking a cold exhaust manifold leak tick for the notorious Hemi camshaft/lifter failure.
Thermal response is the most reliable acoustic differentiator. An exhaust manifold tick is sharpest during an initial cold start. As combustion temperatures rise, the metal parts expand and close the gap, causing the exhaust tick to grow noticeably quieter or vanish entirely within minutes.
A damaged roller lifter behaves very differently. Hemi lifter and camshaft roller failure ticking persists regardless of engine temperature. The mechanical tapping often gets louder as the engine oil warms and thins out, which reduces hydraulic cushioning at the damaged cam lobe.
Do not overlook missing or broken heat shield fasteners when tracking down ticks. Loose or cracked heat shields can emit a lighter, tinny rattle under engine vibration that easily confuses diagnosis and mimics internal valvetrain noise.
Mechanic Stethoscope and Smoke Testing Techniques
Direct physical isolation quickly confirms the acoustic source. Placing an automotive mechanic’s stethoscope directly onto the cylinder head valve cover vs. touching the manifold flange clearly pinpoints the tick origin. Internal valvetrain damage resonates as a solid metallic knock, whereas an exhaust leak yields a sharp, raspy puff at the flange edge.
A low-pressure smoke machine provides visual verification on a completely cold engine. Introducing smoke into the tailpipe with the system sealed will push vapor out through sheared bolt gaps or cracked ports, verifying an exhaust leak before heat expansion occurs.
Extracting Sheared Ram 1500 Exhaust Manifold Bolts From the Cylinder
Recommended Best Deal Products


Broken bolts often snap flush or recessed inside the aluminum head, requiring precise extraction methods to avoid ruining the head threads. Never attempt to drill sheared bolts freehand. Drilling broken bolts freehand without a guide jig often skews off-center into the softer aluminum cylinder head, causing permanent casting damage.
Template Jig and Right-Angle Drilling Protocol
Confined clearance against the inner fender requires mounting a specialized right-angle drill guide fixture (template kit) bolted to adjacent factory threaded holes. This tooling aligns hardened steel drill bushings dead-center over the snapped shank.
Anchor the template plate to the head using two open, undamaged bolt holes. Thread the guide bushing securely over the sheared 8mm bolt location.
Using an alignment template jig with left-hand drill bits often catches the broken 8mm stud and spins it free during the pilot bore, avoiding extractor tools entirely.
If the bit does not back the shank out, step up through the jig’s larger guide bushings. Insert a fluted extractor into the centered hole to twist the shell out.
The MIG Welder Extraction Alternative
When bolts shear flat at the casting face, welding avoids drilling altogether. Disconnect the truck’s battery leads to safeguard sensitive engine control modules before striking an arc near the chassis ground.
Use the alternative MIG welding technique: build up a weld puddle on the broken stud, weld an oversized nut to the bead, and back the stud out while hot. Place a 3/8-inch or 7/16-inch nut over the hole to contain the molten filler wire.
The intense thermal shock from the arc instantly breaks the galvanic corrosion bond holding the steel threads inside the aluminum casting. Allow the glowing cherry metal to cool slightly before gently working a hand wrench back and forth to back out the fastener.
Repairing Stripped Cylinder Head Threads
If a bolt pulled threads out during extraction or a previous drill bit wandered off-center, restore the M8x1.25 hole using a solid steel threaded insert rather than a standard coiled wire spring.
Solid bushing inserts like Time-Sert mechanically lock into the cylinder head casting. Align the reamer square to the cylinder head exhaust port face, cut fresh outer receiver threads, and install the insert flush to maintain correct clamping load.
OEM Cast Replacements vs. Shorty Headers: Upgrade Insights
Evaluation of Replacement Manifold Paths
An OEM cast replacement manifold provides a direct factory design that maintains emissions compliance easily and bolts directly to existing hardware. However, a brand-new raw casting inherits identical thermal expansion vulnerabilities, remaining prone to recurring heat-cycle warping over time.
A machined or planed factory manifold offers an alternative repair path. Re-surfacing a previously heat-cycled factory manifold to flat specifications relieves internal casting tension, creating a seasoned component that is often more thermally stable than fresh cast units.
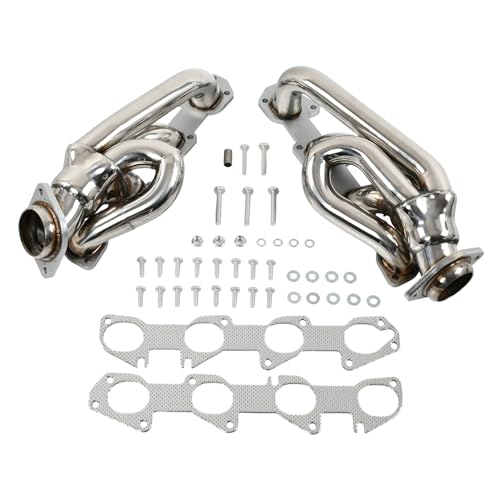
Aftermarket shorty headers are constructed from tubular stainless steel, typically utilizing 409 or 304 alloys with thicker mounting flanges. These tubular runners flex during thermal expansion, significantly reducing stress on cylinder head studs to minimize broken bolts.
How to Read Exhaust Upgrade Comparison Metrics
The comparison table contrasts the structural and legal properties of standard cast options against aftermarket tubular configurations. Base material classifications denote the structural rigidity and metallurgical behavior under high heat cycles. Ductile cast iron is dense and brittle, whereas 409 and 304 austenitic or ferritic stainless steel alloys accommodate cyclical thermal expansion without fracturing.
Flange thickness values directly determine sealing integrity along the cylinder head exhaust ports. Thick 3/8-inch laser-cut flanges resist bowing between port fasteners. Thermal compliance measures an assembly’s capacity to absorb linear expansion without exerting shear stress on mounting hardware. Finally, emissions approvals differ: while factory castings inherently retain full federal and CARB legality, stainless shorties require explicit Executive Order (EO) certification if installed in California-emissions jurisdictions.
Header Considerations: Emissions, Fitment, and Clearances
Stainless shorty headers with 3/8-inch laser-cut flanges dissipate heat faster than 15-pound OEM cast iron blocks. Because shorty configurations bolt directly to the downpipe junction, they preserve catalytic converter placement and factory oxygen sensor geometry.
Fitment clearances require careful inspection during header installation. Tubular geometries run closer to steering shafts, engine crossmembers, and chassis wiring looms than factory castings, demanding adequate physical clearance to protect sensitive engine bay components.
Proper Installation Guide: Torque Specs, Gaskets, and Heat Shields
Surface Preparation and Gasket Selection
Thoroughly clean the aluminum cylinder head mating surface down to bare metal using solvent and a plastic or brass scraper to eliminate all carbon buildup and corrosion. Always install new multi-layer steel (MLS) gaskets completely dry. Never apply RTV sealant, copper spray, or thread compounds to the gasket face, as high exhaust temperatures quickly burn these materials away, creating leak paths.
Never slap a new gasket onto a warped manifold; iron castings will not pull flat under bolt torque and will snap fresh studs. Simply installing a new gasket onto a warped manifold without flattening or replacing the manifold causes rapid leak recurrence.
Tightening Sequence and Torque Specifications
Fasteners must be tightened in a center-out spiral sequence to evenly distribute clamping pressure across the exhaust ports. Torque bolts in a center-out spiral pattern to factory specifications (typically 18–20 ft-lbs / 25 Nm) in two stages to prevent stress concentrations across the manifold body.
As a working procedure, torquing inner bolts to 10 ft-lbs first, then out to the rear corners, followed by a final pass at 18 ft-lbs guarantees uniform gasket compression. Once the manifold is torqued, secure the factory heat shield onto the designated outer studs using the retaining nuts.
Be vigilant to avoid overtightening replacement manifold bolts beyond factory torque specifications, which accelerates bolt fatigue under thermal cycling. Over-torquing cannot force an uneven surface flat; it simply overstretches the steel shank past its yield threshold, ensuring the fastener snaps as the aluminum cylinder head and cast iron manifold expand at differing rates during heat cycles.
Key Takeaways
-
✓
Uneven thermal expansion between aluminum cylinder heads and cast-iron manifolds routinely snaps rear bolts on cylinders 7 and 8, demanding critical engineering information to resolve permanently. -
✓
A cold-start tick that quiets down after engine warm-up confirms an exhaust leak, distinguishing it from constant mechanical valvetrain lifter failure. -
✓
Bolt extraction requires specialized alignment templates, induction heating, or welding extraction nuts to damaged studs without ruining cylinder head threads. -
✓
Upgrading to 409 or 304 stainless steel shorty headers provides lasting durability insights by dissipating heat faster and eliminating thermal shear stress. -
✓
Factory assembly specs require a two-stage spiral torque sequence from the center outward to exactly 18 ft-lbs (25 Nm) using multi-layer steel gaskets.
❓ Frequently Asked Questions
1
Why do Ram 1500 exhaust manifolds warp and break bolts so frequently?
The Ram 1500 5.7L Hemi combines aluminum cylinder heads with heavy cast-iron manifolds. Aluminum expands twice as fast under combustion heat. This differential thermal expansion exerts heavy lateral shear forces on the rearmost bolts, shearing them off and warping the manifold edges over repeated heat cycles.
2
What is the difference between exhaust manifold tick and Hemi lifter tick?
Critical diagnostic facts distinguish the two: manifold leaks tick loudly during cold starts and dissipate after several minutes as metal expands and seals gaps. In contrast, failing lifters and wiped camshaft lobes generate continuous, metallic, rhythmic tapping that does not fade when the engine reaches full operating temperature.
3
Is it better to install OEM cast manifolds or aftermarket shorty headers?
Performance insights favor 409 or 304 stainless steel shorty headers because their individual runner flanges flex independently, eliminating bolt shearing. While OEM cast iron is cheaper, it remains susceptible to recurring thermal warping unless planed completely flat and installed with high-grade aftermarket fasteners.
4
What are the torque specs for Ram 1500 exhaust manifold bolts?
Factory maintenance info requires an initial pass to 10 ft-lbs (14 Nm) starting from inner bolts outward, followed by a final pass to 18 ft-lbs (25 Nm). Exceeding these torque specs risks stripping soft aluminum cylinder head threads or pre-stressing bolts to premature failure.
5
Can I drive my Ram 1500 with a leaking exhaust manifold?
You can drive short distances, but prolonged operation causes hot exhaust gas erosion against cylinder heads, premature upstream catalytic converter failure, and faulty O2 sensor readings that cause rich fuel conditions. Promptly repairing the leak prevents expensive cylinder head resurfacing down the road.
6
Why does my Ram 1500 make a ticking noise on cold startup?
Explain that exhaust gas escapes past warped manifold flanges and broken rear bolts when cold, but the tick diminishes as heating metal expands and seals the gap.

![Dodge Ram Rear Window Replacement Cost [2026]](https://truckguider.com/wp-content/uploads/2026/03/featured-173365c3-768x768.webp)

![2007 Dodge Ram Headlights [2026]](https://truckguider.com/wp-content/uploads/2026/03/2007-dodge-ram-headlights-featured.webp)