Ram 1500 Serpentine Belt Diagram: Step-by-Step Instructions
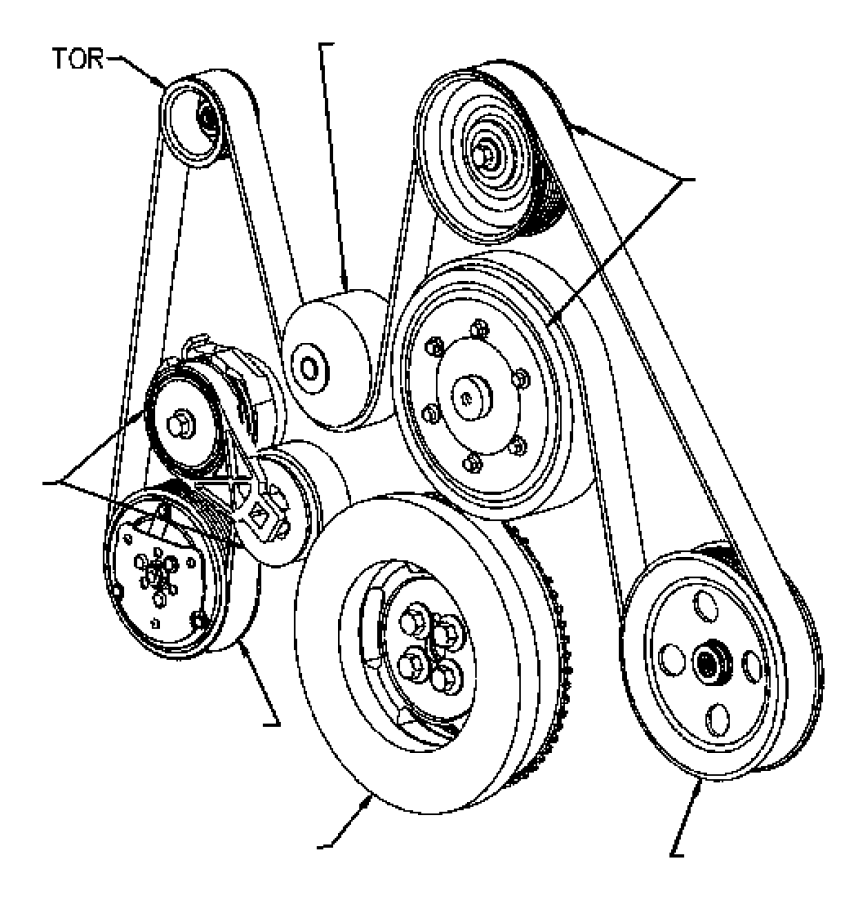
The serpentine belt on a Ram 1500 routes around the crankshaft, alternator, water pump, power steering, and A/C compressor. To install it, use a breaker bar to rotate the spring-loaded tensioner counter-clockwise, release the old belt, and thread the new one following the specific ribbed and smooth pulley path illustrated.
📌 Key Takeaways
- The diagram shows the precise routing path for the 4.7L and 5.7L Hemi engines
- The automatic tensioner is the key to releasing and applying belt pressure
- Misrouting the belt can lead to reverse water pump rotation and overheating
- Always check for rib alignment on every grooved pulley before starting the engine
- Use this diagram when replacing a worn belt or after repairing engine accessories
Navigating the engine bay of your truck requires precision, and having an accurate 2012 Ram 1500 serpentine belt diagram is the most critical tool in your arsenal when performing maintenance on your accessory drive system. Whether you are dealing with a routine inspection or an emergency roadside repair, understanding the specific routing of this long, winding belt is essential for restoring your vehicle’s functionality. A serpentine belt, often referred to as an accessory belt, is the single, continuous ribbon of reinforced rubber that drives multiple peripheral devices in your engine, including the alternator, power steering pump, water pump, and air conditioning compressor. This article provides an exhaustive look at the routing configurations for the various engine options found in this model year, ensuring you have the technical knowledge to identify every pulley, understand the tensioning mechanism, and successfully complete a replacement. By the end of this guide, you will be proficient in reading the diagram, identifying signs of wear, and executing a professional-grade installation.
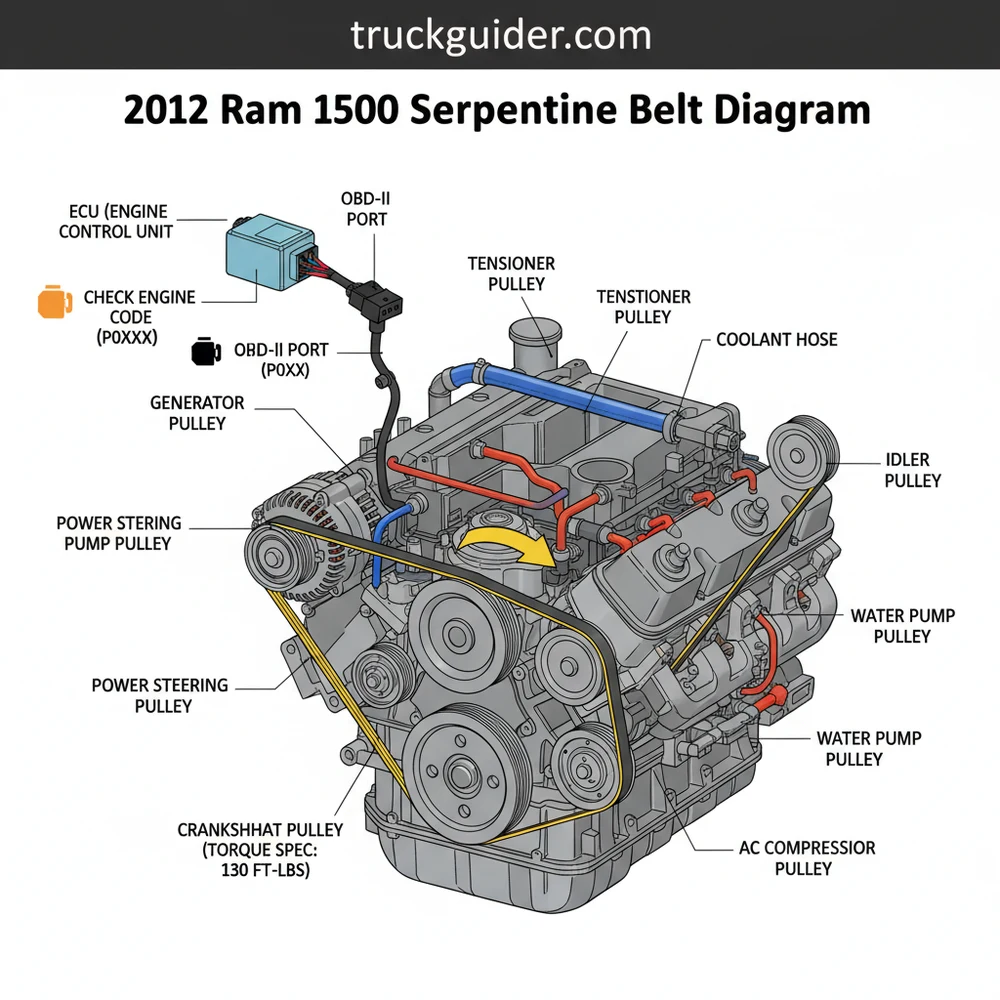
Decoding the 2012 Ram 1500 Serpentine Belt Diagram
The 2012 Ram 1500 serpentine belt diagram serves as a visual map of the “front end accessory drive” (FEAD). While the overall concept of a serpentine system is straightforward, the specific path the belt takes varies significantly depending on whether your truck is equipped with the 3.7L V6, the 4.7L V8, or the legendary 5.7L Hemi V8. Each of these engines utilizes a unique pulley arrangement designed to optimize space and ensure proper wrap-around for maximum friction.
When looking at a diagram, you will notice two types of circles representing pulleys: grooved and smooth. The grooved pulleys correspond to the ribbed side of the belt, while smooth pulleys interact with the flat, back side of the belt. On a 2012 Ram 1500, the crankshaft pulley is the largest at the bottom and serves as the primary driver. From there, the belt travels upward to the alternator, which converts mechanical energy into electrical power for the ECU and battery.
In the 5.7L Hemi configuration, the routing is particularly complex. The belt must navigate around the water pump to ensure consistent coolant flow, pass over the air conditioning compressor, and loop under the power steering pump. The tensioner pulley is usually located in a central or high position, acting as the spring-loaded gatekeeper that maintains the exact pressure needed to prevent slippage without snapping the belt. Understanding these specific points of contact is vital; even a single missed pulley in the routing sequence can lead to the belt being shredded instantly upon engine startup or, worse, causing the belt to spin components in the wrong direction.
Most 2012 Ram 1500 models feature an automatic spring-loaded tensioner. Unlike older vehicles that required manual adjustment via a sliding alternator bracket, these systems use an internal coil spring to apply constant pressure, making the 2012 Ram 1500 serpentine belt diagram even more essential as you must fight this spring pressure during installation.
Step-by-Step Installation Using the Diagram
To effectively use your 2012 Ram 1500 serpentine belt diagram for a replacement, you must approach the task with the right tools and a systematic plan. Replacing an accessory belt is a hallmark DIY project that saves significant labor costs but requires strict adherence to safety protocols to prevent injury or mechanical failure.
Required Tools and Materials
- ✓ 3/8-inch or 1/2-inch drive breaker bar or a dedicated serpentine belt tool
- ✓ Replacement serpentine belt (ensure it matches your engine size)
- ✓ Work gloves and safety glasses
- ✓ A flashlight or shop light to see deep into the engine bay
- ✓ Cleaning solvent and a rag for pulley maintenance
The Replacement Process
1. Safety and Preparation: Ensure the engine is completely cool to the touch. Working near the radiator and water pump can result in burns if the vehicle was recently driven. Disconnect the negative battery terminal as a safety precaution to ensure the engine cannot be cranked while your hands are near the pulleys.
2. Locate the Tensioner: Using your 2012 Ram 1500 serpentine belt diagram, identify the automatic tensioner. On the 5.7L engine, this is typically located on the passenger side of the engine block. It will have a square hole for a breaker bar or a hex bolt head. Identify which direction it needs to rotate to release tension (usually clockwise or counter-clockwise depending on the specific engine variant).
3. Relieve Belt Tension: Insert your breaker bar into the tensioner. Apply firm, steady pressure to rotate the tensioner arm. As the arm moves, the belt will go slack. While holding the tensioner in the open position, use your other hand to slide the belt off one of the upper, easily accessible pulleys, such as the alternator or an idler pulley.
4. Remove the Old Belt: Slowly release the tensioner back to its resting position. Carefully thread the old belt out from around the remaining pulleys. Be mindful of the cooling fan blades, which can be sharp and may obstruct the path of the belt.
5. Inspect the Pulleys: Before installing the new belt, spin each pulley by hand (except for the crankshaft). They should spin freely and quietly. If you hear grinding or feel “play” in the bearing, that component may need replacement. Use a rag to wipe away any oil or debris from the pulley grooves, as contaminants can cause a brand new belt to slip or squeal.
6. Route the New Belt: Referencing your 2012 Ram 1500 serpentine belt diagram, begin threading the new belt. It is often easiest to start at the bottom with the crankshaft pulley and work your way up. Leave the tensioner or a smooth idler pulley as the final step. Ensure the ribs of the belt sit perfectly inside the grooves of the pulleys.
7. Final Seating: Once the belt is routed according to the diagram, rotate the tensioner again to create the necessary slack. Slide the belt over the final pulley. Release the tensioner slowly, allowing it to take up the slack.
8. Verification: Double-check the entire path. Look at every pulley from the side to ensure the belt is centered and not hanging off the edge of any component. Once satisfied, reconnect the battery and start the engine, observing the belt’s operation for a few minutes to ensure there are no unusual noises.
Never place your fingers between the belt and a pulley. If the tensioner tool slips, the spring-loaded arm can snap back with enough force to cause severe injury. Always handle the belt at a point midway between pulleys.
Common Issues & Troubleshooting
A failing accessory drive system often provides several warning signs before total failure. The most common symptom is a high-pitched squealing noise, particularly during cold starts or when turning the steering wheel to full lock. This usually indicates a glazed belt or a tensioner that has lost its spring rate.
If the belt snaps entirely, your truck will experience an immediate loss of power steering, making the vehicle difficult to maneuver. Furthermore, because the belt drives the water pump on most 2012 Ram configurations, coolant flow will stop, leading to rapid engine overheating. The alternator will also stop charging the battery, which will eventually cause the ECU (Engine Control Unit) to shut down the vehicle due to low voltage.
When troubleshooting, check for these specific indicators:
- Fraying or Cracking: Small cracks across the ribs are common as a belt ages, but if pieces of the ribs are missing (chunking) or the edges are frayed, replacement is urgent.
- Check Engine Light: If the belt is slipping, the alternator may not provide consistent voltage. This can trigger a check engine light or a battery warning light on your dashboard.
- Diagnostic Codes: Using an OBD-II scanner can reveal codes related to system voltage. Codes like P0562 (System Voltage Low) often point toward a failing drive system or alternator.
- Fluid Contamination: If you see oil or coolant on the belt, it will degrade the rubber quickly. You must fix the underlying leak (often a water pump seal or timing cover gasket) before installing a new belt.
If you are struggling to find the 2012 Ram 1500 serpentine belt diagram under the hood (as the sticker often peels off over time), use a smartphone to take a photo of the current belt routing before you remove it. This serves as a fail-safe backup to the official diagram.
Tips & Best Practices for Drive System Maintenance
Maintaining the belt system on your 2012 Ram 1500 goes beyond just swapping the rubber. For long-term reliability, you should consider the entire accessory drive as a unified system. While the timing chain in your engine is designed to last the life of the vehicle and is hidden behind the timing cover, the serpentine belt is a wear item that requires replacement every 60,000 to 100,000 miles.
1. Replace the Tensioner and Idler Pulleys Together: It is a best practice to replace the automatic tensioner and any idler pulleys at the same time you replace the belt. These components contain bearings that have been spinning for the same number of miles as the belt. A new, tight belt can put extra stress on an old tensioner bearing, causing it to fail shortly after the repair.
2. Observe Torque Specs: If you find yourself needing to replace a pulley or the tensioner assembly, always adhere to the manufacturer’s torque spec for the mounting bolts. Over-tightening can crack the aluminum housing of the engine block or timing cover, while under-tightening can lead to the component vibrating loose. Most tensioner bolts for this model require approximately 30-40 ft-lbs of torque, but always verify with a service manual.
3. Choose Quality Components: The 2012 Ram 1500 is a heavy-duty machine. Avoid “economy” grade belts which may stretch or squeal prematurely. Opt for EPDM (Ethylene Propylene Diene Monomer) belts, which are designed to withstand extreme heat and resist cracking better than older neoprene versions.
4. The OBD-II Connection: Modern vehicles like the 2012 Ram 1500 use the ECU to monitor the efficiency of all belt-driven components. If you notice your headlights flickering or the dashboard dimming, it might not be a battery issue, but a belt that is losing grip. Regular inspection of the belt’s tension and surface condition can prevent these electrical ghosts from haunting your truck.
By mastering the 2012 Ram 1500 serpentine belt diagram and following these professional guidelines, you ensure that your truck remains dependable for years to come. Whether you’re hauling a trailer or commuting to work, a well-maintained accessory drive system is the heartbeat of your vehicle’s secondary functions, keeping the coolant flow steady and the electrical system fully charged. Tighten your grip on maintenance today to avoid being stranded by a simple piece of rubber tomorrow.
Frequently Asked Questions
Where is the serpentine belt located?
The serpentine belt is located at the very front of the engine block, immediately behind the radiator fan. It is a long, continuous rubber loop that winds around various pulleys, including the crankshaft, which provides the rotational power needed to drive all other engine accessories and components.
What does the serpentine belt diagram show?
The diagram illustrates the exact sequence and direction the belt must take around each pulley. It identifies which pulleys require the ribbed side of the belt and which use the smooth backside, ensuring all components like the alternator and water pump spin in the correct direction.
How many pulleys does the Ram 1500 serpentine system have?
Depending on your specific engine displacement, the system typically features seven to eight pulleys. These include the crankshaft balancer, alternator, power steering pump, air conditioning compressor, water pump, an idler pulley, and the automatic belt tensioner which keeps the belt tight during various engine loads and speeds.
What are the symptoms of a bad serpentine belt?
Signs of failure include chirping or squealing noises, visible cracks, or a battery light on the dash. If the belt snaps, the ECU may trigger a check engine light and store a diagnostic code related to engine overheating or charging system failure since the alternator stops working.
Can I replace this belt myself?
Yes, replacing the belt is a common DIY task that requires minimal tools. By using the 2012 Ram 1500 serpentine belt diagram as a reference, you can complete the job in under 30 minutes. It is a straightforward process of releasing tension, swapping the belt, and verifying alignment.
What tools do I need for this task?
You will need a 3/8-inch or 1/2-inch drive breaker bar to rotate the tensioner arm. A flashlight is helpful for inspecting pulley grooves, and an OBD-II scanner is useful to clear any temporary fault codes if a slipping belt previously caused the check engine light to illuminate.

![Ram 1500 Bed Rack with Tonneau Cover: Compatibility Guide [2026]](https://truckguider.com/wp-content/uploads/2026/03/ram-1500-bed-rack-with-tonneau-cover-featured.webp)

![Service Electronic Throttle Control Ram 1500 [2026]](https://truckguider.com/wp-content/uploads/2026/03/service-electronic-throttle-control-ram-featured.webp)