Vacuum Dodge Dakota 3.9 V6 Engine Diagram: Complete Guide
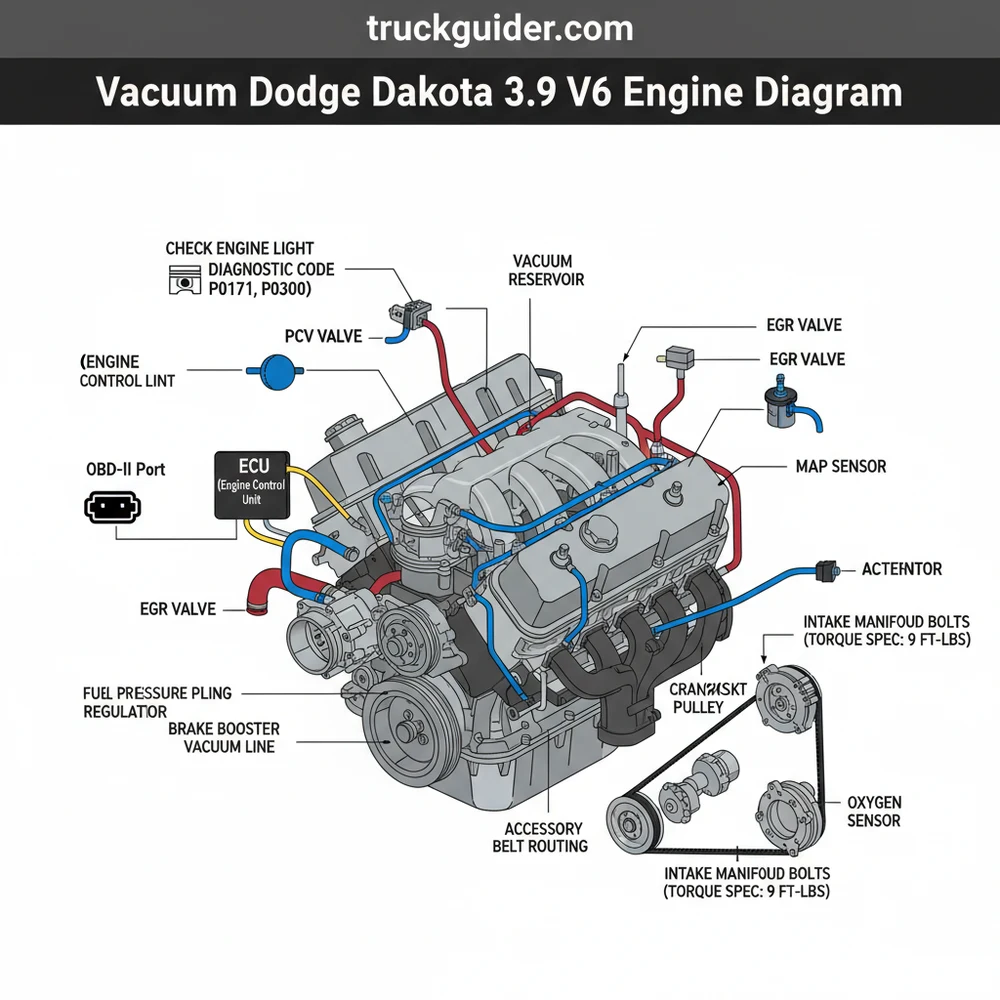
The vacuum dodge dakota 3.9 v6 engine diagram maps the critical lines connecting the intake manifold to the MAP sensor, PCV valve, and charcoal canister. Proper routing ensures the ECU receives accurate air pressure data, preventing a lean diagnostic code and maintaining a smooth idle by following factory routing specifications.
📌 Key Takeaways
- Provides exact routing for emissions and engine performance
- The MAP sensor is the most critical vacuum-monitored component
- Always replace brittle plastic lines with high-temp rubber hoses
- Use an OBD-II scanner to verify repairs after replacing lines
- Essential for passing emissions tests and fixing rough idle issues
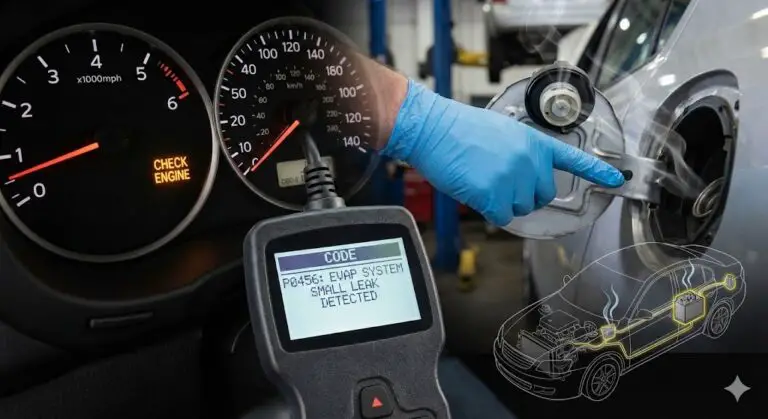
When you are facing a rough idle, poor fuel economy, or a persistent stumbling under acceleration in your truck, finding an accurate vacuum dodge dakota 3.9 v6 engine diagram is the first step toward a successful repair. The 3.9L Magnum V6 engine relies heavily on precise vacuum pressure to manage everything from ignition timing and fuel delivery to cabin climate control and power braking. Without a clear map of these intertwined rubber and plastic lines, a simple DIY project can quickly turn into a confusing maze of disconnected hoses and mysterious ports. This comprehensive guide provides you with the visual and technical layout necessary to identify every vacuum circuit, troubleshoot common leaks, and restore your engine’s performance to factory specifications.
The Anatomy of the 3.9L V6 Vacuum System
The 3.9-liter V6 engine used in the Dodge Dakota utilizes a “speed-density” fuel injection system. Unlike engines with a Mass Air Flow (MAF) sensor, this engine relies on the Manifold Absolute Pressure (MAP) sensor to tell the ECU exactly how much load the engine is under. This makes the vacuum system’s integrity absolutely critical. The diagram below represents the typical routing for the Magnum series V6, focusing on the intake manifold as the central hub of all vacuum activity.
[DIAGRAM_PLACEHOLDER: A detailed 2D schematic of a Dodge 3.9L V6 intake manifold. Labels include: 1. MAP Sensor (Top Rear), 2. PCV Valve (Passenger Valve Cover), 3. Brake Booster Port (Rear Plenum), 4. EVAP Purge Solenoid (Driver Side), 5. Cruise Control Servo (Driver Fender), 6. HVAC Supply Line (Firewall), and 7. Fuel Pressure Regulator (Fuel Rail). Lines are color-coded: Red for high-pressure vacuum, Blue for accessory vacuum, and Green for emissions/EVAP.]
The vacuum system is divided into three primary subsystems:
- ✓ The Engine Management Loop: Includes the MAP sensor and the fuel pressure regulator, which provide real-time data to the ECU.
- ✓ The Emissions Control System: Includes the PCV (Positive Crankcase Ventilation) valve and the EVAP canister purge system, designed to reduce tailpipe pollutants.
- ✓ The Auxiliary Accessories: Provides power for the brake booster, the cruise control servo, and the vacuum-actuated doors inside your HVAC (heating and cooling) box.
Understanding these divisions is key. For instance, a leak in the HVAC line might cause your air conditioner to blow only through the defrost vents, while a leak in the MAP sensor line will cause the engine to run rich and likely trigger a check engine light.
Most 3.9L engines have a vacuum routing sticker located on the underside of the hood or on the radiator fan shroud. If yours is missing or illegible, this guide serves as the primary technical reference for routing and component location.
Decoding the Vacuum Lines: A Step-by-Step Guide
📤 Share
💾 Download
Reading a vacuum dodge dakota 3.9 v6 engine diagram requires a systematic approach. You aren’t just looking for where a hose goes; you are looking for where the vacuum starts (the source) and where it ends (the actuator).
Step 1: Locate the Vacuum Source
The primary source for all vacuum on the 3.9L V6 is the intake manifold plenum. As the pistons move down on the intake stroke, they create a low-pressure area. This “vacuum” is pulled through various ports on the manifold. Locate the large port at the rear of the intake; this is usually dedicated to the power brake booster.
Step 2: Identify the MAP Sensor Port
On the 3.9L engine, the MAP sensor is typically mounted directly to the throttle body or connected via a very short, thick rubber vacuum elbow. This is the most sensitive part of the system. If this connection is brittle or cracked, the ECU will receive incorrect data, leading to a “limp mode” condition or severe hesitation.
Step 3: Trace the PCV and Breather Lines
The PCV valve is located on the passenger side valve cover. A thick rubber hose runs from this valve to a large port on the front or side of the intake manifold. On the driver’s side valve cover, you will find a “breather” hose that connects back to the air filter housing. While the breather isn’t a high-vacuum line, it is essential for the coolant flow and heat management within the crankcase.
Step 4: Check the EVAP Purge Circuit
Follow the lines from the charcoal canister (usually located along the frame rail or in the engine bay) to the purge solenoid. From the solenoid, a line runs to a dedicated vacuum port on the throttle body. The ECU opens this solenoid at cruising speeds to burn off stored fuel vapors.
Step 5: Inspect the Accessory Vacuum Tee
Usually, there is a small plastic “T” or “check valve” located near the firewall. This splits the vacuum to the cruise control servo (located on the driver’s side inner fender) and the HVAC system. If your cruise control stops working simultaneously with your vents acting up, the leak is almost certainly at this junction point.
When replacing vacuum lines, do them one at a time. It is very easy to mix up the ports on the throttle body. Use high-quality silicone vacuum tubing instead of standard rubber; silicone resists the heat of the V6 engine bay much better and won’t crack over time.
Tools and Safety Measures
📤 Share
💾 Download
To properly diagnose or rebuild your vacuum system, you will need basic hand tools. A pair of needle-nose pliers is helpful for reaching tight spring clamps. More importantly, a handheld vacuum pump (like a Mityvac) allows you to test individual components like the cruise control servo or the EGR valve (if equipped) to see if they hold a vacuum.
Safety Warning: Never work on the vacuum system while the engine is hot. Many vacuum ports are located near the thermostat housing and the accessory belt, which can be dangerous while the engine is running. Furthermore, avoid using highly flammable sprays like starting fluid to find leaks unless you have a fire extinguisher nearby, as the ignition system on these trucks can occasionally arc and ignite the fumes.
Troubleshooting Common Vacuum Issues and Diagnostic Codes
A failure in the vacuum system is rarely subtle. Because the 3.9L V6 uses an OBD-II diagnostic system, the truck is often smart enough to tell you that something is wrong, even if it can’t tell you exactly which hose is leaking.
Common diagnostic code indicators include:
- ! P0171 / P0174: System Too Lean. This indicates that “unmetered air” is entering the engine through a vacuum leak, causing the ECU to add extra fuel.
- ! P0507: Idle Control System RPM Higher Than Expected. Often caused by a leak in the PCV hose or a stuck-open purge solenoid.
- ! P0300: Random/Multiple Cylinder Misfire. A major vacuum leak can lean out the mixture so much that the spark plugs fail to ignite it.
One specific issue unique to the Dodge 3.9L (and its 5.2L/5.9L V8 siblings) is the “Plenum Gasket Leak.” The bottom of the intake manifold is a flat steel plate bolted to the aluminum intake. Over time, the gasket between them fails. This creates an internal vacuum leak that sucks oil from the lifter valley into the intake runners. If you see oil pooling in your throttle body or notice your truck is consuming oil without a visible leak, this is likely the culprit.
Do not over-tighten the vacuum fittings or the MAP sensor mounting screws. The throttle body is made of soft cast aluminum. If you strip the threads, you may have to replace the entire throttle body assembly, which is an expensive mistake.
Best Practices for Vacuum System Maintenance
To keep your Dodge Dakota running smoothly, you should inspect the vacuum lines every time you perform an oil change. Heat and vibration are the enemies of rubber. Look for “checking,” which is the technical term for the small spiderweb cracks that appear on the ends of the hoses.
Torque Specifications and Hardware
If you are performing a plenum repair or replacing the throttle body, following the correct torque spec is vital for a vacuum-tight seal. The intake manifold bolts for the 3.9L V6 should generally be torqued to 12-15 foot-pounds in a crisscross pattern starting from the center and working your way out. Using a precision torque wrench ensures that the gasket is compressed evenly, preventing future leaks.
The Role of Other Engine Components
While tracing the vacuum dodge dakota 3.9 v6 engine diagram, take a moment to inspect surrounding components. A worn accessory belt can vibrate excessively, potentially chafing against nearby vacuum lines. Similarly, ensure your timing chain is in good condition; excessive slack in the timing chain can cause erratic vacuum readings on a gauge, which can be easily confused with a physical leak in the hoses.
Cost-Saving Strategy
Instead of buying “pre-formed” vacuum lines from the dealership, which can be incredibly expensive, you can buy bulk vacuum hose by the foot at any local auto parts store. For the hard plastic lines that often crack, you can use short lengths of rubber hose to “sleeve” and bridge the break. This is a permanent and cost-effective fix that maintains the integrity of the system without requiring a full harness replacement.
The Interaction Between Vacuum and Performance
It is helpful to think of vacuum as the “breath” of your engine. On the 3.9L V6, the vacuum levels fluctuate based on throttle position. At idle, the vacuum is high (usually between 17 and 21 inches of mercury). Under wide-open throttle, the vacuum drops to near zero.
If your vacuum diagram is followed correctly but you still have a low reading at idle, it could indicate internal engine issues. For example, a clogged catalytic converter can cause backpressure that lowers manifold vacuum. By using a vacuum gauge in conjunction with your diagram, you can perform a “poor man’s diagnostic” that often reveals more than an electronic scanner can.
In conclusion, maintaining the vacuum system on your Dodge Dakota is one of the most effective ways to ensure longevity and fuel efficiency. By using the vacuum dodge dakota 3.9 v6 engine diagram as your roadmap, you can systematically eliminate leaks, clear that stubborn check engine light, and keep your 3.9L Magnum V6 humming. Whether you are replacing a single elbow or doing a full engine refresh, the key is patience, high-quality materials, and a firm understanding of how each component relies on that invisible force of suction to get you down the road.
Frequently Asked Questions
Where is the vacuum diagram located?
The vacuum dodge dakota 3.9 v6 engine diagram is usually found on a factory decal located on the radiator shroud or the underside of the hood. If this label is missing or illegible, referencing a technical service manual or this digital guide is necessary to ensure the ECU operates correctly.
What does the vacuum diagram show?
This diagram illustrates the complex network of hoses that distribute manifold vacuum to components like the brake booster, cruise control, and EGR system. It shows where each line originates on the intake and where it terminates, which is vital for diagnosing a mysterious check engine light or vacuum leak.
How many connections does the 3.9 V6 vacuum system have?
The 3.9 V6 engine features multiple ports on the throttle body and intake plenum. Major connections include the PCV system, the MAP sensor, and the evaporative emissions canister. Each port must be securely connected to prevent an OBD-II system error and ensure the engine maintains proper vacuum pressure.
What are the symptoms of a bad vacuum line?
Common symptoms include a high or fluctuating idle, poor acceleration, and a whistling noise from the engine bay. A leak will often trigger a lean diagnostic code (such as P0171) because unmetered air enters the system, causing the check engine light to illuminate on your Dakota’s dashboard.
Can I replace vacuum hoses myself?
Yes, replacing vacuum hoses is a straightforward DIY task that requires minimal tools. By following the vacuum dodge dakota 3.9 v6 engine diagram, you can swap out cracked lines one by one. If you remove the intake to reach lower lines, always follow the proper torque spec for reassembly.
What tools do I need for vacuum repairs?
You will need needle-nose pliers, a utility knife for cutting bulk hose, and a hand-held vacuum pump for testing components. Additionally, an OBD-II scan tool is highly recommended to monitor fuel trims and clear any diagnostic code once you have successfully sealed the vacuum leaks in the system.

![P0171 Dodge Ram 1500: Fix & Reset Guide [2026]](https://truckguider.com/wp-content/uploads/2026/03/p0171-dodge-ram-1500-featured.webp)
![275/55R20 vs 33×12.50R20: Specs & Fitment Guide [2026]](https://truckguider.com/wp-content/uploads/2026/03/275-55r20-vs-33x12-50r20-featured.webp)
![6.4 Hemi MDS Delete Kit: Essential Parts & Tuning Guide [2026]](https://truckguider.com/wp-content/uploads/2026/03/6-4-hemi-mds-delete-kit-featured.webp)