Vacuum 4.7 V8 Dodge Engine Diagram: Diagnosis & Fix Guide
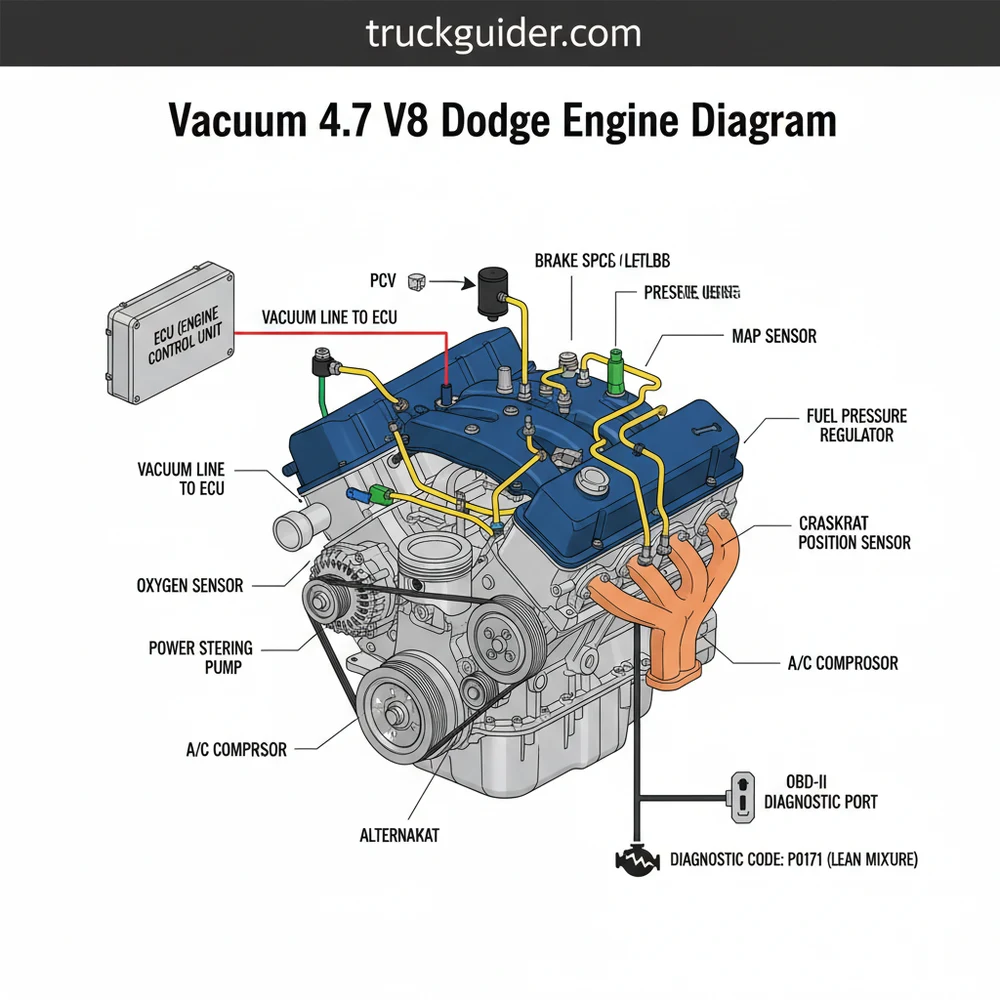
A vacuum 4.7 V8 Dodge engine diagram maps the complex network of hoses connecting the intake manifold, brake booster, PCV system, and EVAP canister. It is essential for locating leaks that cause lean diagnostic codes, ensuring the ECU receives accurate sensor data to maintain proper air-fuel ratios and idle stability.
📌 Key Takeaways
- The diagram traces the path of air flow through critical emissions and braking systems.
- Identifying the PCV valve and brake booster lines is vital for engine stability.
- Unmetered air leaks can cause severe lean conditions and engine stalling.
- A smoke machine is the most effective tool for finding non-visible vacuum leaks.
- Use this diagram when troubleshooting high idle or poor fuel economy.
Maintaining the performance, fuel efficiency, and idle stability of a PowerTech 4.7-liter V8 engine requires a clear understanding of its complex atmospheric architecture. Whether you are dealing with a rough idle or a stubborn “lean” condition code, having a precise vacuum 4.7 v8 dodge engine diagram is the most critical tool in your diagnostic arsenal. This comprehensive guide will walk you through the intricate network of hoses, valves, and sensors that regulate manifold pressure. By the end of this article, you will be able to identify every vacuum circuit, troubleshoot leaks, and understand how these systems interface with your vehicle’s computer.
Understanding the Vacuum 4.7 V8 Dodge Engine Diagram for Repairs
The vacuum system in the Dodge 4.7L V8 is a closed-loop network designed to assist in engine management, emissions control, and brake assistance. The diagram represents the flow of air from the intake manifold to various actuators and sensors. At the heart of this system is the intake manifold, which acts as the primary vacuum source. Unlike older engines with simple vacuum lines, the 4.7 V8 utilizes a combination of rigid nylon tubing and flexible rubber connectors to maintain integrity under high heat.
Key components identified in the diagram include the Manifold Absolute Pressure (MAP) sensor, which is typically mounted directly to the front or top of the intake manifold. This sensor is the primary communication link to the ECU (Engine Control Unit). You will also notice the Positive Crankcase Ventilation (PCV) circuit, which draws blow-by gases from the valve covers back into the combustion chamber. The diagram also highlights the EVAP (Evaporative Emission) purge solenoid, usually located near the driver-side fender or the intake, which regulates fuel vapors from the charcoal canister.
Another critical element shown in the diagram is the brake booster vacuum supply line. This is a large-diameter hose that runs from the rear of the intake manifold to the brake booster on the firewall. If this line fails, your braking effort will increase significantly. Variations in the vacuum 4.7 v8 dodge engine diagram may occur depending on whether the vehicle is equipped with speed control (cruise control), which uses a vacuum servo to pull the throttle cable, or four-wheel drive, which may use vacuum to engage front-axle hubs on certain model years.
Figure 1: Conceptual Vacuum Routing Diagram for Dodge 4.7L V8
Most 4.7 V8 engines also feature a vacuum reservoir hidden behind the front bumper or inside the fender well. This plastic “ball” stores vacuum to maintain operation of climate control vents and cruise control when the engine is under heavy load (low vacuum conditions).
Step-by-Step Guide to Inspecting and Repairing Vacuum Lines
📤 Share
💾 Download
Interpreting a vacuum 4.7 v8 dodge engine diagram and applying it to your vehicle is a methodical process. Because the 4.7L V8 engine bay can be crowded, follow these steps to ensure you don’t miss any leaks that could trigger an OBD-II diagnostic code.
1. Locate the Vehicle Emission Control Information (VECI) Label: Before starting, check for the factory sticker under your hood. This label often contains a simplified vacuum diagram specific to your exact VIN and emissions package. Use this in conjunction with our detailed breakdown.
2. Visual Inspection for Brittle Lines: Engine heat is the primary enemy of vacuum lines. Start at the intake manifold and trace each line outward. Look for cracks, “mushy” rubber at the connection points, or lines that have popped off their plastic fittings. Pay special attention to the elbow connector at the back of the intake manifold, as this is a high-failure point.
3. Use a Handheld Vacuum Pump: To test specific components like the cruise control servo or the EVAP canister, disconnect the line and attach a handheld vacuum pump. Apply 15 inches of mercury (inHg) and see if the component holds the pressure. If the needle on the pump gauge drops, the diaphragm inside that component is ruptured.
4. Perform a Smoke Test: For hard-to-find leaks, a smoke machine is the gold standard. Inject smoke into a main vacuum port on the intake manifold with the engine off. Watch for smoke escaping from hairline cracks in the plastic manifold or hidden lines under the cowl.
5. Check the MAP Sensor Connection: The MAP sensor must have a perfect seal. If the O-ring is dry-rotted or the sensor is loose, the ECU will receive incorrect data, leading to poor fuel mapping and a persistent check engine light.
6. Inspect the PCV System: Remove the PCV valve and shake it. It should rattle freely. If it is clogged, it will cause excessive crankcase pressure, leading to oil leaks and poor vacuum signal. Ensure the rubber grommet in the valve cover is tight.
7. Test the Brake Booster Check Valve: Pull the check valve out of the brake booster. You should be able to blow air through it in only one direction. If air flows both ways, the valve is faulty and will cause a major vacuum leak.
Never use flammable sprays like brake cleaner to find leaks on a hot 4.7 V8 engine. The ignition coils and high exhaust manifold temperatures can ignite the vapors. Use a specialized non-flammable leak detector spray or a smoke machine for safety.
Interaction with Accessory Belt, Timing Chain, and Coolant Flow
📤 Share
💾 Download
While the vacuum system is primarily pneumatic, its performance is deeply intertwined with the mechanical health of the engine. For instance, the timing chain in the 4.7 V8 is a complex three-chain system. If the timing chain guides wear down and the timing jumps even slightly, the intake stroke will not create the proper amount of vacuum. A healthy 4.7 engine should pull between 17 and 21 inHg of vacuum at idle. If you see a fluttering needle on your gauge, it may point toward a timing chain or valve train issue rather than a simple hose leak.
Furthermore, the accessory belt drives the alternator and water pump, which directly impacts coolant flow. If the engine overheats due to poor coolant flow, the plastic intake manifold and vacuum lines can warp or become extremely brittle, leading to secondary vacuum failures. Additionally, some vacuum-controlled heater valves rely on the cooling system’s temperature to operate correctly. Always ensure your accessory belt is in good condition and torqued correctly to prevent vibration that can shake vacuum connectors loose over time.
Common Issues & Troubleshooting Diagnostic Codes
When the vacuum system fails on a Dodge 4.7 V8, the ECU will typically trigger the check engine light. The most common diagnostic code associated with vacuum leaks is P0171 or P0174 (System Too Lean, Bank 1 or 2). This happens because the “unmetered air” entering through the leak leans out the air-fuel mixture, forcing the ECU to max out the fuel trim.
Another frequent issue is a P0507 code, indicating an “Idle Control System RPM Higher Than Expected.” A vacuum leak acts like a tiny open throttle, letting in air and raising the idle speed beyond what the Idle Air Control (IAC) valve can manage. If you experience a hard brake pedal, your first check should always be the large vacuum line running to the booster. Rough shifting in automatic transmissions can also occasionally be traced back to vacuum issues, as the engine load data provided by the MAP sensor is used to calculate shift points.
When replacing the intake manifold or MAP sensor, always follow the proper torque spec. The intake manifold bolts for the 4.7 V8 generally require 105 to 115 inch-pounds (not foot-pounds!). Over-tightening can crack the plastic manifold, creating a permanent vacuum leak that no amount of RTV can fix.
Maintenance Tips and Best Practices
To keep your vacuum system operating at peak efficiency, adopt a proactive maintenance schedule. Vacuum lines are often overlooked until a problem occurs, but a 10-minute inspection every time you change your oil can save hundreds of dollars in diagnostic fees.
- ✓ Replace the PCV Valve: Do this every 30,000 miles to prevent sludge buildup and vacuum loss.
- ✓ Upgrade to Silicone: If you find a damaged rubber line, consider replacing it with high-quality silicone vacuum tubing. Silicone resists heat and ozone much better than standard EPDM rubber.
- ✓ Clean the Throttle Body: Carbon buildup around the throttle plate can mimic a vacuum leak by causing a rough idle. Use a dedicated throttle body cleaner.
- ✓ Check the ECU Connectors: Ensure the wiring harness to the MAP and EVAP sensors is clean and tight. Corrosion here can mimic a vacuum leak in the ECU’s logic.
- ✓ Verify Accessory Belt Tension: Excessive vibration from a loose belt or a failing pulley can cause the rigid nylon vacuum lines to rub against other components, leading to pinhole leaks.
In summary, the vacuum system on the Dodge 4.7L V8 is a robust but heat-sensitive network. By utilizing a high-quality vacuum 4.7 v8 dodge engine diagram and performing regular inspections, you can keep your engine running smoothly. Understanding the relationship between the atmospheric pressure, the MAP sensor, and the ECU’s fuel trims will allow you to diagnose “lean” codes and idle issues with professional accuracy. Remember to always use the correct torque spec when working on the intake manifold and pay close attention to the integrity of the PCV and EVAP systems. With these tools and tips, your PowerTech V8 will continue to deliver reliable performance for years to come.
Frequently Asked Questions
Where is the PCV valve located?
On the Dodge 4.7L V8, the PCV valve is typically located on the oil filler neck or the rear of the passenger-side valve cover. It connects directly to the intake manifold via a thick vacuum hose. Checking this connection is vital for preventing oil consumption and maintaining internal pressure.
What does the vacuum 4.7 V8 Dodge engine diagram show?
This diagram illustrates the routing of all vacuum-operated components, including the EVAP system, brake booster, and manifold absolute pressure sensor. It serves as a visual map for technicians to ensure every hose is connected to the correct port, preventing vacuum-related performance problems and frustrating diagnostic trouble codes.
How many vacuum connections does the intake have?
The Dodge 4.7L intake manifold features several key ports: one for the power brake booster, one for the PCV system, and others for the EVAP purge solenoid and MAP sensor. Identifying these ports correctly is necessary when performing top-end engine repairs, gasket replacements, or intake manifold swaps.
What are the symptoms of a bad vacuum line?
Common symptoms include a rough idle, high RPM at stoplights, and a glowing check engine light. You may also notice a persistent diagnostic code like P0171 or P0174 through your OBD-II scanner, indicating a lean condition caused by unmetered air entering the engine combustion chamber after the throttle.
Can I replace vacuum lines myself?
Yes, replacing vacuum lines is a straightforward DIY task that requires basic patience. You simply need to match the hose diameter and length using automotive-grade vacuum tubing. Always replace one line at a time to avoid crossing connections, and ensure each hose is seated firmly on its respective port.
What tools do I need for vacuum testing?
You will need a basic hand tool set, a vacuum gauge for testing pressure, and an OBD-II scanner to clear codes. If a leak is hard to find, a smoke machine is highly recommended. Always refer to the proper torque spec when re-securing the intake manifold bolts after repair.

![2Nd Gen Dodge Ram For Sale [2026]](https://truckguider.com/wp-content/uploads/2026/03/featured-f8e34e32-768x417.webp)
![Chrysler 9.25 Rear End: Specs, Identification, and Issues [2026]](https://truckguider.com/wp-content/uploads/2026/03/chrysler-9-25-rear-end-featured.webp)