Wiring Diagram Dodge Caravan Ground Points: Easy Setup Guide
The wiring diagram for Dodge Caravan ground points illustrates the connection between the battery’s negative terminal and the vehicle’s chassis or engine block. Each ground wire ensures a complete circuit back to the common terminal, preventing electrical interference. Proper identification of these points is critical for troubleshooting flickering lights or starting issues.
📌 Key Takeaways
- Identifies all critical grounding locations to prevent circuit failure
- The battery-to-chassis ground wire is the most important component to verify
- Always disconnect the battery before cleaning or tightening any ground points
- Use a multimeter to check for continuity between the common terminal and the chassis
- Use this diagram when experiencing intermittent power loss or sensor errors
Finding a reliable wiring diagram dodge caravan ground points is often the first step in resolving frustrating electrical ghosts that haunt your vehicle’s lighting, starting, and sensor systems. When your minivan experiences flickering headlights, erratic shifting, or a “no-start” condition, the culprit is rarely a broken component and more frequently a compromised connection to the chassis. This comprehensive guide provides a deep dive into the grounding architecture of the Dodge Caravan, illustrating where these critical points are located and how they interact with the overall electrical system. By understanding the path electricity takes from the battery to the various modules and back to the frame, you can effectively diagnose and repair complex issues that often baffle even experienced mechanics.
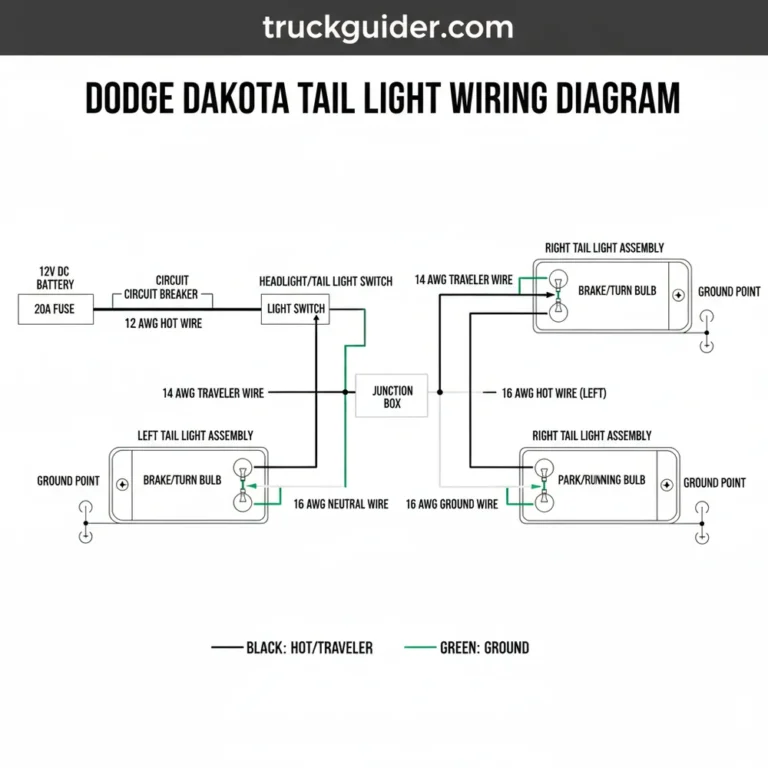
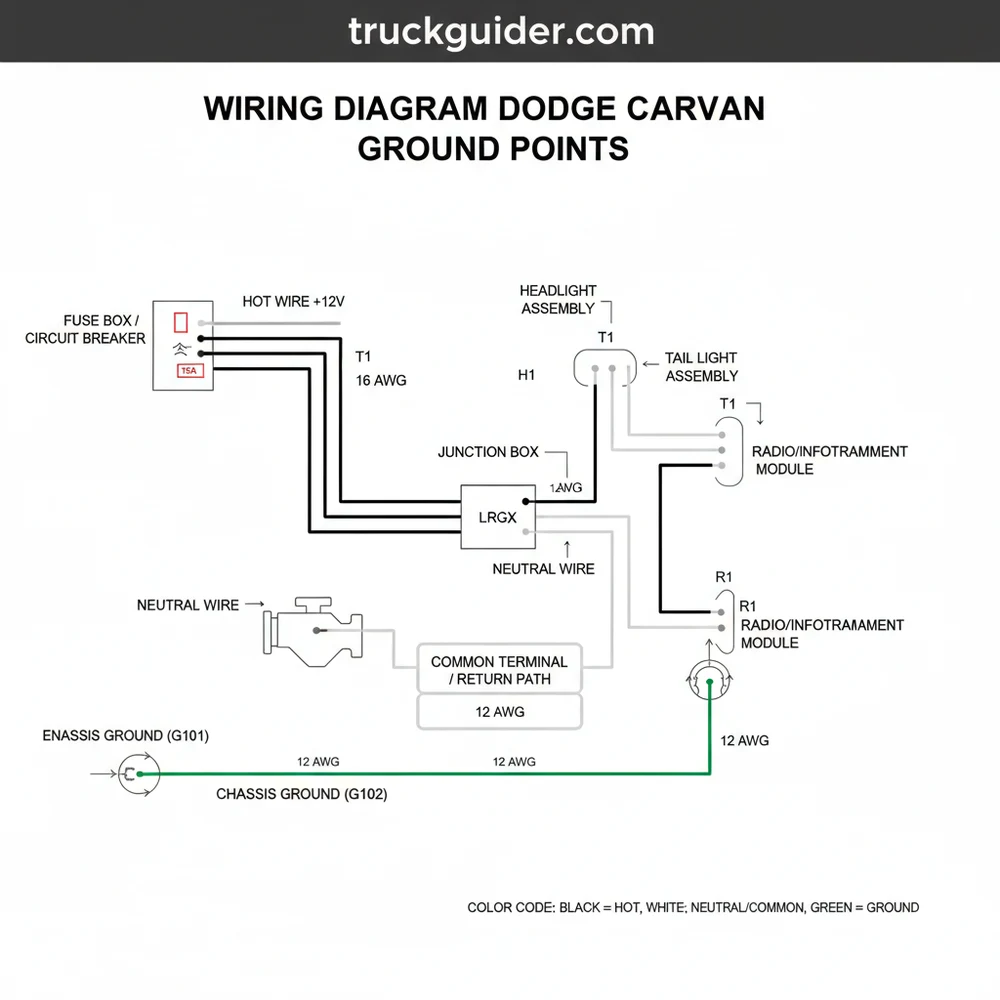
The grounding system in a Dodge Caravan is designed to facilitate a complete circuit back to the battery’s negative post. In a standard wiring diagram, ground points are typically labeled with the letter “G” followed by a numerical code, such as G101 or G203. These points represent the physical location where a ground wire is bolted to the vehicle’s metal frame or engine block. Unlike a hot wire, which carries the positive current from the battery, the ground wire ensures that the circuit is closed, allowing electrons to flow. In the Dodge Caravan, these wires are usually color-coded as solid Black (BK) or Black with a specific tracer color, such as Black/White (BK/WT) or Black/Light Green (BK/LG). The main diagram breakdown reveals three primary zones: the engine compartment (G100 series), the passenger cabin (G200 series), and the rear cargo/liftgate area (G300 and G400 series). Each zone serves specific clusters of electronics, such as the Powertrain Control Module (PCM), the Body Control Module (BCM), and the lighting assemblies.
In automotive DC circuits, the entire metal chassis acts as a “common terminal” for the negative side of the battery. This reduces the amount of wire needed but makes the physical connection between the wire terminal and the metal frame critical for maintaining proper voltage levels.
The visual schematic identifies the most crucial ground points you will encounter. G101 is generally located near the battery on the driver-side fender or radiator support; this is the primary return path for the battery and alternator. G102 and G103 are typically found on the engine block or transmission housing, providing the high-amperage return path required for the starter motor. Inside the cabin, you will find G201 and G202 located behind the kick panels on either the driver or passenger side. These points serve the dashboard electronics, including the instrument cluster and the HVAC system. If your Caravan has a power liftgate or rear wiper issues, the G301 and G400 series grounds located in the rear pillars or near the tail lamps are the first places to inspect. Understanding these labels helps you navigate the physical reality of the vehicle when the digital diagram points to a specific coordinate.
Interpreting a wiring diagram dodge caravan ground points requires a systematic approach to ensure you are tracing the correct circuit. Follow these steps to master the grounding layout and perform professional-grade repairs.
Step-by-Step Guide to Navigating and Repairing Ground Points
- ✓ Step 1: Identify the Affected Circuit – Before looking at the diagram, note which components are failing. If multiple unrelated items (like the radio and the wipers) fail simultaneously, look for a shared ground point in the cabin.
- ✓ Step 2: Locate the Ground Symbol – On the wiring schematic, look for the symbol consisting of three horizontal lines of decreasing length. Follow the wire from the component to this symbol to find the “G” number.
- ✓ Step 3: Verify Wire Color and Gauge – Ensure the physical wire matches the diagram. High-load components like the starter will use a heavy 4-gauge or 6-gauge wire, while sensor grounds might use a thin 18-gauge traveler wire.
- ✓ Step 4: Locate the Physical Connection – Use the diagram’s location key to find the bolt on the chassis. In the Dodge Caravan, many grounds are hidden behind interior trim or underneath the battery tray.
- ✓ Step 5: Perform a Voltage Drop Test – With the circuit turned on, use a multimeter to measure the voltage between the ground terminal and the negative battery post. A reading higher than 0.1V suggests high resistance in the ground path.
- ✓ Step 6: Inspect for Corrosion – Remove the bolt or nut (sometimes a brass screw is used in aftermarket additions, but OEM is usually steel) and check for green or white crusty deposits.
- ✓ Step 7: Clean and Secure – Use a wire brush or sandpaper to clean the terminal and the mounting surface until the metal is shiny. Reinstall the bolt tightly to ensure a low-resistance connection.
- ✓ Step 8: Re-test the System – Once the connection is restored, verify that the component is functioning and the voltage drop has decreased.
To perform these steps effectively, you will need a few essential tools: a digital multimeter (DMM), a set of metric sockets (mostly 10mm and 13mm for the Caravan), a wire brush, and a flashlight. Always prioritize safety when working near the engine; if you are working on the main battery ground, disconnect the negative terminal first to avoid accidental shorts or sparks.
Never attempt to diagnose ground issues while the engine is running unless you are performing a specific live-voltage test. Keep hands and tools away from moving belts and the cooling fan, which can engage at any time.
Understanding Common Issues and Troubleshooting
📤 Share
💾 Download
The Dodge Caravan is notorious for ground-related issues due to its complex Body Control Module (BCM) and the exposure of many ground points to road salt and moisture. One frequent problem is the “limp mode” in the transmission, where the vehicle stays in second gear. While this can be a mechanical failure, it is often caused by a poor ground at the TCM (Transmission Control Module) or the main engine block ground, leading to corrupted signals.
Another common sign of a failing ground is the “dimming effect.” If your interior lights dim when you step on the brake or use the turn signal, the return path is likely congested with high resistance. This forces the current to seek an alternative, unintended path—sometimes referred to as a “floating ground.” This can lead to ghost-like behavior, such as the radio turning off when you use the power windows. The wiring diagram helps you solve this by pointing out the specific “common terminal” or grounding hub where these circuits converge. If the diagram shows five different wires meeting at G202, and all five components are acting up, you have found your culprit.
If you are tracing a intermittent electrical issue, try a “wiggle test.” While the component is on, gently wiggle the ground wire identified in the wiring diagram dodge caravan ground points. If the component flickers or cuts out, you have identified a loose terminal or a broken wire inside the insulation.
The Role of Wire Gauge and Voltage in Grounding

The efficiency of a ground point is heavily dependent on the gauge of the wire. In a Dodge Caravan, the ground wires are specifically sized to handle the maximum possible current load of the circuit. The main battery-to-engine ground is thick because it must carry hundreds of amps during engine cranking. Conversely, a sensor ground is thin because it only carries millivolts of data signal. If you are replacing a damaged ground wire, never use a smaller gauge than what is specified in the original wiring diagram. Using a wire that is too thin increases resistance, which drops the voltage available to the component.
While we often think of “voltage” as something only found on the hot wire, it is the potential difference between the hot wire and the ground wire that makes work possible. In a perfect circuit, the ground wire should have zero volts. However, in the real world of automotive repair, we accept a tiny amount of voltage drop. If you find more than 0.2 volts on a ground wire while the circuit is active, the connection is poor. This is why checking the wiring diagram dodge caravan ground points is so helpful; it tells you where to put your multimeter leads to verify the health of the electrical return path.
Advanced Grounding Architecture: PCM and BCM
In modern Caravans, the Powertrain Control Module (PCM) and Body Control Module (BCM) use “logic grounds.” These are specialized paths designed to keep electrical noise away from sensitive microprocessors. In the wiring diagram, you may notice that some sensors do not ground to the chassis directly but instead ground back to a pin on the PCM. This is called a “sensor ground” or “signal return.”
If you mistakenly ground a sensor traveler wire directly to the chassis instead of following the diagram’s path back to the PCM, you can introduce “electrical noise” into the system. This noise can cause the computer to miscalculate fuel trim or ignition timing, leading to poor fuel economy or engine hesitation. Always follow the diagram’s specific routing to ensure that sensitive electronics are not subjected to the voltage spikes associated with heavier loads like the starter or the cooling fans.
Tips and Best Practices for Electrical Maintenance
Maintaining the grounding system is one of the most cost-effective ways to ensure the longevity of your Dodge Caravan’s electronics. Over time, the vibrations of the road can loosen the nuts that hold ground terminals to the frame. Periodic inspection of the G101 and G102 points under the hood can prevent a breakdown before it happens.
- ✓ Use Dielectric Grease – After cleaning a ground connection to bare metal, apply a thin layer of dielectric grease. While the grease itself is non-conductive, it seals the connection from oxygen and moisture, preventing future corrosion.
- ✓ Check the Braided Straps – Many Dodge Caravans use braided flat wires to ground the engine to the firewall. These straps are prone to fraying and snapping. If they look green or are falling apart, replace them immediately with an equivalent gauge strap.
- ✓ Avoid Over-tightening – While a ground must be secure, over-tightening a bolt into the thin sheet metal of the inner fender can strip the threads, leaving you with a permanently loose connection.
- ✓ Star Washers are Your Friend – When reassembling a ground point, use a star-style lock washer. The teeth of the washer bite into the metal, ensuring a solid bite and preventing the bolt from vibrating loose.
For those looking to save money, diagnosing grounding issues yourself using a wiring diagram can save hundreds of dollars in dealership labor costs. Many “unfixable” electrical problems in Caravans are eventually traced back to a $2 bolt that simply needed a bit of sanding. By focusing on the fundamentals of the circuit—the power, the load, and the ground—you demystify the complexities of modern automotive engineering.
When selecting replacement components, always choose high-quality copper terminals. Avoid cheap, thin aluminum connectors which have higher resistance and are more prone to breaking under the high-vibration environment of a minivan engine bay. Ensure the insulation on your ground wire is rated for automotive use (cross-linked polyethylene or XLPE) to withstand the heat of the engine compartment.
Conclusion: Mastering the Caravan’s Grounding System
In conclusion, a clear and accurate wiring diagram dodge caravan ground points is the most valuable tool in your diagnostic arsenal. By mapping out the G100, G200, and G300 series connections, you gain the ability to trace electrical paths with confidence. Whether you are dealing with a neutral wire equivalent in a sensor circuit or a heavy-duty battery return, the principles remain the same: clean metal, tight connections, and proper wire gauge.
Electrical troubleshooting doesn’t have to be a mystery. By following the steps outlined in this guide—identifying the circuit, performing voltage drop tests, and cleaning the physical connections—you can ensure your Dodge Caravan remains reliable for years to come. Remember that every electronic component in your vehicle is only as good as its connection to the frame. Take the time to inspect your grounds today, and you may find that those lingering electrical glitches disappear for good. With the right diagram and a systematic approach, you are well-equipped to handle any grounding challenge your vehicle throws your way.
Frequently Asked Questions
Where are the Dodge Caravan ground points located?
Ground points are typically found on the driver-side inner fender, near the battery, on the engine block, and behind the dashboard. These locations provide a direct path back to the common terminal, ensuring every circuit has a stable return path for the ground wire to complete the electrical circuit safely.
What does this ground points diagram show?
This diagram illustrates the physical and electrical path of the ground wire system throughout the vehicle. It distinguishes between the chassis grounds and the engine grounds, ensuring that the hot wire in each circuit can safely return power to the battery without causing shorts or electrical interference in sensitive components.
How many ground wire connections does the Caravan have?
A Dodge Caravan typically features between 5 to 10 primary ground points. While it doesn’t use a neutral wire or traveler wire like home AC systems, it relies on these chassis points to serve as the common terminal for all 12V DC electrical components to maintain voltage stability.
What are the symptoms of a bad ground point?
Symptoms of a bad ground include flickering headlights, erratic sensor readings, or a car that won’t start despite a full battery. If the ground wire is loose, the hot wire cannot complete its circuit, leading to high resistance and intermittent electrical failures across the entire vehicle system.
Can I clean or replace ground points myself?
Yes, cleaning ground points is a common DIY task. You must locate the ground wire, remove the bolt, and use a wire brush to clean the common terminal and chassis surface. This ensures a clean connection, much like ensuring a traveler wire is secure in a residential switch setup.
What tools do I need for ground point maintenance?
You will need a basic socket set, a wire brush or sandpaper, and a multimeter. The multimeter helps you verify continuity between the hot wire’s load and the common terminal. Using a dielectric grease after cleaning will prevent future corrosion and oxidation on the ground wire connections.

![P0308 Dodge Ram 1500: Troubleshooting [2026]](https://truckguider.com/wp-content/uploads/2026/03/featured-077bf16b.webp)