1998 Chevy Silverado Fuse Box Diagram: Locations, Relay Specs, and Troubleshooting Guide

The 1998 Chevy Silverado utilizes two primary fuse locations: the instrument panel fuse block on the driver’s side dash and the under-hood electrical center. This article provides the specific fuse assignments, amperage ratings, and relay configurations needed to identify and replace failed components. You will find comprehensive charts, location guides, and safety procedures to help you troubleshoot electrical faults effectively without damaging your vehicle’s wiring or sensitive electronic control modules.


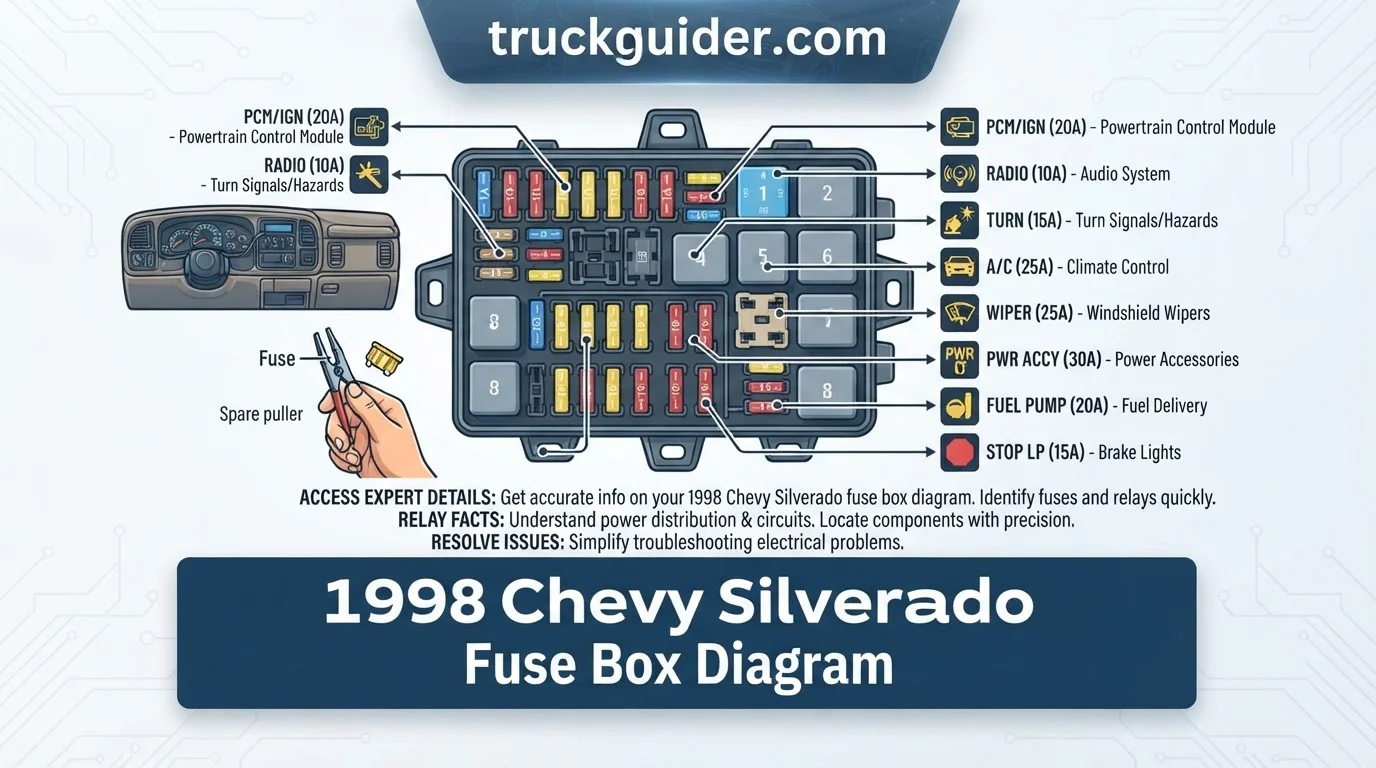
1998 Chevy Silverado Fuse Box Diagram: Main Reference Chart
How to Read the Diagram
The table above serves as a high-level reference for the two primary power distribution centers in your 1998 Chevy Silverado. The Location column indicates whether the component is housed in the instrument panel (cab) or the underhood block. Always cross-reference the physical labels printed on the fuse box cover with your vehicle’s specific owner’s manual.

The Amperage (A) column represents the maximum electrical current the fuse can handle before the internal metal link melts to protect your wiring. Using a higher amperage than specified can lead to severe electrical damage or fire, while a lower rating may cause nuisance blowing. The Type column identifies the physical form factor, such as standard ATO blade fuses or higher-capacity Maxi fuses.

Because the 1998 GMT400 platform supports various engine and trim configurations, some accessory slots may be empty or rated differently depending on your truck’s specific build. If a slot appears empty or contains a rating that deviates from your specific wiring harness, verify the configuration against your factory fuse block diagram.
How to Read Your 1998 Chevy Silverado Fuse Diagram
Reading your fuse diagram requires matching the visual grid layout printed on the inside of your fuse block cover to the physical components on your truck. Each slot is numbered or labeled to correspond with a specific electrical circuit, such as interior lighting, the horn, or the engine control module (ECM).

When reviewing the diagram, look for the text labels that designate which fuse serves which component. You will find that instrument panel fuses are generally grouped by convenience features, while underhood fuses handle high-draw engine and safety systems like the fuel pump and ABS, often requiring heavier-duty relays nearby.
Always verify the orientation of your fuse block relative to the diagram. Most covers show a “top-down” view. Ensure you are not misinterpreting the mirror image of the diagram, which can easily happen when working in cramped spaces under the steering column or inside the engine bay.
Understanding Amperage and Fuse Types in Your Silverado
Your 1998 Silverado utilizes a variety of fuse sizes to manage electrical loads ranging from 5 to 60 Amps. Smaller, 5-10 Amp fuses are typically reserved for low-draw sensors, instrument cluster lighting, and electronic modules. Medium-draw items like radios or cigarette lighters typically utilize 15-20 Amp ATO fuses.
High-current circuits, such as the ABS system or main ignition bus, utilize larger “Maxi” style fuses. These are designed to withstand significantly more heat and current. It is critical to note that the physical size and color of these fuses generally correspond to standard industry codes, but you must always confirm the rating printed on the top of the fuse itself.
Never replace a fuse with one of a higher amperage than what the diagram or fuse block lid dictates. If a fuse continues to blow after being replaced, this indicates a deeper electrical short or an overloaded circuit. Refer to the specific troubleshooting protocols to avoid permanent damage to your truck’s electrical harness.
Locating the Fuse Boxes in Your 1998 Chevy Silverado
The 1998 Chevrolet Silverado utilizes two primary electrical distribution centers to manage the vehicle’s onboard systems. These consist of an interior instrument panel fuse block, which handles components like the radio and interior lights, and an underhood fuse block dedicated to high-amperage engine and exterior functions.
Where is the Interior Fuse Box on a 1998 Silverado?
The interior fuse block, often referred to as the instrument panel fuse center, is located within the passenger cabin. To access it, sit in the driver’s seat and look toward the extreme left side of the dashboard, near the driver-side door frame.
This fuse box is concealed behind a removable plastic cover panel located on the edge of the dashboard. When the driver’s door is fully open, you will see a rectangular plastic trim piece. Gently pull this cover outward to reveal the row of fuses protected behind it.
Once the cover is removed, you will see a detailed layout of the individual fuse positions. This location allows for easy troubleshooting of cabin-based electrical components, such as the cigarette lighter, power windows, and heating or air conditioning controls, without needing to open the engine hood.
Finding the Underhood Fuse Block in a 1998 Chevy Silverado
The second primary fuse location is the underhood electrical center. This unit is designed to handle heavier electrical loads, such as the fuel pump, lighting relays, and ignition system. You will find this box situated in the engine bay on the driver’s side.
Look for a black, rectangular plastic housing mounted near the back of the engine compartment, typically located near the battery. It is usually positioned closer to the firewall than the battery itself, making it easily accessible once the hood is fully raised and secured.
To gain access to the fuses and relays stored inside, you must remove the protective plastic lid. This lid is generally held in place by side-release tabs. Depress the tabs simultaneously and lift the cover straight up to expose the internal wiring components and the electrical diagram printed on the underside of the lid.



📋
Quick Access Guide
Fully open the driver-side door to expose the side panel of the dashboard where the interior fuse cover is located.
Locate the black plastic box near the battery, press the side release tabs firmly, and lift the cover to view the engine fuses.
Understanding 1998 Chevy Silverado Fuse Types and Relays
| Component Type | Primary Purpose | Common Examples |
|---|---|---|
| ATO/ATC Fuse | Standard circuit protection | Radio, Interior Lights |
| Maxi Fuse | High-amperage protection | Main Power/Charging |
| Mini Fuse | Space-saving protection | Instrument Cluster |
| Relay | Remote circuit switching | Fuel Pump, Horn |
How to Read This Chart
The table provides a breakdown of electrical components found in the 1998 Silverado platform. The “Component Type” column identifies the physical hardware, while the “Primary Purpose” explains its function within the electrical architecture. Use the “Common Examples” to cross-reference which circuits usually utilize these specific parts during troubleshooting.
Fuses are sacrificial devices designed to break the circuit when current levels exceed safe limits, preventing wire damage. The 1998 Silverado utilizes three main blade-style fuses: ATO/ATC (standard), Maxi (heavy-duty), and Mini (compact). Their usage varies depending on the specific fuse block location and the power demand of the protected circuit.
Relays serve a completely different purpose than fuses. They function as remote-controlled switches that allow a low-current signal to trigger a higher-current circuit. This is critical for systems like the fuel pump or horn, which require substantial power that would be impractical to route directly through small dashboard switches.
Circuit breakers are also integrated into the 1998 Silverado’s electrical system. Unlike standard fuses that must be replaced after blowing, these are resettable devices often used for power windows and seats to protect them from temporary overloads without requiring a part swap.
Distinguishing between the two is vital for diagnostics. If a component fails to operate, a blown fuse will show a broken internal wire or blackened housing, requiring a direct replacement of the same amperage. A faulty relay, however, often clicks when energized but fails to pass power, or remains stuck, keeping a component running constantly.
Troubleshooting Electrical Problems with Your 1998 Chevy Silverado
When an electrical accessory in your 1998 Chevy Silverado fails to function, the fuse box is the most logical place to begin your diagnostic process. Because electrical circuits are designed to protect themselves from surges, a component failure often indicates that the protective fuse has performed its job correctly.
To begin, narrow down the scope of the problem. If a specific system fails, such as the cigarette lighter or the radio, identify the corresponding circuit using your fuse box diagram. For instance, if your radio is not working, check the radio fuse first before assuming the head unit has failed.
Identifying a Blown Fuse in Your 1998 Silverado
Once you have located the correct fuse panel, carefully extract the suspect fuse using a fuse puller tool. Inspect the metal wire visible through the clear or translucent plastic casing of the fuse. A healthy fuse will feature a continuous, unbroken metal strip from one terminal to the other.
If the fuse is blown, you will observe a distinct gap in the metal wire, often accompanied by dark discoloration or burn marks inside the casing. In instances where the break is too small to see with the naked eye, use a digital multimeter set to the continuity or ohms setting.
To test with a multimeter, touch the two probes to the metal test points on the top of the fuse. A constant tone or a reading near zero ohms confirms the fuse is functional. If the meter remains silent or shows an “OL” (Open Loop) reading, the fuse is blown and requires replacement.
Replacing Fuses Safely: What Amperage to Use
Safety is the primary priority when replacing a fuse in your 1998 Silverado. Always replace a blown fuse with one of the exact same amperage rating as the original. You can identify the rating by the color-coded plastic and the number stamped onto the top surface of the fuse body.
Never substitute a fuse with a higher amperage rating, even as a temporary solution. Using a higher-rated fuse can allow more current to pass through the wiring than it was designed to handle, which creates a significant risk of melting the wire insulation, causing an electrical short, or starting an engine fire.
Conversely, using a lower amperage fuse than specified will likely cause the fuse to fail again immediately under normal operating conditions. Always stick to the manufacturer’s specifications found on your diagram, as these values are calibrated specifically to protect the gauge of the wiring harness used in your truck.



When to Check Relays and Circuit Breakers
If you have confirmed the fuse is intact but the component still does not function, the issue may lie with a relay or a circuit breaker. Relays are used for higher-current circuits, such as the cooling fans or headlights. If you hear a distinct “click” when turning on an accessory, the relay may be functioning, but the contacts inside could be pitted or worn.
Check the underhood electrical center for larger, square-shaped relay blocks. If you suspect a relay is faulty, you can often swap it with an identical relay from a non-critical system to see if the problem resolves. If the new relay restores function, the original unit was the culprit.
If the fuses and relays are both functioning, you must broaden your search to include the component itself, the ground connections, or the wiring harness. Inspect the plug connections for signs of corrosion or melting. Use your multimeter to verify that power is reaching the device; if power is present but the device remains inactive, the fault likely lies within the component itself.
📋
Step-by-Step Diagnostic Routine
Identify the specific accessory not working and cross-reference it with the interior or underhood fuse map.
Remove the fuse and inspect for a broken internal wire. Use a multimeter if the visual check is inconclusive.
If the fuse is good, test the associated relay or inspect the component’s ground connection for signs of corrosion.
Important Safety Precautions When Working with Your 1998 Chevy
Working on the electrical system of your 1998 Chevy Silverado requires diligence and focus. Automotive circuits are designed with specific limits to protect your wiring and sensitive electronics. Failing to follow standard safety protocols can lead to permanent component damage or severe vehicle fires.
Never substitute a fuse with one of a higher amperage rating. For example, using a 30A fuse where a 10A fuse is specified creates a major fire hazard. The higher-rated fuse will not blow during an overload, allowing wires to overheat and melt, potentially igniting a cabin fire.
Always consult your owner’s manual as the primary source for verification. While general diagrams exist, your specific trim, engine configuration, and factory-installed options may dictate slight variations in the fuse block layout. Relying on an unverified diagram can lead to hazardous misidentification of critical circuits.
When performing work on major electrical components, such as replacing a starter, alternator, or wiring harness, you must disconnect the vehicle’s battery. Removing the negative battery cable eliminates the risk of accidental short circuits caused by tools bridging contact points against the chassis or engine block.
Do not ignore recurring electrical issues or “gremlins” in your Silverado. If a fuse continues to blow repeatedly, it is a clear symptom of an underlying problem, such as a shorted wire or a failing motor drawing excessive current. Simply replacing the fuse is a temporary fix that masks a potentially dangerous condition.
Lastly, ensure the ignition is in the “OFF” position before you touch any fuses or relays. Removing or inserting components while the system is energized can cause electrical arcs, which may damage the sensitive pins within the fuse block or cause unexpected operation of vehicle systems like lighting or fuel pumps.
Accessing Your 1998 Chevy Silverado Owner’s Manual for Fuse
The owner’s manual remains the primary source for the correct fuse box diagram for your specific vehicle. While online diagrams provide a helpful starting point, the manual contains the authoritative data tailored exactly to how your truck left the factory floor.
Different trim levels, accessory packages, and engine options in the 1998 Silverado lineup often result in slight variations in electrical circuitry. Features like upgraded towing packages, power seat configurations, or specific audio systems can shift fuse placements or amperage requirements in ways that generic diagrams may overlook.
You should always prioritize the documentation provided by the manufacturer. If the physical booklet is missing from your glove box, you can typically find a digital version on the official Chevrolet owner center website or through reputable automotive technical archives. Ensure that any PDF or online resource you reference specifically matches the 1998 model year and your truck’s chassis configuration.
If you encounter conflicting information between an online diagram and your owner’s manual, rely on the manual as the definitive guide. Cross-referencing these resources is a smart practice to ensure accuracy before you begin pulling or replacing fuses. This verification step helps prevent the installation of incorrect amperage fuses, which is critical for protecting your truck’s sensitive electrical components from potential damage or wiring shorts.



Always keep your owner’s manual in a safe place inside the vehicle or your home office. Having this specific documentation readily available simplifies routine maintenance and ensures you are working with precise, vehicle-specific data whenever an electrical issue arises.
Key Takeaways
-
✓
Locate the instrument panel fuse block on the driver’s side dashboard edge. -
✓
Identify the under-hood relay center for high-amperage components like the fuel pump. -
✓
Reference the main diagram to match specific amperage ratings to circuit functions. -
✓
Use a fuse puller tool to avoid damaging delicate plastic tabs. -
✓
Perform continuity tests to verify if a seemingly intact fuse has failed.
❓ Frequently Asked Questions
1
What is a 1998 Chevy Silverado fuse box diagram?
It is an essential technical map that details the exact position, amperage rating, and protected circuit for every fuse and relay in your truck. This information is critical for identifying why specific vehicle functions—such as headlights, interior lights, or the radio—have stopped working suddenly.
2
How does the fuse box system work?
The fuse box acts as a central distribution hub. Power flows from the battery through various fuses and relays before reaching components. If a circuit draws too much current, the fuse element melts, breaking the connection to protect sensitive wiring and components from permanent heat damage.
3
Why is this diagram important?
Having the correct diagram provides the necessary insights to troubleshoot electrical gremlins without guessing. It saves significant time and money by allowing you to quickly isolate which specific component has failed, rather than replacing healthy parts in an attempt to find the source of an electrical short.
4
What are the benefits of DIY fuse replacement?
Replacing your own fuses allows for immediate roadside repairs, saving you the cost of a tow truck or a professional mechanic’s diagnostic fee. It provides valuable experience and a better understanding of your vehicle’s electrical facts, making you more confident in performing basic vehicle maintenance.
5
How can I get started with electrical troubleshooting?
Start by identifying the symptom—such as a non-working radio—and locating the fuse corresponding to that circuit on the diagram. Inspect the fuse for a broken metal wire. If broken, replace it with an identical fuse. If the new one blows immediately, you likely have a deeper electrical short.
6
Where is the fuse box located on a 1998 Silverado?
The 1998 Silverado typically has two main fuse boxes: one under the hood (Underhood Fuse Block, often near the battery or fender) and another in the cabin (Instrument Panel Fuse Block, usually on the driver’s side dashboard or kick panel).