2014 Ram 1500 Fuse Box Diagram: Locations, Descriptions, And Repair Guide
A sudden electrical failure in your 2014 Ram 1500—whether it is a dead radio, non-functional headlights, or a no-start condition—can often be traced back to a single, inexpensive component: the fuse. For owners of this 4th-generation workhorse, electrical reliability is paramount, yet navigating the maze of wiring and circuit protection can feel overwhelming. Locating the correct fuse and understanding the complex wiring diagrams of modern trucks like the Ram 1500 can be daunting for even experienced owners who are used to simpler platforms. This comprehensive guide provides a professional-grade breakdown of the 2014 Ram 1500 fuse box locations, detailed diagrams for both the engine bay and cabin, and expert troubleshooting steps to get your truck back on the road safely and efficiently.
Locating the 2014 Ram 1500 Power Distribution Center and Interior Fuse Box
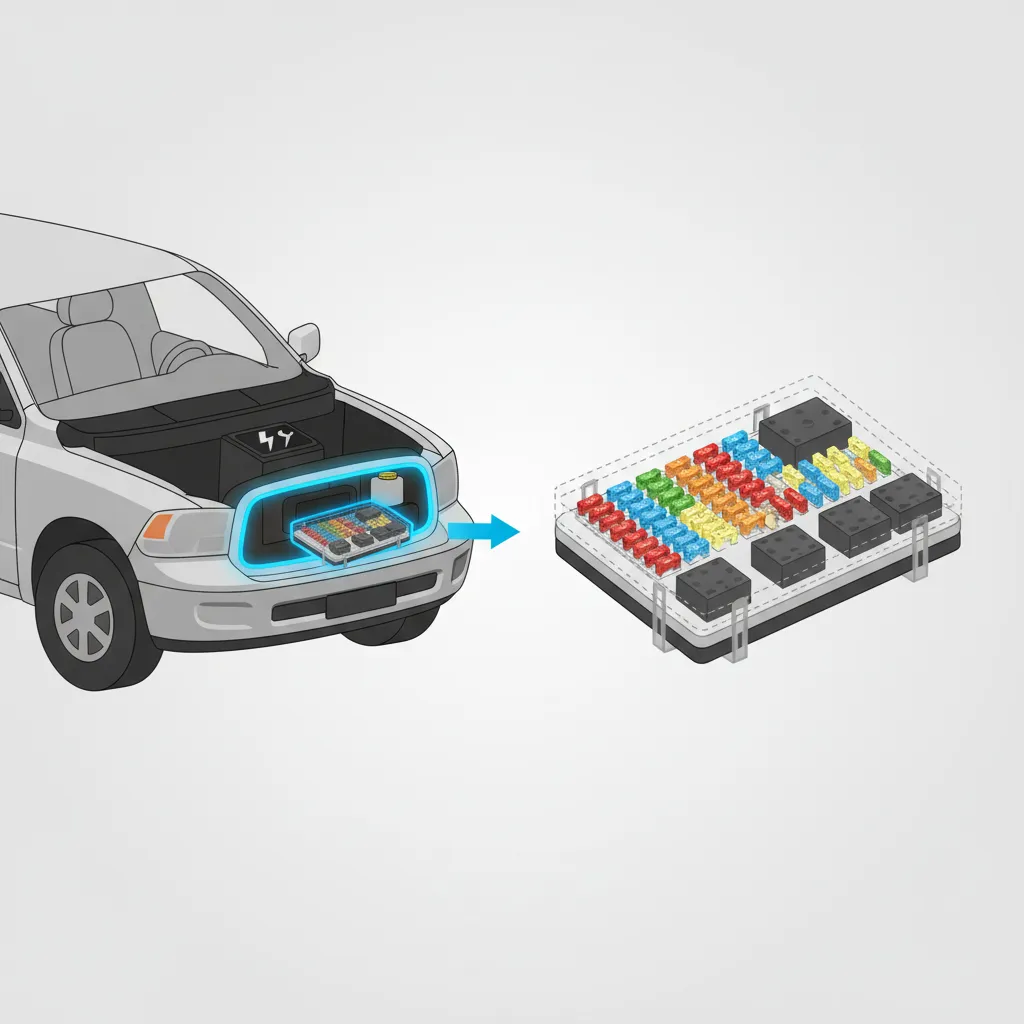
Identifying the physical location of your fuse panels is the first step in any successful electrical repair. In the 2014 Ram 1500, Chrysler engineers split the electrical load between two primary hubs. The first and most critical is the Power Distribution Center (PDC). This unit is housed under the hood, located on the driver’s side of the engine compartment, immediately adjacent to the battery. It is easily identifiable by its black plastic cover, which is often embossed with an “Engine Compartment” label or a fuse icon. Accessing this panel requires releasing the two plastic latches on the sides of the lid; once flipped over, you will find a printed diagram on the underside of the cover—a vital resource when you don’t have the official guide handy.
The second hub is the interior fuse panel, which manages the vehicle’s cabin electronics. This panel is found behind a removable trim cover on the left side of the steering column or the instrument panel. To access it, you must carefully pry the side panel off using a plastic trim tool to avoid marring the interior. While the PDC handles high-current systems like the starter motor and cooling fans, this interior panel protects sensitive low-current electronics like the Uconnect infotainment system, interior lighting, and diagnostic ports. According to RepairPal, electrical issues rank in the top 5 most frequent complaints for the 2014 Ram 1500, making a complete understanding of these locations essential for every owner.
Visual cues for these panels remain consistent across the Tradesman, SLT, and Laramie trim levels, though the density of fuses may increase with higher-optioned trucks. For instance, a Laramie equipped with air suspension and heated seats will feature more populated slots in both the PDC and the interior panel compared to a base-model Tradesman. Always ensure the vehicle is off and the key is removed before opening these covers to prevent accidental shorting against the chassis.
If you are working in low-light conditions, use your smartphone to take a high-resolution photo of the diagram on the lid of the under-hood fuse box. This allows you to zoom in and identify fuse numbers without having to lean over the engine bay repeatedly.
Detailed Under-Hood Fuse Box Diagram and Relay Functionality
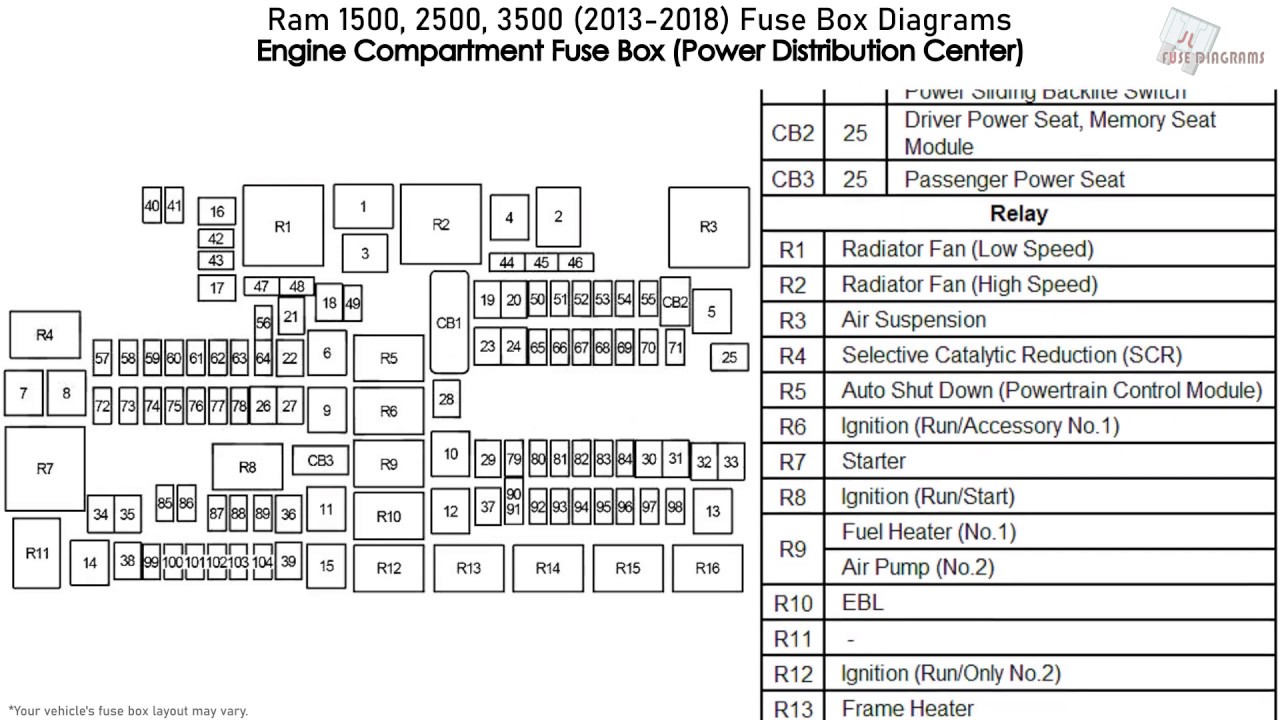
The Power Distribution Center (PDC) is the nerve center of your truck’s high-power systems. It houses over 50 individual circuit protection devices ranging from 5A to 60A. These are categorized primarily into J-Case fuses (F01–F10), which are larger, square fuses used for high-load systems, and Micro/Mini fuses (F11–F100) for standard components. Understanding this mapping is key to a reliable diagnosis.
High-Current J-Case Fuse Assignments
- F01 (20 Amp Blue): Trailer Tow Battery Charge. Essential for those hauling trailers with onboard batteries.
- F03 (60 Amp Yellow): Radiator Fan. A blown F03 will lead to immediate overheating in heavy traffic.
- F05 (40 Amp Green): Compressor for Air Suspension (if equipped).
- F09 (40 Amp Green): ABS Pump Motor. Critical for vehicle safety and braking stability.
Micro and Mini Fuse Critical Circuits
For standard operations, the Micro fuses handle the bulk of the work. For example, F12 (25 Amp Clear) is dedicated to the fuel pump, while F16 (20 Amp Yellow) manages the horn. If your truck has the 5.7L HEMI engine, you will notice specific relays and fuses for the MDS (Multi-Displacement System) that may not be active or present in the 3.6L Pentastar variants. The color-coding system is standardized for rapid identification: Blue is 15A, Yellow is 20A, and Green is 30A.
Relays are equally important in the PDC. These electromechanical switches, such as the ones for the cooling fan and ignition system, control high-current circuits with a low-current signal. If a component like the AC compressor fails to engage but the fuse is intact, the relay is often the expert-recommended place to look next.
Interior Cabin Fuse Layout for 2014 Ram 1500 Electronics
While the heavy lifting happens under the hood, the interior fuse panel is responsible for the “creature comforts” and essential driver interfaces. This panel is managed largely by the Body Control Module (BCM), which acts as the brain for cabin electronics. If you are looking for Ram specs regarding interior electronics, this panel is your primary focus.
The most frequent failure point in the interior panel is the fuse for the accessory power outlets (cigar lighters). In the 2014 Ram 1500, a 20A fuse handles these outlets, and they are commonly blown by faulty phone chargers or high-draw vacuum cleaners. Another critical circuit is the OBDII port fuse. If you plug in a diagnostic scanner and it fails to power up, the fuse protecting this circuit is likely blown, preventing any communication with the vehicle’s computer.
Key Interior Fuses and Modules
- Uconnect Infotainment: Dedicated fuses protect the screen and the radio head unit. If the screen remains black, check these first.
- Instrument Cluster: Manages the digital displays and gauges. A failure here can make the truck undrivable from a safety perspective.
- Climate Control Module: Protects the HVAC buttons and controls. Note that the actual blower motor fuse is typically in the PDC, but the controller is fused here.
Interior fuses are typically of the Mini-ATO variety. These are smaller than standard blade fuses and require the use of a specific fuse puller tool—usually stored inside the PDC cover in the engine bay. Attempting to pull these with your fingers or pliers often leads to cracked plastic casings or damaged terminals, which can introduce professional-level headaches into an otherwise simple repair.
By The Numbers
Commonality of Electrical Issues
Typical DIY Fuse Kit Cost
Total Circuits Protected
Professional Step-by-Step Fuse Replacement and Testing Procedures
Replacing a fuse seems straightforward, but as an industry expert, I have seen many DIYers turn a $1 repair into a $1,000 wiring harness replacement. The trusted approach involves more than just swapping plastic bits; it requires verification. Research indicates that using the wrong amperage fuse is one of the leading causes of vehicle fires in older trucks.
📋
Step-by-Step Guide
Turn off the ignition and remove the key. For major relays or high-current J-Case fuses, disconnect the negative battery terminal to prevent accidental arching.
Pull the suspected fuse using a puller. Inspect the internal metal filament. If it’s broken, it’s blown. For a more accurate test, use a Multimeter on the ‘Continuity’ setting across the two top pins.
Always replace with an identical fuse. Never replace a 20A fuse with a 30A fuse just because you “have one laying around.” This will bypass the safety limit and melt your wiring.
If you find yourself in a situation where you need a replacement but don’t have a spare, check trusted suppliers for a multi-pack to keep in your glovebox. Professional labor for electrical diagnosis can easily exceed $150 per hour, making the $10 investment in a variety pack one of the most cost-effective maintenance decisions you can make.
Advanced Troubleshooting for Recurring Blown Fuses
What happens when you replace a fuse and it blows again immediately? This is a sign of a deeper issue that a simple swap cannot fix. In the 2014 Ram 1500, recurring electrical failures are often caused by one of two things: an overload or a short to ground. An overload occurs when you plug too many devices into a circuit (e.g., using a high-powered inverter in the accessory outlet). A short to ground occurs when a wire’s insulation is compromised and the raw copper touches the vehicle’s metal frame.
✅ Common Quick Fixes
- Replace blown accessory outlet fuse
- Swap aging relays to test function
- Clean corroded fuse box terminals
- Reset BCM by cycling ignition
❌ Signs of Major Trouble
- Burning plastic smell from the PDC
- Melted fuse plastic casings
- Intermittent flickering of ALL lights
- Corrosion inside the taillight housing
Common failure points on this specific truck include the trailer hitch harness—which is exposed to road salt and water—and the wiring loom that passes through the door bellows. Water ingress in the taillight housing is another frequent culprit that causes the brake light fuse to pop repeatedly. If the PDC itself shows signs of heat damage or terminal corrosion, you may be looking at an Integrated Power Module (IPM) failure. This is a complex component where the fuse box and computer logic boards are integrated; failure here usually requires a professional technician and a dealer-level scan tool to program a replacement unit.
Never, under any circumstances, “bridge” a fuse with a piece of wire or a paperclip. This bypasses all circuit protection. In the event of a short, the wire will become red-hot and ignite the surrounding plastic and insulation, leading to a total vehicle loss.
In conclusion, the 2014 Ram 1500 utilizes two primary fuse locations: the Power Distribution Center under the hood and the interior panel near the steering column. Correct identification of amperage and component protection is vital for maintaining the integrity of the vehicle’s electrical system. Replacing a fuse is a simple, cost-effective repair that can solve many common issues, but recurring failures indicate deeper circuit problems that require professional attention. Refer to your owner’s manual for specific trim variations and always ensure you are using high-quality, trusted replacement fuses to protect your vehicle’s sensitive electronics. By following this guide, you can ensure your truck remains a reliable partner on the road for years to come.
Frequently Asked Questions
Where is the fuse box located in my 2014 Ram 1500?
Your 2014 Ram 1500 features two primary locations. The main Power Distribution Center (PDC) is located under the hood, mounted on the driver’s side near the battery. It is housed in a black plastic box with a latched lid. The second, smaller interior fuse panel is located inside the cabin, positioned behind a removable access panel on the left side of the dashboard near the steering wheel.
What does each fuse in the fuse box control?
Each fuse acts as a circuit breaker for specific electrical components. The under-hood PDC generally controls high-power systems like the starter, fuel pump, and radiator fans. The interior fuses manage lower-draw electronics, including the infotainment system, power windows, interior lighting, and the OBDII diagnostic port. A detailed legend is usually printed on the inside of the fuse box cover for quick reference.
How do I identify and replace a blown fuse safely?
To identify a blown fuse, look for a break in the internal metal wire or a dark, scorched appearance inside the plastic casing. Use the fuse puller tool located in the PDC lid to remove it. Always ensure the ignition is off before removal. Replace the damaged fuse with a new one of the exact same amperage rating to maintain circuit safety and prevent potential fire hazards.
What amperage rating fuse do I need for my Ram 1500?
Amperage ratings vary by circuit and are color-coded for clarity. Common ratings include 10A (Red), 15A (Blue), 20A (Yellow), and 25A (Clear/White). Never ‘up-size’ a fuse (e.g., replacing a 15A with a 20A), as this allows more current to flow than the wires can handle, which may result in a melted wiring harness or electrical fire. Always match the number stamped on the top of the fuse.
What should I do if a specific fuse keeps blowing repeatedly?
If a fuse blows immediately or shortly after replacement, there is an underlying fault in the circuit, such as a short to ground or a failing component drawing too much current. Continuing to replace the fuse without fixing the root cause can damage the Power Distribution Center. You should perform a continuity test with a multimeter or consult a professional automotive electrician to locate the short circuit.

![P0308 Dodge Ram 1500: Troubleshooting [2026]](https://truckguider.com/wp-content/uploads/2026/03/featured-077bf16b.webp)
![Best Headers for 5.7 Hemi Ram 1500: Performance & Fixes [2026]](https://truckguider.com/wp-content/uploads/2026/03/headers-for-5-7-hemi-ram-1500-featured.webp)
![2007 Ram 1500 5.7 Hemi: Specs, Reliability & Common Issues [2026]](https://truckguider.com/wp-content/uploads/2026/03/2007-ram-1500-5-7-hemi-featured.webp)
![Chrysler 9.25 Rear End: Specs, Identification, and Issues [2026]](https://truckguider.com/wp-content/uploads/2026/03/chrysler-9-25-rear-end-featured.webp)